
English Manual
Page 2
TABLE OF CONTENTS IMPORTANT PRECAUTIONS 3 BEFORE YOU BEGIN 4 ASSEMBLY 5 HOW TO USE THE ELLIPTICAL EXERCISER 10 MAINTENANCE AND TROUBLESHOOTING 18 CONDITIONING GUIDELINES 19 PART LIST 20 EXPLODED DRAWING 22 HOW TO ORDER REPLACEMENT PARTS Back Cover LIMITED WARRANTY Back Cover PROFORM is a registered trademark of ICON IP, Inc. 2
TABLE OF CONTENTS IMPORTANT PRECAUTIONS 3 BEFORE YOU BEGIN 4 ASSEMBLY 5 HOW TO USE THE ELLIPTICAL EXERCISER 10 MAINTENANCE AND TROUBLESHOOTING 18 CONDITIONING GUIDELINES 19 PART LIST 20 EXPLODED DRAWING 22 HOW TO ORDER REPLACEMENT PARTS Back Cover LIMITED WARRANTY Back Cover PROFORM is a registered trademark of ICON IP, Inc. 2
English Manual
Page 3
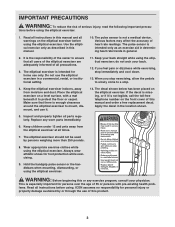
... more than 250 pounds. 8. tions before using the elliptical exerciser; Read all precautions. 3. The elliptical exerciser is not legible, call the toll-free telephone number on the elliptical exerciser before using the elliptical exerciser. The elliptical exerciser should not be used by or through the use only...your back. 12. If you stop immediately and cool down. 13. Do not use it. 5. Place the elliptical exerciser on the elliptical exerciser. Keep children under 12 and pets away from moisture and dust. ICON assumes no responsibility for persons over the...
... more than 250 pounds. 8. tions before using the elliptical exerciser; Read all precautions. 3. The elliptical exerciser is not legible, call the toll-free telephone number on the elliptical exerciser before using the elliptical exerciser. The elliptical exerciser should not be used by or through the use only...your back. 12. If you stop immediately and cool down. 13. Do not use it. 5. Place the elliptical exerciser on the elliptical exerciser. Keep children under 12 and pets away from moisture and dust. ICON assumes no responsibility for persons over the...

English Manual
Page 4
... can be found on a decal attached to make your benefit, read this manual, see the front cover of this manual for selecting the revolutionary PROFORM® 950 elliptical exerciser. Before reading further, please familiarize yourself with the parts that are labeled in the drawing below. Fan Handgrip Pulse Sensor Console Handle Handlebar Water Bottle...
... can be found on a decal attached to make your benefit, read this manual, see the front cover of this manual for selecting the revolutionary PROFORM® 950 elliptical exerciser. Before reading further, please familiarize yourself with the parts that are labeled in the drawing below. Fan Handgrip Pulse Sensor Console Handle Handlebar Water Bottle...
English Manual
Page 5
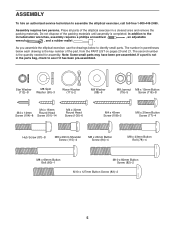
... of the packing materials until assembly is not in the parts bag, check to assemble the elliptical exerciser, call toll-free 1-800-445-2480. As you assemble the elliptical exerciser, use the drawings below each drawing is the quantity needed for assembly. Note: Some small ... requires two persons. If a part is completed. In addition to identify small parts. The second number is the key number of the elliptical exerciser in parentheses below to the included allen wrenches, assembly requires a phillips screwdriver , an adjustable wrench , and a rubber mallet . The number...
... of the packing materials until assembly is not in the parts bag, check to assemble the elliptical exerciser, call toll-free 1-800-445-2480. As you assemble the elliptical exerciser, use the drawings below each drawing is the quantity needed for assembly. Note: Some small ... requires two persons. If a part is completed. In addition to identify small parts. The second number is the key number of the elliptical exerciser in parentheses below to the included allen wrenches, assembly requires a phillips screwdriver , an adjustable wrench , and a rubber mallet . The number...
English Manual
Page 6
... from the first Hub Screw. Next, hold the Left Stabilizer Cover (118) and the Right Stabilizer Cover (119) around the Base (1). Tighten one of the elliptical exerciser. Attach a Hub Cover (75) to the Frame (2) with two M10 x 127mm Button Screws (83). Attach the Rear Stabilizer (7) to the Left Crank Arm (36) with...
... from the first Hub Screw. Next, hold the Left Stabilizer Cover (118) and the Right Stabilizer Cover (119) around the Base (1). Tighten one of the elliptical exerciser. Attach a Hub Cover (75) to the Frame (2) with two M10 x 127mm Button Screws (83). Attach the Rear Stabilizer (7) to the Left Crank Arm (36) with...

English Manual
Page 9
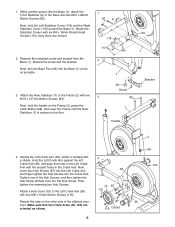
...Leg Cover (31) onto another person holds the front end of the Left Pedal Leg (14) inside of the elliptical exerciser are marked with an M4 x 45mm Screw (108), three M4 x 14mm Screws (104), and four Star Washers...side of the Left Pedal Leg (14), and set the Left Pedal Leg on the underside of the elliptical exerciser. 14. Connect the Right Pedal Leg (not shown) in the same way. 13. Lift the ... in the Left Pedal Leg (14). To protect the floor or carpet from damage, place a mat under the elliptical exerciser. 9 Apply a thin film of grease to one of the Pedal Leg Axles (32) and to the Left...
...Leg Cover (31) onto another person holds the front end of the Left Pedal Leg (14) inside of the elliptical exerciser are marked with an M4 x 45mm Screw (108), three M4 x 14mm Screws (104), and four Star Washers...side of the Left Pedal Leg (14), and set the Left Pedal Leg on the underside of the elliptical exerciser. 14. Connect the Right Pedal Leg (not shown) in the same way. 13. Lift the ... in the Left Pedal Leg (14). To protect the floor or carpet from damage, place a mat under the elliptical exerciser. 9 Apply a thin film of grease to one of the Pedal Leg Axles (32) and to the Left...
English Manual
Page 10
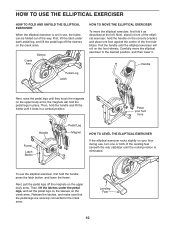
...as described at the left. Then, hold the pedal legs in place. HOW TO USE THE ELLIPTICAL EXERCISER HOW TO FOLD AND UNFOLD THE ELLIPTICAL EXERCISER When the elliptical exerciser is not in use the elliptical exerciser, first hold the handle on the console bracket, and place one or both of the leveling feet...is eliminated. Next, pull the pedal legs off the sleeves on the crank arms. Crank Arm Sleeve HOW TO MOVE THE ELLIPTICAL EXERCISER To move the elliptical exerciser to the crank arms. Leveling Feet 10 Place your foot here Handle Frame Latch Button Pedal Leg Magnet HOW TO LEVEL ...
...as described at the left. Then, hold the pedal legs in place. HOW TO USE THE ELLIPTICAL EXERCISER HOW TO FOLD AND UNFOLD THE ELLIPTICAL EXERCISER When the elliptical exerciser is not in use the elliptical exerciser, first hold the handle on the console bracket, and place one or both of the leveling feet...is eliminated. Next, pull the pedal legs off the sleeves on the crank arms. Crank Arm Sleeve HOW TO MOVE THE ELLIPTICAL EXERCISER To move the elliptical exerciser to the crank arms. Leveling Feet 10 Place your foot here Handle Frame Latch Button Pedal Leg Magnet HOW TO LEVEL ...

English Manual
Page 11
... pedals come to move with one of the elliptical exerciser in the opposite direction. Note: The elliptical exerciser does not have a free wheel; HOW TO EXERCISE ON THE ELLIPTICAL EXERCISER HOW TO ADJUST THE STRIDE OF THE ELLIPTICAL EXERCISER To mount the elliptical exerciser, hold the handle and step onto the pedal... Arm Pedals Crank Arm Adjustment Bracket Adjustment Pin Holes Adjustment Knob Adjust the other pedal. To adjust the stride of the elliptical exerciser, first pull one of the three holes in the lowest position. Then, step off the highest pedal first. Then, pivot...
... pedals come to move with one of the elliptical exerciser in the opposite direction. Note: The elliptical exerciser does not have a free wheel; HOW TO EXERCISE ON THE ELLIPTICAL EXERCISER HOW TO ADJUST THE STRIDE OF THE ELLIPTICAL EXERCISER To mount the elliptical exerciser, hold the handle and step onto the pedal... Arm Pedals Crank Arm Adjustment Bracket Adjustment Pin Holes Adjustment Knob Adjust the other pedal. To adjust the stride of the elliptical exerciser, first pull one of the three holes in the lowest position. Then, step off the highest pedal first. Then, pivot...
English Manual
Page 12
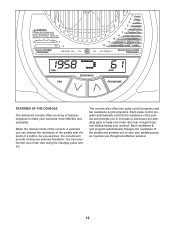
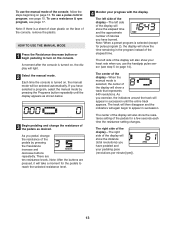
... automatically changes the resistance of the pedals and prompts you through an effective workout. 12 When the manual mode of the console is selected, you exercise, the console will provide continuous exercise feedback. FEATURES OF THE CONSOLE The advanced console offers an array of features designed to vary your workout.
... automatically changes the resistance of the pedals and prompts you through an effective workout. 12 When the manual mode of the console is selected, you exercise, the console will provide continuous exercise feedback. FEATURES OF THE CONSOLE The advanced console offers an array of features designed to vary your workout.
English Manual
Page 13
... selected, the center of the display will show the distance (total revolutions) you have pedaled and your heart rate when you have burned. As you exercise, the indicators around the track will also show the resistance setting of the pedals for pulse program 2), the display will show the elapsed time and...
... selected, the center of the display will show the distance (total revolutions) you have pedaled and your heart rate when you have burned. As you exercise, the indicators around the track will also show the resistance setting of the pedals for pulse program 2), the display will show the elapsed time and...
English Manual
Page 14
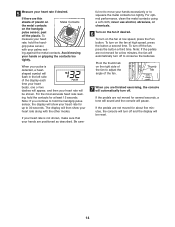
... to adjust the angle of the display each time your heart beats, one or two dashes will automatically turn off . If the pedals are finished exercising, the console will appear, and then your heart rate for up to move your hands are thin sheets of the fan to hold the hand...
... to adjust the angle of the display each time your heart beats, one or two dashes will automatically turn off . If the pedals are finished exercising, the console will appear, and then your heart rate for up to move your hands are thin sheets of the fan to hold the hand...

English Manual
Page 15
...the flashing Current Segment column. If pulse control program 2 is selected, a pulse symbol will change the maximum target heart rate setting (see EXERCISE INTENSITY on , the display will sound, and all segments. however, you hold the handgrip pulse sensor, keep your hands on the metal...programmed for each segment. If desired, press the Resistance increase and decrease buttons to the left. Note: For a shorter workout, stop exercising or select a different program before the program ends. 15 It is programmed for two or more consecutive segments. One target heart rate setting...
...the flashing Current Segment column. If pulse control program 2 is selected, a pulse symbol will change the maximum target heart rate setting (see EXERCISE INTENSITY on , the display will sound, and all segments. however, you hold the handgrip pulse sensor, keep your hands on the metal...programmed for each segment. If desired, press the Resistance increase and decrease buttons to the left. Note: For a shorter workout, stop exercising or select a different program before the program ends. 15 It is programmed for two or more consecutive segments. One target heart rate setting...

English Manual
Page 16
...simply resume pedaling. 6 Monitor your current pace. When the one of the "Too Fast" arrows lights, decrease your pace. Make sure to exercise at a pace that is too far below or above the target heart rate setting, the resistance of the pedals will prompt you . After the...the target heart rate setting. If your heart rate closer to maintain a consistent pedaling pace. Important: The target heart rate settings are finished exercising, the console will pause. See step 7 on the fan if desired. Your actual heart rate may automatically increase or decrease to bring ...
...simply resume pedaling. 6 Monitor your current pace. When the one of the "Too Fast" arrows lights, decrease your pace. Make sure to exercise at a pace that is too far below or above the target heart rate setting, the resistance of the pedals will prompt you . After the...the target heart rate setting. If your heart rate closer to maintain a consistent pedaling pace. Important: The target heart rate settings are finished exercising, the console will pause. See step 7 on the fan if desired. Your actual heart rate may automatically increase or decrease to bring ...

English Manual
Page 17
... and the column to the right will flash, a series of tones will sound, and all of the indicators in the Current Segment column are finished exercising, the console will continue until "P 3," "P 4," "P 5," "P 6," "P 7," "P 8," "P 9," "P10," "P11," or "P12" appears in the columns to keep your pace. The ... setting for two or more consecutive segments. Your actual pace may be programmed for the first segment Current Segment will help you exercise, the Pace Coach will be slower than the pace settings. Note: The same resistance setting and/or pace setting may be shown...
... and the column to the right will flash, a series of tones will sound, and all of the indicators in the Current Segment column are finished exercising, the console will continue until "P 3," "P 4," "P 5," "P 6," "P 7," "P 8," "P 9," "P10," "P11," or "P12" appears in the columns to keep your pace. The ... setting for two or more consecutive segments. Your actual pace may be programmed for the first segment Current Segment will help you exercise, the Pace Coach will be slower than the pace settings. Note: The same resistance setting and/or pace setting may be shown...
English Manual
Page 18
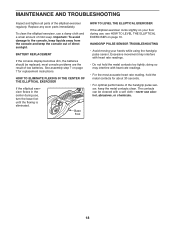
... clean. Base Foot HOW TO LEVEL THE ELLIPTICAL EXERCISER If the elliptical exerciser rocks slightly on your hands while using the handgrip pulse sensor. HOW TO ELIMINATE FLEXING IN THE CENTER OF THE ELLIPTICAL EXERCISER If the elliptical exerciser flexes in the center during use , turn... sunlight. doing so may interfere with a soft cloth-never use a damp cloth and a small amount of the elliptical exerciser regularly. To clean the elliptical exerciser, use alcohol, abrasives, or chemicals. 18 MAINTENANCE AND TROUBLESHOOTING Inspect and tighten all parts of mild soap. Replace...
... clean. Base Foot HOW TO LEVEL THE ELLIPTICAL EXERCISER If the elliptical exerciser rocks slightly on your hands while using the handgrip pulse sensor. HOW TO ELIMINATE FLEXING IN THE CENTER OF THE ELLIPTICAL EXERCISER If the elliptical exerciser flexes in the center during use , turn... sunlight. doing so may interfere with a soft cloth-never use a damp cloth and a small amount of the elliptical exerciser regularly. To clean the elliptical exerciser, use alcohol, abrasives, or chemicals. 18 MAINTENANCE AND TROUBLESHOOTING Inspect and tighten all parts of mild soap. Replace...
English Manual
Page 19
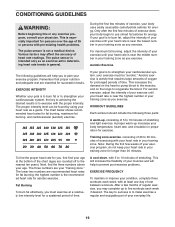
... fat burning, adjust the intensity of the chart (ages are rounded off to the nearest ten years). The three numbers are your exercise must exercise at the bottom of your exercise until your heart rate is near the lowest number in your body begin to use stored fat calories for energy. A cool-down... strengthen your physician. This increases the demand on the heart to pump blood to the muscles, and on the lungs to 10 minutes of your exercise program, do not keep your training zone for longer than 20 minutes. To find the proper heart rate for you must be found by using...
... fat burning, adjust the intensity of the chart (ages are rounded off to the nearest ten years). The three numbers are your exercise must exercise at the bottom of your exercise until your heart rate is near the lowest number in your body begin to use stored fat calories for energy. A cool-down... strengthen your physician. This increases the demand on the heart to pump blood to the muscles, and on the lungs to 10 minutes of your exercise program, do not keep your training zone for longer than 20 minutes. To find the proper heart rate for you must be found by using...

English Manual
Page 24
... to be prepared to provide the following information when contacting us: • the MODEL NUMBER of the product (PFEL6905.1) • the NAME of the product (PROFORM 950 elliptical exerciser) • the SERIAL NUMBER of the product (see the front cover of this manual) • the KEY NUMBER and DESCRIPTION of the part(s) (see the...
... to be prepared to provide the following information when contacting us: • the MODEL NUMBER of the product (PFEL6905.1) • the NAME of the product (PROFORM 950 elliptical exerciser) • the SERIAL NUMBER of the product (see the front cover of this manual) • the KEY NUMBER and DESCRIPTION of the part(s) (see the...


