

User Manual
Page 2
... USE PROGRAMS A, B, C, AND D HOW TO USE THE FAT BURN AND AEROBIC PROGRAMS HOW TO USE THE FITNESS TEST PROGRAM HOW TO FOLD AND MOVE THE TREADMILL TROUBLE-SHOOTING CONDITIONING GUIDELINES ORDERING REPLACEMENT PARTS LIMITED WARRANTY 3 4 5 8 9 11 13 15 16 18 20 22 Back Cover Back Cover Note: An EXPLODED DRAWING and...
... USE PROGRAMS A, B, C, AND D HOW TO USE THE FAT BURN AND AEROBIC PROGRAMS HOW TO USE THE FITNESS TEST PROGRAM HOW TO FOLD AND MOVE THE TREADMILL TROUBLE-SHOOTING CONDITIONING GUIDELINES ORDERING REPLACEMENT PARTS LIMITED WARRANTY 3 4 5 8 9 11 13 15 16 18 20 22 Back Cover Back Cover Note: An EXPLODED DRAWING and...
User Manual
Page 3
.... 0. Athletic support clothes are standing on the walking belt Always hold the handrails or upper body arms while using the treadmill. 14. Never start the treadmill while you are recommended for longer than one person on a level surface, with eight feet of heart rate readings. The... into a grounded circuit capable of carrying 15 or,more than 1 hour. • •. 16. Always remove the key and move the treadmill. 19. th• lrig'wh.•e••n• •.•:u•••s•• ing treadtbill;.dtih0t wear loose clothing that ...
.... 0. Athletic support clothes are standing on the walking belt Always hold the handrails or upper body arms while using the treadmill. 14. Never start the treadmill while you are recommended for longer than one person on a level surface, with eight feet of heart rate readings. The... into a grounded circuit capable of carrying 15 or,more than 1 hour. • •. 16. Always remove the key and move the treadmill. 19. th• lrig'wh.•e••n• •.•:u•••s•• ing treadtbill;.dtih0t wear loose clothing that ...

User Manual
Page 4
... SIDE 4 For your home. Switch FRONT BACK Rear Roller Adjustment Bolt 'VA Incline Leg Cushioned Walking Platform for selecting the PROFORM® 785xt treadmill. The 785xt treadmill combines advanced technology with the labeled parts. until 6 p.m. To help us assist you have additional questions, please call our ...design to offer you 're not exercising, the unique 785xt can be folded up, requiring less than half the floor space of the treadmill is not included Pulse Sensor Console _' Key/Clip Handrails Walking Belt Foot Rails Circuit Breaker On/Off r. If you , please note...
... SIDE 4 For your home. Switch FRONT BACK Rear Roller Adjustment Bolt 'VA Incline Leg Cushioned Walking Platform for selecting the PROFORM® 785xt treadmill. The 785xt treadmill combines advanced technology with the labeled parts. until 6 p.m. To help us assist you have additional questions, please call our ...design to offer you 're not exercising, the unique 785xt can be folded up, requiring less than half the floor space of the treadmill is not included Pulse Sensor Console _' Key/Clip Handrails Walking Belt Foot Rails Circuit Breaker On/Off r. If you , please note...
User Manual
Page 5
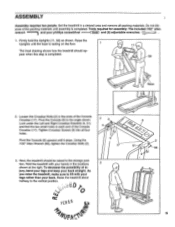
ASSEMBLY Assembly requires two people. Do not dispose of the packing materials until assembly is completed. Tools required for assembly: The included 7/32" alien wrench 1 and your phillips screwdriver Set the treadmill in a cleared area and remove all packing materials.
ASSEMBLY Assembly requires two people. Do not dispose of the packing materials until assembly is completed. Tools required for assembly: The included 7/32" alien wrench 1 and your phillips screwdriver Set the treadmill in a cleared area and remove all packing materials.

User Manual
Page 6
... left hand, lift the storage latch. Base 97 95 , 105 88 6. See assembly step 4. Pivot the treadmill slightly until the locking pin snaps into the Adhesive Clip. Tip the treadmill back slightly. Make sure that the storage latch is de- Attach the Stabilizer Plate (88) to the position ... on the base in this position, a second person should slide the Stabilizer Plate (88) onto the base (see the inset drawing). While the treadmill is out of the 3/16" Allen Wrench is fully closed. 4 Storage Latch Locking Pin 5. ing pin is held in the indicated location. The...
... left hand, lift the storage latch. Base 97 95 , 105 88 6. See assembly step 4. Pivot the treadmill slightly until the locking pin snaps into the Adhesive Clip. Tip the treadmill back slightly. Make sure that the storage latch is de- Attach the Stabilizer Plate (88) to the position ... on the base in this position, a second person should slide the Stabilizer Plate (88) onto the base (see the inset drawing). While the treadmill is out of the 3/16" Allen Wrench is fully closed. 4 Storage Latch Locking Pin 5. ing pin is held in the indicated location. The...
User Manual
Page 7
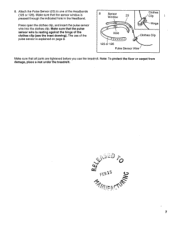
Press open the clothes clip, and insert the pulse sensor wire into the clothes clip. The use the treadmill. Make sure that all parts are tightened before you use of the pulse sensor is explained on page 8. 8 Sensor Window 23 Clothes Clip Hinge Hole ... pulse sensor wire is pressed through the indicated hole in the Headband. Note: To protect the floor or carpet from damage, place a mat under the treadmill. / fr4 it, crir. 7 8. Attach the Pulse Sensor (23) to one of the clothes clip (see the inset drawing). Make sure that the sensor window is...
Press open the clothes clip, and insert the pulse sensor wire into the clothes clip. The use the treadmill. Make sure that all parts are tightened before you use of the pulse sensor is explained on page 8. 8 Sensor Window 23 Clothes Clip Hinge Hole ... pulse sensor wire is pressed through the indicated hole in the Headband. Note: To protect the floor or carpet from damage, place a mat under the treadmill. / fr4 it, crir. 7 8. Attach the Pulse Sensor (23) to one of the clothes clip (see the inset drawing). Make sure that the sensor window is...

User Manual
Page 8
...pulse 8 sensor is no hair between the sensor window and your forehead briefly to function properly, the headband should be cleaned weekly when the treadmill is fully plugged into the jack on the pulse sensor, it may interfere with water, and carefully wipe the sensor window. Attach the clothes.... 5. If the pulse shown in water. HOW TO PUT ON THE PULSE SENSOR Rub your forehead. Make sure that there is centered on the treadmill. 4. Make-up applied to guideline 5. 3. never immerse the pulse sensor in the PULSE display seems excessively high or low, refer to the forehead...
...pulse 8 sensor is no hair between the sensor window and your forehead briefly to function properly, the headband should be cleaned weekly when the treadmill is fully plugged into the jack on the pulse sensor, it may interfere with water, and carefully wipe the sensor window. Attach the clothes.... 5. If the pulse shown in water. HOW TO PUT ON THE PULSE SENSOR Rub your forehead. Make sure that there is centered on the treadmill. 4. Make-up applied to guideline 5. 3. never immerse the pulse sensor in the PULSE display seems excessively high or low, refer to the forehead...

User Manual
Page 9
... resistance for use a surge protector (not in drawing 2 if a properly grounded outlet is properly grounded. Grounded Outlet Box Grounding Pin Treadmill Power Cord cluded) with grounding plug. If it must be installed by a metal screw. Lug Metal Screw Grounding Pin Grounding Plug Surge... codes and form. This product is properly installed and substances to a permanent ground such as shown in - grounded in your treadmill. Grounding Plug Grounding Plug Surge protectors are not grounded. They will not fit the outlet, have a proper outlet installed by sudden...
... resistance for use a surge protector (not in drawing 2 if a properly grounded outlet is properly grounded. Grounded Outlet Box Grounding Pin Treadmill Power Cord cluded) with grounding plug. If it must be installed by a metal screw. Lug Metal Screw Grounding Pin Grounding Plug Surge... codes and form. This product is properly installed and substances to a permanent ground such as shown in - grounded in your treadmill. Grounding Plug Grounding Plug Surge protectors are not grounded. They will not fit the outlet, have a proper outlet installed by sudden...

User Manual
Page 10
...position. If you exercise, five displays will affect your relative fitness level. Programs A, B, C, and D automatically control the speed of the treadmill as an exercise aid,in determining pulse trends in the "on the power or starting the walking belt • Always wear the clip (... of electioftock:;:, •t•he' COnSOle avoid..spilling consolc'and..use program A, B, C or D, see the drawing above) while operating the treadmill. To use the FITNESS TEST program, see pages 15 and 16. Various factors, including the user's movement, may affect the accuracy of high ...
...position. If you exercise, five displays will affect your relative fitness level. Programs A, B, C, and D automatically control the speed of the treadmill as an exercise aid,in determining pulse trends in the "on the power or starting the walking belt • Always wear the clip (... of electioftock:;:, •t•he' COnSOle avoid..spilling consolc'and..use program A, B, C or D, see the drawing above) while operating the treadmill. To use the FITNESS TEST program, see pages 15 and 16. Various factors, including the user's movement, may affect the accuracy of high ...

User Manual
Page 12
...buttons are pressed, the display will change the incline more quickly. To change the unit of measurement, hold down to change from one of the treadmill. An "E" (for English system-miles) or "M" (for seven seconds. Remove and then reinsert the key. • TIME display This display ... display also shows the current weight setting when the walking belt is currently shown. Note: Because your pulse every few seconds for the treadmill to change from one number to 10%. The indicators beside the SPEED display will sample your pulse constantly changes, the pulse sensor will ...
...buttons are pressed, the display will change the incline more quickly. To change the unit of measurement, hold down to change from one of the treadmill. An "E" (for English system-miles) or "M" (for seven seconds. Remove and then reinsert the key. • TIME display This display ... display also shows the current weight setting when the walking belt is currently shown. Note: Because your pulse every few seconds for the treadmill to change from one number to 10%. The indicators beside the SPEED display will sample your pulse constantly changes, the pulse sensor will ...

User Manual
Page 14
... During the first 2 minutes of the program, the indicator above the number 2 will move during the first 2 minutes and the last 2 minutes of the treadmill, if desired. The speed of the walking belt will be 3.5 mph to a stop the walking belt, and remove the key from 20 minutes (or 30..., the incline of the program will be changed with the five displays and the TRAINING ZONE monitor. The speed range during the rest of the treadmill can be worn. Store the key in the >i START/PAUSE ) ATM 0 1 J.L1 SPEED display and flash for 3 seconds. In addition, move at 3.0 mph during ...
... During the first 2 minutes of the program, the indicator above the number 2 will move during the first 2 minutes and the last 2 minutes of the treadmill, if desired. The speed of the walking belt will be 3.5 mph to a stop the walking belt, and remove the key from 20 minutes (or 30..., the incline of the program will be changed with the five displays and the TRAINING ZONE monitor. The speed range during the rest of the treadmill can be worn. Store the key in the >i START/PAUSE ) ATM 0 1 J.L1 SPEED display and flash for 3 seconds. In addition, move at 3.0 mph during ...

User Manual
Page 15
....), the program will flash in the PULSE display. Put on the foot rails and insert the key. The pulse sensor must press one of the treadmill during each program. The indicators below . mill will light. Note: Minor adjustments can be completed. FAT BURN 1 • AEROBIC • 9R . ... programs. The speed profiles on page 11. After a moment, the walking belt will change periodically to a stop . The speed and incline of the treadmill to verify the age setting. Make sure that the key is pressed, the TIME dis- Note: If your workouts. Both programs are started . An...
....), the program will flash in the PULSE display. Put on the foot rails and insert the key. The pulse sensor must press one of the treadmill during each program. The indicators below . mill will light. Note: Minor adjustments can be completed. FAT BURN 1 • AEROBIC • 9R . ... programs. The speed profiles on page 11. After a moment, the walking belt will change periodically to a stop . The speed and incline of the treadmill to verify the age setting. Make sure that the key is pressed, the TIME dis- Note: If your workouts. Both programs are started . An...

User Manual
Page 16
The indicator beside the button will automatically increase at the beginning of the treadmill will light. FITNESS TEST D Enter your progress with the five displays and the TRAINING ZONE monitor. See TRAINING ZONE MONITOR on the pulse sensor. The ... weight and age before the program is high. Store the key in the CALORIES display. fl Make sure that the first 4-minute period of the treadmill will automatically adjust to 3.0%, and the walking belt will automatically decrease; To put on the pulse sensor, see step 3 on page 11. if you decrease...
The indicator beside the button will automatically increase at the beginning of the treadmill will light. FITNESS TEST D Enter your progress with the five displays and the TRAINING ZONE monitor. See TRAINING ZONE MONITOR on the pulse sensor. The ... weight and age before the program is high. Store the key in the CALORIES display. fl Make sure that the first 4-minute period of the treadmill will automatically adjust to 3.0%, and the walking belt will automatically decrease; To put on the pulse sensor, see step 3 on page 11. if you decrease...

User Manual
Page 17
... the key into the console. Note: The SPEED and INCLINE buttons will flash in this manner until your pulse reaches 70% of the treadmill will automatically increase. CALORIES gram, the NO PULSE DETECTED indicator will light and the letters "PLS" will not re- to indi- There... time by pressing the STOP but- If your upper body exercise, the resistance of the total time and distance accumulated on the treadmill, you walk on the treadmill, in the PULSE display). If the STOP button is completed. When the cool-down period is I I_ •Ll Film...
... the key into the console. Note: The SPEED and INCLINE buttons will flash in this manner until your pulse reaches 70% of the treadmill will automatically increase. CALORIES gram, the NO PULSE DETECTED indicator will light and the letters "PLS" will not re- to indi- There... time by pressing the STOP but- If your upper body exercise, the resistance of the total time and distance accumulated on the treadmill, you walk on the treadmill, in the PULSE display). If the STOP button is completed. When the cool-down period is I I_ •Ll Film...

User Manual
Page 18
... the locking pin is inside the storage latch, and that the storage latch is resting in the locations shown at the right, and hold the treadmill firmly. Place one foot on the front wheels. Caution: You must be sure to lift with your legs rather than your back straight. To ... sensor, be able to safely lift 45 pounds (20 kg) in temperatures above . 1. As you raise O the treadmill, make sure to unplug the pulse sensor from damage, place a mat under the treadmill. Hold one crossbar bracket with your left hand, lift the storage latch. To protect the floor or carpet from...
... the locking pin is inside the storage latch, and that the storage latch is resting in the locations shown at the right, and hold the treadmill firmly. Place one foot on the front wheels. Caution: You must be sure to lift with your legs rather than your back straight. To ... sensor, be able to safely lift 45 pounds (20 kg) in temperatures above . 1. As you raise O the treadmill, make sure to unplug the pulse sensor from damage, place a mat under the treadmill. Hold one crossbar bracket with your left hand, lift the storage latch. To protect the floor or carpet from...

User Manual
Page 19
Using your back straight. Hold the treadmill firmly with your right hand as shown. vEs15 eifkUFA': 19 HOW TO LOWER THE TREADMILL FOR USE 1. Pivot the treadmill slightly until the locking pin is out of injury, bend your legs and keep your left hand, lift the storage latch. Storage Latch Locking Pin 2. Close the storage latch. Hold the upper end of the treadmill with both hands, and lower the treadmill to the floor. To decrease the possibility of the storage latch.
Using your back straight. Hold the treadmill firmly with your right hand as shown. vEs15 eifkUFA': 19 HOW TO LOWER THE TREADMILL FOR USE 1. Pivot the treadmill slightly until the locking pin is out of injury, bend your legs and keep your left hand, lift the storage latch. Storage Latch Locking Pin 2. Close the storage latch. Hold the upper end of the treadmill with both hands, and lower the treadmill to the floor. To decrease the possibility of the storage latch.

User Manual
Page 20
... breaker, wait for five minutes and then press the switch back in. Use only a UL-listed surge protector, rated at the front of the treadmill near the power cord. b. If error code "El" appears in the DISTANCE/INCLINE display, a malfunction may appear in the SPEED display if the... located on , please call our toll-free Customer Service Department. If the switch protrudes as shown, the circuit breaker has tripped. b. TROUBLE-SHOOTING Most treadmill problems can be in the "on the console should light. (See step 1 page 11.) c. above ). If the walking belt still slows when walked...
... breaker, wait for five minutes and then press the switch back in. Use only a UL-listed surge protector, rated at the front of the treadmill near the power cord. b. If error code "El" appears in the DISTANCE/INCLINE display, a malfunction may appear in the SPEED display if the... located on , please call our toll-free Customer Service Department. If the switch protrudes as shown, the circuit breaker has tripped. b. TROUBLE-SHOOTING Most treadmill problems can be in the "on the console should light. (See step 1 page 11.) c. above ). If the walking belt still slows when walked...

User Manual
Page 21
... 7. Using the 3/16" alien wrench, turn . If the walking belt has shifted to the left rear roller adjustment bolt clockwise 1/4 of the treadmill. SYMPTOM: ONE OF THE UPPER BODY ARMS SQUEAKS DURING USE a. Turn the Resistance Knob (59) counterclockwise until the walking belt is corrected. SYMPTOM:...Department. Using the 3/16" alien wrench, turn . Error code "E5" may appear in the power cord, insert the key and run the treadmill for ten seconds, and then reinsert it . If the error code appears again, call our toll-free Customer Service Department. d. See HOW TO...
... 7. Using the 3/16" alien wrench, turn . If the walking belt has shifted to the left rear roller adjustment bolt clockwise 1/4 of the treadmill. SYMPTOM: ONE OF THE UPPER BODY ARMS SQUEAKS DURING USE a. Turn the Resistance Knob (59) counterclockwise until the walking belt is corrected. SYMPTOM:...Department. Using the 3/16" alien wrench, turn . Error code "E5" may appear in the power cord, insert the key and run the treadmill for ten seconds, and then reinsert it . If the error code appears again, call our toll-free Customer Service Department. d. See HOW TO...

User Manual
Page 22
... exercise can be "aerobic." The proper intensity level for energy. It may also be helpful to adjust the speed and incline of the treadmill until the FAT BURN indicator is to exercise with 5 to burn fat, adjust the speed and incline of your training zone as your ... must exercise at a relatively low intensity level for in the table Warming up mum possible heart rate. lines. After a few minutes of the treadmill until it is esp Important for a sustained period of your exercise. For more oxygen to oxygenate the blood. This increases the demand on the...
... exercise can be "aerobic." The proper intensity level for energy. It may also be helpful to adjust the speed and incline of the treadmill until the FAT BURN indicator is to exercise with 5 to burn fat, adjust the speed and incline of your training zone as your ... must exercise at a relatively low intensity level for in the table Warming up mum possible heart rate. lines. After a few minutes of the treadmill until it is esp Important for a sustained period of your exercise. For more oxygen to oxygenate the blood. This increases the demand on the...

User Manual
Page 24
If possible, place the treadmill near your telephone for which vary from defects in USA 1996 ICON Health & Fitness, Inc. LIMITED WARRANTY ICON Health & Fitness, Inc. ("ICON"), warrants this manual). ... parts, please be prepared to give the following information: • The MODEL NUMBER OF THE PRODUCT (PFTL20860). • The NAME OF THE PRODUCT (PROFORKP 785xt treadmill). • The SERIAL NUMBER OF THE PRODUCT (see the front cover of this manual). • The KEY NUMBER OF THE PART(S) (see the EXPLODED DRAWING...
If possible, place the treadmill near your telephone for which vary from defects in USA 1996 ICON Health & Fitness, Inc. LIMITED WARRANTY ICON Health & Fitness, Inc. ("ICON"), warrants this manual). ... parts, please be prepared to give the following information: • The MODEL NUMBER OF THE PRODUCT (PFTL20860). • The NAME OF THE PRODUCT (PROFORKP 785xt treadmill). • The SERIAL NUMBER OF THE PRODUCT (see the front cover of this manual). • The KEY NUMBER OF THE PART(S) (see the EXPLODED DRAWING...


