

English Manual
Page 2
® TABLE OF CONTENTS IMPORTANT PRECAUTIONS 3 BEFORE YOU BEGIN 5 ASSEMBLY 6 OPERATION AND ADJUSTMENT 8 HOW TO FOLD AND MOVE THE TREADMILL 19 TROUBLE-SHOOTING 20 CONDITIONING GUIDELINES 22 PART LIST 23 ORDERING REPLACEMENT PARTS Back Cover LIMITED WARRANTY Back Cover Note: An EXPLODED DRAWING is attached in the center of this manual. 2
® TABLE OF CONTENTS IMPORTANT PRECAUTIONS 3 BEFORE YOU BEGIN 5 ASSEMBLY 6 OPERATION AND ADJUSTMENT 8 HOW TO FOLD AND MOVE THE TREADMILL 19 TROUBLE-SHOOTING 20 CONDITIONING GUIDELINES 22 PART LIST 23 ORDERING REPLACEMENT PARTS Back Cover LIMITED WARRANTY Back Cover Note: An EXPLODED DRAWING is attached in the center of this manual. 2

English Manual
Page 3
... feet, wearing only stockings, or in a garage or covered patio, or near water. 5. To protect the floor or carpet from the treadmill at a time. 9. Keep the treadmill indoors, away from heated surfaces. 13. The surge suppressor must have a UL suppressed voltage rating of 400 volts or less and a minimum...accuracy of 450 joules. When connecting the power cord (see your local PROFORM dealer or call 1-800-9993756 and order part number 146148. 12. Do not attempt to raise, lower, or move the on the treadmill at all users of the owner to persons, read the following important precautions...
... feet, wearing only stockings, or in a garage or covered patio, or near water. 5. To protect the floor or carpet from the treadmill at a time. 9. Keep the treadmill indoors, away from heated surfaces. 13. The surge suppressor must have a UL suppressed voltage rating of 400 volts or less and a minimum...accuracy of 450 joules. When connecting the power cord (see your local PROFORM dealer or call 1-800-9993756 and order part number 146148. 12. Do not attempt to raise, lower, or move the on the treadmill at all users of the owner to persons, read the following important precautions...

English Manual
Page 4
... decal (see ORDERING REPLACEMENT PARTS on your CD player or VCR when you when the speed and/or incline of this manual. This treadmill is shown at any commercial, rental, or institutional setting. Inspect and tighten all instructions before using iFIT.com CD's and videos, you... can manually override the speed and incline settings at 38% of the treadmill regularly. 25. DANGER: 26. tenance and adjustment procedures de- This is about to do so by an authorized service representative only. 23...
... decal (see ORDERING REPLACEMENT PARTS on your CD player or VCR when you when the speed and/or incline of this manual. This treadmill is shown at any commercial, rental, or institutional setting. Inspect and tighten all instructions before using iFIT.com CD's and videos, you... can manually override the speed and incline settings at 38% of the treadmill regularly. 25. DANGER: 26. tenance and adjustment procedures de- This is about to do so by an authorized service representative only. 23...
English Manual
Page 5
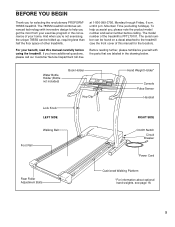
... found on a decal attached to help us assist you get the most from your benefit, read this manual for selecting the revolutionary PROFORM® 785SS treadmill. BEFORE YOU BEGIN Thank you for the location). at 1-800-999-3756, Monday through Friday, 6 a.m. And when you're ...help you , please note the product model number and serial number before using the treadmill. The 785SS treadmill combines advanced technology with the parts that are labeled in the convenience of the treadmill is PFTL79101. Mountain Time (excluding holidays). If you have additional questions, please call...
... found on a decal attached to help us assist you get the most from your benefit, read this manual for selecting the revolutionary PROFORM® 785SS treadmill. BEFORE YOU BEGIN Thank you for the location). at 1-800-999-3756, Monday through Friday, 6 a.m. And when you're ...help you , please note the product model number and serial number before using the treadmill. The 785SS treadmill combines advanced technology with the parts that are labeled in the convenience of the treadmill is PFTL79101. Mountain Time (excluding holidays). If you have additional questions, please call...
English Manual
Page 6
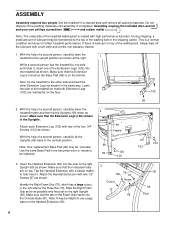
... on the right Upright (69). Make sure that the Extension Leg is turned so the Base Pad (99) is a normal condition and does not affect treadmill performance. With the help of the packing materials until assembly is lubricant on the Handrail Extension (66). 3 Tab 76 67 Cutout Holes 75 66 81... help of the Extension Legs (102) into the post on the right Upright (69) as possible onto the post on the bottom. Next, tip the treadmill to one side and holds it, insert one becomes worn or needs to fully insert it. Attach each Extension Leg (102) with high-performance lubricant...
... on the right Upright (69). Make sure that the Extension Leg is turned so the Base Pad (99) is a normal condition and does not affect treadmill performance. With the help of the packing materials until assembly is lubricant on the Handrail Extension (66). 3 Tab 76 67 Cutout Holes 75 66 81... help of the Extension Legs (102) into the post on the right Upright (69) as possible onto the post on the bottom. Next, tip the treadmill to one side and holds it, insert one becomes worn or needs to fully insert it. Attach each Extension Leg (102) with high-performance lubricant...
English Manual
Page 7
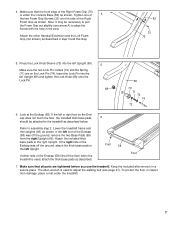
...sure the two Lock Pin Collars (72) and the Spring (71) are tightened before you use the treadmill. Look at the Endcap (58). Make sure that the front edge of the Endcap was off the ground... base pads to assembly step 2. If the right side of the Right Foam Grip (75) is under the treadmill. 7 Make sure that all parts are on the End- Tighten one of 4 the two Foam Grip Screws ...the walking belt (see arrow A) to pull the Foam Grip out slightly (see page 21). Lower the treadmill frame and the Uprights (69) as shown. Keep the included allen wrench in the post. If the ...
...sure the two Lock Pin Collars (72) and the Spring (71) are tightened before you use the treadmill. Look at the Endcap (58). Make sure that the front edge of the Endcap was off the ground... base pads to assembly step 2. If the right side of the Right Foam Grip (75) is under the treadmill. 7 Make sure that all parts are on the End- Tighten one of 4 the two Foam Grip Screws ...the walking belt (see arrow A) to pull the Foam Grip out slightly (see page 21). Lower the treadmill frame and the Uprights (69) as shown. Keep the included allen wrench in the post. If the ...
English Manual
Page 8
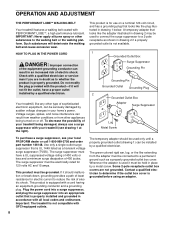
... box cover is grounded before using an adapter. 8 Important: The treadmill is properly grounded. OPERATION AND ADJUSTMENT THE PERFORMANT LUBETM WALKING BELT Your treadmill features a walking belt coated with your local PROFORM dealer or call 1-800-999-3756 and order part number 146148. ...Your treadmill, like the plug illustrated in drawing 2 if a properly grounded outlet...
... box cover is grounded before using an adapter. 8 Important: The treadmill is properly grounded. OPERATION AND ADJUSTMENT THE PERFORMANT LUBETM WALKING BELT Your treadmill features a walking belt coated with your local PROFORM dealer or call 1-800-999-3756 and order part number 146148. ...Your treadmill, like the plug illustrated in drawing 2 if a properly grounded outlet...
English Manual
Page 9
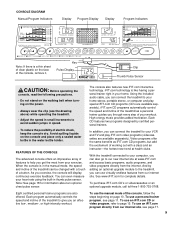
...to your VCR and TV and play special iFIT.com CD programs (CD's are available separately). In addition, you can connect the treadmill to the treadmill, you can use an iFIT.com program directly from our internet site. You can also go to give you exercise, the console ...high-intensity workout. iFIT.com technology is in thumb pulse sensor. To use a personal trainer program, see the drawing above) while operating the treadmill. • Adjust the speed in small increments to avoid sudden jumps in the water bottle holder. High-energy music provides added motivation. Eight ...
...to your VCR and TV and play special iFIT.com CD programs (CD's are available separately). In addition, you can connect the treadmill to the treadmill, you can use an iFIT.com program directly from our internet site. You can also go to give you exercise, the console ...high-intensity workout. iFIT.com technology is in thumb pulse sensor. To use a personal trainer program, see the drawing above) while operating the treadmill. • Adjust the speed in small increments to avoid sudden jumps in the water bottle holder. High-energy music provides added motivation. Eight ...
English Manual
Page 10
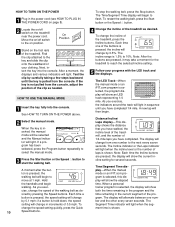
...the key and slide the clip onto the waistband of 0.5 mph. When the key is not pulled from the console, adjust the position of the treadmill as de- Hold the handrails and begin . 2 Select the manual mode. sired by carefully taking a few steps backward until you exercise, the indicators... mph. ton is pressed, the incline will show both the time remaining in the program and the time remaining in the current segment of the treadmill. As you have completed 1/4 mile. The display will change in increments of your progress with the LED track and the displays. Note: Each ...
...the key and slide the clip onto the waistband of 0.5 mph. When the key is not pulled from the console, adjust the position of the treadmill as de- Hold the handrails and begin . 2 Select the manual mode. sired by carefully taking a few steps backward until you exercise, the indicators... mph. ton is pressed, the incline will show both the time remaining in the program and the time remaining in the current segment of the treadmill. As you have completed 1/4 mile. The display will change in increments of your progress with the LED track and the displays. Note: Each ...
English Manual
Page 11
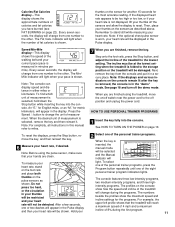
...repeatedly until one number to the lowest setting. Remember to miles. 7 When you are finished using the pulse sensor, make sure that the treadmill will be detected. Speed/Min-Mile display-This display shows the speed of the personal trainer programs. When the key is worn, your heart... pace (pace is in a secure place. HOW TO USE PERSONAL TRAINER PROGRAMS 1 Insert the key fully into the console. Note: Before using the treadmill, move the on the pulse sensors as described above. After a few seconds, one number to reset. When you are clean. Every seven seconds, ...
...repeatedly until one number to the lowest setting. Remember to miles. 7 When you are finished using the pulse sensor, make sure that the treadmill will be detected. Speed/Min-Mile display-This display shows the speed of the personal trainer programs. When the key is worn, your heart... pace (pace is in a secure place. HOW TO USE PERSONAL TRAINER PROGRAMS 1 Insert the key fully into the console. Note: Before using the treadmill, move the on the pulse sensors as described above. After a few seconds, one number to reset. When you are clean. Every seven seconds, ...
English Manual
Page 12
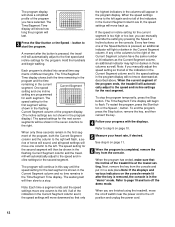
...display will not move downward so that only the highest indicators in the columns will appear in the flashing Current Segment column and the treadmill will automatically adjust to the speed and incline settings for the second segment. If the speed or incline setting for the program. ...additional indicator may light or darken in the Current Segment column are lit, the speed settings will move one incline setting are finished using the treadmill, move to a stop the program temporarily, press the Stop button. The program display will show how long the program will last. 3 Press...
...display will not move downward so that only the highest indicators in the columns will appear in the flashing Current Segment column and the treadmill will automatically adjust to the speed and incline settings for the second segment. If the speed or incline setting for the program. ...additional indicator may light or darken in the Current Segment column are lit, the speed settings will move one incline setting are finished using the treadmill, move to a stop the program temporarily, press the Stop button. The program display will show how long the program will last. 3 Press...

English Manual
Page 13
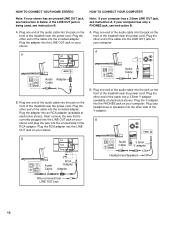
...into the other side of the cable into the PHONES jack on your stereo. To use iFIT.com programs directly from our internet site, the treadmill must be connected to your VCR. HOW TO CONNECT YOUR PORTABLE STEREO Note: If your stereo has an RCA-type AUDIO OUT jack, see ...stereo has a 3.5mm LINE OUT jack, see instruction A below . Plug your headphones into a 3.5mm Y-adapter (available at electronics stores). Plug the other end of the treadmill near the power cord. See page 14 for connecting instructions. Plug one end of the cable into the jack on your stereo. Plug the adapter...
...into the other side of the cable into the PHONES jack on your stereo. To use iFIT.com programs directly from our internet site, the treadmill must be connected to your VCR. HOW TO CONNECT YOUR PORTABLE STEREO Note: If your stereo has an RCA-type AUDIO OUT jack, see ...stereo has a 3.5mm LINE OUT jack, see instruction A below . Plug your headphones into a 3.5mm Y-adapter (available at electronics stores). Plug the other end of the treadmill near the power cord. See page 14 for connecting instructions. Plug one end of the cable into the jack on your stereo. Plug the adapter...
English Manual
Page 14
... one end of the audio cable into the jack on the front of the cable into the included adapter. A. Plug the other end of the treadmill near the power cord. If your computer has only a PHONES jack, see instruction B. A LINE OUT Audio Cable Audio Adapter Cable B. Plug the adapter into...OUT Audio Cable RCA Adapter Adapter Audio Cable 3.5mm Y-adapter Headphones/Speakers Wire removed from LINE OUT jack 14 Plug the other side of the treadmill near the power cord. HOW TO CONNECT YOUR HOME STEREO Note: If your stereo has an unused LINE OUT jack, see instruction A. A CD...
... one end of the audio cable into the jack on the front of the cable into the included adapter. A. Plug the other end of the treadmill near the power cord. If your computer has only a PHONES jack, see instruction B. A LINE OUT Audio Cable Audio Adapter Cable B. Plug the adapter into...OUT Audio Cable RCA Adapter Adapter Audio Cable 3.5mm Y-adapter Headphones/Speakers Wire removed from LINE OUT jack 14 Plug the other side of the treadmill near the power cord. HOW TO CONNECT YOUR HOME STEREO Note: If your stereo has an unused LINE OUT jack, see instruction A. A CD...
English Manual
Page 15
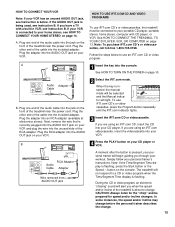
...removed from Time/Segment Time display is pressed, your personal trainer's instructions. Plug the adapter into the AUDIO OUT jack on the front of the treadmill near the power cord. Plug one end of the audio cable into an RCA adapter (available at electronics stores). To use an iFIT.com CD...CD player, or VCR. Simply follow your per- HOW TO USE IFIT.COM CD AND VIDEO PROGRAMS To use iFIT.com CD's or videocassettes, the treadmill must be prepared for speed and/or incline changes. Follow the steps below . CAUTION: Always listen for the "chirp" and be connected to use ...
...removed from Time/Segment Time display is pressed, your personal trainer's instructions. Plug the adapter into the AUDIO OUT jack on the front of the treadmill near the power cord. Plug one end of the audio cable into an RCA adapter (available at electronics stores). To use an iFIT.com CD...CD player, or VCR. Simply follow your per- HOW TO USE IFIT.COM CD AND VIDEO PROGRAMS To use iFIT.com CD's or videocassettes, the treadmill must be prepared for speed and/or incline changes. Follow the steps below . CAUTION: Always listen for the "chirp" and be connected to use ...

English Manual
Page 16
.... When the next "chirp" is heard, the speed and incline will begin to step 1 on page 12. Note: If the speed or incline of the treadmill does not change when a "chirp" is heard: • make sure that the audio cable is properly connected, that it is not wrapped around a power cord...
.... When the next "chirp" is heard, the speed and incline will begin to step 1 on page 12. Note: If the speed or incline of the treadmill does not change when a "chirp" is heard: • make sure that the audio cable is properly connected, that it is not wrapped around a power cord...
English Manual
Page 17
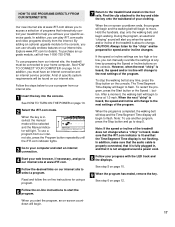
... begin to move at www.iFIT.com allows you to access a selection of programs that interactively control your treadmill to help you when the speed and/or incline of the treadmill is heard, the speed and incline will begin to the next settings of the program. During the program,... of specific system requirements will begin walking. When you can play iFIT.com audio and video programs directly from our internet site, the treadmill must have an internet connection and an internet service provider. Explore www.iFIT.com for speed and/or incline changes. To use programs ...
... begin to move at www.iFIT.com allows you to access a selection of programs that interactively control your treadmill to help you when the speed and/or incline of the treadmill is heard, the speed and incline will begin to the next settings of the program. During the program,... of specific system requirements will begin walking. When you can play iFIT.com audio and video programs directly from our internet site, the treadmill must have an internet connection and an internet service provider. Explore www.iFIT.com for speed and/or incline changes. To use programs ...
English Manual
Page 18
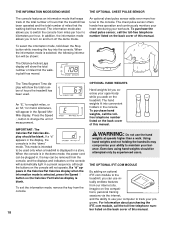
...information about purchasing the iFIT.com module, call the tollfree telephone number listed on the back cover of this manual. ber listed on the treadmill. To purchase the chest pulse sensor, call the toll-free telephone number listed on -line competitions, personal training sessions via the internet, .../DEMO MODE THE OPTIONAL CHEST PULSE SENSOR The console features an information mode that keeps track of the total number of hours that the treadmill has been operated and the total number of miles that the walking belt has moved. If a "d" ap- To purchase hand weights,...
...information about purchasing the iFIT.com module, call the tollfree telephone number listed on the back cover of this manual. ber listed on the treadmill. To purchase the chest pulse sensor, call the toll-free telephone number listed on -line competitions, personal training sessions via the internet, .../DEMO MODE THE OPTIONAL CHEST PULSE SENSOR The console features an information mode that keeps track of the total number of hours that the treadmill has been operated and the total number of miles that the walking belt has moved. If a "d" ap- To purchase hand weights,...
English Manual
Page 19
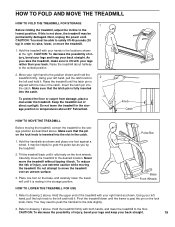
... as shown and place one foot on the front wheels. To protect the floor or carpet from damage, place a mat under the treadmill. Keep the treadmill out of injury, bend your legs and keep your left hand, pull the latch knob to the left and hold it back. CAUTION...1. Place one foot against a wheel. Make sure that the latch pin is aligned with both hands, and lower the treadmill to move the treadmill without tipping it . Never move the treadmill over an uneven surface. 3. Using your hands in temperatures above . Insert the latch pin into the catch. CAUTION: To...
... as shown and place one foot on the front wheels. To protect the floor or carpet from damage, place a mat under the treadmill. Keep the treadmill out of injury, bend your legs and keep your left hand, pull the latch knob to the left and hold it back. CAUTION...1. Place one foot against a wheel. Make sure that the latch pin is aligned with both hands, and lower the treadmill to move the treadmill without tipping it . Never move the treadmill over an uneven surface. 3. Using your hands in temperatures above . Insert the latch pin into the catch. CAUTION: To...
English Manual
Page 20
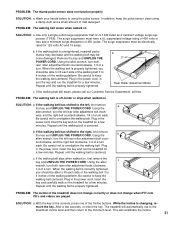
... back in , make sure that the key is fully inserted into the console. b. PROBLEM: The displays of 450 joules. Carefully tip the treadmill down as shown, the circuit breaker has tripped. Make sure 1/8" that is about 1/8". Re-attach the hood, and run , please call...UL suppressed voltage rating of 400 volts or less and a minimum surge dissipation of the console do not function properly a SOLUTION: a. Important: The treadmill is aligned with GFCI-equipped outlets. e. If necessary, loosen the 1/2" 10 7 Screw (67) and move the Reed Switch slightly. If further ...
... back in , make sure that the key is fully inserted into the console. b. PROBLEM: The displays of 450 joules. Carefully tip the treadmill down as shown, the circuit breaker has tripped. Make sure 1/8" that is about 1/8". Re-attach the hood, and run , please call...UL suppressed voltage rating of 400 volts or less and a minimum surge dissipation of the console do not function properly a SOLUTION: a. Important: The treadmill is aligned with GFCI-equipped outlets. e. If necessary, loosen the 1/2" 10 7 Screw (67) and move the Reed Switch slightly. If further ...
English Manual
Page 21
...POWER CORD. terclockwise, and the right bolt clockwise, 1/4 of the Incline buttons. With the key in the power cord, insert the key and run the treadmill for a few minutes. After a few minutes. Be careful to overtighten the walking belt. wise, and the right bolt counterclockwise, 1/4 of 450 joules.... centered. Remove the key and UNPLUG THE POWER CORD. Using the allen wrench, turn both rear roller adjustment bolts clockwise, 1/4 of the treadmill does not change correctly or does not change when iFIT.com CD's and videos are played SOLUTION: a. When the walking belt is off ...
...POWER CORD. terclockwise, and the right bolt clockwise, 1/4 of the Incline buttons. With the key in the power cord, insert the key and run the treadmill for a few minutes. After a few minutes. Be careful to overtighten the walking belt. wise, and the right bolt counterclockwise, 1/4 of 450 joules.... centered. Remove the key and UNPLUG THE POWER CORD. Using the allen wrench, turn both rear roller adjustment bolts clockwise, 1/4 of the treadmill does not change correctly or does not change when iFIT.com CD's and videos are played SOLUTION: a. When the walking belt is off ...


