
Uk Manual
Page 1
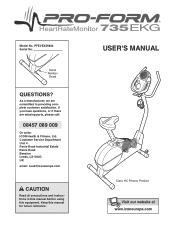
Serial Number Decal QUESTIONS? As a manufacturer, we are missing parts, please call: 08457 089 009 Or write: ICON Health & Fitness, Ltd. Keep this equipment. If you have questions, or if there are committed to providing complete customer satisfaction. Model No. USER'S MANUAL Class HC Fitness Product PFEVEX29832 Serial No. Customer Service Department Unit 4 Revie Road Industrial Estate Revie Road Beeston Leeds, LS118JG UK email: [email protected] CAUTION Read all precautions and instructions in this manual before using this manual for future reference.
Serial Number Decal QUESTIONS? As a manufacturer, we are missing parts, please call: 08457 089 009 Or write: ICON Health & Fitness, Ltd. Keep this equipment. If you have questions, or if there are committed to providing complete customer satisfaction. Model No. USER'S MANUAL Class HC Fitness Product PFEVEX29832 Serial No. Customer Service Department Unit 4 Revie Road Industrial Estate Revie Road Beeston Leeds, LS118JG UK email: [email protected] CAUTION Read all precautions and instructions in this manual before using this manual for future reference.
Uk Manual
Page 2
... not use of the owner to order a free replacement decal. WARNING: Before beginning this manual before using . TABLE OF CONTENTS IMPORTANT PRECAUTIONS 2 BEFORE YOU BEGIN 3 ASSEMBLY 4 HOW TO OPERATE THE EXERCISE CYCLE 8 MAINTENANCE AND TROUBLESHOOTING 12 CONDITIONING GUIDELINES 13 PART LIST 14 EXPLODED DRAWING 15 ORDERING REPLACEMENT PARTS Back Cover IMPORTANT PRECAUTIONS WARNING: To reduce the risk of heart rate readings. The exercise cycle should not be used by...
... not use of the owner to order a free replacement decal. WARNING: Before beginning this manual before using . TABLE OF CONTENTS IMPORTANT PRECAUTIONS 2 BEFORE YOU BEGIN 3 ASSEMBLY 4 HOW TO OPERATE THE EXERCISE CYCLE 8 MAINTENANCE AND TROUBLESHOOTING 12 CONDITIONING GUIDELINES 13 PART LIST 14 EXPLODED DRAWING 15 ORDERING REPLACEMENT PARTS Back Cover IMPORTANT PRECAUTIONS WARNING: To reduce the risk of heart rate readings. The exercise cycle should not be used by...
Uk Manual
Page 3
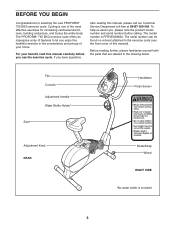
... parts that are labeled in the convenience and privacy of your home. Cycling is one of this manual, please call our Customer Service Department toll-free at 08457 089 009. For your benefit, read this healthful exercise in the drawing below. Seat Fan Console Adjustment Handle Water Bottle Holder* Handlebar Pulse Sensor Adjustment Knob REAR Pedal/Strap Wheel RIGHT SIDE *No water bottle is PFEVEX29832. The PROFORM® 735 EKG exercise...
... parts that are labeled in the convenience and privacy of your home. Cycling is one of this manual, please call our Customer Service Department toll-free at 08457 089 009. For your benefit, read this healthful exercise in the drawing below. Seat Fan Console Adjustment Handle Water Bottle Holder* Handlebar Pulse Sensor Adjustment Knob REAR Pedal/Strap Wheel RIGHT SIDE *No water bottle is PFEVEX29832. The PROFORM® 735 EKG exercise...
Uk Manual
Page 4
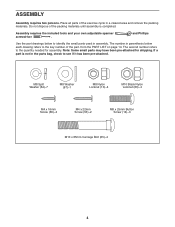
... number refers to the key number of the exercise cycle in assembly. M8 Split Washer (64)-7 M8 Washer (67)-1 M8 Nylon Locknut (10)-4 M10 Black Nylon Locknut (63)-4 M4 x 16mm Screw (66)-4 M4 x 22mm Screw (53)-2 M8 x 25mm Button Screw (14)-3 M10 x 65mm Carriage Bolt (65)-4 4 ASSEMBLY Assembly requires two persons. and Phillips Use the part drawings below each drawing refers to the quantity needed...
... number refers to the key number of the exercise cycle in assembly. M8 Split Washer (64)-7 M8 Washer (67)-1 M8 Nylon Locknut (10)-4 M10 Black Nylon Locknut (63)-4 M4 x 16mm Screw (66)-4 M4 x 22mm Screw (53)-2 M8 x 25mm Button Screw (14)-3 M10 x 65mm Carriage Bolt (65)-4 4 ASSEMBLY Assembly requires two persons. and Phillips Use the part drawings below each drawing refers to the quantity needed...

Uk Manual
Page 5
..., connect the Upper Wire Harness (36) to the Frame with two M10 x 65mm Carriage Bolts (65) and two M10 Black Nylon Locknuts (63). Slide the Upright (13) onto the Frame (1). alkaline batteries are installed correctly, the fan will turn on for a moment. 16 Batteries Screw 5 Battery Drawer Remove the screw from the battery drawer. Attach the Upright to the Lower Wire Harness (43). Pull the battery drawer open and...
..., connect the Upper Wire Harness (36) to the Frame with two M10 x 65mm Carriage Bolts (65) and two M10 Black Nylon Locknuts (63). Slide the Upright (13) onto the Frame (1). alkaline batteries are installed correctly, the fan will turn on for a moment. 16 Batteries Screw 5 Battery Drawer Remove the screw from the battery drawer. Attach the Upright to the Lower Wire Harness (43). Pull the battery drawer open and...

Uk Manual
Page 6
... the Adjustment Handle (9). Connect the console wire to the Upright (13) with four M4 x 16mm Screws (66). Note: The Adjustment Handle works like a spanner. wise until the pin on the Upright (13). Attach the Console (16) to the Upper Wire Harness (36). Then, turn it toward the upright, and then turn the Knob clock- Insert the Adjustment Handle into the Handlebar Clamp (49), and tighten the Adjustment Handle into the Upright. Turn...
... the Adjustment Handle (9). Connect the console wire to the Upright (13) with four M4 x 16mm Screws (66). Note: The Adjustment Handle works like a spanner. wise until the pin on the Upright (13). Attach the Console (16) to the Upper Wire Harness (36). Then, turn it toward the upright, and then turn the Knob clock- Insert the Adjustment Handle into the Handlebar Clamp (49), and tighten the Adjustment Handle into the Upright. Turn...
Uk Manual
Page 7
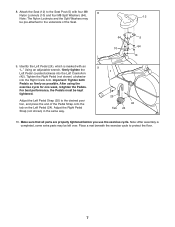
... 24 10. Using an adjustable wrench, firmly tighten the Left Pedal counterclockwise into the Right Crank Arm. Important: Tighten both Pedals as firmly as possible. Make sure that all parts are properly tightened before you use the exercise cycle. For best performance, the Pedals must be pre-attached to the desired position, and press the end of the Seat. 64 10 5 64 10 9. 8. Attach the Seat (12) to...
... 24 10. Using an adjustable wrench, firmly tighten the Left Pedal counterclockwise into the Right Crank Arm. Important: Tighten both Pedals as firmly as possible. Make sure that all parts are properly tightened before you use the exercise cycle. For best performance, the Pedals must be pre-attached to the desired position, and press the end of the Seat. 64 10 5 64 10 9. 8. Attach the Seat (12) to...
Uk Manual
Page 8
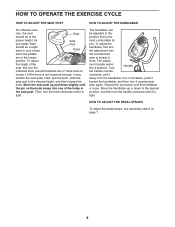
... until it may scratch the seat post). HOW TO OPERATE THE EXERCISE CYCLE HOW TO ADJUST THE SEAT POST HOW TO ADJUST THE HANDLEBAR For effective exer- Next, pull the knob, slide the seat post to loosen it is tight. Note: The adjust- wise again. HOW TO ADJUST THE PEDAL STRAPS To adjust the pedal straps, see assembly step 9 on the knob snaps into one of the...
... until it may scratch the seat post). HOW TO OPERATE THE EXERCISE CYCLE HOW TO ADJUST THE SEAT POST HOW TO ADJUST THE HANDLEBAR For effective exer- Next, pull the knob, slide the seat post to loosen it is tight. Note: The adjust- wise again. HOW TO ADJUST THE PEDAL STRAPS To adjust the pedal straps, see assembly step 9 on the knob snaps into one of the...
Uk Manual
Page 9
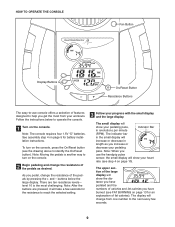
... minute (RPM). See assembly step 4 on the console, press the On/Reset button (see step 4 on the console. 2 Begin pedaling and change the resistance of the pedals as you pedal, change the resistance of the pedals by pressing the + and - To turn on page 5 for the resistance to reach the selected setting. 3 Follow your heart rate (see the drawing above to turn on page 10). The indicator bar in the small display will show your...
... minute (RPM). See assembly step 4 on the console, press the On/Reset button (see step 4 on the console. 2 Begin pedaling and change the resistance of the pedals as you pedal, change the resistance of the pedals by pressing the + and - To turn on page 5 for the resistance to reach the selected setting. 3 Follow your heart rate (see the drawing above to turn on page 10). The indicator bar in the small display will show your...

Uk Manual
Page 10
... both your heart rate if desired. Note: When the button is held down the On/Reset button for a moment. To reset the displays, press the On/Reset button. make Lower Button sure that the word SCAN does not appear. To use the hand- To view only your pedaling speed or the resistance level, press the lower button on the handgrips, peel off the plastic. To change from one number to hold...
... both your heart rate if desired. Note: When the button is held down the On/Reset button for a moment. To reset the displays, press the On/Reset button. make Lower Button sure that the word SCAN does not appear. To use the hand- To view only your pedaling speed or the resistance level, press the lower button on the handgrips, peel off the plastic. To change from one number to hold...
Uk Manual
Page 11
... pedals are finished exercising, the console will turn off . To turn off to conserve the batteries. If the pedals are not moved and the console buttons are not moved for a few seconds, the displays will pause and the time will turn off to conserve the batteries. 11 Note: If the fan is turned on the fan at high speed, press the fan button a Fan Button Thumb Wheel second time. 5 Turn...
... pedals are finished exercising, the console will turn off . To turn off to conserve the batteries. If the pedals are not moved and the console buttons are not moved for a few seconds, the displays will pause and the time will turn off to conserve the batteries. 11 Note: If the fan is turned on the fan at high speed, press the fan button a Fan Button Thumb Wheel second time. 5 Turn...
Uk Manual
Page 12
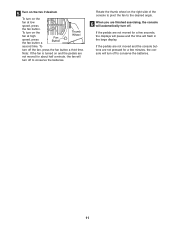
... reed switch should be cleaned with heart rate readings. • For the most console problems are the result of the Side Shield Cover (19). Remove the Screw (59) from the Magnet. Gently remove the Left Side Shield. 19 59 66 24 17 Next, locate the Reed Switch (40). Turn the Left Crank Arm (42) until the console displays correct feedback. See assembly step 4 on page 5 for a moment. HANDGRIP PULSE SENSOR TROUBLESHOOTING • Avoid moving...
... reed switch should be cleaned with heart rate readings. • For the most console problems are the result of the Side Shield Cover (19). Remove the Screw (59) from the Magnet. Gently remove the Left Side Shield. 19 59 66 24 17 Next, locate the Reed Switch (40). Turn the Left Crank Arm (42) until the console displays correct feedback. See assembly step 4 on page 5 for a moment. HANDGRIP PULSE SENSOR TROUBLESHOOTING • Avoid moving...
Uk Manual
Page 13
...-exercise problems. EXERCISE FREQUENCY To maintain or improve your body begin to use stored fat calories for prolonged periods of time. After a few minutes of exercise does your condition, plan three workouts each week, if desired. Remember, the key to success is near the lowest number in your heart rate as you , first find the three numbers above your training zone. The lowest number...
...-exercise problems. EXERCISE FREQUENCY To maintain or improve your body begin to use stored fat calories for prolonged periods of time. After a few minutes of exercise does your condition, plan three workouts each week, if desired. Remember, the key to success is near the lowest number in your heart rate as you , first find the three numbers above your training zone. The lowest number...
Uk Manual
Page 14
... to change without notice. See the back cover of this manual for information about ordering replacement parts. 14 PART LIST-Model No. PFEVEX29832 R0505A Key No. Description 1 1 Frame 38 1 Magnet 2 1 Front Stabiliser 39 2 Small Pulley Washer 3 2 Small Snap Ring 40 1 Reed Switch/Sensor Wire 4 4 Stabilizer Endcap 41 1 "C" Magnet 5 1 Seat Post 42 1 Left Crank Arm 6 1 Bottle Holder 43 1 Lower Wire Harness 7 2 Handlebar Endcap 44 2 Crank Bearing 8 2 Foam Grip 45 1 Resistance Cable 9 1 Adjustment Handle 46 1 Resistance Motor 10...
... to change without notice. See the back cover of this manual for information about ordering replacement parts. 14 PART LIST-Model No. PFEVEX29832 R0505A Key No. Description 1 1 Frame 38 1 Magnet 2 1 Front Stabiliser 39 2 Small Pulley Washer 3 2 Small Snap Ring 40 1 Reed Switch/Sensor Wire 4 4 Stabilizer Endcap 41 1 "C" Magnet 5 1 Seat Post 42 1 Left Crank Arm 6 1 Bottle Holder 43 1 Lower Wire Harness 7 2 Handlebar Endcap 44 2 Crank Bearing 8 2 Foam Grip 45 1 Resistance Cable 9 1 Adjustment Handle 46 1 Resistance Motor 10...
Uk Manual
Page 15
PFEVEX29832 R0505A 16 66 7 66 7 8 19 59 49 36 67 17 9 53 6 12 52 52 18 66 52 66 66 52 65 50 51 4 25 24 13 14 14 64 15 64 14 51 50 63 4 63 2 66 55 63 44 56 33 30 42 31 3 11 64 64 10 5 27 26 57 56 43 20 66 40 22 23 63 58 1 38 28 21 23 35 29 29 54 10 68 35 44 39 61 31 60 3 34 32 31 69 11 63 41 45 47 4 63 66 37 48 48 4 46 62 65 15 EXPLODED DRAWING-Model No.
PFEVEX29832 R0505A 16 66 7 66 7 8 19 59 49 36 67 17 9 53 6 12 52 52 18 66 52 66 66 52 65 50 51 4 25 24 13 14 14 64 15 64 14 51 50 63 4 63 2 66 55 63 44 56 33 30 42 31 3 11 64 64 10 5 27 26 57 56 43 20 66 40 22 23 63 58 1 38 28 21 23 35 29 29 54 10 68 35 44 39 61 31 60 3 34 32 31 69 11 63 41 45 47 4 63 66 37 48 48 4 46 62 65 15 EXPLODED DRAWING-Model No.
Uk Manual
Page 16
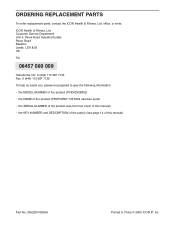
... (PFEVEX29832) • the NAME of the product (PROFORM® 735 EKG exercise cycle) • the SERIAL NUMBER of the product (see the front cover of this manual) • the KEY NUMBER and DESCRIPTION of the part(s) (see page 14 of this manual) Part No. 209228 R0505A Printed in China © 2005 ICON IP, Inc. office, or write: ICON Health & Fitness, Ltd. ORDERING REPLACEMENT PARTS To order replacement parts, contact the ICON Health & Fitness, Ltd.
... (PFEVEX29832) • the NAME of the product (PROFORM® 735 EKG exercise cycle) • the SERIAL NUMBER of the product (see the front cover of this manual) • the KEY NUMBER and DESCRIPTION of the part(s) (see page 14 of this manual) Part No. 209228 R0505A Printed in China © 2005 ICON IP, Inc. office, or write: ICON Health & Fitness, Ltd. ORDERING REPLACEMENT PARTS To order replacement parts, contact the ICON Health & Fitness, Ltd.


