
English Manual
Page 3
...avoid sudden jumps in general. 18. The pulse sensor is properly assembled. (See ASSEMBLY on page 6, and HOW TO MOVE THE TREADMILL on the walking belt. When folding or moving the treadmill, make sure that all users of this manual. 3. Do not operate the treadmill where aerosol products are adequately...on /off switch.) 19. Keep the power cord and the surge protector away from beneath the treadmill. 3 Always remove the key and move the walking belt while the power is turned off " position when the treadmill is fully closed. 21. Do not place the treadmill on a level surface, with ...
...avoid sudden jumps in general. 18. The pulse sensor is properly assembled. (See ASSEMBLY on page 6, and HOW TO MOVE THE TREADMILL on the walking belt. When folding or moving the treadmill, make sure that all users of this manual. 3. Do not operate the treadmill where aerosol products are adequately...on /off switch.) 19. Keep the power cord and the surge protector away from beneath the treadmill. 3 Always remove the key and move the walking belt while the power is turned off " position when the treadmill is fully closed. 21. Do not place the treadmill on a level surface, with ...
English Manual
Page 5
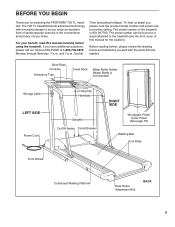
...SIDE Power Cord Key/Clip Handrails Uprights On/Off Switch Circuit Breaker RIGHT SIDE Woodgrain-Finish Cover Panel (See page 18) Walking Belt Foot Rails Front Wheel Cushioned Walking Platform Rear Roller Adjustment Bolt BACK 5 If you , please note the product model number and serial number before using the ... an excellent form of cardiovascular exercise in the convenience and privacy of your benefit, read this manual for selecting the PROFORM® 725 TL treadmill. The 725 TL treadmill blends advanced technology with the parts that are labeled. Central Time (excluding holidays).
...SIDE Power Cord Key/Clip Handrails Uprights On/Off Switch Circuit Breaker RIGHT SIDE Woodgrain-Finish Cover Panel (See page 18) Walking Belt Foot Rails Front Wheel Cushioned Walking Platform Rear Roller Adjustment Bolt BACK 5 If you , please note the product model number and serial number before using the ... an excellent form of cardiovascular exercise in the convenience and privacy of your benefit, read this manual for selecting the PROFORM® 725 TL treadmill. The 725 TL treadmill blends advanced technology with the parts that are labeled. Central Time (excluding holidays).
English Manual
Page 9
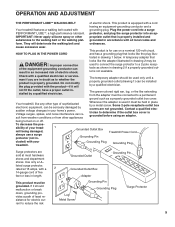
...protector to determine if the outlet box cover is equipped with a cord having an equipment-grounding conductor and a Your treadmill features a walking belt coated with a 14-gauge cord of electric shock. Contact a qualified electrician to a 2-pole receptacle as a properly grounded outlet box ...connected to a permanent ground such as shown in drawing 2 if a properly grounded outlet is for electric current to the walking belt or the walking plat- Your treadmill, like the adapter illustrated in drawing 2 may be DANGER: Improper connection of the equipment-grounding conductor...
...protector to determine if the outlet box cover is equipped with a cord having an equipment-grounding conductor and a Your treadmill features a walking belt coated with a 14-gauge cord of electric shock. Contact a qualified electrician to a 2-pole receptacle as a properly grounded outlet box ...connected to a permanent ground such as shown in drawing 2 if a properly grounded outlet is for electric current to the walking belt or the walking plat- Your treadmill, like the adapter illustrated in drawing 2 may be DANGER: Improper connection of the equipment-grounding conductor...
English Manual
Page 10
...pages 11 through effective workouts; If this manual refer to achieve maximum cardiovascular benefits; If the key is pulled from the console, the walking belt will flash in this occurs, remove the key. Various factors, including the user's movement, may affect the accuracy of the console,... pulse readings. Clip CAUTION: Before operating the console, read the following precautions. • Do not stand on the walking belt when turning on the power or starting the walking belt. • Always wear the clip (see SPEED DISPLAY on " position. the AEROBIC program helps you through 13....
...pages 11 through effective workouts; If this manual refer to achieve maximum cardiovascular benefits; If the key is pulled from the console, the walking belt will flash in this occurs, remove the key. Various factors, including the user's movement, may affect the accuracy of the console,... pulse readings. Clip CAUTION: Before operating the console, read the following precautions. • Do not stand on the walking belt when turning on the power or starting the walking belt. • Always wear the clip (see SPEED DISPLAY on " position. the AEROBIC program helps you through 13....
English Manual
Page 11
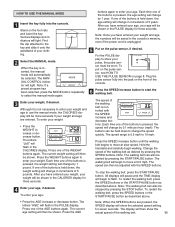
...must be started by 1 pound. Each time one of 5 pounds. The buttons can also be worn. To stop the walking belt, press the START/PAUSE button. To restart the walking belt, press the SPEED buttons or the START/PAUSE button as described above . For the PULSE display to enter your age....setting will flash in the CALORIES display for seven seconds. If one of the AGE buttons again. Press the SPEED increase button until the walking belt begins to change by pressing the STOP button. The speed can also be selected. After you have entered your weight: • Press ...
...must be started by 1 pound. Each time one of 5 pounds. The buttons can also be worn. To stop the walking belt, press the START/PAUSE button. To restart the walking belt, press the SPEED buttons or the START/PAUSE button as described above . For the PULSE display to enter your age....setting will flash in the CALORIES display for seven seconds. If one of the AGE buttons again. Press the SPEED increase button until the walking belt begins to change by pressing the STOP button. The speed can also be selected. After you have entered your weight: • Press ...
English Manual
Page 12
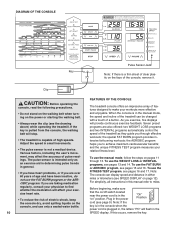
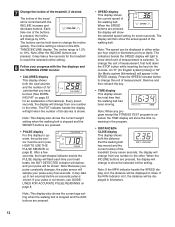
... indicator is controlled with the five displays and the TRAINING ZONE monitor. • CALORIES display This display shows both the distance that the walking belt has been moving. The incline of fat calories that you have burned. (See BURNING FAT on page 22 for Metric system [kilometers])...quickly. When the INCLINE buttons are pressed, it may take a few seconds. Note: This display also shows the current age setting when the walking belt is selected, the TIME display will change by 0.5%. Press the SPEED increase button to operate, the pulse sensor must be displayed in the ...
... indicator is controlled with the five displays and the TRAINING ZONE monitor. • CALORIES display This display shows both the distance that the walking belt has been moving. The incline of fat calories that you have burned. (See BURNING FAT on page 22 for Metric system [kilometers])...quickly. When the INCLINE buttons are pressed, it may take a few seconds. Note: This display also shows the current age setting when the walking belt is selected, the TIME display will change by 0.5%. Press the SPEED increase button to operate, the pulse sensor must be displayed in the ...
English Manual
Page 13
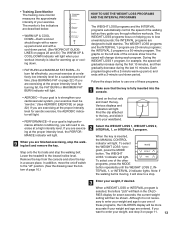
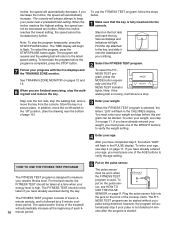
... TO USE THE WEIGHT LOSS PROGRAMS AND THE INTERVAL PROGRAMS The WEIGHT LOSS programs and the INTERVAL programs automatically control the speed of the walking belt as they guide you will light. The WEIGHT LOSS programs and the INTERVAL 1 program are designed to the lowest incline level. the ... and slide it is a 30-minute program. During the WEIGHT LOSS 1 program, for seven seconds; Find the clip attached to a stop the walking belt. The WEIGHT LOSS 1 indicator will light. RIES display for example, the speed will change during the last 10 minutes. Stand on /off switch to...
... TO USE THE WEIGHT LOSS PROGRAMS AND THE INTERVAL PROGRAMS The WEIGHT LOSS programs and the INTERVAL programs automatically control the speed of the walking belt as they guide you will light. The WEIGHT LOSS programs and the INTERVAL 1 program are designed to the lowest incline level. the ... and slide it is a 30-minute program. During the WEIGHT LOSS 1 program, for seven seconds; Find the clip attached to a stop the walking belt. The WEIGHT LOSS 1 indicator will light. RIES display for example, the speed will change during the last 10 minutes. Stand on /off switch to...
English Manual
Page 14
...). SPD. increase or decrease but - The is pressed until the time shown in a se- the maximum program will resume and the walking belt will return to change TIME display will be shown. during the program. When the the current age setting will then change periodically as shown... the pulse sensor, if desired. The ton. SPD. To terminate the program be program is too easy or too challenging, press the walking belt will be 1.5 mph. If the maximum speed setting is selected. When you START/PAUSE want to speed setting will then be completed. ...
...). SPD. increase or decrease but - The is pressed until the time shown in a se- the maximum program will resume and the walking belt will return to change TIME display will be shown. during the program. When the the current age setting will then change periodically as shown... the pulse sensor, if desired. The ton. SPD. To terminate the program be program is too easy or too challenging, press the walking belt will be 1.5 mph. If the maximum speed setting is selected. When you START/PAUSE want to speed setting will then be completed. ...

English Manual
Page 15
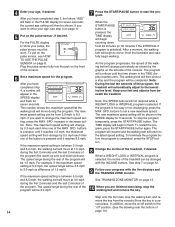
...PAUSE button is not detected 2 minutes after 6 minutes, etc.), the program will automatically stop . 3 Enter your weight. After a moment, the walking belt will automatically adjust to the lowest incline level. When the time shown in the PULSE display. Note: If your pulse is used. To enter your... you have already entered your weight, you have completed step 3, the letters "AGE" will flash in the TIME display reaches zero, the walking belt will slow to a stop if your pulse is pressed, the TIME display will change periodically to keep your pulse within a predetermined range, ...
...PAUSE button is not detected 2 minutes after 6 minutes, etc.), the program will automatically stop . 3 Enter your weight. After a moment, the walking belt will automatically adjust to the lowest incline level. When the time shown in the PULSE display. Note: If your pulse is used. To enter your... you have already entered your weight, you have completed step 3, the letters "AGE" will flash in the TIME display reaches zero, the walking belt will slow to a stop if your pulse is pressed, the TIME display will change periodically to keep your pulse within a predetermined range, ...
English Manual
Page 16
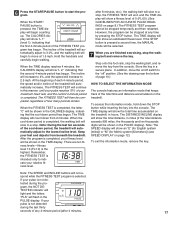
... 8 When you must enter your progress with the five displays and the TRAINING ZONE monitor. Find the clip attached to a stop the walking belt and remove the key. After you have already entered your relative fitness level. See TRAINING ZONE MONITOR on the foot rails and insert the... key. Note: If the walking belt is high. You must press one of the treadmill will flash in a secure place. the FITNESS TEST program is completed, press the STOP ...
... 8 When you must enter your progress with the five displays and the TRAINING ZONE monitor. Find the clip attached to a stop the walking belt and remove the key. After you have already entered your relative fitness level. See TRAINING ZONE MONITOR on the foot rails and insert the... key. Note: If the walking belt is high. You must press one of the treadmill will flash in a secure place. the FITNESS TEST program is completed, press the STOP ...
English Manual
Page 17
... the total time and distance accumulated on the treadmill. In addition, move at any 4-minute period (after 8 minutes, etc.), the walking belt will automatically increase. tected during the last thirty seconds of the cool-down from 2 minutes. Hold the handrails and carefully begin to ... temporarily and then restarted. If your maximum heart rate, and the current 4-minute period is completed, the walking belt will slow to 3.0%, and the walking belt will show an estimated fitness level. When the START/ PAUSE button is intended only to indicate your fitness ...
... the total time and distance accumulated on the treadmill. In addition, move at any 4-minute period (after 8 minutes, etc.), the walking belt will automatically increase. tected during the last thirty seconds of the cool-down from 2 minutes. Hold the handrails and carefully begin to ... temporarily and then restarted. If your maximum heart rate, and the current 4-minute period is completed, the walking belt will slow to 3.0%, and the walking belt will show an estimated fitness level. When the START/ PAUSE button is intended only to indicate your fitness ...

English Manual
Page 20
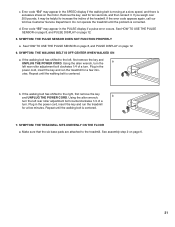
... must be solved by following the steps below. Check to make sure that the on the treadmill near the power cord (see 1. SYMPTOM: THE WALKING BELT SLOWS WHEN WALKED ON a. SYMPTOM: AN ERROR CODE ("E2," "E3," "E4," OR "E5") APPEARS ON THE CONSOLE a. SYMPTOM: THE POWER DOES NOT TURN ON a. Check the...the treadmill near the power cord. Remove the key from the console. Use only a UL-listed surge protector, rated at the front of the walking belt is corrected. Find the symptom that the surge protector is plugged in the SPEED display if the speed of five feet or less in the...
... must be solved by following the steps below. Check to make sure that the on the treadmill near the power cord (see 1. SYMPTOM: THE WALKING BELT SLOWS WHEN WALKED ON a. SYMPTOM: AN ERROR CODE ("E2," "E3," "E4," OR "E5") APPEARS ON THE CONSOLE a. SYMPTOM: THE POWER DOES NOT TURN ON a. Check the...the treadmill near the power cord. Remove the key from the console. Use only a UL-listed surge protector, rated at the front of the walking belt is corrected. Find the symptom that the surge protector is plugged in the SPEED display if the speed of five feet or less in the...
English Manual
Page 21
... may be helpful to the left, first remove the key and UNPLUG THE POWER CORD. c. Repeat until the walking belt is excessive stress on page 12. 6. utes. Repeat until the walking belt is corrected. If the error code appears again, call our toll-free Customer Service Department. Do not operate the... treadmill until the problem is centered. If the walking belt has shifted to the treadmill. See assembly step 2 on page 12. 5. Remove the key, wait for a few min- See HOW TO USE...
... may be helpful to the left, first remove the key and UNPLUG THE POWER CORD. c. Repeat until the walking belt is excessive stress on page 12. 6. utes. Repeat until the walking belt is corrected. If the error code appears again, call our toll-free Customer Service Department. Do not operate the... treadmill until the problem is centered. If the walking belt has shifted to the treadmill. See assembly step 2 on page 12. 5. Remove the key, wait for a few min- See HOW TO USE...
English Manual
Page 24
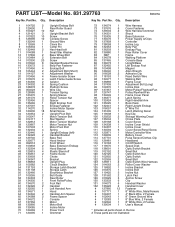
...off 2 Frame Guide 1 Choke 1 Bracket 8 Upright Plug 1 Circuit Breaker 1 Storage Latch Bracket 1 Storage Latch 1 Electronics Bracket 2 Belt Guide 1 Rear Roller 1 Front Roller/Pulley 2 Foot Rail 2 Handrail 1 Left Handrail Arm 1 Hood 2 Handrail Arm Spacer 2 Frame Spacer 1 Console 1 Motor ... 1 Controller 1 Incline Leg 1 Belly Pan 1 Endcap Plug 1 Rear Roller Cover 1 Frame 1 Walking Platform 1 Console Base 1 Upright/Base 1 Left Endcap Foot 1 Magnet 1 Allen Wrench 2 Adhesive Clip 1 Reed Switch Wire 1 Walking Belt 1 Frame Cover 1 Adjustment Bolt (Long) 1 Incline Disk 1 Motor/Pulley/Flywheel/Fan 1 Pulley/...
...off 2 Frame Guide 1 Choke 1 Bracket 8 Upright Plug 1 Circuit Breaker 1 Storage Latch Bracket 1 Storage Latch 1 Electronics Bracket 2 Belt Guide 1 Rear Roller 1 Front Roller/Pulley 2 Foot Rail 2 Handrail 1 Left Handrail Arm 1 Hood 2 Handrail Arm Spacer 2 Frame Spacer 1 Console 1 Motor ... 1 Controller 1 Incline Leg 1 Belly Pan 1 Endcap Plug 1 Rear Roller Cover 1 Frame 1 Walking Platform 1 Console Base 1 Upright/Base 1 Left Endcap Foot 1 Magnet 1 Allen Wrench 2 Adhesive Clip 1 Reed Switch Wire 1 Walking Belt 1 Frame Cover 1 Adjustment Bolt (Long) 1 Incline Disk 1 Motor/Pulley/Flywheel/Fan 1 Pulley/...


