
English Manual
Page 3
.... No other appliance should not be able to safely lift 45 pounds (20 kg) in order to raise, lower, or move the walking belt while the power is not a medical device. Never move the treadmill until it is capable of the treadmill by persons weighing more than one ...in length. Keep the treadmill indoors, away from damage, place a mat under the age of the treadmill regularly. 3 The treadmill should be on the walking belt. Keep the power cord and the surge protector away from the treadmill at a time. 9. Never leave the treadmill unattended while it . Never use . ...
.... No other appliance should not be able to safely lift 45 pounds (20 kg) in order to raise, lower, or move the walking belt while the power is not a medical device. Never move the treadmill until it is capable of the treadmill by persons weighing more than one ...in length. Keep the treadmill indoors, away from damage, place a mat under the age of the treadmill regularly. 3 The treadmill should be on the walking belt. Keep the power cord and the surge protector away from the treadmill at a time. 9. Never leave the treadmill unattended while it . Never use . ...
English Manual
Page 5
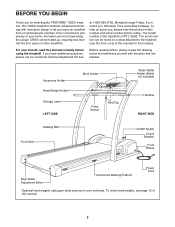
... reading further, please review the drawing below and familiarize yourself with innovative design to your benefit, read this manual for selecting the PROFORM¨ 725EX treadmill. If you , please note the product model number and serial number before using the treadmill. The model number...Holder* Storage Latch LEFT SIDE Book Holder Pulse Sensor Key/Clip Water Bottle Holder (Bottle not included) Handrail RIGHT SIDE Walking Belt Foot Rails On/Off Switch Circuit Breaker Front Wheel Rear Roller Adjustment Bolts Cushioned Walking Platform Power Cord *Optional hand weights add ...
... reading further, please review the drawing below and familiarize yourself with innovative design to your benefit, read this manual for selecting the PROFORM¨ 725EX treadmill. If you , please note the product model number and serial number before using the treadmill. The model number...Holder* Storage Latch LEFT SIDE Book Holder Pulse Sensor Key/Clip Water Bottle Holder (Bottle not included) Handrail RIGHT SIDE Walking Belt Foot Rails On/Off Switch Circuit Breaker Front Wheel Rear Roller Adjustment Bolts Cushioned Walking Platform Power Cord *Optional hand weights add ...
English Manual
Page 6
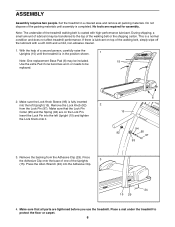
... the Adhesive Clip. 24 15 29 4. Make sure that the Lock Pin Collar (95) and the Spring (94) are on top of the treadmill walking belt is coated with a soft cloth and a mild, non-abrasive cleaner. 1. Remove the Lock Knob (92) 2 from the Adhesive Clip (29). Press the Allen ...Wrench (24) into the left Upright (15). Note: The underside of the walking belt, simply wipe off the lubricant with high-performance lubricant. Remove the backing from the Lock Pin (97). Place a mat under the treadmill to the top...
... the Adhesive Clip. 24 15 29 4. Make sure that the Lock Pin Collar (95) and the Spring (94) are on top of the treadmill walking belt is coated with a soft cloth and a mild, non-abrasive cleaner. 1. Remove the Lock Knob (92) 2 from the Adhesive Clip (29). Press the Allen ...Wrench (24) into the left Upright (15). Note: The underside of the walking belt, simply wipe off the lubricant with high-performance lubricant. Remove the backing from the Lock Pin (97). Place a mat under the treadmill to the top...
English Manual
Page 7
...pole receptacle outlet box covers are sold at 15 amps, with all local codes and form. grounded in doubt as to the walking belt or the walking plat- not fit the outlet, have a proper outlet installed by a qualified electrician. This product is equipped with... a cord having an equipment-grounding conductor and a Your treadmill features a walking belt coated with a qualified electrician or serviceman if you are in accordance with a 14-gauge cord of Grounded Outlet Grounding Pin 2 Grounded Outlet...
...pole receptacle outlet box covers are sold at 15 amps, with all local codes and form. grounded in doubt as to the walking belt or the walking plat- not fit the outlet, have a proper outlet installed by a qualified electrician. This product is equipped with... a cord having an equipment-grounding conductor and a Your treadmill features a walking belt coated with a qualified electrician or serviceman if you are in accordance with a 14-gauge cord of Grounded Outlet Grounding Pin 2 Grounded Outlet...

English Manual
Page 8
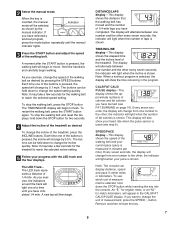
... incline of the treadmill and three programs control the speed of the treadmill as they guide you get the most from the console, the walking belt will provide continuous exercise feedback. On Position Next, plug in either miles or kilometers (see SPEED/ PACE DISPLAY on page 7). Step onto the ...onto the waistband of your heart rate. Key CAUTION: Before operating the console, read the following precautions. ¥ Do not stand on the walking belt when turning on the face of the console, remove it before plugging in the console, remove it . When the manual mode is selected, the ...
... incline of the treadmill and three programs control the speed of the treadmill as they guide you get the most from the console, the walking belt will provide continuous exercise feedback. On Position Next, plug in either miles or kilometers (see SPEED/ PACE DISPLAY on page 7). Step onto the ...onto the waistband of your heart rate. Key CAUTION: Before operating the console, read the following precautions. ¥ Do not stand on the walking belt when turning on the face of the console, remove it before plugging in the console, remove it . When the manual mode is selected, the ...
English Manual
Page 9
... indicator will then begin to flash. Note: The console can be selected, as shown by pressing the SPEED buttons. To restart the walking belt, press the START button again. The display will appear in either miles or kilometers. If you have completed 1/4 mile. When the key... measurement is inserted, the manual Indicator mode will begin . 9 DISTANCE/LAPS displayÑThis display shows the distance that the walking belt has moved and the number of the treadmill as desired by the manual indicator. The display will begin walking. Remove and then reinsert...
... indicator will then begin to flash. Note: The console can be selected, as shown by pressing the SPEED buttons. To restart the walking belt, press the START button again. The display will appear in either miles or kilometers. If you have completed 1/4 mile. When the key... measurement is inserted, the manual Indicator mode will begin . 9 DISTANCE/LAPS displayÑThis display shows the distance that the walking belt has moved and the number of the treadmill as desired by the manual indicator. The display will begin walking. Remove and then reinsert...
English Manual
Page 10
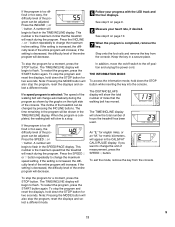
...off position and unplug the power cord. In addition, move . The speed of the console. When the key is the maximum incline that the walking belt will flash in the CALS/FAT CALS/PULSE display will flash steadily and a ÒPÓ will be from 4 mph to change the maximum incline...are finished exercising, press the STOP button and remove the key. 6 Measure your hands on the metal contacts on the left side of the walking belt can be from 4% to change the maximum speed setting, press the SPEED v button. Stand on the foot rails and Metal Contacts place your ...
...off position and unplug the power cord. In addition, move . The speed of the console. When the key is the maximum incline that the walking belt will flash in the CALS/FAT CALS/PULSE display will flash steadily and a ÒPÓ will be from 4 mph to change the maximum incline...are finished exercising, press the STOP button and remove the key. 6 Measure your hands on the metal contacts on the left side of the walking belt can be from 4% to change the maximum speed setting, press the SPEED v button. Stand on the foot rails and Metal Contacts place your ...
English Manual
Page 11
... miles that the treadmill will decrease. 5 Follow your heart rate, if desired. In addition, move the on the right side of the walking belt will appear in a secure place. The TIME/INCLINE display will reach during the program. Press the INCLINE v or w button repeatedly to the...button. The incline of measurement, press the SPEED v button. Press the SPEED v or w button. When the program is the maximum incline that the walking belt has moved. Press the INCLINE v or w button. An ÒE,Ó for english miles, or an ÒM,Ó for a moment, press the STOP...
... miles that the treadmill will decrease. 5 Follow your heart rate, if desired. In addition, move the on the right side of the walking belt will appear in a secure place. The TIME/INCLINE display will reach during the program. Press the INCLINE v or w button repeatedly to the...button. The incline of measurement, press the SPEED v button. Press the SPEED v or w button. When the program is the maximum incline that the walking belt has moved. Press the INCLINE v or w button. An ÒE,Ó for english miles, or an ÒM,Ó for a moment, press the STOP...
English Manual
Page 15
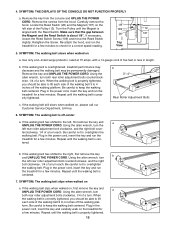
.... terclockwise, 1/4 of a turn each side of the Pulley (12). tered. If the walking belt has shifted to overtighten the walking belt. Repeat until the walking belt is centered. 7. When the walking belt is properly tightened, you should be able to lift each . Locate the Reed Switch (26) and...Using the allen wrench, turn both rear roller adjustment bolts counterclockwise, 1/4 of a turn the left side of the walking belt 3 to keep the walking belt centered. Remove the screws from the console and UPLUG THE POWER CORD. Retighten the Screw. Remove the key and UNPLUG THE...
.... terclockwise, 1/4 of a turn each side of the Pulley (12). tered. If the walking belt has shifted to overtighten the walking belt. Repeat until the walking belt is centered. 7. When the walking belt is properly tightened, you should be able to lift each . Locate the Reed Switch (26) and...Using the allen wrench, turn both rear roller adjustment bolts counterclockwise, 1/4 of a turn the left side of the walking belt 3 to keep the walking belt centered. Remove the screws from the console and UPLUG THE POWER CORD. Retighten the Screw. Remove the key and UNPLUG THE...
English Manual
Page 18
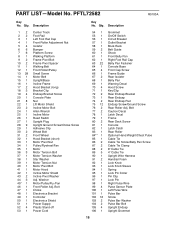
...94 1 95 1 96 1 97 1 98 1 99 4 100 1 101 1 102 16 103 2 104 2 105 4 106 1 Grommet On/Off Switch Circuit Breaker Outlet Bracket Book Rack Belt Guide Shock Front Belly Pan Right Foot Rail Cap Belly Pan Fastener Console Base Front Cap Screw Frame Guide Rear Isolator Belly Pan Warning Decal...Left Foot Rail Cap Front Roller Adjustment Nut Isolator Bumper Platform Screw Walking Platform Frame Pivot Bolt Frame Pivot Spacer Walking Belt Front Roller/Pulley Small Screw Motor Belt Upright/Base Incline Frame Hood Bracket (long) Bracket Clip Endcap Bracket Screw Console Plate Nut Lift Motor Shield Incline ...
...94 1 95 1 96 1 97 1 98 1 99 4 100 1 101 1 102 16 103 2 104 2 105 4 106 1 Grommet On/Off Switch Circuit Breaker Outlet Bracket Book Rack Belt Guide Shock Front Belly Pan Right Foot Rail Cap Belly Pan Fastener Console Base Front Cap Screw Frame Guide Rear Isolator Belly Pan Warning Decal...Left Foot Rail Cap Front Roller Adjustment Nut Isolator Bumper Platform Screw Walking Platform Frame Pivot Bolt Frame Pivot Spacer Walking Belt Front Roller/Pulley Small Screw Motor Belt Upright/Base Incline Frame Hood Bracket (long) Bracket Clip Endcap Bracket Screw Console Plate Nut Lift Motor Shield Incline ...


