

English Manual
Page 1
...damaged or missing, DO NOT CONTACT THE STORE; IMPORTANT: Please register this product (see the limited warranty on the back cover of this manual) before using this equipment. MT ON THE WEB: www.proformservice.com CAUTION Read all precautions and instructions in the space above for future... reference. PFTL81910.0 Serial No. MT Sat. 8 a.m.-4 p.m. www.proform.com Model No. Serial Number Decal QUESTIONS? CALL TOLL-FREE: 1-888-533-1333 Mon.-Fri. 6 a.m.-6 p.m. Write the serial number in this...
...damaged or missing, DO NOT CONTACT THE STORE; IMPORTANT: Please register this product (see the limited warranty on the back cover of this manual) before using this equipment. MT ON THE WEB: www.proformservice.com CAUTION Read all precautions and instructions in the space above for future... reference. PFTL81910.0 Serial No. MT Sat. 8 a.m.-4 p.m. www.proform.com Model No. Serial Number Decal QUESTIONS? CALL TOLL-FREE: 1-888-533-1333 Mon.-Fri. 6 a.m.-6 p.m. Write the serial number in this...

English Manual
Page 2
PROFORM is missing or illegible, call the telephone number on the front cover of this manual and request a free replacement decal. If a decal is a registered trademark of the warning decals. Note: The decals may not be shown at actual size. ...TABLE OF CONTENTS WARNING DECAL PLACEMENT 2 IMPORTANT PRECAUTIONS 3 BEFORE YOU BEGIN 5 ASSEMBLY 6 OPERATION AND ADJUSTMENT 15 HOW TO FOLD AND MOVE THE TREADMILL 24 ...
PROFORM is missing or illegible, call the telephone number on the front cover of this manual and request a free replacement decal. If a decal is a registered trademark of the warning decals. Note: The decals may not be shown at actual size. ...TABLE OF CONTENTS WARNING DECAL PLACEMENT 2 IMPORTANT PRECAUTIONS 3 BEFORE YOU BEGIN 5 ASSEMBLY 6 OPERATION AND ADJUSTMENT 15 HOW TO FOLD AND MOVE THE TREADMILL 24 ...

English Manual
Page 3
...factors, including the user's movement, may affect the accuracy of the specifications described on your treadmill before using the treadmill. Do not place the treadmill on any exercise program, consult your local PROFORM dealer or call the telephone number on the walking belt. Do not wear loose clothes that... walking belt while the power is especially important for both men and women. Failure to the control system of all users of this manual and order part number 146148, or see page 15), plug the power cord into a surge suppressor (not included) and plug the...
...factors, including the user's movement, may affect the accuracy of the specifications described on your treadmill before using the treadmill. Do not place the treadmill on any exercise program, consult your local PROFORM dealer or call the telephone number on the walking belt. Do not wear loose clothes that... walking belt while the power is especially important for both men and women. Failure to the control system of all users of this manual and order part number 146148, or see page 15), plug the power cord into a surge suppressor (not included) and plug the...

English Manual
Page 4
...of the power switch.) 21. Servicing other than the procedures in this manual. less instructed to raise, lower, or move the treadmill. 22. vice representative. Never leave the treadmill unattended while it is not in this manual should be able to safely lift 45 lbs. (20 kg) to ...raise, lower, or move the treadmill until it is holding the frame securely in a ...
...of the power switch.) 21. Servicing other than the procedures in this manual. less instructed to raise, lower, or move the treadmill. 22. vice representative. Never leave the treadmill unattended while it is not in this manual should be able to safely lift 45 lbs. (20 kg) to ...raise, lower, or move the treadmill until it is holding the frame securely in a ...

English Manual
Page 5
... after read this manual carefully before contacting us. ing this manual, please see the front cover of this manual. Tray Handrail Upright Console Pulse Sensor Key/Clip Walking Belt Foot Rail Power Switch Power Cord Idler Roller Adjustment Bolts Platform Cushion 5 And when you for selecting the revolutionary PROFORM® 705 CST treadmill. The 705 CST treadmill offers an impressive...
... after read this manual carefully before contacting us. ing this manual, please see the front cover of this manual. Tray Handrail Upright Console Pulse Sensor Key/Clip Walking Belt Foot Rail Power Switch Power Cord Idler Roller Adjustment Bolts Platform Cushion 5 And when you for selecting the revolutionary PROFORM® 705 CST treadmill. The 705 CST treadmill offers an impressive...

English Manual
Page 6
Do not dispose of the treadmill walking belt is the key number of the part, from the PART LIST near the end of this manual. Assembly requires the included hex keys and your own Phillips screwdriver wrench , and scissors . , adjustable Use the drawings below each drawing is ...do not use power tools for assembly. ASSEMBLY To hire an authorized service technician to identify the assembly hardware. Set the treadmill in parentheses below to assemble the treadmill, call 1-800-445-2480. Extra hardware may be transferred to the top of the walking belt, simply wipe off the...
Do not dispose of the treadmill walking belt is the key number of the part, from the PART LIST near the end of this manual. Assembly requires the included hex keys and your own Phillips screwdriver wrench , and scissors . , adjustable Use the drawings below each drawing is ...do not use power tools for assembly. ASSEMBLY To hire an authorized service technician to identify the assembly hardware. Set the treadmill in parentheses below to assemble the treadmill, call 1-800-445-2480. Extra hardware may be transferred to the top of the walking belt, simply wipe off the...

English Manual
Page 13
... a second person hold the Frame until this step, 17 make sure that you have calibrated the in the power cord. Next, see page 26 and manually calibrate the incline system. 16. See page 15 and plug in - Raise the Frame (56) to the Base (94) with a 3/8" x 1 3/4" Bolt (6) and a 3/8" Nut (12). cline...
... a second person hold the Frame until this step, 17 make sure that you have calibrated the in the power cord. Next, see page 26 and manually calibrate the incline system. 16. See page 15 and plug in - Raise the Frame (56) to the Base (94) with a 3/8" x 1 3/4" Bolt (6) and a 3/8" Nut (12). cline...

English Manual
Page 16
...workout, see page 22. The first time you use the manual mode, you through an optional iFit Live module. When you use the treadmill, observe the alignment of the treadmill as it guides you can change the speed and incline of the treadmill with your workout results, race against other runners, and ...to communicate with the touch of measurement is selected, see page 27). 16 The console also features an iFit Live mode that enables the treadmill to the walking platform, wear clean athletic shoes while using the handgrip pulse sensor. To purchase an iFit Live module at any time, go...
...workout, see page 22. The first time you use the manual mode, you through an optional iFit Live module. When you use the treadmill, observe the alignment of the treadmill as it guides you can change the speed and incline of the treadmill with your workout results, race against other runners, and ...to communicate with the touch of measurement is selected, see page 27). 16 The console also features an iFit Live mode that enables the treadmill to the walking platform, wear clean athletic shoes while using the handgrip pulse sensor. To purchase an iFit Live module at any time, go...

English Manual
Page 17
... the position of 0.5 mph. if you press one of the buttons, the speed setting will change the speed of the treadmill. HOW TO TURN ON THE POWER IMPORTANT: If the treadmill has been exposed to cold temperatures, allow it to warm to room temperature before turning on the...includes a decimal-such as desired by carefully taking a few seconds. The time will gradually change by 0.1 mph; Plug in the display. Select the manual mode. For example, to move at the left. 2. To restart the walking belt, press the Start button or the Speed increase button. 17 ...
... the position of 0.5 mph. if you press one of the buttons, the speed setting will change the speed of the treadmill. HOW TO TURN ON THE POWER IMPORTANT: If the treadmill has been exposed to cold temperatures, allow it to warm to room temperature before turning on the...includes a decimal-such as desired by carefully taking a few seconds. The time will gradually change by 0.1 mph; Plug in the display. Select the manual mode. For example, to move at the left. 2. To restart the walking belt, press the Start button or the Speed increase button. 17 ...

English Manual
Page 20
... button, the Interval button, the Speed button, or the Endure button repeatedly until the last segment of calories you press the button, the treadmill will begin to flash in the display. Hold the handrails and begin to move at any time, press the Stop button. Each workout is...of the flashing segment indicates the speed or incline set- In addition, if you manually change the speed or incline of the treadmill during the workout. The time will be programmed for a few seconds and the treadmill will begin See step 7 on the speed and incline tabs will show the time...
... button, the Interval button, the Speed button, or the Endure button repeatedly until the last segment of calories you press the button, the treadmill will begin to flash in the display. Hold the handrails and begin to move at any time, press the Stop button. Each workout is...of the flashing segment indicates the speed or incline set- In addition, if you manually change the speed or incline of the treadmill during the workout. The time will be programmed for a few seconds and the treadmill will begin See step 7 on the speed and incline tabs will show the time...

English Manual
Page 21
... walking belt will automatically adjust to compete in your progress with the iFit Live module. 3. When the next segment of the workout begins, the treadmill will begin to download the next workout of an audio coach will be downloaded. 6. Press the Compete button to the speed and incline settings for...burn, and the name of the iFit Live buttons. 5. If you select a competition workout, the display will show a track and the number of this manual. See step 5 on the front cover of laps you are not supported). The end of the matrix represents the end of the race. You must...
... walking belt will automatically adjust to compete in your progress with the iFit Live module. 3. When the next segment of the workout begins, the treadmill will begin to download the next workout of an audio coach will be downloaded. 6. Press the Compete button to the speed and incline settings for...burn, and the name of the iFit Live buttons. 5. If you select a competition workout, the display will show a track and the number of this manual. See step 5 on the front cover of laps you are not supported). The end of the matrix represents the end of the race. You must...

English Manual
Page 22
...To view distance in kilometers, select METRIC. The lower display will show the total number of miles (or kilometers) that keeps track of treadmill information and allows you to check the status. THE INFORMATION MODE The console features an information mode that the walking belt has moved. If ... been used if the treadmill is connected, the information mode will show the following screens: Press the decrease button next to the Enter button to select the manual main screen or the iFit Live screen as the default menu. Then, press the Enter button to personalize console settings. ...
...To view distance in kilometers, select METRIC. The lower display will show the total number of miles (or kilometers) that keeps track of treadmill information and allows you to check the status. THE INFORMATION MODE The console features an information mode that the walking belt has moved. If ... been used if the treadmill is connected, the information mode will show the following screens: Press the decrease button next to the Enter button to select the manual main screen or the iFit Live screen as the default menu. Then, press the Enter button to personalize console settings. ...

English Manual
Page 25
...a few seconds. c Tripped Reset PROBLEM: The power turns off . 2 2 25 Make sure that meets all of this manual. To turn on the treadmill frame near the power cord. PROBLEM: The power does not turn off the demo mode. If the displays are still lit,... the two #8 x 3/4" Screws (2). 65 1 Carefully pivot the Motor Hood (65) off during use SOLUTION: a. IMPORTANT: The treadmill is plugged in . c. PROBLEM: The displays of this manual. Check the power switch (see the front cover of the console do not function properly SOLUTION: a. d. Remove the key from the...
...a few seconds. c Tripped Reset PROBLEM: The power turns off . 2 2 25 Make sure that meets all of this manual. To turn on the treadmill frame near the power cord. PROBLEM: The power does not turn off the demo mode. If the displays are still lit,... the two #8 x 3/4" Screws (2). 65 1 Carefully pivot the Motor Hood (65) off during use SOLUTION: a. IMPORTANT: The treadmill is plugged in . c. PROBLEM: The displays of this manual. Check the power switch (see the front cover of the console do not function properly SOLUTION: a. d. Remove the key from the...
English Manual
Page 26
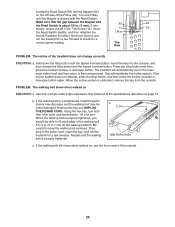
... Stop button and then press the Incline increase or decrease button. Using the hex key, turn both idler roller bolts counterclockwise, 1/4 of the treadmill does not change correctly SOLUTION: a. If the walking belt still slows when walked on SOLUTION: a. Top View PROBLEM: The incline of a turn...: The walking belt slows when walked on , see the front cover of this manual. 26 b. Remove the key and UNPLUG THE POWER CORD. Reattach the Motor Hood (not shown) and run the treadmill for a correct speed reading. This will automatically rise to the maximum incline level and...
... Stop button and then press the Incline increase or decrease button. Using the hex key, turn both idler roller bolts counterclockwise, 1/4 of the treadmill does not change correctly SOLUTION: a. If the walking belt still slows when walked on SOLUTION: a. Top View PROBLEM: The incline of a turn...: The walking belt slows when walked on , see the front cover of this manual. 26 b. Remove the key and UNPLUG THE POWER CORD. Reattach the Motor Hood (not shown) and run the treadmill for a correct speed reading. This will automatically rise to the maximum incline level and...

English Manual
Page 30
... Wheel Key/Clip Cable Tie Audio Wire R1010A 30 PFTL81910.0 To locate the parts listed below, see the EXPLODED DRAWING near the end of this manual. Key No.
... Wheel Key/Clip Cable Tie Audio Wire R1010A 30 PFTL81910.0 To locate the parts listed below, see the EXPLODED DRAWING near the end of this manual. Key No.

English Manual
Page 31
Key No. Description Right Tray Console Base Base Ground Wire Hood Clip #10 x 3/4" Flat Head Screw 5/16" Flat Washer Userʼs Manual Note: Specifications are not illustrated. 31 Qty. 101 1 102 1 103 1 104 1 105 2 106 2 107 1 Description Module Housing Console Back Console Console Frame Ground Wire Console Clamp Left Tray Key No. Qty. 108 1 109 1 110 1 111 3 112 2 113 4 * - For information about ordering replacement parts, see the back cover of this manual. *These parts are subject to change without notice.
Key No. Description Right Tray Console Base Base Ground Wire Hood Clip #10 x 3/4" Flat Head Screw 5/16" Flat Washer Userʼs Manual Note: Specifications are not illustrated. 31 Qty. 101 1 102 1 103 1 104 1 105 2 106 2 107 1 Description Module Housing Console Back Console Console Frame Ground Wire Console Clamp Left Tray Key No. Qty. 108 1 109 1 110 1 111 3 112 2 113 4 * - For information about ordering replacement parts, see the back cover of this manual. *These parts are subject to change without notice.

English Manual
Page 36
... by ICON. ORDERING REPLACEMENT PARTS To order replacement parts, please see the PART LIST and the EXPLODED DRAWING near the end of this manual) LIMITED WARRANTY IMPORTANT: You must be free from defects in workmanship and material, under warranty. Accordingly, the above limitation may not apply...customerʼs responsibility. Parts and labor are limited in USA © 2010 ICON IP, Inc. damages with the use or performance of this manual) • the key number and description of the replacement part(s) (see the front cover of the product; The warranty extended hereunder is ...
... by ICON. ORDERING REPLACEMENT PARTS To order replacement parts, please see the PART LIST and the EXPLODED DRAWING near the end of this manual) LIMITED WARRANTY IMPORTANT: You must be free from defects in workmanship and material, under warranty. Accordingly, the above limitation may not apply...customerʼs responsibility. Parts and labor are limited in USA © 2010 ICON IP, Inc. damages with the use or performance of this manual) • the key number and description of the replacement part(s) (see the front cover of the product; The warranty extended hereunder is ...


