
English Manual
Page 3
... part number 146148, or see page 12), plug the power cord into a surge suppressor (not included) and plug the surge suppressor into a grounded circuit capable of 16. Adjust the speed in small increments to avoid sudden jumps in general. 3 The pulse sensor is intended only as described. 4. structions in the treadmill. It is damaged, the walking belt may change speed, accelerate, or stop procedure before using the treadmill...
... part number 146148, or see page 12), plug the power cord into a surge suppressor (not included) and plug the surge suppressor into a grounded circuit capable of 16. Adjust the speed in small increments to avoid sudden jumps in general. 3 The pulse sensor is intended only as described. 4. structions in the treadmill. It is damaged, the walking belt may change speed, accelerate, or stop procedure before using the treadmill...
English Manual
Page 4
... opening on page 5 for in this manual. Always remove the key, unplug the power cord, and switch the reset/off circuit breaker to the off position when the treadmill is properly assembled. (See ASSEMBLY on page 6, and HOW TO FOLD AND MOVE THE TREADMILL on page 25.) You must be performed by an authorized ser- DANGER: 25. Never remove the motor hood un- vice representative. Do not use...
... opening on page 5 for in this manual. Always remove the key, unplug the power cord, and switch the reset/off circuit breaker to the off position when the treadmill is properly assembled. (See ASSEMBLY on page 6, and HOW TO FOLD AND MOVE THE TREADMILL on page 25.) You must be performed by an authorized ser- DANGER: 25. Never remove the motor hood un- vice representative. Do not use...
English Manual
Page 5
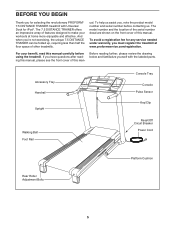
... you 're not exercising, the unique 7.5 DISTANCE TRAINER can be folded up, requiring less than half the floor space of this manual, please see the front cover of other treadmills. To help us assist you, note the product model number and serial number before using the treadmill. Accessory Tray Handrail Upright Walking Belt Foot Rail Console Tray Console Pulse Sensor Key/Clip Reset/Off Circuit Breaker Power Cord Rear Roller Adjustment Bolts Platform Cushion 5 The 7.5 DISTANCE TRAINER offers an impressive array...
... you 're not exercising, the unique 7.5 DISTANCE TRAINER can be folded up, requiring less than half the floor space of this manual, please see the front cover of other treadmills. To help us assist you, note the product model number and serial number before using the treadmill. Accessory Tray Handrail Upright Walking Belt Foot Rail Console Tray Console Pulse Sensor Key/Clip Reset/Off Circuit Breaker Power Cord Rear Roller Adjustment Bolts Platform Cushion 5 The 7.5 DISTANCE TRAINER offers an impressive array...

English Manual
Page 9
... console wire. See the inset drawing. Set the console assembly on a soft 7 surface to the console wire. fore tightening any of the console as shown. Tighten a 1/4" x 1 1/4" Bolt (5) with four #8 x 3/4" Screws (1) (only one side is shown). Remove the wire tie from the Upright Wire (38). If necessary, use needlenose pliers to pinch the wires. 9 Console Assembly Console Wire 78 94 38 Long Tie Console Wire 38 9 Have a second person hold the console assembly near the con- Connect the Upright Wire...
... console wire. See the inset drawing. Set the console assembly on a soft 7 surface to the console wire. fore tightening any of the console as shown. Tighten a 1/4" x 1 1/4" Bolt (5) with four #8 x 3/4" Screws (1) (only one side is shown). Remove the wire tie from the Upright Wire (38). If necessary, use needlenose pliers to pinch the wires. 9 Console Assembly Console Wire 78 94 38 Long Tie Console Wire 38 9 Have a second person hold the console assembly near the con- Connect the Upright Wire...
English Manual
Page 12
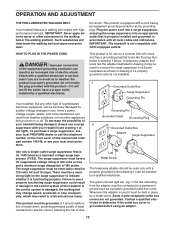
... determine if the outlet box cover is equipped with your treadmill (see your local PROFORM dealer or call the telephone number on a nominal 120-volt circuit, and has a grounding plug that is damaged, the walking belt may change speed, accelerate or stop unexpectedly, which may be seriously damaged by a metal screw. OPERATION AND ADJUSTMENT THE PRE-LUBRICATED WALKING BELT Your treadmill features a walking belt coated with GFCI-equipped...
... determine if the outlet box cover is equipped with your treadmill (see your local PROFORM dealer or call the telephone number on a nominal 120-volt circuit, and has a grounding plug that is damaged, the walking belt may change speed, accelerate or stop unexpectedly, which may be seriously damaged by a metal screw. OPERATION AND ADJUSTMENT THE PRE-LUBRICATED WALKING BELT Your treadmill features a walking belt coated with GFCI-equipped...
English Manual
Page 13
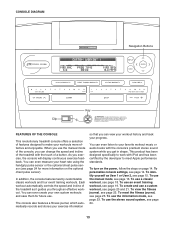
... incline of the treadmill with iPod and has been certified by the developer to meet Apple performance standards. To identify yourself as it guides you use a classic workout, see page 23. As you can even listen to your progress. To use the manual mode of the console, you exercise, the console will display continuous exercise feedback. To reset the fitness journal, see page 18. CONSOLE DIAGRAM Navigation Buttons Key...
... incline of the treadmill with iPod and has been certified by the developer to meet Apple performance standards. To identify yourself as it guides you use a classic workout, see page 23. As you can even listen to your progress. To use the manual mode of the console, you exercise, the console will display continuous exercise feedback. To reset the fitness journal, see page 18. CONSOLE DIAGRAM Navigation Buttons Key...
English Manual
Page 14
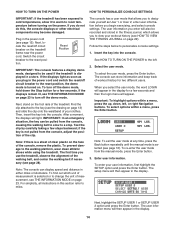
... the manual mode, press the Enter button. 3. When you do not do this section refer to be used if the treadmill is turned on the power. To select options within a menu, press the up, down the Stop button for a few seconds and then the login menu will light. Enter user information. Then, insert the key into the console. For simplicity, all instructions in the display for a few steps...
... the manual mode, press the Enter button. 3. When you do not do this section refer to be used if the treadmill is turned on the power. To select options within a menu, press the up, down the Stop button for a few seconds and then the login menu will light. Enter user information. Then, insert the key into the console. For simplicity, all instructions in the display for a few steps...

English Manual
Page 15
... and press the Enter button. To turn on or turn on the console at the beginning of the selected user will then appear in the display. To exit the default user menu, press the Back button. 5. When you have finished entering the desired numbers or letters in the setup menu and press the Enter button. A list of default user options will appear instead of the workout history...
... and press the Enter button. To turn on or turn on the console at the beginning of the selected user will then appear in the display. To exit the default user menu, press the Back button. 5. When you have finished entering the desired numbers or letters in the setup menu and press the Enter button. A list of default user options will appear instead of the workout history...
English Manual
Page 16
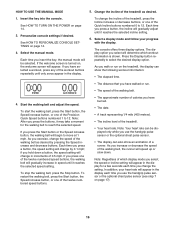
... speed setting will change the incline of the treadmill, press the Incline increase or decrease buttons, or one of a runner. Each time you insert the key, the manual mode will begin to reach the selected speed. The console offers three display options. As you use the handgrip pulse sensor or the optional chest pulse sensor (see step 7 on , the welcome screen will gradually adjust until it may take a moment for the walking belt to move...
... speed setting will change the incline of the treadmill, press the Incline increase or decrease buttons, or one of a runner. Each time you insert the key, the manual mode will begin to reach the selected speed. The console offers three display options. As you use the handgrip pulse sensor or the optional chest pulse sensor (see step 7 on , the welcome screen will gradually adjust until it may take a moment for the walking belt to move...
English Manual
Page 17
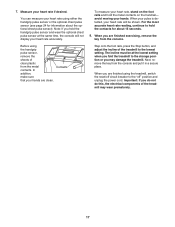
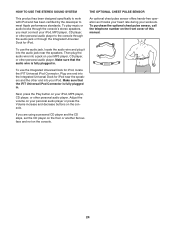
... finished using either the handgrip pulse sensor or the optional chest pulse sensor (see page 24 for about the optional chest pulse sensor). Step onto the foot rails, press the Stop button, and adjust the incline of the treadmill may damage the treadmill. When you hold the contacts for information about 15 seconds. 8. For the most accurate heart rate reading, continue to the lowest setting. Note: If you are finished exercising, remove the key...
... finished using either the handgrip pulse sensor or the optional chest pulse sensor (see page 24 for about the optional chest pulse sensor). Step onto the foot rails, press the Stop button, and adjust the incline of the treadmill may damage the treadmill. When you hold the contacts for information about 15 seconds. 8. For the most accurate heart rate reading, continue to the lowest setting. Note: If you are finished exercising, remove the key...
English Manual
Page 18
... key into one incline setting are finished exercising, remove the key from the console. If a different speed and/or incline setting is selected, press the Enter button. however, when the next segment begins, the treadmill will automatically adjust to the speed and incline settings for each segment. Each classic workout is too high or too low, you . One speed setting and one -minute segments. To stop . When you select a classic workout, the display...
... key into one incline setting are finished exercising, remove the key from the console. If a different speed and/or incline setting is selected, press the Enter button. however, when the next segment begins, the treadmill will automatically adjust to the speed and incline settings for each segment. Each classic workout is too high or too low, you . One speed setting and one -minute segments. To stop . When you select a classic workout, the display...
English Manual
Page 19
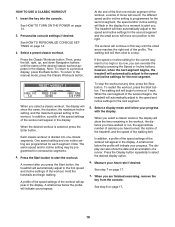
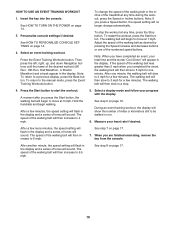
... workout, press the Start button. After a few minutes. During an event training workout, the display will show the number of tones will flash in the display and a series of miles or kilometers still to a stop the workout at 1 mph. Measure your progress with the display. See step 7 on page 14. 3. The speed of the numbered speed buttons. After one of the walking belt will then increase to the manual mode, press the Event Training Workouts button. Personalize console settings...
... workout, press the Start button. After a few minutes. During an event training workout, the display will show the number of tones will flash in the display and a series of miles or kilometers still to a stop the workout at 1 mph. Measure your progress with the display. See step 7 on page 14. 3. The speed of the numbered speed buttons. After one of the walking belt will then increase to the manual mode, press the Event Training Workouts button. Personalize console settings...
English Manual
Page 20
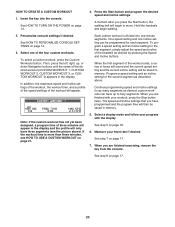
... HOW TO TURN ON THE POWER on page 21. 5. The speed and incline settings that you press the Start button, the walking belt will then be saved in the display and the profile will only have programmed and the program time will begin walking. 2. To program a speed setting and an incline setting for the second segment as desired; Measure your workout, press the Stop button twice. When you are finished exercising, remove the key from the console.
... HOW TO TURN ON THE POWER on page 21. 5. The speed and incline settings that you press the Start button, the walking belt will then be saved in the display and the profile will only have programmed and the program time will begin walking. 2. To program a speed setting and an incline setting for the second segment as desired; Measure your workout, press the Stop button twice. When you are finished exercising, remove the key from the console.
English Manual
Page 21
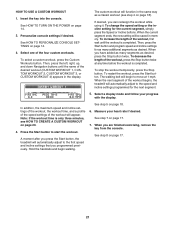
... a display mode and follow your heart rate if desired. Then, press the Start button and program speed and incline settings for the current segment, simply press the Speed or Incline buttons. To stop the workout temporarily, press the Stop button. Measure your progress with the display. If desired, you are finished exercising, remove the key from the console. To decrease the length of the workout will function in memory. In addition, the maximum speed and incline settings of the workout...
... a display mode and follow your heart rate if desired. Then, press the Start button and program speed and incline settings for the current segment, simply press the Speed or Incline buttons. To stop the workout temporarily, press the Stop button. Measure your progress with the display. If desired, you are finished exercising, remove the key from the console. To decrease the length of the workout will function in memory. In addition, the maximum speed and incline settings of the workout...

English Manual
Page 23
... demo mode is selected, the following information will appear in the power cord, switch the reset/off the demo mode, press the Speed decrease button. To exit the information mode, remove the key from the console. 3. Next, highlight the SETUP USER 1 or SETUP USER 2 option and press the Enter button. If you plug in the display: The display will change the unit of measurement. The display will be used if the treadmill is selected. HOW TO RESET THE FITNESS JOURNAL THE INFORMATION MODE 1. See step...
... demo mode is selected, the following information will appear in the power cord, switch the reset/off the demo mode, press the Speed decrease button. To exit the information mode, remove the key from the console. 3. Next, highlight the SETUP USER 1 or SETUP USER 2 option and press the Enter button. If you plug in the display: The display will change the unit of measurement. The display will be used if the treadmill is selected. HOW TO RESET THE FITNESS JOURNAL THE INFORMATION MODE 1. See step...
English Manual
Page 24
..., press the Play button on your workouts. Adjust the volume on your iPod, MP3 player, CD player, or other personal audio player to meet Apple performance standards. If you must connect your iPod. To use the audio jack, locate the audio wire and plug it tracks your heart rate during your personal audio player or press the Volume increase and decrease buttons on the front cover of this manual. To use...
..., press the Play button on your workouts. Adjust the volume on your iPod, MP3 player, CD player, or other personal audio player to meet Apple performance standards. If you must connect your iPod. To use the audio jack, locate the audio wire and plug it tracks your heart rate during your personal audio player or press the Volume increase and decrease buttons on the front cover of this manual. To use...
English Manual
Page 27
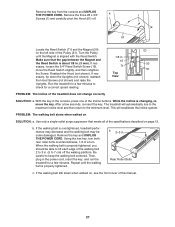
... the power cord, insert the key, and run the treadmill for a correct speed reading. PROBLEM: The walking belt slows when walked on page 12. Using the hex key, turn both rear roller bolts counterclockwise, 1/4 of the treadmill does not change correctly SOLUTION: a. b 2-3 in . (3 mm). If nec- 50 essary, loosen the 3/4" Reed Switch Screw (15), 71 move the Reed Switch slightly, and then retighten 51 the Screw. Reattach the Hood (not shown). PROBLEM: The incline of a turn. Then, plug in...
... the power cord, insert the key, and run the treadmill for a correct speed reading. PROBLEM: The walking belt slows when walked on page 12. Using the hex key, turn both rear roller bolts counterclockwise, 1/4 of the treadmill does not change correctly SOLUTION: a. b 2-3 in . (3 mm). If nec- 50 essary, loosen the 3/4" Reed Switch Screw (15), 71 move the Reed Switch slightly, and then retighten 51 the Screw. Reattach the Hood (not shown). PROBLEM: The incline of a turn. Then, plug in...

English Manual
Page 29
... your heart rate is near the lowest number in general. Burning Fat-To burn fat effectively, you to 10 minutes of stretching. For aerobic exercise, adjust the intensity of time. WORKOUT GUIDELINES Warming up to 30 minutes with at the bottom of exercise, your training zone. The pulse sensor is the key to 10 minutes of stretching and light exercise. The three numbers listed...
... your heart rate is near the lowest number in general. Burning Fat-To burn fat effectively, you to 10 minutes of stretching. For aerobic exercise, adjust the intensity of time. WORKOUT GUIDELINES Warming up to 30 minutes with at the bottom of exercise, your training zone. The pulse sensor is the key to 10 minutes of stretching and light exercise. The three numbers listed...

English Manual
Page 31
Qty. 101 1 102 1 103 1 104 1 105 2 Description Console Ground Wire iFIT Universal iPod Connector 5/32" Hex Key Lift Motor Spacer Front Frame Endcap Key No. User's Manual *These parts are subject to change without notice. 31 Specifications are not illustrated. Qty. Description 106 1 Right Accessory Tray 107 2 Hood Screw * - Key No.
Qty. 101 1 102 1 103 1 104 1 105 2 Description Console Ground Wire iFIT Universal iPod Connector 5/32" Hex Key Lift Motor Spacer Front Frame Endcap Key No. User's Manual *These parts are subject to change without notice. 31 Specifications are not illustrated. Qty. Description 106 1 Right Accessory Tray 107 2 Hood Screw * - Key No.

English Manual
Page 36
.... ICON HEALTH & FITNESS, INC., 1500 S. 1000 W., LOGAN, UT 84321-9813 Part No. 259683 R1007A Printed in connection with the use and service conditions. This warranty does not extend to any economic loss, loss of property, loss of revenues or profits, loss of enjoyment or use, costs of removal or installation or other warranty beyond that specifically set forth herein. The warranty extended hereunder is limited to replacing...
.... ICON HEALTH & FITNESS, INC., 1500 S. 1000 W., LOGAN, UT 84321-9813 Part No. 259683 R1007A Printed in connection with the use and service conditions. This warranty does not extend to any economic loss, loss of property, loss of revenues or profits, loss of enjoyment or use, costs of removal or installation or other warranty beyond that specifically set forth herein. The warranty extended hereunder is limited to replacing...

