
Uk Manual
Page 1
... instructions in this manual before using this manual for future reference. PETL59021 Serial No. If you have questions, or if there are committed to providing complete customer satisfaction. USER'S MANUAL Visit our website at www.iconeurope.com Serial Number Decal QUESTIONS? Save this equipment. As a manufacturer, we are missing or damaged parts, please call: 08457 089 009 Or write: ICON Health & Fitness, Ltd. Model...
... instructions in this manual before using this manual for future reference. PETL59021 Serial No. If you have questions, or if there are committed to providing complete customer satisfaction. USER'S MANUAL Visit our website at www.iconeurope.com Serial Number Decal QUESTIONS? Save this equipment. As a manufacturer, we are missing or damaged parts, please call: 08457 089 009 Or write: ICON Health & Fitness, Ltd. Model...

Uk Manual
Page 2
TABLE OF CONTENTS IMPORTANT PRECAUTIONS 3 BEFORE YOU BEGIN 5 ASSEMBLY 6 OPERATION AND ADJUSTMENT 9 HOW TO FOLD AND MOVE THE TREADMILL 13 TROUBLESHOOTING 15 CONDITIONING GUIDELINES 17 ORDERING REPLACEMENT PARTS Back Cover Note: An EXPLODED DRAWING and a PART LIST are attached in the centre of ICON Health & Fitness, Inc. 2 PROFORM is registered trademark of this manual.
TABLE OF CONTENTS IMPORTANT PRECAUTIONS 3 BEFORE YOU BEGIN 5 ASSEMBLY 6 OPERATION AND ADJUSTMENT 9 HOW TO FOLD AND MOVE THE TREADMILL 13 TROUBLESHOOTING 15 CONDITIONING GUIDELINES 17 ORDERING REPLACEMENT PARTS Back Cover Note: An EXPLODED DRAWING and a PART LIST are attached in the centre of ICON Health & Fitness, Inc. 2 PROFORM is registered trademark of this manual.
Uk Manual
Page 3
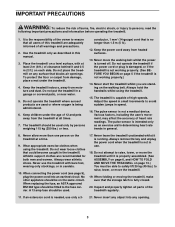
... replacing the fuse, an ASTA approved BS1362 type should be fitted to avoid sudden jumps in general. 8. Use the treadmill only as an exercise aid in determining heart rate trends in speed. 16. Do not put the treadmill in sandals. 10. Never move the walking belt whilst the power is needed, use . 18. Wear appropriate exercise clothes when using the treadmill. 15. Always remove the key and unplug the power cord when...
... replacing the fuse, an ASTA approved BS1362 type should be fitted to avoid sudden jumps in general. 8. Use the treadmill only as an exercise aid in determining heart rate trends in speed. 16. Do not put the treadmill in sandals. 10. Never move the walking belt whilst the power is needed, use . 18. Wear appropriate exercise clothes when using the treadmill. 15. Always remove the key and unplug the power cord when...
Uk Manual
Page 4
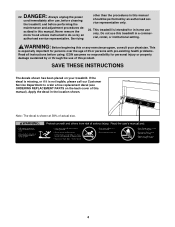
... this manual. scribed in this or any exercise program, consult your treadmill. DANGER: 22. Servicing other than the procedures in -home use this product. Do not use only. SAVE THESE INSTRUCTIONS The decals shown has been placed on the back cover of actual size. 4 Note: The decal is intended for in this manual). Never remove the motor hood unless instructed to order a free replacement decal (see ORDERING REPLACEMENT PARTS on...
... this manual. scribed in this or any exercise program, consult your treadmill. DANGER: 22. Servicing other than the procedures in -home use this product. Do not use only. SAVE THESE INSTRUCTIONS The decals shown has been placed on the back cover of actual size. 4 Note: The decal is intended for in this manual). Never remove the motor hood unless instructed to order a free replacement decal (see ORDERING REPLACEMENT PARTS on...
Uk Manual
Page 5
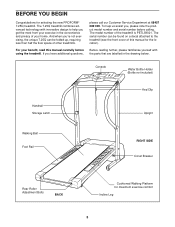
... exercising, the unique 7.25Q can be folded up, requiring less than half the floor space of your benefit, read this manual for the location). BEFORE YOU BEGIN Congratulations for maximum exercise comfort Incline Leg 5 Console Water Bottle Holder (Bottle not included) Handrail Storage Latch Key/Clip Upright Walking Belt Foot Rail RIGHT SIDE Circuit Breaker Rear Roller Adjustment Bolts BACK Cushioned Walking Platform for selecting the new PROFORM® 7.25Q treadmill. For your home. The serial number...
... exercising, the unique 7.25Q can be folded up, requiring less than half the floor space of your benefit, read this manual for the location). BEFORE YOU BEGIN Congratulations for maximum exercise comfort Incline Leg 5 Console Water Bottle Holder (Bottle not included) Handrail Storage Latch Key/Clip Upright Walking Belt Foot Rail RIGHT SIDE Circuit Breaker Rear Roller Adjustment Bolts BACK Cushioned Walking Platform for selecting the new PROFORM® 7.25Q treadmill. For your home. The serial number...
Uk Manual
Page 6
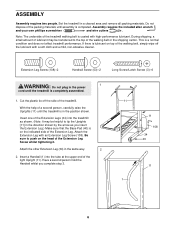
Extension Leg Screw (108)-2 Handrail Screw (53)-2 Long Screw/Latch Screw (3)-6 WARNING: Do not plug in a cleared area and remove all packing materials. Be sure to push on the head of the treadmill. Assembly requires the included allen wrench and your own phillips screwdriver and wire cutters . During shipping, a small amount of lubricant may be transferred to tip the Uprights [11] in the direction shown...
Extension Leg Screw (108)-2 Handrail Screw (53)-2 Long Screw/Latch Screw (3)-6 WARNING: Do not plug in a cleared area and remove all packing materials. Be sure to push on the head of the treadmill. Assembly requires the included allen wrench and your own phillips screwdriver and wire cutters . During shipping, a small amount of lubricant may be transferred to tip the Uprights [11] in the direction shown...
Uk Manual
Page 7
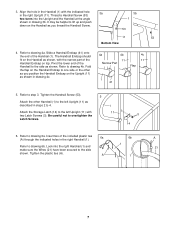
...steps 2 to 4. 5 1 Attach the Storage Latch (14) to the left Upright (11) as shown. A 1 7 The Handrail Endcap should fit on the Handrail as shown, with the indicated hole 3a in drawing 3b. Refer to drawing 6b. Look into the Upright and the Handrail at the angle shown in the right Upright (11). Tighten the plastic ties (A). Fold...the other Handrail (1) to drawing 4b. Attach the other as you position the Handrail Endcap on top. Thread a Handrail Screw (53) two turns into the right Handrail (1) and 21 make sure the Wires (21) have been secured to drawing ...
...steps 2 to 4. 5 1 Attach the Storage Latch (14) to the left Upright (11) as shown. A 1 7 The Handrail Endcap should fit on the Handrail as shown, with the indicated hole 3a in drawing 3b. Refer to drawing 6b. Look into the Upright and the Handrail at the angle shown in the right Upright (11). Tighten the plastic ties (A). Fold...the other Handrail (1) to drawing 4b. Attach the other as you position the Handrail Endcap on top. Thread a Handrail Screw (53) two turns into the right Handrail (1) and 21 make sure the Wires (21) have been secured to drawing ...
Uk Manual
Page 8
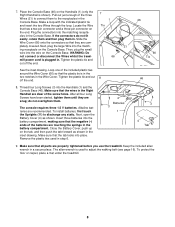
.... pletely covered. Thread four Long Screws (3) into the battery compartment, making sure that has a two-pin connector and a three-pin connector on the Console Base. To protect the floor or carpet, place a mat under the treadmill. 8 After all parts are properly tightened before you use the treadmill. Remove the plastic ties used to discharge any static. To install batteries, first touch the Uprights (11) to adjust the walking belt...
.... pletely covered. Thread four Long Screws (3) into the battery compartment, making sure that has a two-pin connector and a three-pin connector on the Console Base. To protect the floor or carpet, place a mat under the treadmill. 8 After all parts are properly tightened before you use the treadmill. Remove the plastic ties used to discharge any static. To install batteries, first touch the Uprights (11) to adjust the walking belt...
Uk Manual
Page 9
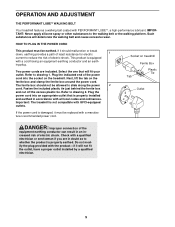
...-performance lubricant. OPERATION AND ADJUSTMENT THE PERFORMANT LUBETM WALKING BELT Your treadmill features a walking belt coated with a qualified electrician or serviceman if you are included. Select the one that is equipped with a manufacturer-recommended power cord. This product is properly installed and earthed in an increased risk of electric shock. Next, lift the tab on the treadmill. DANGER: Improper connection of the power cord...
...-performance lubricant. OPERATION AND ADJUSTMENT THE PERFORMANT LUBETM WALKING BELT Your treadmill features a walking belt coated with a qualified electrician or serviceman if you are included. Select the one that is equipped with a manufacturer-recommended power cord. This product is properly installed and earthed in an increased risk of electric shock. Next, lift the tab on the treadmill. DANGER: Improper connection of the power cord...
Uk Manual
Page 10
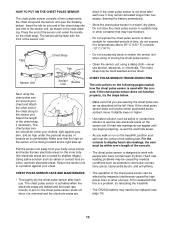
... the walking belt. Pull the sensor unit away from your skin, and as is put on the chest strap. For the console to work with the console. Tabs Chest Strap Tab dried. The chest strap may be replaced (see the drawing below). the chest pulse sensor shuts off when it to direct sunlight for extended periods of two components: the chest strap and the sensor unit (see page 16). 10 Using...
... the walking belt. Pull the sensor unit away from your skin, and as is put on the chest strap. For the console to work with the console. Tabs Chest Strap Tab dried. The chest strap may be replaced (see the drawing below). the chest pulse sensor shuts off when it to direct sunlight for extended periods of two components: the chest strap and the sensor unit (see page 16). 10 Using...
Uk Manual
Page 11
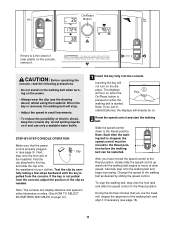
... the Key On/Reset button is pressed or when the walking belt is stopped, the speed control must be moved to move at slow speed. Next, Clip step onto the foot rails of your clothes. STEP-BY-STEP CONSOLE OPERATION Make sure that you use only a sealable water bottle. fully taking a few minutes that the power cord is properly plugged in (see page 9). The displays will turn on . 2 Reset the speed control and start the walking belt. Carefully step...
... the Key On/Reset button is pressed or when the walking belt is stopped, the speed control must be moved to move at slow speed. Next, Clip step onto the foot rails of your clothes. STEP-BY-STEP CONSOLE OPERATION Make sure that you use only a sealable water bottle. fully taking a few minutes that the power cord is properly plugged in (see page 9). The displays will turn on . 2 Reset the speed control and start the walking belt. Carefully step...
Uk Manual
Page 12
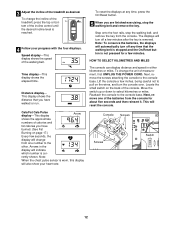
... change from one of the treadmill as desired. Locate the small switch on the wires, and turn the console over. Next, remove one number to the other. Distance display- Cals/Fat Cals/Pulse display-This display Arrow shows the approximate numbers of the console. Note: When the chest pulse sensor is worn, this display will automatically turn off any time, press the On/Reset button. 5 When you are finished exercising, stop the walking belt, and remove the key from the console...
... change from one of the treadmill as desired. Locate the small switch on the wires, and turn the console over. Next, remove one number to the other. Distance display- Cals/Fat Cals/Pulse display-This display Arrow shows the approximate numbers of the console. Note: When the chest pulse sensor is worn, this display will automatically turn off any time, press the On/Reset button. 5 When you are finished exercising, stop the walking belt, and remove the key from the console...
Uk Manual
Page 13
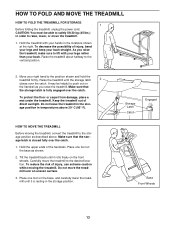
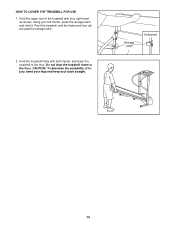
... injury, use extreme caution whilst moving the treadmill, convert the treadmill to the position shown and hold the treadmill firmly. Tilt the treadmill back until it rolls freely on the base as described above 30° C (85° F). Storage Latch Catch Engaged Base Front Wheels 13 HOW TO FOLD AND MOVE THE TREADMILL HOW TO FOLD THE TREADMILL FOR STORAGE 1 Before folding the treadmill, unplug the power cord.
... injury, use extreme caution whilst moving the treadmill, convert the treadmill to the position shown and hold the treadmill firmly. Tilt the treadmill back until it rolls freely on the base as described above 30° C (85° F). Storage Latch Catch Engaged Base Front Wheels 13 HOW TO FOLD AND MOVE THE TREADMILL HOW TO FOLD THE TREADMILL FOR STORAGE 1 Before folding the treadmill, unplug the power cord.
Uk Manual
Page 14
Hold the treadmill firmly with your right hand as shown. Using your back straight. Do not drop the treadmill frame to the floor. Storage Latch Unlatched 14 CAUTION: To decrease the possibility of the treadmill with both hands, and lower the treadmill to the floor. HOW TO LOWER THE TREADMILL FOR USE 1. Pivot the treadmill until the frame and foot rail are past the storage latch. 2. Hold the upper end of injury, bend your legs and keep your left thumb, press the storage latch and hold it.
Hold the treadmill firmly with your right hand as shown. Using your back straight. Do not drop the treadmill frame to the floor. Storage Latch Unlatched 14 CAUTION: To decrease the possibility of the treadmill with both hands, and lower the treadmill to the floor. HOW TO LOWER THE TREADMILL FOR USE 1. Pivot the treadmill until the frame and foot rail are past the storage latch. 2. Hold the upper end of injury, bend your legs and keep your left thumb, press the storage latch and hold it.
Uk Manual
Page 15
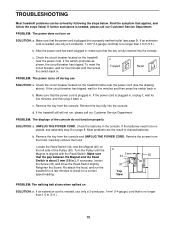
... five minutes and then press the switch back in the console. Remove the key from the console and UNPLUG THE POWER CORD. Check the batteries in . Turn the Pulley until the Magnet is plugged in. If necessary, loosen the Screw (33) and move the Reed Switch slightly. PROBLEM: The power does not turn on SOLUTION: a. Check the circuit breaker located on the treadmill frame near the power cord. To reset the circuit breaker, wait...
... five minutes and then press the switch back in the console. Remove the key from the console and UNPLUG THE POWER CORD. Check the batteries in . Turn the Pulley until the Magnet is plugged in. If necessary, loosen the Screw (33) and move the Reed Switch slightly. PROBLEM: The power does not turn on SOLUTION: a. Check the circuit breaker located on the treadmill frame near the power cord. To reset the circuit breaker, wait...
Uk Manual
Page 16
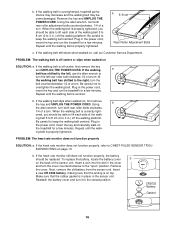
... key and run the treadmill for a few minutes. PROBLEM: The walking belt is properly tightened, you should be able to lift each side of the walking belt 5 to 8 cm (2 to CHEST PULSE SENSOR TROUBLESHOOTING on , call our Customer Service Department. Be careful not to keep the walking belt centred. If the walking belt slips when walked on SOLUTION: a. ing belt 5 to 8 cm (2 to turn the left rear roller bolt clockwise 1/2 of the walk- To replace the battery, locate...
... key and run the treadmill for a few minutes. PROBLEM: The walking belt is properly tightened, you should be able to lift each side of the walking belt 5 to 8 cm (2 to CHEST PULSE SENSOR TROUBLESHOOTING on , call our Customer Service Department. Be careful not to keep the walking belt centred. If the walking belt slips when walked on SOLUTION: a. ing belt 5 to 8 cm (2 to turn the left rear roller bolt clockwise 1/2 of the walk- To replace the battery, locate...
Uk Manual
Page 17
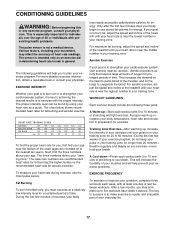
..., your movement, may complete up -Start each week, with the proper intensity. The three numbers define your exercise program. The following three parts: A Warm-up to burn fat, adjust the speed and incline of the treadmill until your heart rate is near the bottom of time. If your goal is to five workouts each workout with preexisting health problems. The pulse sensor is not a medical device. Next...
..., your movement, may complete up -Start each week, with the proper intensity. The three numbers define your exercise program. The following three parts: A Warm-up to burn fat, adjust the speed and incline of the treadmill until your heart rate is near the bottom of time. If your goal is to five workouts each workout with preexisting health problems. The pulse sensor is not a medical device. Next...
Uk Manual
Page 20
... MODEL NUMBER of the product (PETL59021) • the NAME of the product (PROFORM® 7.25Q treadmill) • the SERIAL NUMBER of the product (see the front cover of this manual) • the KEY NUMBER and the DESCRIPTION of the part(s) (see the PART LIST and the EXPLODED DRAWING attached in the centre of this manual) Part No. 183798 R0902A Printed in Canada © 2002 ICON Health & Fitness, Inc. ORDERING REPLACEMENT PARTS To...
... MODEL NUMBER of the product (PETL59021) • the NAME of the product (PROFORM® 7.25Q treadmill) • the SERIAL NUMBER of the product (see the front cover of this manual) • the KEY NUMBER and the DESCRIPTION of the part(s) (see the PART LIST and the EXPLODED DRAWING attached in the centre of this manual) Part No. 183798 R0902A Printed in Canada © 2002 ICON Health & Fitness, Inc. ORDERING REPLACEMENT PARTS To...
Uk Manual
Page 21
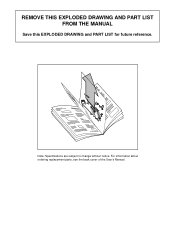
Note: Specifications are subject to change without notice. For information about ordering replacement parts, see the back cover of the User's Manual. 34 REMOVE THIS EXPLODED DRAWING AND PART LIST FROM THE MANUAL Save this EXPLODED DRAWING and PART LIST for future reference.
Note: Specifications are subject to change without notice. For information about ordering replacement parts, see the back cover of the User's Manual. 34 REMOVE THIS EXPLODED DRAWING AND PART LIST FROM THE MANUAL Save this EXPLODED DRAWING and PART LIST for future reference.
Uk Manual
Page 22
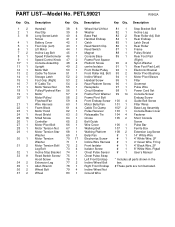
... Wire Power Cord Set Console Screw/ Endcap Screw Guide Belt Screw Filter Wires Base Leg Assembly Console Base Cover Fastener Short Console Screw Pulse Bar Ferrite Box Extension Leg Screw 14" White Wire 4" White Wire, 2F 4" Green Wire, F/ring 4" Black Wire, 2F 8" White Wire, Pigtail User's Manual * Includes all parts shown in the box. # These parts are not illustrated. Handrail 38 6 Key/Clip 39 5 Long Screw/Latch 40 4 Screw 41 2 Battery Cover 42 1 Foot Grip (Left) 43 1 Lift Motor 44 1 Incline Leg Bolt 45 1 Speed Potentiometer 46 1 Speed Control Knob 47 2 Console Assembly...
... Wire Power Cord Set Console Screw/ Endcap Screw Guide Belt Screw Filter Wires Base Leg Assembly Console Base Cover Fastener Short Console Screw Pulse Bar Ferrite Box Extension Leg Screw 14" White Wire 4" White Wire, 2F 4" Green Wire, F/ring 4" Black Wire, 2F 8" White Wire, Pigtail User's Manual * Includes all parts shown in the box. # These parts are not illustrated. Handrail 38 6 Key/Clip 39 5 Long Screw/Latch 40 4 Screw 41 2 Battery Cover 42 1 Foot Grip (Left) 43 1 Lift Motor 44 1 Incline Leg Bolt 45 1 Speed Potentiometer 46 1 Speed Control Knob 47 2 Console Assembly...

