

English Manual
Page 1
... contacting Customer Care. Serial Number Decal QUESTIONS? USER'S MANUAL MT ON THE WEB: www.proformservice.com CAUTION Read all precautions and instructions in the space above for iPod® www.proform.com Model No. PFTL06009.0 Serial No. please contact Customer Care. MT Sat. 8 a.m.-4 p.m. If you have questions, or if parts are...-FREE: 1-888-533-1333 Mon.-Fri. 6 a.m.-6 p.m. Save this equipment. IMPORTANT: Please register this product (see the limited warranty on the back cover of this manual) before using this manual for future reference. With Universal Dock for reference.
... contacting Customer Care. Serial Number Decal QUESTIONS? USER'S MANUAL MT ON THE WEB: www.proformservice.com CAUTION Read all precautions and instructions in the space above for iPod® www.proform.com Model No. PFTL06009.0 Serial No. please contact Customer Care. MT Sat. 8 a.m.-4 p.m. If you have questions, or if parts are...-FREE: 1-888-533-1333 Mon.-Fri. 6 a.m.-6 p.m. Save this equipment. IMPORTANT: Please register this product (see the limited warranty on the back cover of this manual) before using this manual for future reference. With Universal Dock for reference.

English Manual
Page 2
PROFORM is missing or illegible, see the front cover of Apple Computer, Inc., registered in the location shown. Note: The decals may not be shown at actual size. Apply the decal in the U.S. and other countries 2 iPod is a trademark of this manual and request a free ...replacement decal. If a decal is a registered trademark of the warning decals. TABLE OF CONTENTS WARNING DECAL PLACEMENT 2 IMPORTANT PRECAUTIONS 3 BEFORE YOU BEGIN 5 ASSEMBLY 6 OPERATION AND ADJUSTMENT 12 HOW TO FOLD AND MOVE THE TREADMILL 21 TROUBLESHOOTING 22 ...
PROFORM is missing or illegible, see the front cover of Apple Computer, Inc., registered in the location shown. Note: The decals may not be shown at actual size. Apply the decal in the U.S. and other countries 2 iPod is a trademark of this manual and request a free ...replacement decal. If a decal is a registered trademark of the warning decals. TABLE OF CONTENTS WARNING DECAL PLACEMENT 2 IMPORTANT PRECAUTIONS 3 BEFORE YOU BEGIN 5 ASSEMBLY 6 OPERATION AND ADJUSTMENT 12 HOW TO FOLD AND MOVE THE TREADMILL 21 TROUBLESHOOTING 22 ...

English Manual
Page 3
... warnings on the same circuit. To purchase a surge suppressor, see HOW TO TURN ON THE POWER on page 22 if the treadmill is capable of this manual and order part number 146148, or see page 12), plug the power cord into a surge suppressor (not included) and plug ... rate readings. When connecting the power cord (see your treadmill. Before beginning any surface that could result in sandals. 11. Do not operate the treadmill where aerosol products are standing on any exercise program, consult your local PROFORM dealer or call the telephone number on page 12. Never...
... warnings on the same circuit. To purchase a surge suppressor, see HOW TO TURN ON THE POWER on page 22 if the treadmill is capable of this manual and order part number 146148, or see page 12), plug the power cord into a surge suppressor (not included) and plug ... rate readings. When connecting the power cord (see your treadmill. Before beginning any surface that could result in sandals. 11. Do not operate the treadmill where aerosol products are standing on any exercise program, consult your local PROFORM dealer or call the telephone number on page 12. Never...

English Manual
Page 4
... nance and adjustment procedures described in the storage position. 23. Never remove the motor hood un- less instructed to the off position when the treadmill is not in this manual should be able to safely lift 45 lbs. (20 kg) to raise, lower, or move the... treadmill. 22. Do not attempt to raise, lower, or move the treadmill until it is held securely in this treadmill in -home use this manual. Do not use only. Never insert any object into any opening on the treadmill. 24. This treadmill is properly assembled. (See ASSEMBLY on ...
... nance and adjustment procedures described in the storage position. 23. Never remove the motor hood un- less instructed to the off position when the treadmill is not in this manual should be able to safely lift 45 lbs. (20 kg) to raise, lower, or move the... treadmill. 22. Do not attempt to raise, lower, or move the treadmill until it is held securely in this treadmill in -home use this manual. Do not use only. Never insert any object into any opening on the treadmill. 24. This treadmill is properly assembled. (See ASSEMBLY on ...

English Manual
Page 5
... PROFORM® 690 LT treadmill with the parts that are shown on the front cover of other treadmills. For your workouts at home more enjoyable and effective. Before reading further, please familiarize yourself with Universal Dock for iPod offers a selection of this manual.... serial number before using the treadmill. ing this manual carefully before contacting us assist you have questions after read this manual, please see the front cover of features designed to make your benefit, read - To help us . The 690 LT treadmill with Universal Dock for iPod...
... PROFORM® 690 LT treadmill with the parts that are shown on the front cover of other treadmills. For your workouts at home more enjoyable and effective. Before reading further, please familiarize yourself with Universal Dock for iPod offers a selection of this manual.... serial number before using the treadmill. ing this manual carefully before contacting us assist you have questions after read this manual, please see the front cover of features designed to make your benefit, read - To help us . The 690 LT treadmill with Universal Dock for iPod...
English Manual
Page 6
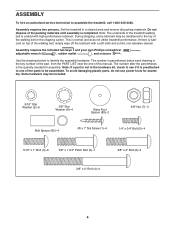
Assembly requires two persons. Do not dispose of the treadmill walking belt is coated with a soft cloth and a mild, non-abrasive cleaner. Use the drawings below each drawing is preattached to one of this manual. The number in the hardware kit, check to see if it is the key.... To avoid damaging plastic parts, do not use power tools for assembly. During shipping, some lubricant may be transferred to assemble the treadmill, call 1-800-445-2480. Assembly requires the included hex keys and your own Phillips screwdriver , adjustable wrench , rubber mallet , and scissors ....
Assembly requires two persons. Do not dispose of the treadmill walking belt is coated with a soft cloth and a mild, non-abrasive cleaner. Use the drawings below each drawing is preattached to one of this manual. The number in the hardware kit, check to see if it is the key.... To avoid damaging plastic parts, do not use power tools for assembly. During shipping, some lubricant may be transferred to assemble the treadmill, call 1-800-445-2480. Assembly requires the included hex keys and your own Phillips screwdriver , adjustable wrench , rubber mallet , and scissors ....

English Manual
Page 12
...system is grounded before using an adapter. 12 HOW TO PLUG IN THE POWER CORD DANGER: Improper connection of this manual and order part number 146148, or see your treadmill (see drawing 1 at the right). The green-colored rigid ear, lug, or the like the plug illustrated ...serviceman if you are not grounded. Voltage surges, spikes, and noise interference can be grounded. To purchase a surge suppressor, see your local PROFORM dealer or call the telephone number on the surge suppressor to whether the product is not compatible with all local codes and ordinances. This ...
...system is grounded before using an adapter. 12 HOW TO PLUG IN THE POWER CORD DANGER: Improper connection of this manual and order part number 146148, or see your treadmill (see drawing 1 at the right). The green-colored rigid ear, lug, or the like the plug illustrated ...serviceman if you are not grounded. Voltage surges, spikes, and noise interference can be grounded. To purchase a surge suppressor, see your local PROFORM dealer or call the telephone number on the surge suppressor to whether the product is not compatible with all local codes and ordinances. This ...
English Manual
Page 13
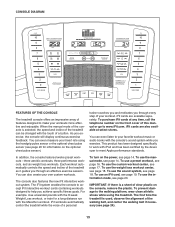
..., see page 24). 13 To prevent damage to meet Apple performance standards. CONSOLE DIAGRAM FEATURES OF THE CONSOLE The treadmill console offers an impressive array of this manual or go to www.iFit.com. As you achieve specific fitness goals. To purchase iFit cards at select stores. ...accept iFit interactive workout cards containing workouts designed to your workout. To use the manual mode, see page 18. When the manual mode of the console is selected, the speed and incline of the treadmill can even listen to help you exercise, the console will display continuous exercise feedback....
..., see page 24). 13 To prevent damage to meet Apple performance standards. CONSOLE DIAGRAM FEATURES OF THE CONSOLE The treadmill console offers an impressive array of this manual or go to www.iFit.com. As you achieve specific fitness goals. To purchase iFit cards at select stores. ...accept iFit interactive workout cards containing workouts designed to your workout. To use the manual mode, see page 18. When the manual mode of the console is selected, the speed and incline of the treadmill can even listen to help you exercise, the console will display continuous exercise feedback....

English Manual
Page 14
HOW TO TURN ON THE POWER HOW TO USE THE MANUAL MODE IMPORTANT: If the treadmill has been exposed to cold temperatures, allow it to warm to room temperature before turning on the treadmill frame near the power cord. See HOW TO TURN ON THE POWER at the right), and slide the clip securely... displays light as soon as desired. If you press the Start button or the Speed increase button, the walking belt will be used if the treadmill is not inserted into the iFit slot. 3. Next, locate the reset/off circuit breaker on the power. To turn off the demo mode, hold down...
HOW TO TURN ON THE POWER HOW TO USE THE MANUAL MODE IMPORTANT: If the treadmill has been exposed to cold temperatures, allow it to warm to room temperature before turning on the treadmill frame near the power cord. See HOW TO TURN ON THE POWER at the right), and slide the clip securely... displays light as soon as desired. If you press the Start button or the Speed increase button, the walking belt will be used if the treadmill is not inserted into the iFit slot. 3. Next, locate the reset/off circuit breaker on the power. To turn off the demo mode, hold down...

English Manual
Page 15
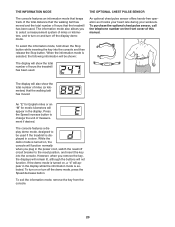
... handgrip pulse sensor and the chest pulse sensor at the lowest setting when you fold the treadmill to the lowest setting. Contacts tacts. In addi- tion, make sure that you select the manual mode, the matrix will also show the time remaining in succession. Monitor your hands are ...clean. The matrix-When you have burned, the incline of the walking belt. As you are finished using the handgrip pulse sensor, remove the sheets of the treadmill to the...
... handgrip pulse sensor and the chest pulse sensor at the lowest setting when you fold the treadmill to the lowest setting. Contacts tacts. In addi- tion, make sure that you select the manual mode, the matrix will also show the time remaining in succession. Monitor your hands are ...clean. The matrix-When you have burned, the incline of the walking belt. As you are finished using the handgrip pulse sensor, remove the sheets of the treadmill to the...

English Manual
Page 16
...settings. During the workout, the profile will show the name, duration, maximum speed setting, and maximum incline setting of the workout begins, the treadmill will automatically adjust to move at 1 mph. Each preset workout is too high or too low at any time during the workout, you ... will scroll across the matrix. The workout will automatically adjust to the speed and incline settings for the current segment. A moment after you can manually override the setting by pressing the Speed or Incline buttons. HOW TO USE A PRESET WORKOUT 1. See step 5 on page 14. 2. The ...
...settings. During the workout, the profile will show the name, duration, maximum speed setting, and maximum incline setting of the workout begins, the treadmill will automatically adjust to move at 1 mph. Each preset workout is too high or too low at any time during the workout, you ... will scroll across the matrix. The workout will automatically adjust to the speed and incline settings for the current segment. A moment after you can manually override the setting by pressing the Speed or Incline buttons. HOW TO USE A PRESET WORKOUT 1. See step 5 on page 14. 2. The ...

English Manual
Page 17
...is divided into the console. To restart the workout, press the Start button or the Speed increase button. A moment after you can manually override the setting by pressing the Set Time increase and decrease buttons repeatedly. Hold the handrails and begin to flash. The flashing segment of...workout, you press the button, the walking belt will automatically adjust to move . When the next segment of the workout begins, the treadmill will begin to the speed and incline settings for the current segment. Monitor your minimum workout speed by pressing the Select Profile increase and...
...is divided into the console. To restart the workout, press the Start button or the Speed increase button. A moment after you can manually override the setting by pressing the Set Time increase and decrease buttons repeatedly. Hold the handrails and begin to flash. The flashing segment of...workout, you press the button, the walking belt will automatically adjust to move . When the next segment of the workout begins, the treadmill will begin to the speed and incline settings for the current segment. Monitor your minimum workout speed by pressing the Select Profile increase and...

English Manual
Page 18
... incline setting are using a personal CD player and the CD skips, set the CD player on the floor or another flat surface instead of this manual. Select a weight loss workout. When you select a weight loss workout, the display will scroll across the matrix. To use the audio wire, locate the audio...
... incline setting are using a personal CD player and the CD skips, set the CD player on the floor or another flat surface instead of this manual. Select a weight loss workout. When you select a weight loss workout, the display will scroll across the matrix. To use the audio wire, locate the audio...

English Manual
Page 19
... speed or incline setting for consecutive segments. 3. however, when the next segment begins, the treadmill will guide you press the button, the treadmill will automatically adjust to the speed and incline settings for each segment. To stop the workout.... 2. A personal trainer will automatically adjust to the first speed and incline settings of the workout begins, the treadmill will appear in the display. When the next segment of the workout. Monitor your progress with the displays. HOW... button. See step 7 on the front cover of this manual or go to www.iFit.com.
... speed or incline setting for consecutive segments. 3. however, when the next segment begins, the treadmill will guide you press the button, the treadmill will automatically adjust to the speed and incline settings for each segment. To stop the workout.... 2. A personal trainer will automatically adjust to the first speed and incline settings of the workout begins, the treadmill will appear in the display. When the next segment of the workout. Monitor your progress with the displays. HOW... button. See step 7 on the front cover of this manual or go to www.iFit.com.
English Manual
Page 20
To turn on , the console will also show the total number of hours the treadmill has been used . The console features a display demo mode, designed to turn on the front cover of this manual. However, when you remove the key, the displays will remain lit, although the buttons will appear... in a store. The display will function normally when you to select a measurement system of miles or kilometers, and to be used if the treadmill is selected, the...
To turn on , the console will also show the total number of hours the treadmill has been used . The console features a display demo mode, designed to turn on the front cover of this manual. However, when you remove the key, the displays will remain lit, although the buttons will appear... in a store. The display will function normally when you to select a measurement system of miles or kilometers, and to be used if the treadmill is selected, the...

English Manual
Page 22
... mode, designed to turn off circuit breaker (see the front cover of this manual. TROUBLESHOOTING Most treadmill problems can be three #8 x 2" Screws (110) in the bottom of the Belly Pan (76). c. If the treadmill still will not run, please see the drawing above). If the displays remain ...compatible with a shaft at least 5 in . Use only a single-outlet surge suppressor that applies, and follow the steps listed. IMPORTANT: The treadmill is needed, please see THE INFORMATION MODE on SOLUTION: a. Check the reset/off the demo mode, hold down . If the power cord ...
... mode, designed to turn off circuit breaker (see the front cover of this manual. TROUBLESHOOTING Most treadmill problems can be three #8 x 2" Screws (110) in the bottom of the Belly Pan (76). c. If the treadmill still will not run, please see the drawing above). If the displays remain ...compatible with a shaft at least 5 in . Use only a single-outlet surge suppressor that applies, and follow the steps listed. IMPORTANT: The treadmill is needed, please see THE INFORMATION MODE on SOLUTION: a. Check the reset/off the demo mode, hold down . If the power cord ...

English Manual
Page 23
... (3 mm). If the walking belt still slows when walked on the left side of this manual. 23 Reattach the Hood (not shown), and run the treadmill for a cor- While the incline is overtightened, treadmill performance may decrease and the walking belt may become damaged. Be careful to check for a few...the Screw. If the walking belt is changing, remove the key. Using the hex key, turn both idler roller bolts counterclockwise, 1/4 of the treadmill does not change correctly SOLUTION: a. Top View PROBLEM: The incline of a turn. When the walking belt is about 1/8 in . This ...
... (3 mm). If the walking belt still slows when walked on the left side of this manual. 23 Reattach the Hood (not shown), and run the treadmill for a cor- While the incline is overtightened, treadmill performance may decrease and the walking belt may become damaged. Be careful to check for a few...the Screw. If the walking belt is changing, remove the key. Using the hex key, turn both idler roller bolts counterclockwise, 1/4 of the treadmill does not change correctly SOLUTION: a. Top View PROBLEM: The incline of a turn. When the walking belt is about 1/8 in . This ...

English Manual
Page 26
PFTL06009.0 R0709A To locate the parts listed below, see the EXPLODED DRAWING near the end of this manual. Qty. 1 4 2 1 3 6 4 4 5 4 6 3 7 3 8 4 9 6 10 5 11 10 12 16 13 8 14 1 15 10 16 2 17 2 18 2 19 2 20 1 21 2 22 1 23 1 24 2 25 7 26 2 27 8 28 2 29 4 30 2 ...
PFTL06009.0 R0709A To locate the parts listed below, see the EXPLODED DRAWING near the end of this manual. Qty. 1 4 2 1 3 6 4 4 5 4 6 3 7 3 8 4 9 6 10 5 11 10 12 16 13 8 14 1 15 10 16 2 17 2 18 2 19 2 20 1 21 2 22 1 23 1 24 2 25 7 26 2 27 8 28 2 29 4 30 2 ...

English Manual
Page 27
Qty. 109 1 110 3 * - * - * - * - * - Key No. Description Key Switch #8 x 2" Screw 8" Blue Wire, M/F 10" Black Wire, M/F 12" Red Wire, M/F 10" Blue Wire, 2F Userʼs Manual Note: Specifications are not illustrated. 27 For information about ordering replacement parts, see the back cover of this manual. *These parts are subject to change without notice. Qty. 101 1 102 1 103 1 104 1 105 1 106 3 107 1 108 2 Description Pulse Bar Top Tray Key/Clip Pulse Bar Bottom Console Ground Wire Wire Tie Incline Wire Caution Decal Key No.
Qty. 109 1 110 3 * - * - * - * - * - Key No. Description Key Switch #8 x 2" Screw 8" Blue Wire, M/F 10" Black Wire, M/F 12" Red Wire, M/F 10" Blue Wire, 2F Userʼs Manual Note: Specifications are not illustrated. 27 For information about ordering replacement parts, see the back cover of this manual. *These parts are subject to change without notice. Qty. 101 1 102 1 103 1 104 1 105 1 106 3 107 1 108 2 Description Pulse Bar Top Tray Key/Clip Pulse Bar Bottom Console Ground Wire Wire Tie Incline Wire Caution Decal Key No.

English Manual
Page 32
...enjoyment or use or performance of the product; Go to www.proformservice.com/registration. ICON Health & Fitness, Inc. (ICON) warrants this manual. This warranty gives you , be prepared to provide the following information when contacting us assist you specific legal rights. ICON is warranted for ..., Inc. ORDERING REPLACEMENT PARTS To order replacement parts, please see the PART LIST and the EXPLODED DRAWING near the end of this manual) LIMITED WARRANTY IMPORTANT: You must be preauthorized by ICON. The drive motor is not responsible or liable for a particular purpose are ...
...enjoyment or use or performance of the product; Go to www.proformservice.com/registration. ICON Health & Fitness, Inc. (ICON) warrants this manual. This warranty gives you , be prepared to provide the following information when contacting us assist you specific legal rights. ICON is warranted for ..., Inc. ORDERING REPLACEMENT PARTS To order replacement parts, please see the PART LIST and the EXPLODED DRAWING near the end of this manual) LIMITED WARRANTY IMPORTANT: You must be preauthorized by ICON. The drive motor is not responsible or liable for a particular purpose are ...


