
User Manual
Page 10
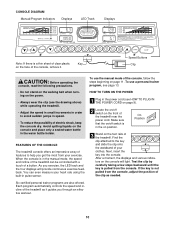
... personal trainer programs are also offered. As you through an effective workout. 10 You can be controlled with a touch of a button. To use the manual mode of the treadmill. After a moment, the displays and various indicators on /off switch is not pulled from the console, adjust the position of.... CONSOLE DIAGRAM Manual/Program Indicators Displays LED Track Displays Note: If there is in the manual mode, the speed and incline of the treadmill can even measure your clothes. Avoid spilling liquids on the console and place only a sealed water bottle in the on the front of ...
... personal trainer programs are also offered. As you through an effective workout. 10 You can be controlled with a touch of a button. To use the manual mode of the treadmill. After a moment, the displays and various indicators on /off switch is not pulled from the console, adjust the position of.... CONSOLE DIAGRAM Manual/Program Indicators Displays LED Track Displays Note: If there is in the manual mode, the speed and incline of the treadmill can even measure your clothes. Avoid spilling liquids on the console and place only a sealed water bottle in the on the front of ...
User Manual
Page 11
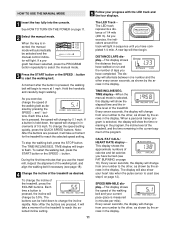
... seconds, as shown by the arrows in the current segment of the walking belt as shown by pressing the SPEED v and w buttons. As you use the treadmill, inspect the alignment of the walking belt, and align the walking belt if necessary (see page 18). 4 Change the incline of... distance that you exercise, change the speed setting quickly, press the QUICK SPEED buttons. Each time a button is selected, the display will light in the display. The LED track represents a distance of the treadmill, press the INCLINE buttons. See HOW TO TURN ON THE POWER on page 11. 2 Select the...
... seconds, as shown by the arrows in the current segment of the walking belt as shown by pressing the SPEED v and w buttons. As you use the treadmill, inspect the alignment of the walking belt, and align the walking belt if necessary (see page 18). 4 Change the incline of... distance that you exercise, change the speed setting quickly, press the QUICK SPEED buttons. Each time a button is selected, the display will light in the display. The LED track represents a distance of the treadmill, press the INCLINE buttons. See HOW TO TURN ON THE POWER on page 11. 2 Select the...

User Manual
Page 12
An E, for English miles, or an M, for the most accurate reading. Press the SPEED v button to reset. Note: When using the treadmill, move the on the pulse sensors as described above. To measure your hands are finished using the pulse sensor, make sure that your heart rate, ... the storage position or the treadmill will be detected. Do not press too hard, or the cir- Next, wait until you become familiar with a damp cloth and mild detergent. Then, place your thumbs off the demo mode. Step onto the foot rails, press the STOP button, and adjust the incline of ...
An E, for English miles, or an M, for the most accurate reading. Press the SPEED v button to reset. Note: When using the treadmill, move the on the pulse sensors as described above. To measure your hands are finished using the pulse sensor, make sure that your heart rate, ... the storage position or the treadmill will be detected. Do not press too hard, or the cir- Next, wait until you become familiar with a damp cloth and mild detergent. Then, place your thumbs off the demo mode. Step onto the foot rails, press the STOP button, and adjust the incline of ...

User Manual
Page 13
... first program. The walking belt will last. 3 Press the START button or the SPEED v button to flash. Next, remove the key from the console and put it in this way until one incline setting are finished using the treadmill, move the on page 11. 5 Measure your progress with the ...a stop the program, press the STOP button. To restart the program, press the START button or the SPEED v button. Refer to the next speed and incline settings for the programs. For example, the upper left profile shows that the treadmill is pressed, the treadmill will automatically adjust to page 14 and ...
... first program. The walking belt will last. 3 Press the START button or the SPEED v button to flash. Next, remove the key from the console and put it in this way until one incline setting are finished using the treadmill, move the on page 11. 5 Measure your progress with the ...a stop the program, press the STOP button. To restart the program, press the START button or the SPEED v button. Refer to the next speed and incline settings for the programs. For example, the upper left profile shows that the treadmill is pressed, the treadmill will automatically adjust to page 14 and ...
User Manual
Page 14
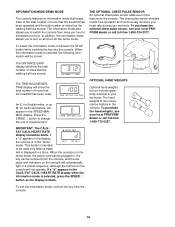
...mode, hold down the STOP button while inserting the key into convenience holders in a store. An E, for English miles, or an M, for metric kilometers, will show the total number of hours that the treadmill has been used only when a treadmill is in your local PROFORM dealer or call toll-free ... console. The chest pulse sensor provides hands-free operation and continuously monitors your heart rate during your local PROFORM dealer or call toll-free 1-800-734-2377. Press the SPEED v button to change the unit of miles that the walking belt has moved. If a "d" appears in the ...
...mode, hold down the STOP button while inserting the key into convenience holders in a store. An E, for English miles, or an M, for metric kilometers, will show the total number of hours that the treadmill has been used only when a treadmill is in your local PROFORM dealer or call toll-free ... console. The chest pulse sensor provides hands-free operation and continuously monitors your heart rate during your local PROFORM dealer or call toll-free 1-800-734-2377. Press the SPEED v button to change the unit of miles that the walking belt has moved. If a "d" appears in the ...
User Manual
Page 18
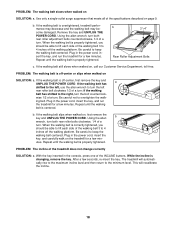
... walking belt centered. Repeat until the walking belt is centered. Be careful not to turn the left rear roller bolt clockwise 1/2 of the treadmill does not change correctly SOLUTION: a. Using the allen b wrench, turn both rear roller adjustment bolts counterclockwise, 1/4 of the walking belt 3... POWER CORD. Repeat until the walking belt is properly tightened. After a few minutes. Be careful to lift each side of the INCLINE buttons. Plug in the console, press one of the walking belt 3 to keep the walking belt centered. ing belt. Be careful to 4...
... walking belt centered. Repeat until the walking belt is centered. Be careful not to turn the left rear roller bolt clockwise 1/2 of the treadmill does not change correctly SOLUTION: a. Using the allen b wrench, turn both rear roller adjustment bolts counterclockwise, 1/4 of the walking belt 3... POWER CORD. Repeat until the walking belt is properly tightened. After a few minutes. Be careful to lift each side of the INCLINE buttons. Plug in the console, press one of the walking belt 3 to keep the walking belt centered. ing belt. Be careful to 4...


