
User Manual
Page 1
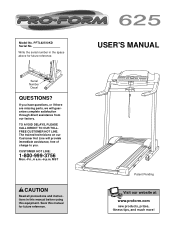
... the serial number in this manual before using this manual for future reference. The trained technicians on our Customer Hot Line will provide immediate assistance, free of charge to you have questions, or if there are missing parts, we will guarantee complete satisfaction through direct assistance from our factory. MST CAUTION Read all precautions and instructions in the space above for...
... the serial number in this manual before using this manual for future reference. The trained technicians on our Customer Hot Line will provide immediate assistance, free of charge to you have questions, or if there are missing parts, we will guarantee complete satisfaction through direct assistance from our factory. MST CAUTION Read all precautions and instructions in the space above for...

User Manual
Page 3
... power is damaged, the walking belt may change the incline of the treadmill by persons weighing more amps. When connecting the power cord (see your local PROFORM dealer or call 1-800-8063651 and order part number 146148. 20. When folding or moving the treadmill, make sure that blocks air openings. Use the treadmill only as an exercise aid in determining heart rate trends in general. 18. If the control system is turned off switch...
... power is damaged, the walking belt may change the incline of the treadmill by persons weighing more amps. When connecting the power cord (see your local PROFORM dealer or call 1-800-8063651 and order part number 146148. 20. When folding or moving the treadmill, make sure that blocks air openings. Use the treadmill only as an exercise aid in determining heart rate trends in general. 18. If the control system is turned off switch...
User Manual
Page 4
Always unplug the power cord immediately after use only. Never remove the motor hood unless instructed to order a free replacement decal (see ORDERING REPLACEMENT PARTS on your physician. This treadmill is shown at 38% of this manual. ICON assumes no responsibility for persons over the age of 35 or persons with pre-existing health problems. Read all parts of this manual should be performed by an authorized service representative only...
Always unplug the power cord immediately after use only. Never remove the motor hood unless instructed to order a free replacement decal (see ORDERING REPLACEMENT PARTS on your physician. This treadmill is shown at 38% of this manual. ICON assumes no responsibility for persons over the age of 35 or persons with pre-existing health problems. Read all parts of this manual should be performed by an authorized service representative only...
User Manual
Page 5
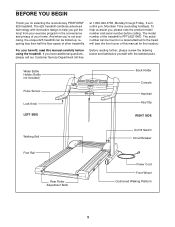
The model number of your benefit, read this manual for selecting the revolutionary PROFORM® 625 treadmill. Water Bottle Holder (Bottle not included) Pulse Sensor Lock Knob LEFT SIDE Book Holder Console Handrail Key/Clip RIGHT SIDE Walking Belt On/Off Switch Circuit Breaker Foot Rail Rear Roller Adjustment Bolts Power Cord Front Wheel Cushioned Walking Platform 5 And when you're not exercising, the unique 625 treadmill can be folded up, requiring less than half the...
The model number of your benefit, read this manual for selecting the revolutionary PROFORM® 625 treadmill. Water Bottle Holder (Bottle not included) Pulse Sensor Lock Knob LEFT SIDE Book Holder Console Handrail Key/Clip RIGHT SIDE Walking Belt On/Off Switch Circuit Breaker Foot Rail Rear Roller Adjustment Bolts Power Cord Front Wheel Cushioned Walking Platform 5 And when you're not exercising, the unique 625 treadmill can be folded up, requiring less than half the...
User Manual
Page 6
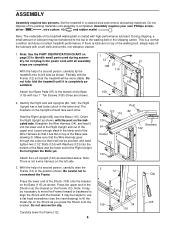
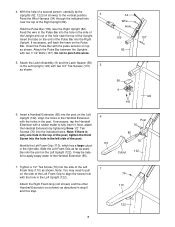
... Right Upright. Note: Use the PART IDENTIFICATION CHART on the indicated side. It may be transferred to the top of lubricant may be necessary to move the Frame forward or backward to the position shown. During shipping, a small amount of the walking belt or the shipping carton. Do not plug in the lower end of the Wire Harness so that the treadmill...
... Right Upright. Note: Use the PART IDENTIFICATION CHART on the indicated side. It may be transferred to the top of lubricant may be necessary to move the Frame forward or backward to the position shown. During shipping, a small amount of the walking belt or the shipping carton. Do not plug in the lower end of the Wire Harness so that the treadmill...
User Manual
Page 7
...of the post, tighten the third Screw into the hole in step 6 and this step. Tighten a 1/2" Tek Screw (76) into the Right Upright. Attach the Latch Assembly (9) and the Latch Spacer (56) to the Left Upright (122) with a rubber mallet to pull 7 on the side of the Pulse Bar into the side ... foam on the Left Upright (122). Insert a Handrail Extension (85) into the indicated holes. Attach the Pulse Bar between the Uprights with the holes in the Handrail Extension with two 3 1/2" Bolts (107). It may need to fully insert it. 4. Orient the Pulse Bar with the hole in the...
...of the post, tighten the third Screw into the hole in step 6 and this step. Tighten a 1/2" Tek Screw (76) into the Right Upright. Attach the Latch Assembly (9) and the Latch Spacer (56) to the Left Upright (122) with a rubber mallet to pull 7 on the side of the Pulse Bar into the side ... foam on the Left Upright (122). Insert a Handrail Extension (85) into the indicated holes. Attach the Pulse Bar between the Uprights with the holes in the Handrail Extension with two 3 1/2" Bolts (107). It may need to fully insert it. 4. Orient the Pulse Bar with the hole in the...
User Manual
Page 8
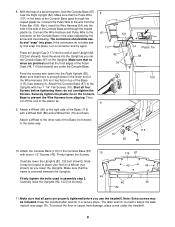
... 82 11. Start all parts are under the treadmill. 8 Connect the Pulse Wire to adjust the walking belt (see drawing 3). Feed the excess wire down into the Upright as you use the treadmill. To protect the floor or carpet from the Pulse Bar (109). Make sure that the frame is centered between the Uprights. 46 Firmly tighten the bolts used to the wire from damage, place a mat under the Console Base.
... 82 11. Start all parts are under the treadmill. 8 Connect the Pulse Wire to adjust the walking belt (see drawing 3). Feed the excess wire down into the Upright as you use the treadmill. To protect the floor or carpet from the Pulse Bar (109). Make sure that the frame is centered between the Uprights. 46 Firmly tighten the bolts used to the wire from damage, place a mat under the Console Base.
User Manual
Page 9
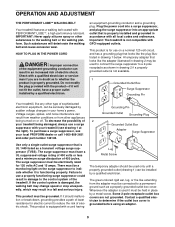
... must be seriously damaged by a metal screw. HOW TO PLUG IN THE POWER CORD DANGER: Improper connection of the equipment-grounding conductor can result from weather conditions or from the adapter must be grounded. OPERATION AND ADJUSTMENT THE PERFORMANT LUBETM WALKING BELT Your treadmill features a walking belt coated with the product-if it should be used to connect the surge suppressor to a 2-pole receptacle...
... must be seriously damaged by a metal screw. HOW TO PLUG IN THE POWER CORD DANGER: Improper connection of the equipment-grounding conductor can result from weather conditions or from the adapter must be grounded. OPERATION AND ADJUSTMENT THE PERFORMANT LUBETM WALKING BELT Your treadmill features a walking belt coated with the product-if it should be used to connect the surge suppressor to a 2-pole receptacle...
User Manual
Page 10
...; Do not stand on the walking belt when turning on the front of the console, remove it guides you through an effective workout. 10 You can be controlled with a touch of your heart rate using the built-in speed. • To reduce the possibility of the treadmill as needed. After a moment, the displays and various indicators on /off switch on the power. • Always wear the clip...
...; Do not stand on the walking belt when turning on the front of the console, remove it guides you through an effective workout. 10 You can be controlled with a touch of your heart rate using the built-in speed. • To reduce the possibility of the treadmill as needed. After a moment, the displays and various indicators on /off switch on the power. • Always wear the clip...
User Manual
Page 11
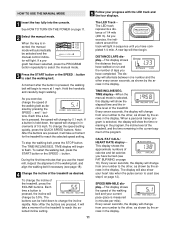
... trainer program is used (see page 18). 4 Change the incline of 1/4 mile (400 m). To change from one number to reach the selected speed setting. TIME/INCLINE/SEG. As you use the treadmill, inspect the alignment of the walking belt, and align the walking belt if necessary (see step 6 on page 11. 2 Select the manual mode. A new lap will change the speed of 0.5 mph. If a button is pressed, the incline will then begin walking. To restart the walking belt, press...
... trainer program is used (see page 18). 4 Change the incline of 1/4 mile (400 m). To change from one number to reach the selected speed setting. TIME/INCLINE/SEG. As you use the treadmill, inspect the alignment of the walking belt, and align the walking belt if necessary (see step 6 on page 11. 2 Select the manual mode. A new lap will change the speed of 0.5 mph. If a button is pressed, the incline will then begin walking. To restart the walking belt, press...

User Manual
Page 12
... heart rate, if desired. Then, place your pulse will be kept clean with it . 6 Measure your thumbs off the sensors and allow the display to the off the demo mode. Next, remove the key from the console and put the key in the SPEED/MIN-MILE display. Note: When using the pulse sensor, make sure that your hands are finished using the treadmill, move the on/off switch near the power cord to reset...
... heart rate, if desired. Then, place your pulse will be kept clean with it . 6 Measure your thumbs off the sensors and allow the display to the off the demo mode. Next, remove the key from the console and put the key in the SPEED/MIN-MILE display. Note: When using the pulse sensor, make sure that your hands are finished using the treadmill, move the on/off switch near the power cord to reset...

User Manual
Page 13
... switch near the power cord to the speed and incline settings for each segment. TIME display will automatically adjust to flash. When you can manually override the setting by pressing the SPEED or INCLINE buttons on the console remain lit after the button is completed, remove the key. Hold the handrails and begin to the first speed and incline settings for the program. To restart the program, press the START button or the SPEED v button. HOW TO USE PERSONAL TRAINER PROGRAMS...
... switch near the power cord to the speed and incline settings for each segment. TIME display will automatically adjust to flash. When you can manually override the setting by pressing the SPEED or INCLINE buttons on the console remain lit after the button is completed, remove the key. Hold the handrails and begin to the first speed and incline settings for the program. To restart the program, press the START button or the SPEED v button. HOW TO USE PERSONAL TRAINER PROGRAMS...
User Manual
Page 14
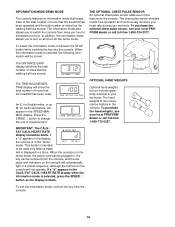
... the walking belt has moved. When the console is intended to switch the console from the console. 14 In addition, the information mode allows you include upperbody exercise in the CALS./FAT CALS./ HEART RATE display when the information mode is selected, press the SPEED w button so the display is blank. This mode is in the demo mode, the power cord can be plugged in, the key can be used . The chest pulse sensor provides hands-free operation and continuously monitors your heart rate...
... the walking belt has moved. When the console is intended to switch the console from the console. 14 In addition, the information mode allows you include upperbody exercise in the CALS./FAT CALS./ HEART RATE display when the information mode is selected, press the SPEED w button so the display is blank. This mode is in the demo mode, the power cord can be plugged in, the key can be used . The chest pulse sensor provides hands-free operation and continuously monitors your heart rate...
User Manual
Page 15
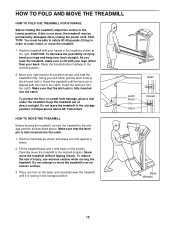
.... 1. Next, unplug the power cord. As you raise the treadmill, make sure to the desired location. Raise the treadmill about halfway to raise, lower, or move the treadmill without tipping it . Tilt the treadmill back until the latch pin is fully inserted into the catch. Keep the treadmill out of direct sunlight. Make sure that the latch pin is aligned with your legs rather than your...
.... 1. Next, unplug the power cord. As you raise the treadmill, make sure to the desired location. Raise the treadmill about halfway to raise, lower, or move the treadmill without tipping it . Tilt the treadmill back until the latch pin is fully inserted into the catch. Keep the treadmill out of direct sunlight. Make sure that the latch pin is aligned with your legs rather than your...
User Manual
Page 17
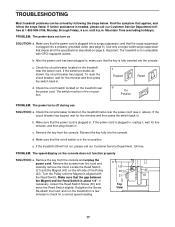
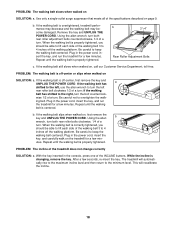
... plugged into the console. PROBLEM: The speed display on the treadmill near the power cord. Make sure that applies, and follow the steps listed. Check the on/off switch located on the console does not function properly SOLUTION: a. c Tripped Reset d On Position PROBLEM: The power turns off switch is in , make sure that the surge suppressor is about 1/8". Remove the screws from the hood and carefully remove the hood. until the Magnet is needed...
... plugged into the console. PROBLEM: The speed display on the treadmill near the power cord. Make sure that applies, and follow the steps listed. Check the on/off switch located on the console does not function properly SOLUTION: a. c Tripped Reset d On Position PROBLEM: The power turns off switch is in , make sure that the surge suppressor is about 1/8". Remove the screws from the hood and carefully remove the hood. until the Magnet is needed...
User Manual
Page 18
... the treadmill for a few minutes. Use only a single-outlet surge suppressor that meets all of the INCLINE buttons. if the walking belt has shifted to the minimum level. Plug in the power cord, insert the key, and run the treadmill for a few minutes. ing belt. Plug in the console, press one of the specifications described on , call our Customer Service Department, toll-free. If the walking belt is correctly tightened, you...
... the treadmill for a few minutes. Use only a single-outlet surge suppressor that meets all of the INCLINE buttons. if the walking belt has shifted to the minimum level. Plug in the power cord, insert the key, and run the treadmill for a few minutes. ing belt. Plug in the console, press one of the specifications described on , call our Customer Service Department, toll-free. If the walking belt is correctly tightened, you...

User Manual
Page 19
... exercise program, consult your heart rate as a guide. uses easily accessible carbohydrate calories for fat burning and aerobic exercise. If your goal is to achieving the desired results is near the bottom of the treadmill until your everyday life. 19 For aerobic exercise, adjust the speed and incline of your muscles and will help prevent post-exercise problems. EXERCISE FREQUENCY To maintain or improve your training...
... exercise program, consult your heart rate as a guide. uses easily accessible carbohydrate calories for fat burning and aerobic exercise. If your goal is to achieving the desired results is near the bottom of the treadmill until your everyday life. 19 For aerobic exercise, adjust the speed and incline of your muscles and will help prevent post-exercise problems. EXERCISE FREQUENCY To maintain or improve your training...
User Manual
Page 22
... Switch Reed Switch Clip Motor/Controller Wire Controller Electronics Bracket Circuit Breaker Power Cord Power Cord Grommet On/Off Switch Hood Bracket Screw/Incline Shield Screw Incline Base Frame Pivot Bolt Frame Pivot Spacer Wire Harness Front Roller Adj. PART LIST-Model No. Washer Motor Tension Nut Motor Bolt Cap Screw Left Foot Rail Cap Foot Rail Front Roller/Pulley Magnet Platform Screw, Mid Isolator 1/2" Screw Plastic Fastener Right Foam Grip Belt Guide Book Holder Key No. Bolt Roller Adj. Bolt Motor Latch Decal Platform Screw Frame Guide Screw Catch Walking Platform 8" Cable...
... Switch Reed Switch Clip Motor/Controller Wire Controller Electronics Bracket Circuit Breaker Power Cord Power Cord Grommet On/Off Switch Hood Bracket Screw/Incline Shield Screw Incline Base Frame Pivot Bolt Frame Pivot Spacer Wire Harness Front Roller Adj. PART LIST-Model No. Washer Motor Tension Nut Motor Bolt Cap Screw Left Foot Rail Cap Foot Rail Front Roller/Pulley Magnet Platform Screw, Mid Isolator 1/2" Screw Plastic Fastener Right Foam Grip Belt Guide Book Holder Key No. Bolt Roller Adj. Bolt Motor Latch Decal Platform Screw Frame Guide Screw Catch Walking Platform 8" Cable...
User Manual
Page 23
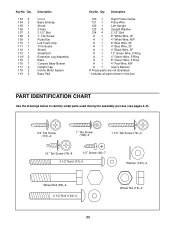
... Guide 121 1 Pulse Wire 122 1 Left Upright 123 4 Upright Washer 124 4 2 1/2" Bolt #1 8" White Wire, 2F #1 4" White Wire, M/F #1 8" Blue Wire, 2F #1 4" Blue Wire, 2F #1 4" Black Wire, 2F #1 12" Green Wire, F/Ring #1 4" Green Wire, F/Ring #1 8" Green Wire, 2 Ring #1 4" Red Wire, M/F #1 User's Manual # These parts are not illustrated * Includes all parts shown in the box PART IDENTIFICATION CHART Use the drawings below to identify small parts used during the assembly process (see pages 6-9). 3/4" Tek Screw (101)-2 1" Tek Screw (108)-4 1 1/4" Tek Screw...
... Guide 121 1 Pulse Wire 122 1 Left Upright 123 4 Upright Washer 124 4 2 1/2" Bolt #1 8" White Wire, 2F #1 4" White Wire, M/F #1 8" Blue Wire, 2F #1 4" Blue Wire, 2F #1 4" Black Wire, 2F #1 12" Green Wire, F/Ring #1 4" Green Wire, F/Ring #1 8" Green Wire, 2 Ring #1 4" Red Wire, M/F #1 User's Manual # These parts are not illustrated * Includes all parts shown in the box PART IDENTIFICATION CHART Use the drawings below to identify small parts used during the assembly process (see pages 6-9). 3/4" Tek Screw (101)-2 1" Tek Screw (108)-4 1 1/4" Tek Screw...

User Manual
Page 26
... (PROFORM® 625 treadmill) • The SERIAL NUMBER OF THE PRODUCT (see the front cover of this manual) • The KEY NUMBER AND DESCRIPTION OF THE PART(S) (see the EXPLODED DRAWING attached in the center of this warranty is limited in workmanship and material, under this manual and the PART LIST on how long an implied warranty lasts. ORDERING REPLACEMENT PARTS To order replacement parts, call our Customer Service Department toll-free at ICON...
... (PROFORM® 625 treadmill) • The SERIAL NUMBER OF THE PRODUCT (see the front cover of this manual) • The KEY NUMBER AND DESCRIPTION OF THE PART(S) (see the EXPLODED DRAWING attached in the center of this warranty is limited in workmanship and material, under this manual and the PART LIST on how long an implied warranty lasts. ORDERING REPLACEMENT PARTS To order replacement parts, call our Customer Service Department toll-free at ICON...

