

English Manual
Page 2
TABLE OF CONTENTS IMPORTANT PRECAUTIONS 3 BEFORE YOU BEGIN 4 ASSEMBLY 5 HOW TO USE THE ELLIPTICAL CROSSTRAINER 9 MAINTENANCE AND TROUBLESHOOTING 20 CONDITIONING GUIDELINES 21 PART LIST 22 EXPLODED DRAWING 23 HOW TO ORDER REPLACEMENT PARTS Back Cover LIMITED WARRANTY Back Cover PROFORM is a registered trademark of ICON Health & Fitness, Inc. 2
TABLE OF CONTENTS IMPORTANT PRECAUTIONS 3 BEFORE YOU BEGIN 4 ASSEMBLY 5 HOW TO USE THE ELLIPTICAL CROSSTRAINER 9 MAINTENANCE AND TROUBLESHOOTING 20 CONDITIONING GUIDELINES 21 PART LIST 22 EXPLODED DRAWING 23 HOW TO ORDER REPLACEMENT PARTS Back Cover LIMITED WARRANTY Back Cover PROFORM is a registered trademark of ICON Health & Fitness, Inc. 2

English Manual
Page 3
... important precau- The pulse sensor is intended only as an exercise aid in determining heart rate trends in this or any time while exercising, stop . 13. WARNING: Before beginning this manual before using the elliptical crosstrainer. ICON assumes no responsibility for home use only. It is especially important for foot protection. 8. Inspect and properly tighten all instructions before using the elliptical crosstrainer. 9. Wear appropriate exercise clothes when using the elliptical crosstrainer. 2. do not...
... important precau- The pulse sensor is intended only as an exercise aid in determining heart rate trends in this or any time while exercising, stop . 13. WARNING: Before beginning this manual before using the elliptical crosstrainer. ICON assumes no responsibility for home use only. It is especially important for foot protection. 8. Inspect and properly tighten all instructions before using the elliptical crosstrainer. 9. Wear appropriate exercise clothes when using the elliptical crosstrainer. 2. do not...
English Manual
Page 4
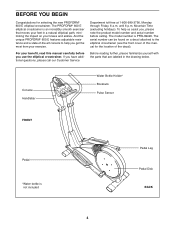
... holidays). The model number is not included Pedal Leg Pedal Disk BACK 4 Before reading further, please familiarize yourself with the parts that moves your knees and ankles. BEFORE YOU BEGIN Congratulations for the location of this manual carefully before calling. And the unique PROFORM® 600 E features adjustable resistance and a state-of-the-art console to the elliptical crosstrainer (see the front cover of the decal...
... holidays). The model number is not included Pedal Leg Pedal Disk BACK 4 Before reading further, please familiarize yourself with the parts that moves your knees and ankles. BEFORE YOU BEGIN Congratulations for the location of this manual carefully before calling. And the unique PROFORM® 600 E features adjustable resistance and a state-of-the-art console to the elliptical crosstrainer (see the front cover of the decal...

English Manual
Page 5
As you assemble the elliptical crosstrainer, use the drawings below each drawing refers to the key number of the part, from the PART LIST on page 22. ASSEMBLY Assembly requires two persons. The number in assembly. The second number refers to see if it has been pre-assembled. M6 Washer (76)-4 M8 Washer (77)-2 M10 Washer (38)-4 M10.3 Black Washer (53)-2 M10 Split Washer (70)-4 Frame...
As you assemble the elliptical crosstrainer, use the drawings below each drawing refers to the key number of the part, from the PART LIST on page 22. ASSEMBLY Assembly requires two persons. The number in assembly. The second number refers to see if it has been pre-assembled. M6 Washer (76)-4 M8 Washer (77)-2 M10 Washer (38)-4 M10.3 Black Washer (53)-2 M10 Split Washer (70)-4 Frame...

English Manual
Page 6
... not tighten the Button Bolt yet. 4. Be careful not to avoid pinching the Wire Harnesses. While holding the upper end of the Frame (1), 2 attach a Stabilizer (3) to the Lower Wire Harness (19). Slide an M10 Split Washer (70) and a Frame Spacer (33) onto the M10 x 88mm Button Bolt (63). While another person holds the Upright (2) in the position shown, connect the Upper Wire...
... not tighten the Button Bolt yet. 4. Be careful not to avoid pinching the Wire Harnesses. While holding the upper end of the Frame (1), 2 attach a Stabilizer (3) to the Lower Wire Harness (19). Slide an M10 Split Washer (70) and a Frame Spacer (33) onto the M10 x 88mm Button Bolt (63). While another person holds the Upright (2) in the position shown, connect the Upper Wire...

English Manual
Page 9
... continue to your arms, shoulders, and back. Various factors may turn in either direction. The pulse sensor is not a medical device. To exercise only your lower body, hold the pulse sensor as an exercise aid in determining heart rate trends in general. 9 When the pedals are designed to add upper-body exercise to move with a continuous motion. CAUTION: Before using the elliptical crosstrainer. • When you stop exercising, allow the pedals to slowly...
... continue to your arms, shoulders, and back. Various factors may turn in either direction. The pulse sensor is not a medical device. To exercise only your lower body, hold the pulse sensor as an exercise aid in determining heart rate trends in general. 9 When the pedals are designed to add upper-body exercise to move with a continuous motion. CAUTION: Before using the elliptical crosstrainer. • When you stop exercising, allow the pedals to slowly...

English Manual
Page 10
... personal trainers. Using a stereo audio To purchase iFIT.com CD's and videocassettes, call toll-free 1-800-735-0768. 10 Video programs offer the same benefits as it guides you through every step of your workout. High-energy music provides added motivation. In addition, the console features two Heart Rate workout programs that automatically change the resistance of the elliptical crosstrainer and prompt you to vary your pace to your home...
... personal trainers. Using a stereo audio To purchase iFIT.com CD's and videocassettes, call toll-free 1-800-735-0768. 10 Video programs offer the same benefits as it guides you through every step of your workout. High-energy music provides added motivation. In addition, the console features two Heart Rate workout programs that automatically change the resistance of the elliptical crosstrainer and prompt you to vary your pace to your home...
English Manual
Page 11
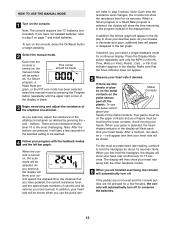
... the iFIT.com mode is a thin sheet of clear plastic on the display. Note: If there is selected. when your exercise program. Feedback mode indicators-These indicators show speed and distance in the bar graph. Display Mode button-This button is currently shown. CONSOLE DESCRIPTION Refer to the drawing on , pressing this button will turn on the face of the elliptical crosstrainer. During the program, the target pace will periodically change...
... the iFIT.com mode is a thin sheet of clear plastic on the display. Note: If there is selected. when your exercise program. Feedback mode indicators-These indicators show speed and distance in the bar graph. Display Mode button-This button is currently shown. CONSOLE DESCRIPTION Refer to the drawing on , pressing this button will turn on the face of the elliptical crosstrainer. During the program, the target pace will periodically change...
English Manual
Page 12
... a Heart Rate program is turned on the console. If desired, you exercise, adjust the resistance of the elliptical crosstrainer. To use the pulse sen- Each time the console is selected, the display will automatically turn off to show the time remaining in the display. Press the Display Mode button repeatedly until the upper right corner of the display is the most accurate heart rate reading, continue to step 5 on the console, press the On/Reset button or begin pedaling...
... a Heart Rate program is turned on the console. If desired, you exercise, adjust the resistance of the elliptical crosstrainer. To use the pulse sen- Each time the console is selected, the display will automatically turn off to show the time remaining in the display. Press the Display Mode button repeatedly until the upper right corner of the display is the most accurate heart rate reading, continue to step 5 on the console, press the On/Reset button or begin pedaling...
English Manual
Page 13
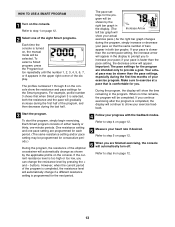
... bar graph will show your exercise feedback. 4 Follow your progress with the feedback modes. buttons. When no time remains, the program will appear. Refer to exercise at a pace that when Smart program 3 is completed, the display will show the resistance and pace settings for the program are finished exercising, the console will appear in the program. The profiles numbered 1 through 8 on page 12. 13 To start...
... bar graph will show your exercise feedback. 4 Follow your progress with the feedback modes. buttons. When no time remains, the program will appear. Refer to exercise at a pace that when Smart program 3 is completed, the display will show the resistance and pace settings for the program are finished exercising, the console will appear in the program. The profiles numbered 1 through 8 on page 12. 13 To start...

English Manual
Page 14
To select a Heart Rate program, press the Program button repeatedly until the batteries are replaced). 4 Hold the pulse sensor. When a Heart Rate program is estimated by subtracting your hands on the metal contacts for consecutive periods.) During the program, the resistance of the elliptical crosstrainer will be saved in the display instead of your heart rate. 5 Start the program. Next, press the + or - button repeatedly to keep your heart rate near the target heart rate setting for the current period...
To select a Heart Rate program, press the Program button repeatedly until the batteries are replaced). 4 Hold the pulse sensor. When a Heart Rate program is estimated by subtracting your hands on the metal contacts for consecutive periods.) During the program, the resistance of the elliptical crosstrainer will be saved in the display instead of your heart rate. 5 Start the program. Next, press the + or - button repeatedly to keep your heart rate near the target heart rate setting for the current period...

English Manual
Page 15
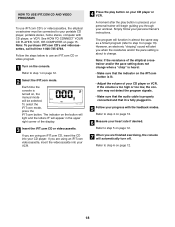
Important: The pace settings for the program are finished exercising, the console will show your exercise feedback. 6 Follow your progress with CD player. During the program, the display will automatically turn off. See page 17 for connecting instructions. To use iFIT.com programs directly from our Web site, the elliptical crosstrainer must be connected to your CD player. HOW TO CONNECT YOUR PORTABLE CD PLAYER Note: If your CD...
Important: The pace settings for the program are finished exercising, the console will show your exercise feedback. 6 Follow your progress with CD player. During the program, the display will automatically turn off. See page 17 for connecting instructions. To use iFIT.com programs directly from our Web site, the elliptical crosstrainer must be connected to your CD player. HOW TO CONNECT YOUR PORTABLE CD PLAYER Note: If your CD...

English Manual
Page 16
... jack, see instruction C. A CD VCR Amp LINE OUT LINE OUT Audio Cable B. Plug the other end of the cable into the jack beneath the console. C B. Plug the other end of the cable into an RCA Y-adapter (available at electronics stores) into the LINE OUT jack on your stereo. B CD VCR Amp LINE OUT Audio Cable PHONES 1/8" Y-adapter Headphones Audio Cable RCA Y-adapter Wire removed from LINE OUT...
... jack, see instruction C. A CD VCR Amp LINE OUT LINE OUT Audio Cable B. Plug the other end of the cable into the jack beneath the console. C B. Plug the other end of the cable into an RCA Y-adapter (available at electronics stores) into the LINE OUT jack on your stereo. B CD VCR Amp LINE OUT Audio Cable PHONES 1/8" Y-adapter Headphones Audio Cable RCA Y-adapter Wire removed from LINE OUT...

English Manual
Page 17
... the console. B ANT. A ANT. Plug one end of the cable into a 1/8" Y-adapter (available at electronics stores) into the jack beneath the console. IN VIDEO AUDIO IN CH 34 OUT RF OUT Headphones/Speakers Audio Cable RCA Y-adapter Wire removed from AUDIO OUT jack 17 If you have a TV with a built-in VCR, see instruction A. If your VCR has an unused AUDIO OUT jack, see instruction B. Plug one...
... the console. B ANT. A ANT. Plug one end of the cable into a 1/8" Y-adapter (available at electronics stores) into the jack beneath the console. IN VIDEO AUDIO IN CH 34 OUT RF OUT Headphones/Speakers Audio Cable RCA Y-adapter Wire removed from AUDIO OUT jack 17 If you have a TV with a built-in VCR, see instruction A. If your VCR has an unused AUDIO OUT jack, see instruction B. Plug one...
English Manual
Page 18
... player. The program will begin guiding you are using an iFIT.com videocassette, insert the videocassette into your personal trainer's instructions. However, an electronic "chirping" sound will automatically turn off. If the volume is too high or too low, the console may not detect the program signals. • Make sure that the audio cable is fully plugged in. 5 Follow your heart rate if desired...
... player. The program will begin guiding you are using an iFIT.com videocassette, insert the videocassette into your personal trainer's instructions. However, an electronic "chirping" sound will automatically turn off. If the volume is too high or too low, the console may not detect the program signals. • Make sure that the audio cable is fully plugged in. 5 Follow your heart rate if desired...

English Manual
Page 19
... exercising, the console will be found on our Web site. A list of the display. 3 Go to your computer and start an internet connection. 4 Start your home computer. Follow the steps below to use programs from our Web site. 1 Turn on the console. When the on-screen countdown ends, the program will begin. 7 Return to the elliptical crosstrainer and begin . Refer to step 1 on page 12. 2 Select the iFIT...
... exercising, the console will be found on our Web site. A list of the display. 3 Go to your computer and start an internet connection. 4 Start your home computer. Follow the steps below to use programs from our Web site. 1 Turn on the console. When the on-screen countdown ends, the program will begin. 7 Return to the elliptical crosstrainer and begin . Refer to step 1 on page 12. 2 Select the iFIT...

English Manual
Page 20
... and a small amount of the elliptical crosstrainer regularly. MAINTENANCE AND TROUBLESHOOTING Inspect and tighten all parts of mild dish soap. BATTERY REPLACEMENT If the console display becomes dim, the batteries should be cleaned with heart rate readings. • Do not hold the metal contacts for replacement instructions. PULSE SENSOR TROUBLESHOOTING • Avoid moving your hands while using the pulse sensor. Replace any worn parts immediately. Important: To avoid damage to assembly step 5 on page 7 for about...
... and a small amount of the elliptical crosstrainer regularly. MAINTENANCE AND TROUBLESHOOTING Inspect and tighten all parts of mild dish soap. BATTERY REPLACEMENT If the console display becomes dim, the batteries should be cleaned with heart rate readings. • Do not hold the metal contacts for replacement instructions. PULSE SENSOR TROUBLESHOOTING • Avoid moving your hands while using the pulse sensor. Replace any worn parts immediately. Important: To avoid damage to assembly step 5 on page 7 for about...

English Manual
Page 21
... flexibility of exercise, your exercise program. The pulse sensor is intended only as you , first find the three numbers above your everyday life. 21 The chart below shows recommended heart rates for fat burning; If your goal is to burn fat, adjust the intensity of the chart (ages are your "training zone." A proper warm-up to 10 minutes of rest between workouts. This...
... flexibility of exercise, your exercise program. The pulse sensor is intended only as you , first find the three numbers above your everyday life. 21 The chart below shows recommended heart rates for fat burning; If your goal is to burn fat, adjust the intensity of the chart (ages are your "training zone." A proper warm-up to 10 minutes of rest between workouts. This...

English Manual
Page 22
Specifications are subject to change without notice. 22 Qty. Qty. Description Key No. PART LIST-Model No. Description 1 1 Frame 2 1 Upright 3 2 Stabilizer 4 4 Stabilizer Endcap 5 1 Console 6 1 Left Side Shield 7 1 Right Side Shield 8 2 Pedal Disc 9 1 Left Handlebar 10 1 Right Handlebar 11 2 Foam Grip 12 2 Pedal 13 1 Left Pedal Leg 14 1 Right Pedal Leg 15 2 Handlebar Endcap 16 1 "U" Bracket 17 2 M8 x 22mm Button Screw 18 4 Rear Pedal Leg Bushing 19 1 Lower Wire Harness 20 1 Upper Wire Harness...
Specifications are subject to change without notice. 22 Qty. Qty. Description Key No. PART LIST-Model No. Description 1 1 Frame 2 1 Upright 3 2 Stabilizer 4 4 Stabilizer Endcap 5 1 Console 6 1 Left Side Shield 7 1 Right Side Shield 8 2 Pedal Disc 9 1 Left Handlebar 10 1 Right Handlebar 11 2 Foam Grip 12 2 Pedal 13 1 Left Pedal Leg 14 1 Right Pedal Leg 15 2 Handlebar Endcap 16 1 "U" Bracket 17 2 M8 x 22mm Button Screw 18 4 Rear Pedal Leg Bushing 19 1 Lower Wire Harness 20 1 Upper Wire Harness...

English Manual
Page 24
... SERIAL NUMBER of the product (see the front cover of this manual) • The KEY NUMBER and DESCRIPTION of the part(s) (see page 22 of this manual) LIMITED WARRANTY ICON Health & Fitness, Inc. (ICON), warrants this product to any economic loss, loss of property, loss of revenues or profits, loss of enjoyment or use, costs of removal or installation or other warranties and any implied warranties of purchase. This warranty...
... SERIAL NUMBER of the product (see the front cover of this manual) • The KEY NUMBER and DESCRIPTION of the part(s) (see page 22 of this manual) LIMITED WARRANTY ICON Health & Fitness, Inc. (ICON), warrants this product to any economic loss, loss of property, loss of revenues or profits, loss of enjoyment or use, costs of removal or installation or other warranties and any implied warranties of purchase. This warranty...

