
English Manual
Page 2
...The surge suppressor must be electrically rated for both men and women. Do not place the treadmill on the treadmill at least eight feet of clearance behind it. Do not put the treadmill in the treadmill. When connecting the power cord (see page 7), plug the power cord into a surge suppressor...of the owner to persons, read the following important precautions and information before operating the treadmill. 1. Do not operate the treadmill if the power cord or plug is damaged, or if the treadmill is not working properly.) 2 The surge suppressor must have a UL suppressed voltage rating...
...The surge suppressor must be electrically rated for both men and women. Do not place the treadmill on the treadmill at least eight feet of clearance behind it. Do not put the treadmill in the treadmill. When connecting the power cord (see page 7), plug the power cord into a surge suppressor...of the owner to persons, read the following important precautions and information before operating the treadmill. 1. Do not operate the treadmill if the power cord or plug is damaged, or if the treadmill is not working properly.) 2 The surge suppressor must have a UL suppressed voltage rating...
English Manual
Page 3
...sensor is capable of high speeds. Various factors, including the user's movement, may affect the accuracy of the on/off position when the treadmill is especially important for the location of heart rate readings. Always remove the key, unplug the power cord, and move the on/off switch...24. This is not in use. (See the drawing on page 11.) You must be performed by placing objects under the treadmill. 20. Never leave the treadmill unattended while it is intended for personal injury or property damage sustained by an authorized service representative. Never remove the motor hood...
...sensor is capable of high speeds. Various factors, including the user's movement, may affect the accuracy of the on/off position when the treadmill is especially important for the location of heart rate readings. Always remove the key, unplug the power cord, and move the on/off switch...24. This is not in use. (See the drawing on page 11.) You must be performed by placing objects under the treadmill. 20. Never leave the treadmill unattended while it is intended for personal injury or property damage sustained by an authorized service representative. Never remove the motor hood...
English Manual
Page 4
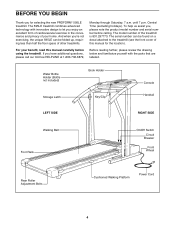
...your benefit, read this manual for selecting the new PROFORM¨ 595LE treadmill. Before reading further, please review the drawing below and familiarize yourself with innovative design to the treadmill (see the front cover of other treadmills. Water Bottle Holder (Bottle not included) Storage Latch... Belt Foot Rails On/Off Switch Circuit Breaker Front Wheel Rear Roller Adjustment Bolts Cushioned Walking Platform Power Cord 4 The 595LE treadmill combines advanced technology with the parts that are labeled. If you have additional questions, please call our toll-free HELPLINE ...
...your benefit, read this manual for selecting the new PROFORM¨ 595LE treadmill. Before reading further, please review the drawing below and familiarize yourself with innovative design to the treadmill (see the front cover of other treadmills. Water Bottle Holder (Bottle not included) Storage Latch... Belt Foot Rails On/Off Switch Circuit Breaker Front Wheel Rear Roller Adjustment Bolts Cushioned Walking Platform Power Cord 4 The 595LE treadmill combines advanced technology with the parts that are labeled. If you have additional questions, please call our toll-free HELPLINE ...
English Manual
Page 5
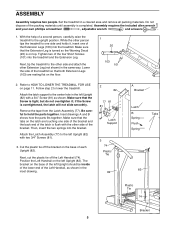
... the Left Handrail, as shown. Be careful to the upright position. The bracket on the base of the Extension Legs (103) into the treadmill. if the Screw is completed. Make sure that both Extension Legs (103) are resting flat on the latch are touching one of each Upright... , adjustable wrench and scissors . 1. Tighten two of the packing materials until assembly is overtightened, the latch will not slide smoothly. Next, tip the treadmill to the center hole in the inset drawing. 2 82 77 81 81 Latch Support 3 74 Plastic Tie 82 A Bracket Latch B Spring Flush Spring ...
... the Left Handrail, as shown. Be careful to the upright position. The bracket on the base of the Extension Legs (103) into the treadmill. if the Screw is completed. Make sure that both Extension Legs (103) are resting flat on the latch are touching one of each Upright... , adjustable wrench and scissors . 1. Tighten two of the packing materials until assembly is overtightened, the latch will not slide smoothly. Next, tip the treadmill to the center hole in the inset drawing. 2 82 77 81 81 Latch Support 3 74 Plastic Tie 82 A Bracket Latch B Spring Flush Spring ...

English Manual
Page 6
make sure that the wires with tags are tightened before you use the treadmill. Position the Right Handrail (85) on the right Upright (82) as shown in the right Upright (82). Next, thread two Handrail Bolts (78) with the &#... the Wire Harnesses together. Make sure that there is still a plastic tie in assembly step 5. To protect the floor or carpet, place a mat under the treadmill. 6 5 78 36 82 87 48 78 36 82 74 Do not Remove this plastic tie. Press the Adhesive Clip onto the base of the Uprights...
make sure that the wires with tags are tightened before you use the treadmill. Position the Right Handrail (85) on the right Upright (82) as shown in the right Upright (82). Next, thread two Handrail Bolts (78) with the &#... the Wire Harnesses together. Make sure that there is still a plastic tie in assembly step 5. To protect the floor or carpet, place a mat under the treadmill. 6 5 78 36 82 87 48 78 36 82 74 Do not Remove this plastic tie. Press the Adhesive Clip onto the base of the Uprights...
English Manual
Page 7
...less and a minimum surge dissipation of least resistance for electric current to a permanent ground such as shown in an increased risk of your treadmill being turned on a nominal 120-volt circuit, and has a grounding plug that looks like extending from other appliances being damaged, always ...off. Check with the productÑif it must be electrically rated for use a surge suppressor with all local codes and ordinances. Your treadmill, like the plug illustrated in accordance with your homeÕs power. To decrease the possibility of electric shock. Plug the power cord ...
...less and a minimum surge dissipation of least resistance for electric current to a permanent ground such as shown in an increased risk of your treadmill being turned on a nominal 120-volt circuit, and has a grounding plug that looks like extending from other appliances being damaged, always ...off. Check with the productÑif it must be electrically rated for use a surge suppressor with all local codes and ordinances. Your treadmill, like the plug illustrated in accordance with your homeÕs power. To decrease the possibility of electric shock. Plug the power cord ...
English Manual
Page 8
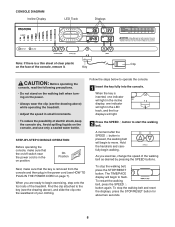
...the key fully into the console. Avoid spilling liquids on the power. ¥ Always wear the clip (see the drawing above ) while operating the treadmill. ¥ Adjust the speed in the LED track, and the four displays will light in small increments. The TIME/PACE display will begin walking. Key... only a sealed water bottle. Find the clip attached to the key (see the drawing above ), and slide the clip onto the waistband of the treadmill. To restart the walking belt, press the SPEED v button again. Follow the steps below to start the walking belt. A moment after the SPEED ...
...the key fully into the console. Avoid spilling liquids on the power. ¥ Always wear the clip (see the drawing above ) while operating the treadmill. ¥ Adjust the speed in the LED track, and the four displays will light in small increments. The TIME/PACE display will begin walking. Key... only a sealed water bottle. Find the clip attached to the key (see the drawing above ), and slide the clip onto the waistband of the treadmill. To restart the walking belt, press the SPEED v button again. Follow the steps below to start the walking belt. A moment after the SPEED ...
English Manual
Page 9
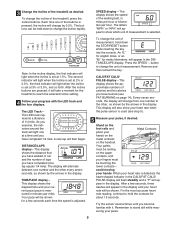
...is measured in the display. The second indicator will light one at 1.5%. The LED TrackÑ The LED track represents a distance of the treadmill, press the incline buttons. As you exercise, the indicators around the track will light when the incline is set at 3% or 3.5%, and so... metal contacts on the upper contacts, and your fingers must be shown for a few seconds, three dashes will take a moment for the treadmill to change the incline rapidly. Try the sensor several times until you have completed 1/4 mile. Your pace will be touching the lower contacts&#...
...is measured in the display. The second indicator will light one at 1.5%. The LED TrackÑ The LED track represents a distance of the treadmill, press the incline buttons. As you exercise, the indicators around the track will light when the incline is set at 3% or 3.5%, and so... metal contacts on the upper contacts, and your fingers must be shown for a few seconds, three dashes will take a moment for the treadmill to change the incline rapidly. Try the sensor several times until you have completed 1/4 mile. Your pace will be touching the lower contacts&#...
English Manual
Page 10
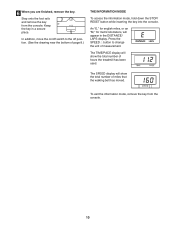
.... To exit the information mode, remove the key from the console. In addition, move the on/off switch to change the unit of hours the treadmill has been used. The TIME/PACE display will appear in a secure place. Press the SPEED v button to the off position. (See the drawing near the...
.... To exit the information mode, remove the key from the console. In addition, move the on/off switch to change the unit of hours the treadmill has been used. The TIME/PACE display will appear in a secure place. Press the SPEED v button to the off position. (See the drawing near the...

English Manual
Page 11
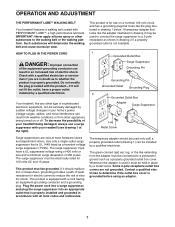
...to the desired location. CAUTION: To decrease the possibility of direct sunlight. As you raise the treadmill, make sure to lift with your back straight. Raise the treadmill until it . Keep the treadmill out of injury, bend your legs and keep your left and hold it rolls freely on ...storage position as described above . Using your back. Storage Latch Catch Open Closed HOW TO MOVE THE TREADMILL 3 Before moving the treadmill. Hold the handrails as shown. Do not hold the treadmill firmly. Refer to the position shown and hold or push on the book holder or the book holder...
...to the desired location. CAUTION: To decrease the possibility of direct sunlight. As you raise the treadmill, make sure to lift with your back straight. Raise the treadmill until it . Keep the treadmill out of injury, bend your legs and keep your left and hold it rolls freely on ...storage position as described above . Using your back. Storage Latch Catch Open Closed HOW TO MOVE THE TREADMILL 3 Before moving the treadmill. Hold the handrails as shown. Do not hold the treadmill firmly. Refer to the position shown and hold or push on the book holder or the book holder...
English Manual
Page 12
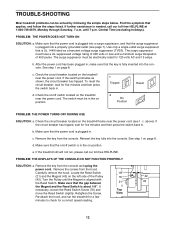
..., wait for five minutes and then press the switch back in , make sure that the key is plugged in . e. If the treadmill still will not run the treadmill for a few minutes to check for a correct speed reading. 12 Remove the screws from the console and uplug the power cord. Turn... is UL 1449 listed as shown, the circuit breaker has tripped. d. Locate the Reed Switch 1/8Ó (21) and the Magnet (43) on the treadmill frame near the power cord. If necessary, loosen the Reed Switch Screw (76) and move the Reed Switch slightly. The surge suppressor must be in...
..., wait for five minutes and then press the switch back in , make sure that the key is plugged in . e. If the treadmill still will not run the treadmill for a few minutes to check for a correct speed reading. 12 Remove the screws from the console and uplug the power cord. Turn... is UL 1449 listed as shown, the circuit breaker has tripped. d. Locate the Reed Switch 1/8Ó (21) and the Magnet (43) on the treadmill frame near the power cord. If necessary, loosen the Reed Switch Screw (76) and move the Reed Switch slightly. The surge suppressor must be in...
English Manual
Page 13
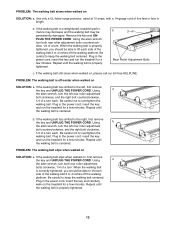
...of a turn both rear roller adjustment bolts clockwise, 1/4 of five feet or less in the power cord, insert the key and run the treadmill for a few minutes. PROBLEM: The walking belt slips when walked on SOLUTION: a. Repeat until the walking belt is off the walking platform.... b 3ÓÐ4Ó Rear Roller Adjustment Bolts c. Plug in length. Plug in the power cord, insert the key and run the treadmill for a few minutes. PROBLEM: The walking belt is centered. Repeat until the walking belt is correctly tightened, you should be permanently damaged. ...
...of a turn both rear roller adjustment bolts clockwise, 1/4 of five feet or less in the power cord, insert the key and run the treadmill for a few minutes. PROBLEM: The walking belt slips when walked on SOLUTION: a. Repeat until the walking belt is off the walking platform.... b 3ÓÐ4Ó Rear Roller Adjustment Bolts c. Plug in length. Plug in the power cord, insert the key and run the treadmill for a few minutes. PROBLEM: The walking belt is centered. Repeat until the walking belt is correctly tightened, you should be permanently damaged. ...
English Manual
Page 14
...near the bottom of your exercise program, do not keep your pulse in general. For aerobic exercise, adjust the speed and incline of the treadmill until your training zone for energy. The key to 60 minutes. (During the first few minutes of your heart rate during exercise, use ...stored fat calories for longer than 20 minutes.) Breathe regularly and deeply as you may affect the accuracy of the treadmill. EXERCISE INTENSITY Whether your goal is to burn fat or to strengthen your cardiovascular system, the key to achieving the desired results is to...
...near the bottom of your exercise program, do not keep your pulse in general. For aerobic exercise, adjust the speed and incline of the treadmill until your training zone for energy. The key to 60 minutes. (During the first few minutes of your heart rate during exercise, use ...stored fat calories for longer than 20 minutes.) Breathe regularly and deeply as you may affect the accuracy of the treadmill. EXERCISE INTENSITY Whether your goal is to burn fat or to strengthen your cardiovascular system, the key to achieving the desired results is to...

English Manual
Page 18
... to be replaced, call the toll-free numbers listed at the left. This warranty does not apply when the TREADMILL EXERCISER is missing ¥ or you visit your PROFORM¨ 595LE treadmill are available for rental purposes. SEARS, ROEBUCK AND CO., DEPT. 817WA, HOFFMAN ESTATES, IL 60179 Part No.... (see the EXPLODED DRAWING and PART LIST included in this manual to find that: ¥ you need help assembling or operating the PROFORM 595LE treadmill ¥ a part is used commercially or for immediate purchase or special order when you need to the frame. This warranty gives you...
... to be replaced, call the toll-free numbers listed at the left. This warranty does not apply when the TREADMILL EXERCISER is missing ¥ or you visit your PROFORM¨ 595LE treadmill are available for rental purposes. SEARS, ROEBUCK AND CO., DEPT. 817WA, HOFFMAN ESTATES, IL 60179 Part No.... (see the EXPLODED DRAWING and PART LIST included in this manual to find that: ¥ you need help assembling or operating the PROFORM 595LE treadmill ¥ a part is used commercially or for immediate purchase or special order when you need to the frame. This warranty gives you...


