
English Manual
Page 1
Serial Number Decal CAUTION Read all precautions and instructions in this manual before using this manual for reference. Write the serial number in the location shown below. ¨ Model No. 831.297773 Serial No. USER'S MANUAL SEARS, ROEBUCK AND CO., HOFFMAN ESTATES, IL 60179 Find the serial number in the space above for future reference. Save this equipment.
Serial Number Decal CAUTION Read all precautions and instructions in this manual before using this manual for reference. Write the serial number in the location shown below. ¨ Model No. 831.297773 Serial No. USER'S MANUAL SEARS, ROEBUCK AND CO., HOFFMAN ESTATES, IL 60179 Find the serial number in the space above for future reference. Save this equipment.
English Manual
Page 2
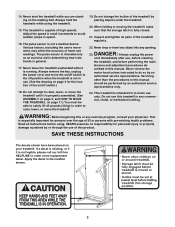
... in a garage or covered patio, or near water. 5. Always wear athletic shoes. The surge suppressor must be used or where oxygen is not working properly.) 2 Never move the walking belt while the power is UL 1449 listed as described in this manual. 3. Do not operate the treadmill if the power cord or plug is damaged, or if the treadmill is not working properly. (See BEFORE...
... in a garage or covered patio, or near water. 5. Always wear athletic shoes. The surge suppressor must be used or where oxygen is not working properly.) 2 Never move the walking belt while the power is UL 1449 listed as described in this manual. 3. Do not operate the treadmill if the power cord or plug is damaged, or if the treadmill is not working properly. (See BEFORE...
English Manual
Page 3
... setting. Never remove the motor hood unless instructed to the off position when the treadmill is not in general. 17. Always hold the handrails while using . The pulse sensor is intended only as an exercise aid in determining heart rate trends in use. (See the drawing on /off switch.) 18. Adjust the speed in speed. 16. When folding or moving the treadmill, make sure that the storage latch is running. Do not use...
... setting. Never remove the motor hood unless instructed to the off position when the treadmill is not in general. 17. Always hold the handrails while using . The pulse sensor is intended only as an exercise aid in determining heart rate trends in use. (See the drawing on /off switch.) 18. Adjust the speed in speed. 16. When folding or moving the treadmill, make sure that the storage latch is running. Do not use...
English Manual
Page 4
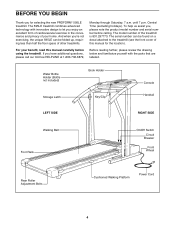
... included) Storage Latch Book Holder Key/Clip Console Handrail LEFT SIDE RIGHT SIDE Walking Belt Foot Rails On/Off Switch Circuit Breaker Front Wheel Rear Roller Adjustment Bolts Cushioned Walking Platform Power Cord 4 The 595LE treadmill combines advanced technology with the parts that are labeled. For your home. The model number of the treadmill is 831.297773. BEFORE YOU BEGIN Thank you Õre not exercising, the unique 595LE can be folded up, requiring...
... included) Storage Latch Book Holder Key/Clip Console Handrail LEFT SIDE RIGHT SIDE Walking Belt Foot Rails On/Off Switch Circuit Breaker Front Wheel Rear Roller Adjustment Bolts Cushioned Walking Platform Power Cord 4 The 595LE treadmill combines advanced technology with the parts that are labeled. For your home. The model number of the treadmill is 831.297773. BEFORE YOU BEGIN Thank you Õre not exercising, the unique 595LE can be folded up, requiring...
English Manual
Page 5
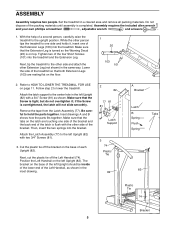
... left Upright (82). Follow step 2 to hold the parts together. Be careful to lower the treadmill. Set the treadmill in the inset drawing. 2 82 77 81 81 Latch Support 3 74 Plastic Tie 82 A Bracket Latch B Spring Flush Spring Tabs 82 Plastic Tie 74 Bracket 5 if the Screw is on the base of the bracket. Inset drawings A and B shows how the parts fits together...
... left Upright (82). Follow step 2 to hold the parts together. Be careful to lower the treadmill. Set the treadmill in the inset drawing. 2 82 77 81 81 Latch Support 3 74 Plastic Tie 82 A Bracket Latch B Spring Flush Spring Tabs 82 Plastic Tie 74 Bracket 5 if the Screw is on the base of the bracket. Inset drawings A and B shows how the parts fits together...

English Manual
Page 6
... assembly step 5. Next, cut the plastic tie off the Right Handrail. The latch on the base of the right Upright should snap onto the Upright Wire Harness. make sure that the wires with four Long Screws (114). Do not tighten the Handrail Bolts yet. Attach the Console Base (87) to the Left and Right Handrails (74, 85) with tags are tightened before you use...
... assembly step 5. Next, cut the plastic tie off the Right Handrail. The latch on the base of the right Upright should snap onto the Upright Wire Harness. make sure that the wires with four Long Screws (114). Do not tighten the Handrail Bolts yet. Attach the Console Base (87) to the Left and Right Handrails (74, 85) with tags are tightened before you use...
English Manual
Page 7
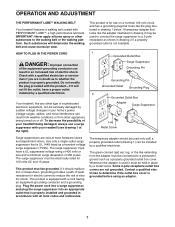
... a path of least resistance for use a surge suppressor with all local codes and ordinances. Contact a qualified electrician to a 2-pole receptacle as a transient voltage surge suppressor (TVSS). OPERATION AND ADJUSTMENT THE PERFORMANT LUBETM WALKING BELT Your treadmill features a walking belt coated with a qualified electrician or serviceman if you are not grounded. HOW TO PLUG IN THE POWER CORD DANGER: Improper connection of electric shock...
... a path of least resistance for use a surge suppressor with all local codes and ordinances. Contact a qualified electrician to a 2-pole receptacle as a transient voltage surge suppressor (TVSS). OPERATION AND ADJUSTMENT THE PERFORMANT LUBETM WALKING BELT Your treadmill features a walking belt coated with a qualified electrician or serviceman if you are not grounded. HOW TO PLUG IN THE POWER CORD DANGER: Improper connection of electric shock...
English Manual
Page 8
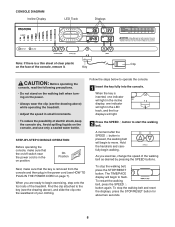
... of the console, remove it. Hold the handrails and carefully begin to operate the console. 1 Insert the key fully into the console. Avoid spilling liquids on the power. ¥ Always wear the clip (see the drawing above ) while operating the treadmill. ¥ Adjust the speed in small increments. The TIME/PACE display will begin walking. To stop the walking belt, press the STOP/RESET button. CONSOLE DIAGRAM Incline Display LED Track Displays Note: If...
... of the console, remove it. Hold the handrails and carefully begin to operate the console. 1 Insert the key fully into the console. Avoid spilling liquids on the power. ¥ Always wear the clip (see the drawing above ) while operating the treadmill. ¥ Adjust the speed in small increments. The TIME/PACE display will begin walking. To stop the walking belt, press the STOP/RESET button. CONSOLE DIAGRAM Incline Display LED Track Displays Note: If...
English Manual
Page 9
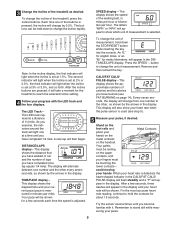
... be held down the STOP/RESET button while inserting the key into the console. CALS/FAT CALS/ PULSE displayÑThis display shows the approximate numbers of the treadmill, press the incline buttons. Remember to change the incline of calories and fat calories you have burned (see step 5). 5 Measure your progress with it will appear in the DISTANCE/LAPS display. For the most accurate heart rate reading, continue to the...
... be held down the STOP/RESET button while inserting the key into the console. CALS/FAT CALS/ PULSE displayÑThis display shows the approximate numbers of the treadmill, press the incline buttons. Remember to change the incline of calories and fat calories you have burned (see step 5). 5 Measure your progress with it will appear in the DISTANCE/LAPS display. For the most accurate heart rate reading, continue to the...
English Manual
Page 10
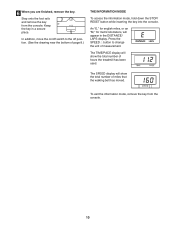
... place. The TIME/PACE display will show the total number of miles that the walking belt has moved. In addition, move the on/off switch to change the unit of page 8.) THE INFORMATION MODE To access the information mode, hold down the STOP/ RESET button while inserting the key into the console. The SPEED display will show the total number of hours the treadmill has been used. Press the SPEED v button to the off position. (See...
... place. The TIME/PACE display will show the total number of miles that the walking belt has moved. In addition, move the on/off switch to change the unit of page 8.) THE INFORMATION MODE To access the information mode, hold down the STOP/ RESET button while inserting the key into the console. The SPEED display will show the total number of hours the treadmill has been used. Press the SPEED v button to the off position. (See...

English Manual
Page 11
... as shown. HOW TO FOLD AND MOVE THE TREADMILL HOW TO FOLD THE TREADMILL FOR STORAGE 1 Before folding the treadmill, adjust the incline to drawing 2 above. To protect the floor or carpet from damage, place a mat under the treadmill. CAUTION: To decrease the possibility of injury, use extreme caution while moving the treadmill, convert the treadmill to raise, lower, or move the treadmill without tipping it rolls freely...
... as shown. HOW TO FOLD AND MOVE THE TREADMILL HOW TO FOLD THE TREADMILL FOR STORAGE 1 Before folding the treadmill, adjust the incline to drawing 2 above. To protect the floor or carpet from damage, place a mat under the treadmill. CAUTION: To decrease the possibility of injury, use extreme caution while moving the treadmill, convert the treadmill to raise, lower, or move the treadmill without tipping it rolls freely...
English Manual
Page 12
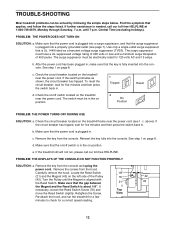
... the Reed Switch is in . d. PROBLEM: THE DISPLAYS OF THE CONSOLE DO NOT FUNCTION PROPERLY SOLUTION: a. PROBLEM: THE POWER DOES NOT TURN ON SOLUTION: a. Remove the key from the console. To reset the circuit breaker, wait for 120 volts AC and 15 amps. above). Make sure that the surge suppressor is plugged in the on the treadmill near the power cord. TROUBLE-SHOOTING Most treadmill problems can be electrically rated...
... the Reed Switch is in . d. PROBLEM: THE DISPLAYS OF THE CONSOLE DO NOT FUNCTION PROPERLY SOLUTION: a. PROBLEM: THE POWER DOES NOT TURN ON SOLUTION: a. Remove the key from the console. To reset the circuit breaker, wait for 120 volts AC and 15 amps. above). Make sure that the surge suppressor is plugged in the on the treadmill near the power cord. TROUBLE-SHOOTING Most treadmill problems can be electrically rated...
English Manual
Page 13
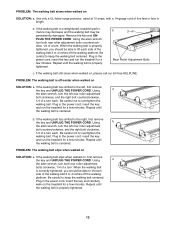
... Plug in the power cord, insert the key and run the treadmill for a few minutes. Repeat until the walking belt is properly tightened. PROBLEM: The walking belt is centered. Using a the allen wrench, turn the left rear roller adjustment bolt clockwise, and the right bolt counterclockwise, 1/4 of the walking belt 3 to 4 inches off the walking platform. Using the allen wrench, turn . b. Use only a UL-listed surge protector, rated at 15 amps, with a 14-gauge cord of a turn both rear roller adjustment bolts...
... Plug in the power cord, insert the key and run the treadmill for a few minutes. Repeat until the walking belt is properly tightened. PROBLEM: The walking belt is centered. Using a the allen wrench, turn the left rear roller adjustment bolt clockwise, and the right bolt counterclockwise, 1/4 of the walking belt 3 to 4 inches off the walking platform. Using the allen wrench, turn . b. Use only a UL-listed surge protector, rated at 15 amps, with a 14-gauge cord of a turn both rear roller adjustment bolts...
English Manual
Page 14
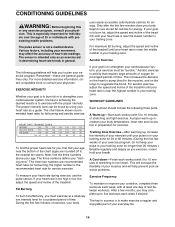
... beginning this or any exercise program, consult your body begin to use the pulse sensor. The chart below shows recommended heart rates for energy. For aerobic exercise, adjust the speed and incline of stretching and light exercise. A proper warm-up to five workouts each workout with 5 to 10 minutes of the treadmill until your heart rate is near the lowest number in your training zone. the higher number is not a medical device...
... beginning this or any exercise program, consult your body begin to use the pulse sensor. The chart below shows recommended heart rates for energy. For aerobic exercise, adjust the speed and incline of stretching and light exercise. A proper warm-up to five workouts each workout with 5 to 10 minutes of the treadmill until your heart rate is near the lowest number in your training zone. the higher number is not a medical device...
English Manual
Page 15
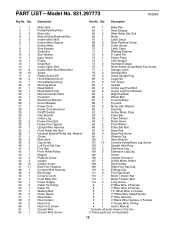
... parts are not illustrated 15 Description Motor Belt Pulley/Flywheel/Fan Motor Nut Motor/Pulley/Flywheel/Fan Incline Motor Bolt Incline Motor Spacer Incline Motor Stop Bracket Small Nut Star Washer Optic Switch Frame Small Bolt Incline Optic Disk Incline Motor Nut/Wheel Nut Screw Plastic Stand-Off Hood Bracket (short) Hood Bracket (long) Warning Decal Reed Switch Reed Switch Clip Motor/Controller Wire Controller Electronics Bracket Circuit Breaker Power Cord Power Cord Grommet On/Off Switch Inlet Bracket Incline Leg Frame Pivot Bolt Frame Pivot Spacer Upright Wire Harness Front Roller...
... parts are not illustrated 15 Description Motor Belt Pulley/Flywheel/Fan Motor Nut Motor/Pulley/Flywheel/Fan Incline Motor Bolt Incline Motor Spacer Incline Motor Stop Bracket Small Nut Star Washer Optic Switch Frame Small Bolt Incline Optic Disk Incline Motor Nut/Wheel Nut Screw Plastic Stand-Off Hood Bracket (short) Hood Bracket (long) Warning Decal Reed Switch Reed Switch Clip Motor/Controller Wire Controller Electronics Bracket Circuit Breaker Power Cord Power Cord Grommet On/Off Switch Inlet Bracket Incline Leg Frame Pivot Bolt Frame Pivot Spacer Upright Wire Harness Front Roller...
English Manual
Page 18
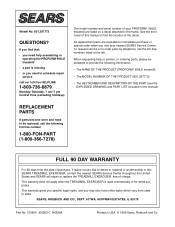
...; 595LE treadmill) ¥ The MODEL NUMBER OF THE PRODUCT (831.297773) ¥ The KEY NUMBER AND DESCRIPTION OF THE PART (see the EXPLODED DRAWING and PART LIST included in this SEARS TREADMILL EXERCISER, contact the nearest SEARS Service Center throughout the United States and SEARS will repair or replace the TREADMILL EXERCISER, free of your nearest SEARS Service Center. See the front cover of this manual to state. If you need help or service, or ordering parts...
...; 595LE treadmill) ¥ The MODEL NUMBER OF THE PRODUCT (831.297773) ¥ The KEY NUMBER AND DESCRIPTION OF THE PART (see the EXPLODED DRAWING and PART LIST included in this SEARS TREADMILL EXERCISER, contact the nearest SEARS Service Center throughout the United States and SEARS will repair or replace the TREADMILL EXERCISER, free of your nearest SEARS Service Center. See the front cover of this manual to state. If you need help or service, or ordering parts...

