
English Manual
Page 2
TABLE OF CONTENTS IMPORTANT PRECAUTIONS 3 BEFORE YOU BEGIN 4 ASSEMBLY 5 HOW TO USE THE ELLIPTICAL CROSSTRAINER 10 MAINTENANCE AND TROUBLE-SHOOTING 14 CONDITIONING GUIDELINES 15 PART LIST 18 EXPLODED DRAWING 19 HOW TO ORDER REPLACEMENT PARTS Back Cover LIMITED WARRANTY Back Cover 2
TABLE OF CONTENTS IMPORTANT PRECAUTIONS 3 BEFORE YOU BEGIN 4 ASSEMBLY 5 HOW TO USE THE ELLIPTICAL CROSSTRAINER 10 MAINTENANCE AND TROUBLE-SHOOTING 14 CONDITIONING GUIDELINES 15 PART LIST 18 EXPLODED DRAWING 19 HOW TO ORDER REPLACEMENT PARTS Back Cover LIMITED WARRANTY Back Cover 2
English Manual
Page 3
...Always hold the handlebar or the upper body arms when mounting, dismounting, or using the elliptical crosstrainer. Keep the elliptical crosstrainer indoors, away from the elliptical crosstrainer at all precautions. 8. The pulse sensor is intended for foot protection. 12. Keep children under...moisture and dust. 4. Wear appropriate exercise clothing when using the elliptical crosstrainer. 9. tions before using the elliptical crosstrainer; do not arch your back straight when using . The elliptical crosstrainer is not a medical device. It is the responsibility of the ...
...Always hold the handlebar or the upper body arms when mounting, dismounting, or using the elliptical crosstrainer. Keep the elliptical crosstrainer indoors, away from the elliptical crosstrainer at all precautions. 8. The pulse sensor is intended for foot protection. 12. Keep children under...moisture and dust. 4. Wear appropriate exercise clothing when using the elliptical crosstrainer. 9. tions before using the elliptical crosstrainer; do not arch your back straight when using . The elliptical crosstrainer is not a medical device. It is the responsibility of the ...
English Manual
Page 4
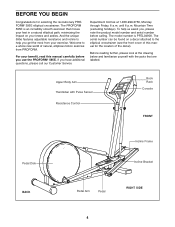
... elliptical crosstrainer (see the front cover of this manual carefully before calling. The serial number can be found on your knees and ankles. The model number is an incredibly smooth exerciser that are labeled. BEFORE YOU BEGIN Congratulations for the location of the decal). To help you use the PROFORM¨ 595E. Before..., minimizing the impact on a decal attached to a whole new world of natural, elliptical-motion exercise from your benefit, read this manual for selecting the revolutionary PROFORM¨ 595E elliptical crosstrainer.
... elliptical crosstrainer (see the front cover of this manual carefully before calling. The serial number can be found on your knees and ankles. The model number is an incredibly smooth exerciser that are labeled. BEFORE YOU BEGIN Congratulations for the location of the decal). To help you use the PROFORM¨ 595E. Before..., minimizing the impact on a decal attached to a whole new world of natural, elliptical-motion exercise from your benefit, read this manual for selecting the revolutionary PROFORM¨ 595E elliptical crosstrainer.
English Manual
Page 5
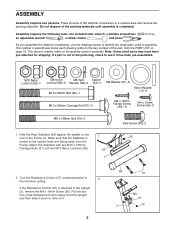
... dispose of the Resistance Control away from the PART LIST on the rear of the elliptical crosstrainer in assembly. Place all parts of the Frame (1). ASSEMBLY Assembly requires two persons. As you assemble the elliptical crosstrainer, use the drawings below each drawing refers to the key number of the part, from the...
... dispose of the Resistance Control away from the PART LIST on the rear of the elliptical crosstrainer in assembly. Place all parts of the Frame (1). ASSEMBLY Assembly requires two persons. As you assemble the elliptical crosstrainer, use the drawings below each drawing refers to the key number of the part, from the...
English Manual
Page 9
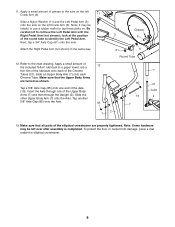
... (not shown) in the same way. 12. rub a thin film of the lubricant onto each Chrome Tube. Make sure that all parts of the elliptical crosstrainer are turned as shown. Apply a small amount of the Axle (19). Tap another 5/8Ó Axle Cap (85) onto the Axle. 85 7 Grease 3 6...the Upright (2). Slide the other Upper Body Arm (7) onto the Axle. To protect the floor or carpet from damage, place a mat under the elliptical crosstrainer. 9 Make sure that the Upper Body Arms are properly tightened. 11. Slide an Upper Body Arm (7) onto each of the round tube to the...
... (not shown) in the same way. 12. rub a thin film of the lubricant onto each Chrome Tube. Make sure that all parts of the elliptical crosstrainer are turned as shown. Apply a small amount of the Axle (19). Tap another 5/8Ó Axle Cap (85) onto the Axle. 85 7 Grease 3 6...the Upright (2). Slide the other Upper Body Arm (7) onto the Axle. To protect the floor or carpet from damage, place a mat under the elliptical crosstrainer. 9 Make sure that the Upper Body Arms are properly tightened. 11. Slide an Upper Body Arm (7) onto each of the round tube to the...
English Manual
Page 10
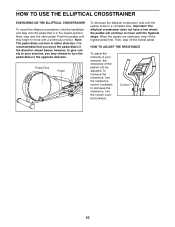
... To adjust the intensity of the pedals can turn in either direction. HOW TO USE THE ELLIPTICAL CROSSTRAINER EXERCISING ON THE ELLIPTICAL CROSSTRAINER To mount the elliptical crosstrainer, hold the handlebar and step onto the pedal that you may choose to turn the pedal disks ... a continuous motion. Control 10 Next, step onto the other pedal. Pedal Disk Pedal To dismount the elliptical crosstrainer, wait until the flywheel stops. Important: The elliptical crosstrainer does not have a free wheel; to move the pedal disks in the direction shown below; Then, step off...
... To adjust the intensity of the pedals can turn in either direction. HOW TO USE THE ELLIPTICAL CROSSTRAINER EXERCISING ON THE ELLIPTICAL CROSSTRAINER To mount the elliptical crosstrainer, hold the handlebar and step onto the pedal that you may choose to turn the pedal disks ... a continuous motion. Control 10 Next, step onto the other pedal. Pedal Disk Pedal To dismount the elliptical crosstrainer, wait until the flywheel stops. Important: The elliptical crosstrainer does not have a free wheel; to move the pedal disks in the direction shown below; Then, step off...
English Manual
Page 14
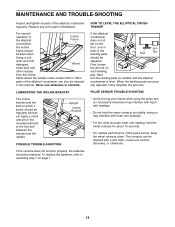
... rate readings. ¥ Do not hold the metal contacts for about 15 seconds. ¥ For optimal performance of the elliptical Incline Frame crosstrainer, the incline frame should be cleaned in this manner. First, loosen the jam nut on which it . Next, turn the leveling pads ...contacts clean. To replace the batteries, refer to the bolt and between the bracket and the upright. HOW TO LEVEL THE ELLIPTICAL CROSSTRAINER If the elliptical crosstrainer does not sit flat on page 7. Apply a small amount of the included lubricant to assembly step 7 on the floor, one...
... rate readings. ¥ Do not hold the metal contacts for about 15 seconds. ¥ For optimal performance of the elliptical Incline Frame crosstrainer, the incline frame should be cleaned in this manner. First, loosen the jam nut on which it . Next, turn the leveling pads ...contacts clean. To replace the batteries, refer to the bolt and between the bracket and the upright. HOW TO LEVEL THE ELLIPTICAL CROSSTRAINER If the elliptical crosstrainer does not sit flat on page 7. Apply a small amount of the included lubricant to assembly step 7 on the floor, one...
English Manual
Page 20
...and all other warranty beyond that specifically set forth herein. Some states do not allow limitations on how long an implied warranty lasts. PROFORM¨ is not responsible or liable for indirect, special or consequential damages arising out of or in connection with the use or ...only to give the following information when calling: ¥ The MODEL NUMBER of the product (PFEL04900) ¥ The NAME of the product (PROFORM¨ 595E elliptical crosstrainer) ¥ The SERIAL NUMBER of the product (see the front cover of this manual) ¥ The KEY NUMBER and DESCRIPTION of the ...
...and all other warranty beyond that specifically set forth herein. Some states do not allow limitations on how long an implied warranty lasts. PROFORM¨ is not responsible or liable for indirect, special or consequential damages arising out of or in connection with the use or ...only to give the following information when calling: ¥ The MODEL NUMBER of the product (PFEL04900) ¥ The NAME of the product (PROFORM¨ 595E elliptical crosstrainer) ¥ The SERIAL NUMBER of the product (see the front cover of this manual) ¥ The KEY NUMBER and DESCRIPTION of the ...