
English Manual
Page 2
TABLE OF CONTENTS IMPORTANT PRECAUTIONS 3 BEFORE YOU BEGIN 5 ASSEMBLY 6 OPERATION AND ADJUSTMENT 11 HOW TO FOLD AND MOVE THE TREADMILL 19 TROUBLESHOOTING 21 CONDITIONING GUIDELINES 23 HOW TO ORDER REPLACEMENT PARTS Back Cover LIMITED WARRANTY Back Cover Note: An EXPLODED DRAWING and a PART LIST are attached in the center of ICON IP, Inc. 2 PROFORM is a registered trademark of this manual.
TABLE OF CONTENTS IMPORTANT PRECAUTIONS 3 BEFORE YOU BEGIN 5 ASSEMBLY 6 OPERATION AND ADJUSTMENT 11 HOW TO FOLD AND MOVE THE TREADMILL 19 TROUBLESHOOTING 21 CONDITIONING GUIDELINES 23 HOW TO ORDER REPLACEMENT PARTS Back Cover LIMITED WARRANTY Back Cover Note: An EXPLODED DRAWING and a PART LIST are attached in the center of ICON IP, Inc. 2 PROFORM is a registered trademark of this manual.
English Manual
Page 3
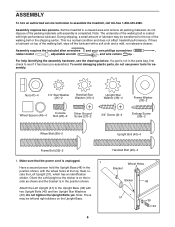
..., lower, or move the walking belt while the power is properly assembled. (See ASSEMBLY on page 6, and HOW TO FOLD AND MOVE THE TREADMILL on each side. Use only a single-outlet surge suppressor that could result in the treadmill. Do not wear loose clothes that meets all users of this manual...only by persons weighing 275 pounds or less. 8. When connecting the power cord (see your local PROFORM dealer or call the tollfree telephone number on page 11. Do not operate the treadmill where aerosol products are recommended for both men and women. To protect the floor or carpet from...
..., lower, or move the walking belt while the power is properly assembled. (See ASSEMBLY on page 6, and HOW TO FOLD AND MOVE THE TREADMILL on each side. Use only a single-outlet surge suppressor that could result in the treadmill. Do not wear loose clothes that meets all users of this manual...only by persons weighing 275 pounds or less. 8. When connecting the power cord (see your local PROFORM dealer or call the tollfree telephone number on page 11. Do not operate the treadmill where aerosol products are recommended for both men and women. To protect the floor or carpet from...
English Manual
Page 6
...shown, with a soft cloth and a mild, non-abrasive cleaner. do not use power tools for assembly. This is not in the position shown. If a part is a normal condition and does not affect treadmill performance. Make sure that the power cord is in the parts bag, first check to the top...shipping, a small amount of lubricant may be transferred to see the drawings below. For help identifying the assembly hardware, see if it has been pre-assembled. Attach the Left Upright (31) to assemble the treadmill, call toll-free 1-800-445-2480. Orient the Left Upright so the sticker is on the inside as...
...shown, with a soft cloth and a mild, non-abrasive cleaner. do not use power tools for assembly. This is not in the position shown. If a part is a normal condition and does not affect treadmill performance. Make sure that the power cord is in the parts bag, first check to the top...shipping, a small amount of lubricant may be transferred to see the drawings below. For help identifying the assembly hardware, see if it has been pre-assembled. Attach the Left Upright (31) to assemble the treadmill, call toll-free 1-800-445-2480. Orient the Left Upright so the sticker is on the inside as...

English Manual
Page 7
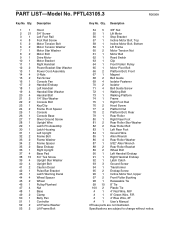
...from the Wire Harness (28). 28 36 Left Side 34 Right Side Bracket 47 33 34 32 Frame Assembly 7 Attach each Frame Spacer (34). Insert the Wire Harness (28) into the Right Upright; Make ...flat on the left side. Next, position the Upright Base and the Uprights (31, 36) around the frame assembly as shown. Insert a Frame Bolt (32) through a Frame Washer (33), the Right Upright, the Frame...so the Wheels (45) are at the bottom. Do not remove the large colored tie on the frame assembly. Repeat this step on the floor. Next, raise the Uprights (31, 36) so the Upright Base (...
...from the Wire Harness (28). 28 36 Left Side 34 Right Side Bracket 47 33 34 32 Frame Assembly 7 Attach each Frame Spacer (34). Insert the Wire Harness (28) into the Right Upright; Make ...flat on the left side. Next, position the Upright Base and the Uprights (31, 36) around the frame assembly as shown. Insert a Frame Bolt (32) through a Frame Washer (33), the Right Upright, the Frame...so the Wheels (45) are at the bottom. Do not remove the large colored tie on the frame assembly. Repeat this step on the floor. Next, raise the Uprights (31, 36) so the Upright Base (...

English Manual
Page 8
... ON. 5 20 18 19 Cutout 90 95 28 31 20 19 11 36 91 95 6 26 27 Ground Wire 28 11 28 7. Set the console assembly on the Console Base (26). Make sure that the screw hole in the Handrail with four 3/4" Screws (2), 11 two Console Bolts (22), and two 1/4" Star... are pinched. Hold the Console Base (26) near the Right Upright (36), and insert the Wire Harness (28) into the Right Handrail. 7 Attach the console assembly with a Silver Ground Screw (27). The connectors should slide together easily and snap into the Handrail and the Right Upright. Start all four Screws and...
... ON. 5 20 18 19 Cutout 90 95 28 31 20 19 11 36 91 95 6 26 27 Ground Wire 28 11 28 7. Set the console assembly on the Console Base (26). Make sure that the screw hole in the Handrail with four 3/4" Screws (2), 11 two Console Bolts (22), and two 1/4" Star... are pinched. Hold the Console Base (26) near the Right Upright (36), and insert the Wire Harness (28) into the Right Handrail. 7 Attach the console assembly with a Silver Ground Screw (27). The connectors should slide together easily and snap into the Handrail and the Right Upright. Start all four Screws and...
English Manual
Page 24
...Motor Tension Washer 7 1 Motor Star Washer 8 2 Motor Bolt 9 1 Drive Motor 10 1 Motor Bracket 11 1 Right Handrail 12 2 Power Bracket Star Washer 13 1 Power Cord Assembly 14 4 U-Nuts 15 2 Fan Screw 16 1 Console Fan 17 2 Handrail Endcap 18 1 Left Handrail 19 4 Handrail Star Washer 20 4 Handrail Bolt 21 2 1/4" Star Washer...Console Bolt 23 1 Key/Clip 24 2 Frame Pivot Spacer 25 1 Console 26 1 Console Base 27 7 Sliver Ground Screw 28 1 Upright Wire 29 1 Latch Pin Assembly 30 1 Latch Housing 31 1 Left Upright 32 2 Frame Bolt 33 2 Frame Washer 34 2 Frame Spacer 35 2 Base Endcap 36 1 Right Upright 37 4 ...
...Motor Tension Washer 7 1 Motor Star Washer 8 2 Motor Bolt 9 1 Drive Motor 10 1 Motor Bracket 11 1 Right Handrail 12 2 Power Bracket Star Washer 13 1 Power Cord Assembly 14 4 U-Nuts 15 2 Fan Screw 16 1 Console Fan 17 2 Handrail Endcap 18 1 Left Handrail 19 4 Handrail Star Washer 20 4 Handrail Bolt 21 2 1/4" Star Washer...Console Bolt 23 1 Key/Clip 24 2 Frame Pivot Spacer 25 1 Console 26 1 Console Base 27 7 Sliver Ground Screw 28 1 Upright Wire 29 1 Latch Pin Assembly 30 1 Latch Housing 31 1 Left Upright 32 2 Frame Bolt 33 2 Frame Washer 34 2 Frame Spacer 35 2 Base Endcap 36 1 Right Upright 37 4 ...


