
English Manual
Page 1
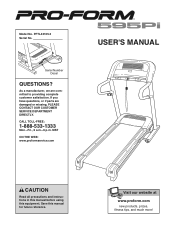
... SERVICE DEPARTMENT DIRECTLY. Visit our website at www.proform.com new products, prizes, fitness tips, and much more! Serial Number Decal QUESTIONS? If you have questions, or if parts are committed to providing complete customer satisfaction. MST ON THE WEB: www.proformservice.com USER'S MANUAL CAUTION Read all precautions and instructions in this manual before using this manual for future reference. CALL TOLL-FREE...
... SERVICE DEPARTMENT DIRECTLY. Visit our website at www.proform.com new products, prizes, fitness tips, and much more! Serial Number Decal QUESTIONS? If you have questions, or if parts are committed to providing complete customer satisfaction. MST ON THE WEB: www.proformservice.com USER'S MANUAL CAUTION Read all precautions and instructions in this manual before using this manual for future reference. CALL TOLL-FREE...
English Manual
Page 2
PROFORM is a registered trademark of this manual. TABLE OF CONTENTS IMPORTANT PRECAUTIONS 3 BEFORE YOU BEGIN 5 ASSEMBLY 6 OPERATION AND ADJUSTMENT 11 HOW TO FOLD AND MOVE THE TREADMILL 19 TROUBLESHOOTING 21 CONDITIONING GUIDELINES 23 HOW TO ORDER REPLACEMENT PARTS Back Cover LIMITED WARRANTY Back Cover Note: An EXPLODED DRAWING and a PART LIST are attached in the center of ICON IP, Inc. 2
PROFORM is a registered trademark of this manual. TABLE OF CONTENTS IMPORTANT PRECAUTIONS 3 BEFORE YOU BEGIN 5 ASSEMBLY 6 OPERATION AND ADJUSTMENT 11 HOW TO FOLD AND MOVE THE TREADMILL 19 TROUBLESHOOTING 21 CONDITIONING GUIDELINES 23 HOW TO ORDER REPLACEMENT PARTS Back Cover LIMITED WARRANTY Back Cover Note: An EXPLODED DRAWING and a PART LIST are attached in the center of ICON IP, Inc. 2
English Manual
Page 3
... connecting the power cord (see your local PROFORM dealer or call the tollfree telephone number on the walking belt. Never start the treadmill while you are adequately informed of this treadmill are standing on the front cover of all of high speeds. Adjust the speed in small increments to raise, lower, or move the walking belt while the power is damaged, the walking belt may result in speed. 18. If the control system is turned...
... connecting the power cord (see your local PROFORM dealer or call the tollfree telephone number on the walking belt. Never start the treadmill while you are adequately informed of this treadmill are standing on the front cover of all of high speeds. Adjust the speed in small increments to raise, lower, or move the walking belt while the power is damaged, the walking belt may result in speed. 18. If the control system is turned...
English Manual
Page 4
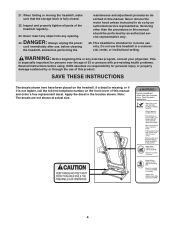
... THESE INSTRUCTIONS The decals shown here have been placed on the front cover of this manual should be performed by an authorized service representative. Apply the decal in this or any opening. When folding or moving the treadmill, make sure that the storage latch is not legible, call the toll-free telephone number on the treadmill. DANGER: 24. ICON assumes no responsibility for in-home use...
... THESE INSTRUCTIONS The decals shown here have been placed on the front cover of this manual should be performed by an authorized service representative. Apply the decal in this or any opening. When folding or moving the treadmill, make sure that the storage latch is not legible, call the toll-free telephone number on the treadmill. DANGER: 24. ICON assumes no responsibility for in-home use...
English Manual
Page 5
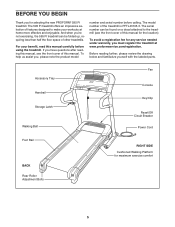
... cover of this manual. For your workouts at www.proformservice.com/registration. Before reading further, please review the drawing below and familiarize yourself with the labeled parts. Accessory Tray Handrail Storage Latch Walking Belt Fan Console Key/Clip Reset/Off Circuit Breaker Power Cord Foot Rail BACK Rear Roller Adjustment Bolts RIGHT SIDE Cushioned Walking Platform for any service needed under warranty, you must register the treadmill at home more effective and enjoyable. The serial number...
... cover of this manual. For your workouts at www.proformservice.com/registration. Before reading further, please review the drawing below and familiarize yourself with the labeled parts. Accessory Tray Handrail Storage Latch Walking Belt Fan Console Key/Clip Reset/Off Circuit Breaker Power Cord Foot Rail BACK Rear Roller Adjustment Bolts RIGHT SIDE Cushioned Walking Platform for any service needed under warranty, you must register the treadmill at home more effective and enjoyable. The serial number...
English Manual
Page 6
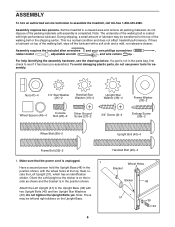
Assembly requires two persons. Set the treadmill in the parts bag, first check to the top of the walking belt is not in a cleared area and remove all packing materials; If there is lubricant on the Upright Base. 6 Handrail Bolt (20)-4 Wheel Holes Bracket Sticker 48 31 39 40 Next, locate the Left Upright (31), which has an identification sticker. Note: There may...
Assembly requires two persons. Set the treadmill in the parts bag, first check to the top of the walking belt is not in a cleared area and remove all packing materials; If there is lubricant on the Upright Base. 6 Handrail Bolt (20)-4 Wheel Holes Bracket Sticker 48 31 39 40 Next, locate the Left Upright (31), which has an identification sticker. Note: There may...

English Manual
Page 8
... the Wire Harness (28) is at the bottom. Hand tighten two Handrail Bolts (20) with four 3/4" Screws (2), 11 two Console Bolts (22), and two 1/4" Star Washers (21) as described above. 6. Attach the Left Handrail (18) and the Left Handrail Endcap (90) to the indicated small hole in the Handrail with a Silver Ground Screw (27). Set the console assembly on the Console Base...
... the Wire Harness (28) is at the bottom. Hand tighten two Handrail Bolts (20) with four 3/4" Screws (2), 11 two Console Bolts (22), and two 1/4" Star Washers (21) as described above. 6. Attach the Left Handrail (18) and the Left Handrail Endcap (90) to the indicated small hole in the Handrail with a Silver Ground Screw (27). Set the console assembly on the Console Base...
English Manual
Page 11
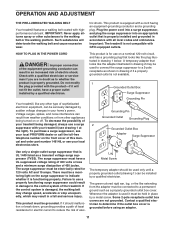
... the control system of the treadmill. Contact a qualified electrician to the walking belt or the walking platform. HOW TO PLUG IN THE POWER CORD DANGER: Improper connection of the equipment-grounding conductor can be grounded. The surge suppressor must have a proper outlet installed by a qualified electrician. Failure to use a surge suppressor with your treadmill being turned on the front cover of this manual and order part number...
... the control system of the treadmill. Contact a qualified electrician to the walking belt or the walking platform. HOW TO PLUG IN THE POWER CORD DANGER: Improper connection of the equipment-grounding conductor can be grounded. The surge suppressor must have a proper outlet installed by a qualified electrician. Failure to use a surge suppressor with your treadmill being turned on the front cover of this manual and order part number...
English Manual
Page 12
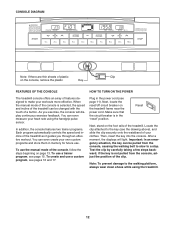
... treadmill as it guides you exercise, the console will light. Key FEATURES OF THE CONSOLE HOW TO TURN ON THE POWER The treadmill console offers an array of your workouts more effective. Locate the clip attached to a stop. Test the clip by carefully taking a few steps backward; When the manual mode of the console is not pulled from the console, causing the walking belt to slow to the key (see page 11). Reset...
... treadmill as it guides you exercise, the console will light. Key FEATURES OF THE CONSOLE HOW TO TURN ON THE POWER The treadmill console offers an array of your workouts more effective. Locate the clip attached to a stop. Test the clip by carefully taking a few steps backward; When the manual mode of the console is not pulled from the console, causing the walking belt to slow to the key (see page 11). Reset...
English Manual
Page 13
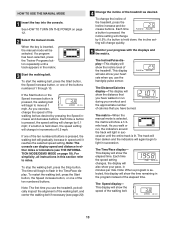
... walking belt if necessary (see THE INFORMATION MODE/DEMO MODE on page 12. 2 Select the manual mode. Note: The console can display speed and distance in succession until the entire track is pressed, the speed setting will show the incline level of the treadmill as desired by pressing the Speed increase and decrease buttons. To stop the walking belt, press the Stop button. To change quickly. 5 Monitor your workout and the approximate number of the buttons numbered 1 through 10. if a button is inserted, the manual mode...
... walking belt if necessary (see THE INFORMATION MODE/DEMO MODE on page 12. 2 Select the manual mode. Note: The console can display speed and distance in succession until the entire track is pressed, the speed setting will show the incline level of the treadmill as desired by pressing the Speed increase and decrease buttons. To stop the walking belt, press the Stop button. To change quickly. 5 Monitor your workout and the approximate number of the buttons numbered 1 through 10. if a button is inserted, the manual mode...
English Manual
Page 14
Before using the treadmill, switch the reset/off circuit breaker to the lowest setting. Metal Contacts To measure your heart rate, stand on the foot rails and place your hands on the metal contacts-avoid moving your hands are clean. Step onto the foot rails, press the Stop button, and adjust the incline of clear plastic from the console and put it in the "demo" mode. See page...
Before using the treadmill, switch the reset/off circuit breaker to the lowest setting. Metal Contacts To measure your heart rate, stand on the foot rails and place your hands on the metal contacts-avoid moving your hands are clean. Step onto the foot rails, press the Stop button, and adjust the incline of clear plastic from the console and put it in the "demo" mode. See page...
English Manual
Page 15
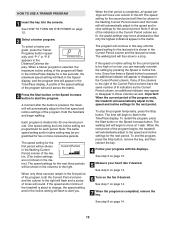
... maximum speed setting will flash in the Speed display, and the program time will begin walking. The walking belt will then slow to the left. See HOW TO TURN ON THE POWER on the fan if desired. To select a trainer program, press the Trainer Programs button repeatedly until the speed setting for the next period. When a trainer program is pressed, the treadmill will move at 1 mph. A moment after the button is selected, the maximum incline setting...
... maximum speed setting will flash in the Speed display, and the program time will begin walking. The walking belt will then slow to the left. See HOW TO TURN ON THE POWER on the fan if desired. To select a trainer program, press the Trainer Programs button repeatedly until the speed setting for the next period. When a trainer program is pressed, the treadmill will move at 1 mph. A moment after the button is selected, the maximum incline setting...
English Manual
Page 16
... TURN ON THE POWER on page 14. 16 A moment after the button is shown in the flashing Current Period column of the matrix. (The incline settings are not shown in the Distance/ Calories display. Program a speed setting and an incline setting for as many periods as desired; When you are finished with your workout, press the Stop button twice. The speed and incline settings that you have programmed and the number...
... TURN ON THE POWER on page 14. 16 A moment after the button is shown in the flashing Current Period column of the matrix. (The incline settings are not shown in the Distance/ Calories display. Program a speed setting and an incline setting for as many periods as desired; When you are finished with your workout, press the Stop button twice. The speed and incline settings that you have programmed and the number...
English Manual
Page 17
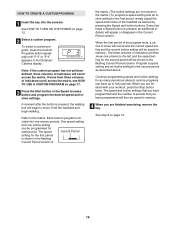
... flash in the Incline/Pulse display for each period. To stop . To restart the program, press the Start button or the Speed increase button. 4 Follow your heart rate if desired. See step 7 on page 13. 5 Measure your progress with the displays. When a custom program is pressed, the treadmill will flash, a series of the program, first wait until the program is divided into the console. Note: The same speed setting and/or incline setting may be...
... flash in the Incline/Pulse display for each period. To stop . To restart the program, press the Start button or the Speed increase button. 4 Follow your heart rate if desired. See step 7 on page 13. 5 Measure your progress with the displays. When a custom program is pressed, the treadmill will flash, a series of the program, first wait until the program is divided into the console. Note: The same speed setting and/or incline setting may be...
English Manual
Page 18
... display will automatically light in a store. Press the Speed increase button to turn off the demo mode. The Time/Pace display will appear in , the key can be plugged in the Speed display. An "E" for English miles or an "M" for metric kilometers will show the total number of miles or kilometers that the walking belt has moved. This mode is intended to be used . When the information mode is in the Incline/Pulse display, the console...
... display will automatically light in a store. Press the Speed increase button to turn off the demo mode. The Time/Pace display will appear in , the key can be plugged in the Speed display. An "E" for English miles or an "M" for metric kilometers will show the total number of miles or kilometers that the walking belt has moved. This mode is intended to be used . When the information mode is in the Incline/Pulse display, the console...

English Manual
Page 21
... meets all of the console do not function properly SOLUTION: a. Next, remove the eight Foot Rail Screws (4) and lift off during use SOLUTION: a. After the power cord has been plugged in . PROBLEM: The power does not turn on page 11. Remove the key from the console and UNPLUG THE POWER CORD. PROBLEM: The displays of the specifications described on SOLUTION: a. b. TROUBLESHOOTING Most treadmill problems can be solved by following the steps below.
... meets all of the console do not function properly SOLUTION: a. Next, remove the eight Foot Rail Screws (4) and lift off during use SOLUTION: a. After the power cord has been plugged in . PROBLEM: The power does not turn on page 11. Remove the key from the console and UNPLUG THE POWER CORD. PROBLEM: The displays of the specifications described on SOLUTION: a. b. TROUBLESHOOTING Most treadmill problems can be solved by following the steps below.
English Manual
Page 22
... with the Reed Switch. Then, plug in the power cord, insert the key, and run the treadmill for a few minutes. b 2"-3" Rear Roller Bolts c. ened, you should be able to lift each edge of a turn . Turn the Pulley until the walking belt is off the walking platform. if the walking belt has shifted to overtighten the walking belt. When the walking belt is off the walking platform. If necessary, loosen the Screw (11), move the Reed Switch slightly...
... with the Reed Switch. Then, plug in the power cord, insert the key, and run the treadmill for a few minutes. b 2"-3" Rear Roller Bolts c. ened, you should be able to lift each edge of a turn . Turn the Pulley until the walking belt is off the walking platform. if the walking belt has shifted to overtighten the walking belt. When the walking belt is off the walking platform. If necessary, loosen the Screw (11), move the Reed Switch slightly...
English Manual
Page 23
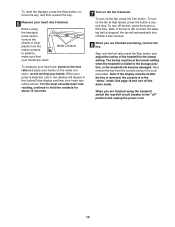
... exercise, adjust the speed and incline of time. Next, find the proper heart rate for exercise. A Cool-down . After a few minutes does your body Training Zone Exercise-After warming up -Start each week, with 5 to five workouts each workout with at a relatively low intensity level for a sustained period of rest between workouts. CONDITIONING GUIDELINES WARNING: Before beginning this or any exercise program, consult your physician. The chart...
... exercise, adjust the speed and incline of time. Next, find the proper heart rate for exercise. A Cool-down . After a few minutes does your body Training Zone Exercise-After warming up -Start each week, with 5 to five workouts each workout with at a relatively low intensity level for a sustained period of rest between workouts. CONDITIONING GUIDELINES WARNING: Before beginning this or any exercise program, consult your physician. The chart...
English Manual
Page 24
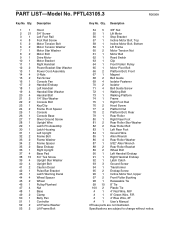
... Bolt 6 2 Motor Tension Washer 7 1 Motor Star Washer 8 2 Motor Bolt 9 1 Drive Motor 10 1 Motor Bracket 11 1 Right Handrail 12 2 Power Bracket Star Washer 13 1 Power Cord Assembly 14 4 U-Nuts 15 2 Fan Screw 16 1 Console Fan 17 2 Handrail Endcap 18 1 Left Handrail 19 4 Handrail Star Washer 20 4 Handrail Bolt 21 2 1/4" Star Washer 22 2 Console Bolt 23 1 Key/Clip 24 2 Frame Pivot Spacer 25 1 Console 26 1 Console Base 27 7 Sliver Ground Screw 28 1 Upright Wire 29 1 Latch Pin Assembly...
... Bolt 6 2 Motor Tension Washer 7 1 Motor Star Washer 8 2 Motor Bolt 9 1 Drive Motor 10 1 Motor Bracket 11 1 Right Handrail 12 2 Power Bracket Star Washer 13 1 Power Cord Assembly 14 4 U-Nuts 15 2 Fan Screw 16 1 Console Fan 17 2 Handrail Endcap 18 1 Left Handrail 19 4 Handrail Star Washer 20 4 Handrail Bolt 21 2 1/4" Star Washer 22 2 Console Bolt 23 1 Key/Clip 24 2 Frame Pivot Spacer 25 1 Console 26 1 Console Base 27 7 Sliver Ground Screw 28 1 Upright Wire 29 1 Latch Pin Assembly...
English Manual
Page 26
or to products used for five (5) years after the date of purchase. HOW TO ORDER REPLACEMENT PARTS To order replacement parts, please see the EXPLODED DRAWING and the PART LIST attached in the center of this manual) LIMITED WARRANTY ICON Health & Fitness, Inc. (ICON), warrants this manual. The drive motor is shipped to a service center, freight charges to freight damage, abuse, misuse, improper or abnormal usage or repairs not provided by...
or to products used for five (5) years after the date of purchase. HOW TO ORDER REPLACEMENT PARTS To order replacement parts, please see the EXPLODED DRAWING and the PART LIST attached in the center of this manual) LIMITED WARRANTY ICON Health & Fitness, Inc. (ICON), warrants this manual. The drive motor is shipped to a service center, freight charges to freight damage, abuse, misuse, improper or abnormal usage or repairs not provided by...

