

Canadian English Manual
Page 2
... YOU BEGIN on any surface that could become caught in a garage or covered patio, or near water. 5. Do not put the treadmill in the treadmill. When connecting the power cord (see page 7), plug the power cord into a surge suppressor (not included) and plug the surge ... properly.) 2 TABLE OF CONTENTS IMPORTANT PRECAUTIONS 2 BEFORE YOU BEGIN 4 ASSEMBLY 5 OPERATION AND ADJUSTMENT 7 HOW TO FOLD AND MOVE THE TREADMILL 10 MAINTENANCE AND TROUBLE-SHOOTING 12 CONDITIONING GUIDELINES 14 ORDERING REPLACEMENT PARTS 15 LIMITED WARRANTY Back Cover Note: An EXPLODED DRAWING and PART LIST ...
... YOU BEGIN on any surface that could become caught in a garage or covered patio, or near water. 5. Do not put the treadmill in the treadmill. When connecting the power cord (see page 7), plug the power cord into a surge suppressor (not included) and plug the surge ... properly.) 2 TABLE OF CONTENTS IMPORTANT PRECAUTIONS 2 BEFORE YOU BEGIN 4 ASSEMBLY 5 OPERATION AND ADJUSTMENT 7 HOW TO FOLD AND MOVE THE TREADMILL 10 MAINTENANCE AND TROUBLE-SHOOTING 12 CONDITIONING GUIDELINES 14 ORDERING REPLACEMENT PARTS 15 LIMITED WARRANTY Back Cover Note: An EXPLODED DRAWING and PART LIST ...

Canadian English Manual
Page 3
...is intended only as an exercise aid in determining heart rate trends in use. (See the drawing on the walking belt. Never leave the treadmill unattended while it is not in general. 17. Always unplug the power cord immediately after use only. tenance and adjustment procedures de- Servicing ... sudden jumps in this manual). The decal shown has been placed on page 10.) You must be performed by an authorized service representative. The treadmill is not legible, please call our Customer Service Department, toll-free, to safely lift 20 kg (45 lbs.) in this or any opening....
...is intended only as an exercise aid in determining heart rate trends in use. (See the drawing on the walking belt. Never leave the treadmill unattended while it is not in general. 17. Always unplug the power cord immediately after use only. tenance and adjustment procedures de- Servicing ... sudden jumps in this manual). The decal shown has been placed on page 10.) You must be performed by an authorized service representative. The treadmill is not legible, please call our Customer Service Department, toll-free, to safely lift 20 kg (45 lbs.) in this or any opening....

Canadian English Manual
Page 4
...-936-4266, Before reading further, please review the drawing below and familiarize yourself with innovative design to the treadmill (see the front cover of your benefit, read this manual for selecting the PROFORM® 585EX treadmill. Water Bottle Holder (Bottle not included) Handrail Storage Latch Book Holder Key/Clip Accessory Tray Console Handrail LEFT...
...-936-4266, Before reading further, please review the drawing below and familiarize yourself with innovative design to the treadmill (see the front cover of your benefit, read this manual for selecting the PROFORM® 585EX treadmill. Water Bottle Holder (Bottle not included) Handrail Storage Latch Book Holder Key/Clip Accessory Tray Console Handrail LEFT...
Canadian English Manual
Page 5
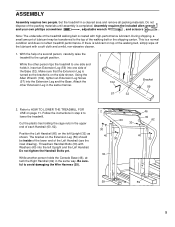
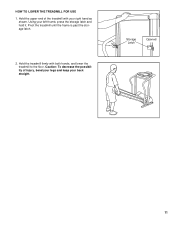
... person holds the Console Base (46), attach the Right Handrail (62) in a cleared area and remove all packing materials. Attach the other person tips the treadmill to avoid damaging the Wire Harness (35). 2 30 40 60 30 46 35 62 30 40 30 32 59 59 5 If there is coated with... of the Base (32). The bracket on the Extension Leg (59) should be transferred to HOW TO LOWER THE TREADMILL FOR USE on top of a second person, carefully raise the treadmill to lower the treadmill. Do not dispose of each Handrail (60, 62). Make sure that the Extension Leg is turned so the...
... person holds the Console Base (46), attach the Right Handrail (62) in a cleared area and remove all packing materials. Attach the other person tips the treadmill to avoid damaging the Wire Harness (35). 2 30 40 60 30 46 35 62 30 40 30 32 59 59 5 If there is coated with... of the Base (32). The bracket on the Extension Leg (59) should be transferred to HOW TO LOWER THE TREADMILL FOR USE on top of a second person, carefully raise the treadmill to lower the treadmill. Do not dispose of each Handrail (60, 62). Make sure that the Extension Leg is turned so the...
Canadian English Manual
Page 6
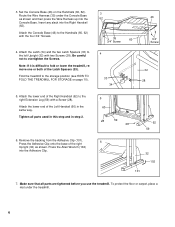
... STORAGE on the Handrails (60, 62). Note: If it is difficult to the right Extension Leg (59) with a Screw (28). Fold the treadmill to the Handrails (60, 62) with two Screws (28). Remove the backing from the Adhesive Clip (101). Set the Console Base (46) on page 10). 3 ... right 6 Upright (32) as shown and then press the Wire Harness up into the Console Base. Tighten all parts are tightened before you use the treadmill. Be careful not to the left Upright (32) with the four 3/4" Screws. 4. To protect the floor or carpet, place a mat under the Console Base as...
... STORAGE on the Handrails (60, 62). Note: If it is difficult to the right Extension Leg (59) with a Screw (28). Fold the treadmill to the Handrails (60, 62) with two Screws (28). Remove the backing from the Adhesive Clip (101). Set the Console Base (46) on page 10). 3 ... right 6 Upright (32) as shown and then press the Wire Harness up into the Console Base. Tighten all parts are tightened before you use the treadmill. Be careful not to the left Upright (32) with the four 3/4" Screws. 4. To protect the floor or carpet, place a mat under the Console Base as...
Canadian English Manual
Page 7
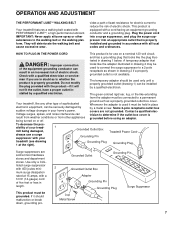
...nominal 120-volt circuit, and has a grounding plug that looks like the adapter illustrated in your Grounded Outlet Box Grounding Pin Treadmill Power Cord treadmill (see drawing 1 at the right). If it must be used to connect the surge suppressor to reduce the risk of electric... to determine if the outlet box cover is grounded before using an adapter. OPERATION AND ADJUSTMENT THE PERFORMANT LUBETM WALKING BELT Your treadmill features a walking belt coated with a qualified electrician or service- IMPORTANT: Never apply silicone spray or other type of sophisticated electronic...
...nominal 120-volt circuit, and has a grounding plug that looks like the adapter illustrated in your Grounded Outlet Box Grounding Pin Treadmill Power Cord treadmill (see drawing 1 at the right). If it must be used to connect the surge suppressor to reduce the risk of electric... to determine if the outlet box cover is grounded before using an adapter. OPERATION AND ADJUSTMENT THE PERFORMANT LUBETM WALKING BELT Your treadmill features a walking belt coated with a qualified electrician or service- IMPORTANT: Never apply silicone spray or other type of sophisticated electronic...
Canadian English Manual
Page 8
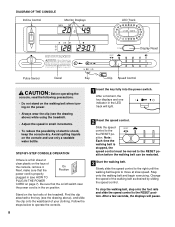
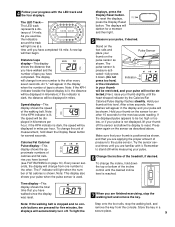
.... STEP-BY-STEP CONSOLE OPERATION If there is stopped, the speed control must be moved to the key (see the drawing above ) while using the treadmill. • Adjust the speed in the LED track will pause. After a few seconds, the displays will light. 2 Reset the speed control. Next, make sure that...
.... STEP-BY-STEP CONSOLE OPERATION If there is stopped, the speed control must be moved to the key (see the drawing above ) while using the treadmill. • Adjust the speed in the LED track will pause. After a few seconds, the displays will light. 2 Reset the speed control. Next, make sure that...
Canadian English Manual
Page 9
... allow the display to the other 15 seconds for a moment and then light. 5 Measure your progress with it down the top or bottom of the treadmill, if desired. Press down the Display Reset button for five minutes, the displays will be displayed in miles per hour; To change the unit of...
... allow the display to the other 15 seconds for a moment and then light. 5 Measure your progress with it down the top or bottom of the treadmill, if desired. Press down the Display Reset button for five minutes, the displays will be displayed in miles per hour; To change the unit of...
Canadian English Manual
Page 10
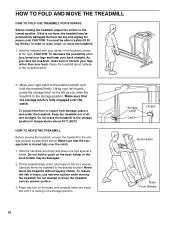
... To protect the floor or carpet from damage, place a mat under the treadmill. Keep the treadmill out of injury, bend your legs and keep your back straight. Never move the treadmill. 1. Hold the treadmill with your legs rather than your hands in temperatures above . Make sure that... latch is closed fully over an uneven surface. 3. HOW TO MOVE THE TREADMILL Before moving the treadmill. To reduce the risk of injury, use extreme caution while moving the treadmill, convert the treadmill to the storage position. Storage Latch Catch Closed Book Holder Base Front Wheels ...
... To protect the floor or carpet from damage, place a mat under the treadmill. Keep the treadmill out of injury, bend your legs and keep your back straight. Never move the treadmill. 1. Hold the treadmill with your legs rather than your hands in temperatures above . Make sure that... latch is closed fully over an uneven surface. 3. HOW TO MOVE THE TREADMILL Before moving the treadmill. To reduce the risk of injury, use extreme caution while moving the treadmill, convert the treadmill to the storage position. Storage Latch Catch Closed Book Holder Base Front Wheels ...
Canadian English Manual
Page 11
Hold the upper end of injury, bend your legs and keep your right hand as shown. Hold the treadmill firmly with your back straight. Storage Latch Opened 11 Caution: To decrease the possibility of the treadmill with both hands, and lower the treadmill to the floor. HOW TO LOWER THE TREADMILL FOR USE 1. Using your left thumb, press the storage latch and hold it. Pivot the treadmill until the frame is past the storage latch. 2.
Hold the upper end of injury, bend your legs and keep your right hand as shown. Hold the treadmill firmly with your back straight. Storage Latch Opened 11 Caution: To decrease the possibility of the treadmill with both hands, and lower the treadmill to the floor. HOW TO LOWER THE TREADMILL FOR USE 1. Using your left thumb, press the storage latch and hold it. Pivot the treadmill until the frame is past the storage latch. 2.
Canadian English Manual
Page 12
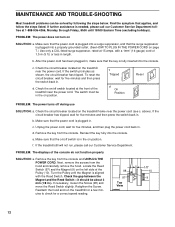
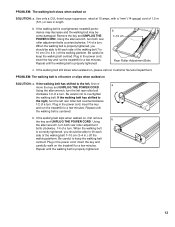
.... b. f. Next, remove the screws from the console and UNPLUG THE POWER CORD. Locate the Reed Switch (97) and the Magnet (9) on the treadmill near the power cord (see c. Retighten the Screw. Check the on position. c Tripped Reset Tripped d On Position Reset PROBLEM: The power turns off...on position. If the circuit breaker has tripped, wait for five minutes and then press the switch back in . e. If the treadmill still will not run the treadmill for a few minutes to check for five minutes, and then plug the power cord back in . c. To reset the circuit...
.... b. f. Next, remove the screws from the console and UNPLUG THE POWER CORD. Locate the Reed Switch (97) and the Magnet (9) on the treadmill near the power cord (see c. Retighten the Screw. Check the on position. c Tripped Reset Tripped d On Position Reset PROBLEM: The power turns off...on position. If the circuit breaker has tripped, wait for five minutes and then press the switch back in . e. If the treadmill still will not run the treadmill for a few minutes to check for five minutes, and then plug the power cord back in . c. To reset the circuit...
Canadian English Manual
Page 13
...turn the left , first re- If the walking belt has shifted to 4 in the power cord, insert the key and carefully walk on the treadmill for a few minutes. If the walking belt slips when walked on , please call our Customer Service Department. PROBLEM: The walking belt is properly ...tightened. 13 Be careful not to keep the walking belt centred. Plug in length. Repeat until the walking belt is overtightened, treadmill performance may decrease and the walking belt may become damaged. If the walking belt still slows when walked on , first remove b the ...
...turn the left , first re- If the walking belt has shifted to 4 in the power cord, insert the key and carefully walk on the treadmill for a few minutes. If the walking belt slips when walked on , please call our Customer Service Department. PROBLEM: The walking belt is properly ...tightened. 13 Be careful not to keep the walking belt centred. Plug in length. Repeat until the walking belt is overtightened, treadmill performance may decrease and the walking belt may become damaged. If the walking belt still slows when walked on , first remove b the ...
Canadian English Manual
Page 14
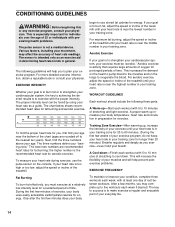
... ten years). To find the three numbers above your heart rate is too high or too low, adjust the speed or incline of the treadmill until your heart rate is to make exercise a regular and enjoyable part of the chart (ages are recommended heart rates for energy. If ...aerobic exercise. For aerobic exercise, adjust the speed or incline of stretching to cool down -Finish each workout with 5 to 10 minutes of the treadmill until your cardiovascular system, the key to strengthen your cardiovascular system, your training zone. Next, find the proper heart rate for you must be ...
... ten years). To find the three numbers above your heart rate is too high or too low, adjust the speed or incline of the treadmill until your heart rate is to make exercise a regular and enjoyable part of the chart (ages are recommended heart rates for energy. If ...aerobic exercise. For aerobic exercise, adjust the speed or incline of stretching to cool down -Finish each workout with 5 to 10 minutes of the treadmill until your cardiovascular system, the key to strengthen your cardiovascular system, your training zone. Next, find the proper heart rate for you must be ...

Canadian English Manual
Page 15
When ordering parts, please be prepared to give the following information: • The MODEL NUMBER of the product (PCTL58590) • The NAME of the product (PROFORM® 835QT treadmill) • The SERIAL NUMBER of the product (see the front cover of this manual). ICON of this manual) • The KEY NUMBER and DESCRIPTION...
When ordering parts, please be prepared to give the following information: • The MODEL NUMBER of the product (PCTL58590) • The NAME of the product (PROFORM® 835QT treadmill) • The SERIAL NUMBER of the product (see the front cover of this manual). ICON of this manual) • The KEY NUMBER and DESCRIPTION...

Canadian English Manual
Page 16
...another manufacturer? ❏ No ❏ Yes What other manufacturer? 9) Based on how long an implied warranty lasts. Printed in USA PROFORM is a registered trademark of incidental or consequential damages. Part No. 155593 R1201A Printed in lieu of any and all freight and other ...other brand equipment would you purchase? 10) What other type of exercise equipment do you own? ❏ Bicycle ❏ Exercise Cycle ❏ Treadmill ❏ Home Gym ❏ Weight Bench ❏ Stepper ❏ Cardio Glide ❏ Other 11) Which type of magazines do not ...
...another manufacturer? ❏ No ❏ Yes What other manufacturer? 9) Based on how long an implied warranty lasts. Printed in USA PROFORM is a registered trademark of incidental or consequential damages. Part No. 155593 R1201A Printed in lieu of any and all freight and other ...other brand equipment would you purchase? 10) What other type of exercise equipment do you own? ❏ Bicycle ❏ Exercise Cycle ❏ Treadmill ❏ Home Gym ❏ Weight Bench ❏ Stepper ❏ Cardio Glide ❏ Other 11) Which type of magazines do not ...


