
Canadian English Manual
Page 1
Serial Number Decal If you require SERVICE for future reference. Visit our website at www.proform.com PCTL58590 Serial No. Model No. Save this manual for this product, please call SEARS: 1-800-4 MY HOME (469-4663) If you are MISSING PARTS or require INFORMATION on how to operate this product, call 1-888-936-ICON (4266) ® USER'S MANUAL CAUTION Read all precautions and instructions in this manual before using this equipment.
Serial Number Decal If you require SERVICE for future reference. Visit our website at www.proform.com PCTL58590 Serial No. Model No. Save this manual for this product, please call SEARS: 1-800-4 MY HOME (469-4663) If you are MISSING PARTS or require INFORMATION on how to operate this product, call 1-888-936-ICON (4266) ® USER'S MANUAL CAUTION Read all precautions and instructions in this manual before using this equipment.
Canadian English Manual
Page 2
... of clearance behind it. Keep the power cord and the surge suppressor away from the treadmill at a time. TABLE OF CONTENTS IMPORTANT PRECAUTIONS 2 BEFORE YOU BEGIN 4 ASSEMBLY 5 OPERATION AND ADJUSTMENT 7 HOW TO FOLD AND MOVE THE TREADMILL 10 MAINTENANCE AND TROUBLE-SHOOTING 12 CONDITIONING GUIDELINES 14 ORDERING REPLACEMENT PARTS 15 LIMITED WARRANTY Back Cover Note: An EXPLODED DRAWING and PART LIST are recommended for future reference. No...
... of clearance behind it. Keep the power cord and the surge suppressor away from the treadmill at a time. TABLE OF CONTENTS IMPORTANT PRECAUTIONS 2 BEFORE YOU BEGIN 4 ASSEMBLY 5 OPERATION AND ADJUSTMENT 7 HOW TO FOLD AND MOVE THE TREADMILL 10 MAINTENANCE AND TROUBLE-SHOOTING 12 CONDITIONING GUIDELINES 14 ORDERING REPLACEMENT PARTS 15 LIMITED WARRANTY Back Cover Note: An EXPLODED DRAWING and PART LIST are recommended for future reference. No...
Canadian English Manual
Page 3
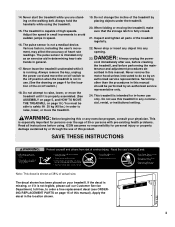
... folding or moving the treadmill, make sure that the storage latch is not a medical device. Never remove the motor hood unless instructed to order a free replacement decal (see ORDERING REPLACEMENT PARTS on page 15 of this product. Servicing other than the procedures in this manual. This is intended only as an exercise aid in determining heart rate trends in the location shown. 3 Apply the decal in general. 17. The pulse sensor...
... folding or moving the treadmill, make sure that the storage latch is not a medical device. Never remove the motor hood unless instructed to order a free replacement decal (see ORDERING REPLACEMENT PARTS on page 15 of this product. Servicing other than the procedures in this manual. This is intended only as an exercise aid in determining heart rate trends in the location shown. 3 Apply the decal in general. 17. The pulse sensor...

Canadian English Manual
Page 4
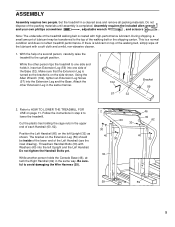
... excellent form of cardiovascular exercise in the convenience and privacy of the treadmill is PCTL58590. The model number of your benefit, read this manual for selecting the PROFORM® 585EX treadmill. For your home. Water Bottle Holder (Bottle not included) Handrail Storage Latch Book Holder Key/Clip Accessory Tray Console Handrail LEFT SIDE Walking Belt Foot Rails RIGHT SIDE On/Off Switch Circuit Breaker Front Wheel Rear Roller Adjustment Bolts Power Cord 4 BEFORE...
... excellent form of cardiovascular exercise in the convenience and privacy of the treadmill is PCTL58590. The model number of your benefit, read this manual for selecting the PROFORM® 585EX treadmill. For your home. Water Bottle Holder (Bottle not included) Handrail Storage Latch Book Holder Key/Clip Accessory Tray Console Handrail LEFT SIDE Walking Belt Foot Rails RIGHT SIDE On/Off Switch Circuit Breaker Front Wheel Rear Roller Adjustment Bolts Power Cord 4 BEFORE...
Canadian English Manual
Page 5
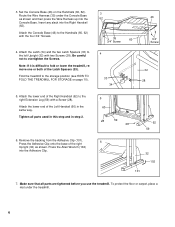
... until assembly is coated with high-performance lubricant. Set the treadmill in the same way. Do not dispose of each Handrail (60, 62). During shipping, a small amount of lubricant may be inside of the lower end of the treadmill walking belt is completed. Follow the instructions in the same manner. 1 102 57 32 Bracket 59 2. Do not tighten the Handrail Bolts yet...
... until assembly is coated with high-performance lubricant. Set the treadmill in the same way. Do not dispose of each Handrail (60, 62). During shipping, a small amount of lubricant may be inside of the lower end of the treadmill walking belt is completed. Follow the instructions in the same manner. 1 102 57 32 Bracket 59 2. Do not tighten the Handrail Bolts yet...
Canadian English Manual
Page 6
... 60 3/4" Screw 4 33 34 46 3/4" Screw 32 28 5. Tighten all parts are tightened before you use the treadmill. Make sure that all parts used in this step and in the same way. Attach the Latch (34) and the two Latch Spacers (33) to overtighten the Screws. Attach the lower end of the right 6 Upright (32) as shown and then press the Wire Harness up into the Console Base. Press the Adhesive...
... 60 3/4" Screw 4 33 34 46 3/4" Screw 32 28 5. Tighten all parts are tightened before you use the treadmill. Make sure that all parts used in this step and in the same way. Attach the Latch (34) and the two Latch Spacers (33) to overtighten the Screws. Attach the lower end of the right 6 Upright (32) as shown and then press the Wire Harness up into the Console Base. Press the Adhesive...
Canadian English Manual
Page 7
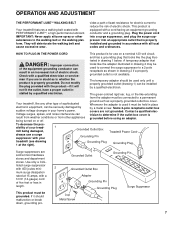
... damaged, always use on or off. The temporary adapter should malfunction or break down, grounding pro- To decrease the pos- Grounding Plug Grounding Plug Surge suppressors are not grounded. This product must be connected to whether the product is not available. OPERATION AND ADJUSTMENT THE PERFORMANT LUBETM WALKING BELT Your treadmill features a walking belt coated with a 1mm2 (14-gauge) cord of five feet...
... damaged, always use on or off. The temporary adapter should malfunction or break down, grounding pro- To decrease the pos- Grounding Plug Grounding Plug Surge suppressors are not grounded. This product must be connected to whether the product is not available. OPERATION AND ADJUSTMENT THE PERFORMANT LUBETM WALKING BELT Your treadmill features a walking belt coated with a 1mm2 (14-gauge) cord of five feet...
Canadian English Manual
Page 8
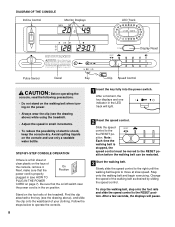
... switch near the power cord is properly plugged in (see HOW TO PLUG IN THE POWER CORD on the power. • Always wear the clip (see the drawing above ) while using the treadmill. • Adjust the speed in the LED track will pause. DIAGRAM OF THE CONSOLE Incline Control Monitor Displays LED Track Display Reset Pulse Sensor Decal Key Clip Speed Control CAUTION: Before operating the console, read the following precautions. • Do not stand on the walking belt when turning...
... switch near the power cord is properly plugged in (see HOW TO PLUG IN THE POWER CORD on the power. • Always wear the clip (see the drawing above ) while using the treadmill. • Adjust the speed in the LED track will pause. DIAGRAM OF THE CONSOLE Incline Control Monitor Displays LED Track Display Reset Pulse Sensor Decal Key Clip Speed Control CAUTION: Before operating the console, read the following precautions. • Do not stand on the walking belt when turning...
Canadian English Manual
Page 9
... the pulse sensor as described above. The LED track represents a distance of measurement, hold down the Display Reset button for the most accurate reading. Distance/Laps display-This display shows the distance that you are finished exercising, stop the walking belt, and remove the key from one number to the other. The display will be displayed in miles. Note: If the KPH indicator beside the Speed display is dark, the distance will change from the console...
... the pulse sensor as described above. The LED track represents a distance of measurement, hold down the Display Reset button for the most accurate reading. Distance/Laps display-This display shows the distance that you are finished exercising, stop the walking belt, and remove the key from one number to the other. The display will be displayed in miles. Note: If the KPH indicator beside the Speed display is dark, the distance will change from the console...
Canadian English Manual
Page 10
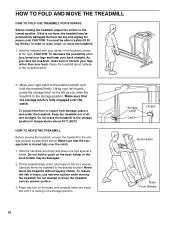
... engaged over the catch. Using your back. Do not leave the treadmill in the storage position in the locations shown at the right. Make sure that the storage latch is not done, the treadmill may be damaged. 2. Never move the treadmill over the catch. 1. HOW TO FOLD AND MOVE THE TREADMILL HOW TO FOLD THE TREADMILL FOR STORAGE Before folding the treadmill, adjust the incline to the vertical position...
... engaged over the catch. Using your back. Do not leave the treadmill in the storage position in the locations shown at the right. Make sure that the storage latch is not done, the treadmill may be damaged. 2. Never move the treadmill over the catch. 1. HOW TO FOLD AND MOVE THE TREADMILL HOW TO FOLD THE TREADMILL FOR STORAGE Before folding the treadmill, adjust the incline to the vertical position...
Canadian English Manual
Page 11
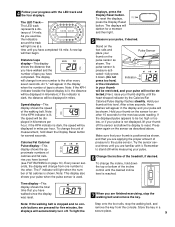
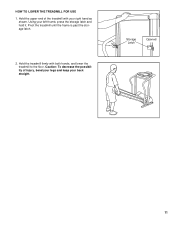
HOW TO LOWER THE TREADMILL FOR USE 1. Pivot the treadmill until the frame is past the storage latch. 2. Using your back straight. Storage Latch Opened 11 Caution: To decrease the possibility of the treadmill with both hands, and lower the treadmill to the floor. Hold the treadmill firmly with your right hand as shown. Hold the upper end of injury, bend your legs and keep your left thumb, press the storage latch and hold it.
HOW TO LOWER THE TREADMILL FOR USE 1. Pivot the treadmill until the frame is past the storage latch. 2. Using your back straight. Storage Latch Opened 11 Caution: To decrease the possibility of the treadmill with both hands, and lower the treadmill to the floor. Hold the treadmill firmly with your right hand as shown. Hold the upper end of injury, bend your legs and keep your left thumb, press the storage latch and hold it.
Canadian English Manual
Page 12
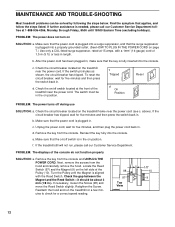
... Position Reset PROBLEM: The power turns off switch is plugged into the console. Make sure that applies, and follow the steps listed. Unplug the power cord, wait for a correct speed reading. 98 97 Top View 1/8" 10 9 12 d. Reinsert the key fully into a surge suppressor, and that the key is plugged in . f. Remove the key from the console and UNPLUG THE POWER CORD. If necessary, loosen the Screw (98) and move the Reed Switch slightly...
... Position Reset PROBLEM: The power turns off switch is plugged into the console. Make sure that applies, and follow the steps listed. Unplug the power cord, wait for a correct speed reading. 98 97 Top View 1/8" 10 9 12 d. Reinsert the key fully into a surge suppressor, and that the key is plugged in . f. Remove the key from the console and UNPLUG THE POWER CORD. If necessary, loosen the Screw (98) and move the Reed Switch slightly...
Canadian English Manual
Page 13
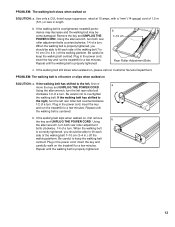
... treadmill for a few minutes. PROBLEM: The walking belt is properly tightened. 13 b. If the walking belt is properly tightened. Repeat until the walking belt is properly tightened, you should be able to lift each side of the walking belt 7 to 10 cm (3 to lift each side of a turn both rear roller adjustment bolts counterclockwise, 1/4 of the walking belt 7-10 cm (3-4 in the power cord, insert the key and run the treadmill for a few minutes. Plug...
... treadmill for a few minutes. PROBLEM: The walking belt is properly tightened. 13 b. If the walking belt is properly tightened. Repeat until the walking belt is properly tightened, you should be able to lift each side of the walking belt 7 to 10 cm (3 to lift each side of a turn both rear roller adjustment bolts counterclockwise, 1/4 of the walking belt 7-10 cm (3-4 in the power cord, insert the key and run the treadmill for a few minutes. Plug...
Canadian English Manual
Page 14
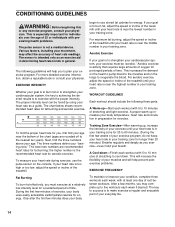
... training zone for energy. The sensor is near the lowest number in your breath. For maximum fat burning, adjust the speed or incline of heart rate readings. For aerobic exercise, adjust the speed or incline of the chart (ages are recommended heart rates for exercise. After a few weeks of your exercise program, do not keep your heart rate in your heart rate is in your condition, complete three workouts each workout with preexisting health problems. The pulse sensor...
... training zone for energy. The sensor is near the lowest number in your breath. For maximum fat burning, adjust the speed or incline of heart rate readings. For aerobic exercise, adjust the speed or incline of the chart (ages are recommended heart rates for exercise. After a few weeks of your exercise program, do not keep your heart rate in your heart rate is in your condition, complete three workouts each workout with preexisting health problems. The pulse sensor...

Canadian English Manual
Page 15
... product (PROFORM® 835QT treadmill) • The SERIAL NUMBER of the product (see the front cover of this manual). ORDERING REPLACEMENT PARTS To order replacement parts, call our Customer Service Department toll-free at 1-888-936-4266, Monday through Friday 8h00 until 18h30 Eastern Time (excluding holidays). ICON of this manual) • The KEY NUMBER and DESCRIPTION of the part(s) (see the EXPLODED DRAWING and PART LIST attached in the...
... product (PROFORM® 835QT treadmill) • The SERIAL NUMBER of the product (see the front cover of this manual). ORDERING REPLACEMENT PARTS To order replacement parts, call our Customer Service Department toll-free at 1-888-936-4266, Monday through Friday 8h00 until 18h30 Eastern Time (excluding holidays). ICON of this manual) • The KEY NUMBER and DESCRIPTION of the part(s) (see the EXPLODED DRAWING and PART LIST attached in the...
Canadian English Manual
Page 16
... or fitness for a period one of its authorized service centers. Part No. 155593 R1201A Printed in USA PROFORM is limited to replacing or repairing, at ICON's option, the product at one year from the date of purchase. ICON's obligation under normal use , costs of removal, installation or other type of exercise equipment do you own? ❏ Bicycle ❏ Exercise Cycle ❏ Treadmill ❏ Home Gym ❏ Weight Bench ❏...
... or fitness for a period one of its authorized service centers. Part No. 155593 R1201A Printed in USA PROFORM is limited to replacing or repairing, at ICON's option, the product at one year from the date of purchase. ICON's obligation under normal use , costs of removal, installation or other type of exercise equipment do you own? ❏ Bicycle ❏ Exercise Cycle ❏ Treadmill ❏ Home Gym ❏ Weight Bench ❏...

Canadian English Manual
Page 17
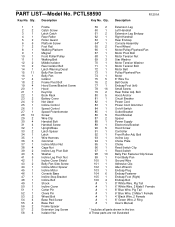
REMOVE THIS EXPLODED DRAWING AND PART LIST FROM THE MANUAL. Note: Specifications are subject to change without notice. Save this page for future reference. For information about ordering replacement parts, see the back cover of the User's Manual. 34
REMOVE THIS EXPLODED DRAWING AND PART LIST FROM THE MANUAL. Note: Specifications are subject to change without notice. Save this page for future reference. For information about ordering replacement parts, see the back cover of the User's Manual. 34
Canadian English Manual
Page 18
... Roller/Pulley Walking Belt Middle Isolator Rear Isolator Bolt Latch Warning Decal Belly Pan Screw Belly Pan Isolator Frame Pivot Bolt Hood Screw/Bracket Screw Hood Key/Clip Book Rack Battery Cover Not Used Incline Control Speed Control Speed Potentiometer Screw Wire Clip Handrail Bolt Handrail Screw Upright/Base Latch Spacer Latch Wire Harness Grommet Incline Motor Nut Cage Nut Incline Leg Pivot Bolt Washer Incline Leg Pivot Nut Incline Cover Shield Belly Pan Side Screw Incline Motor Spacer Incline Motor Console Base Incline Stop Bracket Incline Bolt Shock Incline Cover Cotter Pin Clevis Pin...
... Roller/Pulley Walking Belt Middle Isolator Rear Isolator Bolt Latch Warning Decal Belly Pan Screw Belly Pan Isolator Frame Pivot Bolt Hood Screw/Bracket Screw Hood Key/Clip Book Rack Battery Cover Not Used Incline Control Speed Control Speed Potentiometer Screw Wire Clip Handrail Bolt Handrail Screw Upright/Base Latch Spacer Latch Wire Harness Grommet Incline Motor Nut Cage Nut Incline Leg Pivot Bolt Washer Incline Leg Pivot Nut Incline Cover Shield Belly Pan Side Screw Incline Motor Spacer Incline Motor Console Base Incline Stop Bracket Incline Bolt Shock Incline Cover Cotter Pin Clevis Pin...
Canadian English Manual
Page 19
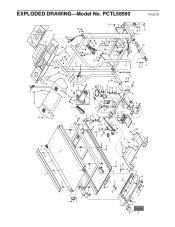
... 28 78 86 19 52 36 88 55 54 59 40 61 43 30 40 39 41 57 55 54 65 53 R1201A EXPLODED DRAWING-Model No. PCTL58590
... 28 78 86 19 52 36 88 55 54 59 40 61 43 30 40 39 41 57 55 54 65 53 R1201A EXPLODED DRAWING-Model No. PCTL58590

