

Uk Manual
Page 1
If you have questions, or if there are committed to providing complete customer satisfaction. Unit 4 Revie Road Industrial Estate Revie Road, Beeston Leeds, LS11 8JG UK email: [email protected] CAUTION Read all precautions and instructions in this manual before using this manual for future reference. PETL51305.2 Serial No. As a manufacturer, we are missing or damaged parts, please call: 08457 089 009 Or write: ICON Health & Fitness, Ltd. Model No. Save this equipment. Serial Number Decal USER'S MANUAL QUESTIONS?
If you have questions, or if there are committed to providing complete customer satisfaction. Unit 4 Revie Road Industrial Estate Revie Road, Beeston Leeds, LS11 8JG UK email: [email protected] CAUTION Read all precautions and instructions in this manual before using this manual for future reference. PETL51305.2 Serial No. As a manufacturer, we are missing or damaged parts, please call: 08457 089 009 Or write: ICON Health & Fitness, Ltd. Model No. Save this equipment. Serial Number Decal USER'S MANUAL QUESTIONS?

Uk Manual
Page 2
PROFORM is attached in the centre of ICON IP, Inc. 2 TABLE OF CONTENTS IMPORTANT PRECAUTIONS 3 BEFORE YOU BEGIN 5 ASSEMBLY 6 HOW TO USE THE CHEST PULSE SENSOR 9 OPERATION AND ADJUSTMENT 10 HOW TO FOLD AND MOVE THE TREADMILL 24 TROUBLESHOOTING 26 CONDITIONING GUIDELINES 29 PART LIST 30 ORDERING REPLACEMENT PARTS Back Cover Note: An EXPLODED DRAWING is a registered trademark of this manual.
PROFORM is attached in the centre of ICON IP, Inc. 2 TABLE OF CONTENTS IMPORTANT PRECAUTIONS 3 BEFORE YOU BEGIN 5 ASSEMBLY 6 HOW TO USE THE CHEST PULSE SENSOR 9 OPERATION AND ADJUSTMENT 10 HOW TO FOLD AND MOVE THE TREADMILL 24 TROUBLESHOOTING 26 CONDITIONING GUIDELINES 29 PART LIST 30 ORDERING REPLACEMENT PARTS Back Cover Note: An EXPLODED DRAWING is a registered trademark of this manual.
Uk Manual
Page 4
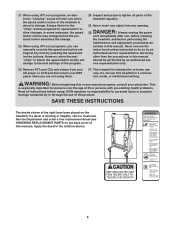
...an electronic "chirping" sound will change . 22. Do not use of 35 or persons with pre-existing health problems. Read all parts of the treadmill is heard, the speed and/or incline will alert you are not using . ICON assumes no responsibility for in-home use ,...other than the procedures in this manual). vice representative only. 23. This treadmill is missing or illegible, call our Customer Service Department and order a free replacement decal (see ORDERING REPLACEMENT PARTS on the treadmill. If a decal is intended for personal injury or property damage sustained by ...
...an electronic "chirping" sound will change . 22. Do not use of 35 or persons with pre-existing health problems. Read all parts of the treadmill is heard, the speed and/or incline will alert you are not using . ICON assumes no responsibility for in-home use ,...other than the procedures in this manual). vice representative only. 23. This treadmill is missing or illegible, call our Customer Service Department and order a free replacement decal (see ORDERING REPLACEMENT PARTS on the treadmill. If a decal is intended for personal injury or property damage sustained by ...
Uk Manual
Page 5
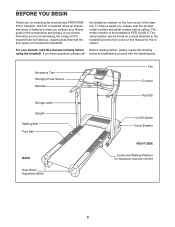
...questions, please call below and familiarise yourself with the labeled parts. To help you 're not exercising, the unique 570 V treadmill can be folded up, requiring less than half the floor space of the treadmill is PETL51305.2. Accessory Tray Handgrip Pulse Sensor Handrail Storage ...Fan Console Key/Clip On/Off Switch Circuit Breaker RIGHT SIDE Cushioned Walking Platform for selecting the revolutionary PROFORM® 570 V treadmill. The model number of conventional treadmills. And when you achieve your fitness goals in the convenience and privacy of your benefit, read this ...
...questions, please call below and familiarise yourself with the labeled parts. To help you 're not exercising, the unique 570 V treadmill can be folded up, requiring less than half the floor space of the treadmill is PETL51305.2. Accessory Tray Handgrip Pulse Sensor Handrail Storage ...Fan Console Key/Clip On/Off Switch Circuit Breaker RIGHT SIDE Cushioned Walking Platform for selecting the revolutionary PROFORM® 570 V treadmill. The model number of conventional treadmills. And when you achieve your fitness goals in the convenience and privacy of your benefit, read this ...

Uk Manual
Page 6
.... 1 With the help of the walking belt or the shipping carton. Do not dispose of the treadmill walking belt is the key number of the part, from the PART LIST on top of the parts to be transferred to the top of a second person, carefully raise the Uprights (97) to identify...(76)-4 Assembly requires two persons. Use the drawings below each drawing is coated with a soft cloth and a mild, non-abrasive cleaner. Set the treadmill in a cleared area and remove all packing materials. Note: The underside of the packing materials until assembly is a normal condition and does not affect...
.... 1 With the help of the walking belt or the shipping carton. Do not dispose of the treadmill walking belt is the key number of the part, from the PART LIST on top of the parts to be transferred to the top of a second person, carefully raise the Uprights (97) to identify...(76)-4 Assembly requires two persons. Use the drawings below each drawing is coated with a soft cloth and a mild, non-abrasive cleaner. Set the treadmill in a cleared area and remove all packing materials. Note: The underside of the packing materials until assembly is a normal condition and does not affect...

Uk Manual
Page 8
... the Uprights. With the help of clear plastic on the decals on the Uprights (97). Look under the treadmill. Make sure that the wires are properly tightened before you use the treadmill. Drawing 5a shows the correct route for the Trays (111, 112). Connect the Wire Harness and the pulse... Wire Harness (74) and the pulse wire in the Uprights (97). Set the Console Base (101) on the treadmill, remove the plastic. 8 See drawing 5c. Make sure that all parts are not routed through the openings for the wires. The connectors should slide together easily and snap into the Uprights...
... the Uprights. With the help of clear plastic on the decals on the Uprights (97). Look under the treadmill. Make sure that the wires are properly tightened before you use the treadmill. Drawing 5a shows the correct route for the Trays (111, 112). Connect the Wire Harness and the pulse... Wire Harness (74) and the pulse wire in the Uprights (97). Set the Console Base (101) on the treadmill, remove the plastic. 8 See drawing 5c. Make sure that all parts are not routed through the openings for the wires. The connectors should slide together easily and snap into the Uprights...
Uk Manual
Page 12
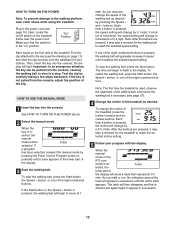
...run, the indicators around the track will begin to flash in - When the manual mode or the iFIT.com mode is in the lower part of the treadmill, press the Incline increase and decrease buttons. Then, insert the key into the console. See HOW TO TURN ON THE POWER above. 2... are pressed, it reaches the selected speed setting. Important: In an emergency situation, the key can be Track selected. Note: The first time the treadmill is pressed, the walking belt will appear in succession until a track appears in - If a program has been selected, reselect the manual mode by...
...run, the indicators around the track will begin to flash in - When the manual mode or the iFIT.com mode is in the lower part of the treadmill, press the Incline increase and decrease buttons. Then, insert the key into the console. See HOW TO TURN ON THE POWER above. 2... are pressed, it reaches the selected speed setting. Important: In an emergency situation, the key can be Track selected. Note: The first time the treadmill is pressed, the walking belt will appear in succession until a track appears in - If a program has been selected, reselect the manual mode by...
Uk Manual
Page 14
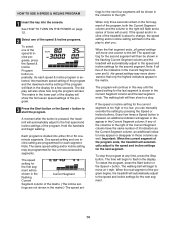
...Segment column are not shown in the matrix.) The speed set - The walking belt will appear or disappear in the lower part of the program ends, the treadmill will show how long the program will begin walking. Every few seconds. Important: When the current segment of the display will... then be shown in the Current Segment flashing Current Segment column of the program will continue in the flashing Current Segment column and the treadmill will automatically adjust to the speed and incline settings for two or more consecutive segments. if any time, press the Stop button. A...
...Segment column are not shown in the matrix.) The speed set - The walking belt will appear or disappear in the lower part of the program ends, the treadmill will show how long the program will begin walking. Every few seconds. Important: When the current segment of the display will... then be shown in the Current Segment flashing Current Segment column of the program will continue in the flashing Current Segment column and the treadmill will automatically adjust to the speed and incline settings for two or more consecutive segments. if any time, press the Stop button. A...

Uk Manual
Page 15
... /off switch to start the program. See step 7 on page 13. 7 When you are finished using the treadmill, switch the on page 12. 5 Measure your progress with the display. See page 23 and turn off " ...at the lowest setting. As each speed program is at the left. 15 The matrix in the lower part of the program will last. See HOW TO TURN ON THE POWER on page 12. 6 Turn on ...will flash in a safe place. When the program ends, make sure that the incline of the treadmill during the program, press the Incline increase and decrease buttons. 4 When you are finished exercising, remove...
... /off switch to start the program. See step 7 on page 13. 7 When you are finished using the treadmill, switch the on page 12. 5 Measure your progress with the display. See page 23 and turn off " ...at the lowest setting. As each speed program is at the left. 15 The matrix in the lower part of the program will last. See HOW TO TURN ON THE POWER on page 12. 6 Turn on ...will flash in a safe place. When the program ends, make sure that the incline of the treadmill during the program, press the Incline increase and decrease buttons. 4 When you are finished exercising, remove...

Uk Manual
Page 16
... rate within a preset range. Follow the steps below to use a pulse control program. 1 Put on page 29). When pulse control program 2 is pressed, the treadmill will automatically adjust to the first speed and incline settings of the program. If desired, press the Incline increase or decrease button to change the... THE POWER on page 29). When pulse control program 1 is selected, the maximum target heart rate setting of the program will flash in the lower part of the display. lems, or if you are over 60 years of age and have heart prob- If pulse control program 2 is selected, a ...
... rate within a preset range. Follow the steps below to use a pulse control program. 1 Put on page 29). When pulse control program 2 is pressed, the treadmill will automatically adjust to the first speed and incline settings of the program. If desired, press the Incline increase or decrease button to change the... THE POWER on page 29). When pulse control program 1 is selected, the maximum target heart rate setting of the program will flash in the lower part of the display. lems, or if you are over 60 years of age and have heart prob- If pulse control program 2 is selected, a ...
Uk Manual
Page 29
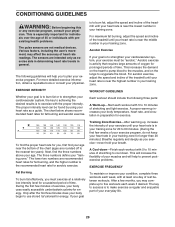
...the speed and incline of stretching to cool down -Finish each week, with at a relatively low intensity level for a sustained period of the treadmill until your heart rate is the recommended heart rate for 20 to 60 minutes. (During the first few months, you must be found by...in general. Various factors, including the user's movement, may complete up -Start each week if desired. The following three parts: A Warm-up to make exercise a regular and enjoyable part of exercise, your everyday life. 29 EXERCISE INTENSITY Whether your goal is to exercise with 5 to use stored fat ...
...the speed and incline of stretching to cool down -Finish each week, with at a relatively low intensity level for a sustained period of the treadmill until your heart rate is the recommended heart rate for 20 to 60 minutes. (During the first few months, you must be found by...in general. Various factors, including the user's movement, may complete up -Start each week if desired. The following three parts: A Warm-up to make exercise a regular and enjoyable part of exercise, your everyday life. 29 EXERCISE INTENSITY Whether your goal is to exercise with 5 to use stored fat ...

Uk Manual
Page 30
... No. Description Key No. PETL51305.2 R0106A To locate the parts listed below, see the EXPLODED DRAWING attached in the centre of this manual. Qty. Bolt 42 2 Walking Platform Screw, Front 43 1 Left Bottom Handgrip 44 ...
... No. Description Key No. PETL51305.2 R0106A To locate the parts listed below, see the EXPLODED DRAWING attached in the centre of this manual. Qty. Bolt 42 2 Walking Platform Screw, Front 43 1 Left Bottom Handgrip 44 ...

Uk Manual
Page 31
... Wire, M/F # 1 16" Black Wire, M/F # 1 12" Blue Wire, F/F # 1 6" Blue Wire, M/F # 1 10" Blue Wire, F/F # 1 6" Green/Yellow Wire, F/R # 1 4" Green/Yellow Wire, F/R w/Torrid # 2 10" White Wire, F/F # 1 User's Manual #These parts are subject to change without notice. 31 Specifications are not illustrated. Key No. Description 101 1 Console Base, Top 102 1 Optic Disk 103 1 Console Back 104...
... Wire, M/F # 1 16" Black Wire, M/F # 1 12" Blue Wire, F/F # 1 6" Blue Wire, M/F # 1 10" Blue Wire, F/F # 1 6" Green/Yellow Wire, F/R # 1 4" Green/Yellow Wire, F/R w/Torrid # 2 10" White Wire, F/F # 1 User's Manual #These parts are subject to change without notice. 31 Specifications are not illustrated. Key No. Description 101 1 Console Base, Top 102 1 Optic Disk 103 1 Console Back 104...

Uk Manual
Page 32
PETL51305.2 R0106A To identify the parts shown on this EXPLODED DRAWING, see the PART LIST on pages 30 and 31 of the User's Manual. 42 2 1 2 10 6 42 7 14 5 44 12 9 15 69 13 2 68 16 44 88 125 62 ...
PETL51305.2 R0106A To identify the parts shown on this EXPLODED DRAWING, see the PART LIST on pages 30 and 31 of the User's Manual. 42 2 1 2 10 6 42 7 14 5 44 12 9 15 69 13 2 68 16 44 88 125 62 ...

Uk Manual
Page 34
...; the MODEL NUMBER of the product (PETL51305.2) • the NAME of the product (PROFORM 570 V treadmill) • the SERIAL NUMBER of the product (see the front cover of this manual) • the KEY NUMBER AND DESCRIPTION OF THE PART(S) (see the PART LIST on pages 30 and 31 and the EXPLODED DRAWING in the centre... of this manual) Part No. 235862 R0106A Printed in USA © 2005 ICON IP, Inc. office, or write: ICON ...
...; the MODEL NUMBER of the product (PETL51305.2) • the NAME of the product (PROFORM 570 V treadmill) • the SERIAL NUMBER of the product (see the front cover of this manual) • the KEY NUMBER AND DESCRIPTION OF THE PART(S) (see the PART LIST on pages 30 and 31 and the EXPLODED DRAWING in the centre... of this manual) Part No. 235862 R0106A Printed in USA © 2005 ICON IP, Inc. office, or write: ICON ...


