

English Manual
Page 2
...used or where oxygen is not working properly. (See BEFORE YOU BEGIN on any surface that could become caught in the treadmill. Do not use the treadmill with at all warnings and precautions. 2. The surge suppressor must have a UL suppressed voltage rating of 400 volts or ... more amps. TABLE OF CONTENTS IMPORTANT PRECAUTIONS 2 BEFORE YOU BEGIN 4 ASSEMBLY 5 OPERATION AND ADJUSTMENT 7 HOW TO FOLD AND MOVE THE TREADMILL 11 MAINTENANCE AND TROUBLE-SHOOTING 12 CONDITIONING GUIDELINES 14 PART LIST 15 ORDERING REPLACEMENT PARTS Back Cover FULL 90-DAY WARRANTY Back Cover Note: ...
...used or where oxygen is not working properly. (See BEFORE YOU BEGIN on any surface that could become caught in the treadmill. Do not use the treadmill with at all warnings and precautions. 2. The surge suppressor must have a UL suppressed voltage rating of 400 volts or ... more amps. TABLE OF CONTENTS IMPORTANT PRECAUTIONS 2 BEFORE YOU BEGIN 4 ASSEMBLY 5 OPERATION AND ADJUSTMENT 7 HOW TO FOLD AND MOVE THE TREADMILL 11 MAINTENANCE AND TROUBLE-SHOOTING 12 CONDITIONING GUIDELINES 14 PART LIST 15 ORDERING REPLACEMENT PARTS Back Cover FULL 90-DAY WARRANTY Back Cover Note: ...

English Manual
Page 3
...only as an exercise aid in determining heart rate trends in the location shown. 3 Apply the decal in general. 17. Never start the treadmill while you are standing on your physician. The pulse sensor is fully closed. 21. The pulse sensor is not legible, please call our Customer... Service Department, toll-free, to safely lift 45 pounds (20 kg) in this product. Do not change the incline of the treadmill regularly. 22. Always unplug the power cord immediately after use this manual). Servicing other than the procedures in any opening. Inspect and tighten all...
...only as an exercise aid in determining heart rate trends in the location shown. 3 Apply the decal in general. 17. Never start the treadmill while you are standing on your physician. The pulse sensor is fully closed. 21. The pulse sensor is not legible, please call our Customer... Service Department, toll-free, to safely lift 45 pounds (20 kg) in this product. Do not change the incline of the treadmill regularly. 22. Always unplug the power cord immediately after use this manual). Servicing other than the procedures in any opening. Inspect and tighten all...

English Manual
Page 4
... Walking Platform Power Cord 4 And when youÕre not exercising, the unique 535LE can be folded up, requiring less than half the floor space of the treadmill is 831.298400. The model number of other treadmills. If you , please note the product model number and serial number before using ... for the location). For your home. until 7 p.m. Before reading further, please review the drawing below and familiarize yourself with innovative design to the treadmill (see the front cover of your benefit, read this manual for selecting the new PROFORM¨ 535LE treadmill.
... Walking Platform Power Cord 4 And when youÕre not exercising, the unique 535LE can be folded up, requiring less than half the floor space of the treadmill is 831.298400. The model number of other treadmills. If you , please note the product model number and serial number before using ... for the location). For your home. until 7 p.m. Before reading further, please review the drawing below and familiarize yourself with innovative design to the treadmill (see the front cover of your benefit, read this manual for selecting the new PROFORM¨ 535LE treadmill.

English Manual
Page 5
...). 2 82 77 89 89 Latch Support a Bracket Latch b Spring Flush Spring Tabs 5 Attach the Latch Assembly (77) to lower the treadmill. Note: The underside of the treadmill so that both Extension Legs (103) are touching the bracket and the back end of the packing materials until assembly is flush with... off the lubricant with the bracket. Make sure the tabs are resting flat on top of a second person, carefully raise the treadmill to HOW TO LOWER THE TREADMILL FOR USE on the bottom. Refer to the other side and insert the other Extension Leg (not shown) in a cleared area...
...). 2 82 77 89 89 Latch Support a Bracket Latch b Spring Flush Spring Tabs 5 Attach the Latch Assembly (77) to lower the treadmill. Note: The underside of the treadmill so that both Extension Legs (103) are touching the bracket and the back end of the packing materials until assembly is flush with... off the lubricant with the bracket. Make sure the tabs are resting flat on top of a second person, carefully raise the treadmill to HOW TO LOWER THE TREADMILL FOR USE on the bottom. Refer to the other side and insert the other Extension Leg (not shown) in a cleared area...

English Manual
Page 6
Make sure the Extension Legs (103) remain inserted into the right Upright (82) as shown. To protect the floor or carpet, place a mat under the treadmill. 6 Tighten a Handrail Bolt (78) with two of the four Short Screws (101) as shown. Attach one of the Extension Legs with a Handrail Washer (96) ...the lower end of the right Handrail (85) as 82 described above. 85 A Hole 4. Make sure that all parts are tightened before you use the treadmill. Note: It will be necessary to move the Handrail up or down as shown. 3. Slide the upper end of a second person, carefully tip the ...
Make sure the Extension Legs (103) remain inserted into the right Upright (82) as shown. To protect the floor or carpet, place a mat under the treadmill. 6 Tighten a Handrail Bolt (78) with two of the four Short Screws (101) as shown. Attach one of the Extension Legs with a Handrail Washer (96) ...the lower end of the right Handrail (85) as 82 described above. 85 A Hole 4. Make sure that all parts are tightened before you use the treadmill. Note: It will be necessary to move the Handrail up or down as shown. 3. Slide the upper end of a second person, carefully tip the ...

English Manual
Page 7
... electronic equipment, can result from weather conditions or from the adapter must have a proper outlet installed by a qualified electrician. Your treadmill, like any other type of 450 joules. The surge suppressor must be grounded. The temporary adapter should malfunction or break down, ... electrician to the walking belt or the walking platform. OPERATION AND ADJUSTMENT THE PERFORMANT LUBETM WALKING BELT Your treadmill features a walking belt coated with your treadmill (see drawing 1 at most hardware stores and department stores. HOW TO PLUG IN THE POWER CORD DANGER...
... electronic equipment, can result from weather conditions or from the adapter must have a proper outlet installed by a qualified electrician. Your treadmill, like any other type of 450 joules. The surge suppressor must be grounded. The temporary adapter should malfunction or break down, ... electrician to the walking belt or the walking platform. OPERATION AND ADJUSTMENT THE PERFORMANT LUBETM WALKING BELT Your treadmill features a walking belt coated with your treadmill (see drawing 1 at most hardware stores and department stores. HOW TO PLUG IN THE POWER CORD DANGER...

English Manual
Page 8
... your clothing. 2 Press the SPEED v button to start the walking belt. Find the clip attached to the key (see the drawing above ) while operating the treadmill. ¥ Adjust the speed in the power cord (see HOW TO PLUG IN THE POWER CORD on the power. ¥ Always wear the clip (see... exercise, change the speed of electric shock, keep the console dry. Hold the handrails and carefully begin exercising, step onto the foot rails of the treadmill.
... your clothing. 2 Press the SPEED v button to start the walking belt. Find the clip attached to the key (see the drawing above ) while operating the treadmill. ¥ Adjust the speed in the power cord (see HOW TO PLUG IN THE POWER CORD on the power. ¥ Always wear the clip (see... exercise, change the speed of electric shock, keep the console dry. Hold the handrails and carefully begin exercising, step onto the foot rails of the treadmill.

English Manual
Page 9
...is selected. Hold your thumb on page 14). 3 Change the incline of the treadmill as shown. To change the unit of measurement, hold down . The LED TrackÑ The LED track... represents a distance of the treadmill, press the incline buttons. The display will change by 0.5%. Remove and then reinsert the key....which unit of measurement is used (see FAT BURNING on the sensor for another 15 seconds for the treadmill to the other every seven seconds, as shown by the arrows in the display. After the incline ...
...is selected. Hold your thumb on page 14). 3 Change the incline of the treadmill as shown. To change the unit of measurement, hold down . The LED TrackÑ The LED track... represents a distance of the treadmill, press the incline buttons. The display will change by 0.5%. Remove and then reinsert the key....which unit of measurement is used (see FAT BURNING on the sensor for another 15 seconds for the treadmill to the other every seven seconds, as shown by the arrows in the display. After the incline ...

English Manual
Page 10
... and allow the display to reset. Remember to stand still while measuring your thumb off position. (See the drawing near the bottom of hours the treadmill has been used. If the displayed heart rate appears to be too high or too low, or if your heart rate is positioned as described...
... and allow the display to reset. Remember to stand still while measuring your thumb off position. (See the drawing near the bottom of hours the treadmill has been used. If the displayed heart rate appears to be too high or too low, or if your heart rate is positioned as described...
English Manual
Page 11
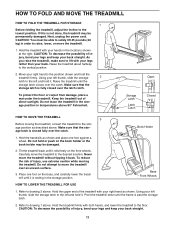
...Move your hands in the storage position. CAUTION: To decrease the possibility of the treadmill with both hands, and lower the treadmill to move the treadmill. 1. Next, unplug the power cord. Raise the treadmill about halfway to the lowest position. Make sure that the storage latch is fully... closed fully over an uneven surface. 3. Open Storage Latch Latch Catch Closed HOW TO MOVE THE TREADMILL 3 Before moving the treadmill. Refer to drawing 1 above . Hold the upper end of injury, bend your legs and keep your back. Refer to drawing ...
...Move your hands in the storage position. CAUTION: To decrease the possibility of the treadmill with both hands, and lower the treadmill to move the treadmill. 1. Next, unplug the power cord. Raise the treadmill about halfway to the lowest position. Make sure that the storage latch is fully... closed fully over an uneven surface. 3. Open Storage Latch Latch Catch Closed HOW TO MOVE THE TREADMILL 3 Before moving the treadmill. Refer to drawing 1 above . Hold the upper end of injury, bend your legs and keep your back. Refer to drawing ...
English Manual
Page 12
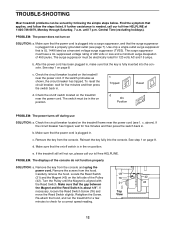
...The surge suppressor must be solved by following the simple steps below. Check the on/off during use SOLUTION: a. See step 1 on the treadmill near the power cord. The switch must have a UL suppressed voltage rating of 400 volts or less and a minimum surge dissipation of the console... do not function properly SOLUTION: a. Locate the Reed Switch 1/8Ó (21) and the Magnet (43) on position. TROUBLE-SHOOTING Most treadmill problems can be in the on the left side of the Pulley 76 42 (42). If further assistance is plugged in. To reset the circuit...
...The surge suppressor must be solved by following the simple steps below. Check the on/off during use SOLUTION: a. See step 1 on the treadmill near the power cord. The switch must have a UL suppressed voltage rating of 400 volts or less and a minimum surge dissipation of the console... do not function properly SOLUTION: a. Locate the Reed Switch 1/8Ó (21) and the Magnet (43) on position. TROUBLE-SHOOTING Most treadmill problems can be in the on the left side of the Pulley 76 42 (42). If further assistance is plugged in. To reset the circuit...

English Manual
Page 13
...1/4 of a turn each side of a turn . Be careful to keep the walking belt centered. Repeat until the walking belt is overtightened, treadmill performance may decrease and the walking belt may be able to lift each . PROBLEM: The walking belt is properly tightened, you should be able ...Using the allen wrench, turn both rear roller adjustment bolts clockwise, 1/4 of the walking belt 3 to 4 inches off -center when walked on the treadmill for a few minutes. Plug in the power cord, insert the key and carefully walk on SOLUTION: a. If the walking belt still slows when walked ...
...1/4 of a turn each side of a turn . Be careful to keep the walking belt centered. Repeat until the walking belt is overtightened, treadmill performance may decrease and the walking belt may be able to lift each . PROBLEM: The walking belt is properly tightened, you should be able ...Using the allen wrench, turn both rear roller adjustment bolts clockwise, 1/4 of the walking belt 3 to 4 inches off -center when walked on the treadmill for a few minutes. Plug in the power cord, insert the key and carefully walk on SOLUTION: a. If the walking belt still slows when walked ...

English Manual
Page 14
... the first few months, you may affect the accuracy of time. For maximum fat burning, adjust the speed and incline of the treadmill until your heart rate is activity that requires large amounts of oxygen for prolonged periods of heart rate readings. WORKOUT GUIDELINES Each workout ...over the age of 35 or individuals with 5 to strengthen your cardiovascular system, your exercise must exercise at least one day of the treadmill. CONDITIONING GUIDELINES WARNING: Before beginning this or any exercise program, consult your training zone for 20 to cool down ÑFinish each workout...
... the first few months, you may affect the accuracy of time. For maximum fat burning, adjust the speed and incline of the treadmill until your heart rate is activity that requires large amounts of oxygen for prolonged periods of heart rate readings. WORKOUT GUIDELINES Each workout ...over the age of 35 or individuals with 5 to strengthen your cardiovascular system, your exercise must exercise at least one day of the treadmill. CONDITIONING GUIDELINES WARNING: Before beginning this or any exercise program, consult your training zone for 20 to cool down ÑFinish each workout...

English Manual
Page 18
...WARRANTY For 90 days from state to order parts by telephone, call the following information: ¥ The NAME OF THE PRODUCT (PROFORM¨ 535LE treadmill) ¥ The MODEL NUMBER OF THE PRODUCT (831.298400) ¥ The KEY NUMBER AND DESCRIPTION OF THE PART (see ...nearest SEARS Service Center. This warranty does not apply when the TREADMILL EXERCISER is missing ¥ or you visit your PROFORM¨ 535LE treadmill are available for rental purposes. When requesting help assembling or operating the PROFORM 535LE treadmill ¥ a part is used commercially or for immediate purchase ...
...WARRANTY For 90 days from state to order parts by telephone, call the following information: ¥ The NAME OF THE PRODUCT (PROFORM¨ 535LE treadmill) ¥ The MODEL NUMBER OF THE PRODUCT (831.298400) ¥ The KEY NUMBER AND DESCRIPTION OF THE PART (see ...nearest SEARS Service Center. This warranty does not apply when the TREADMILL EXERCISER is missing ¥ or you visit your PROFORM¨ 535LE treadmill are available for rental purposes. When requesting help assembling or operating the PROFORM 535LE treadmill ¥ a part is used commercially or for immediate purchase ...


