

User Manual
Page 2
...the 8. TABLE OF CONTENTS IMPORTANT PRECAUTIONS 2 BEFORE YOU BEGIN 4 ASSEMBLY 5 OPERATION AND ADJUSTMENT 7 HOW TO FOLD AND MOVE THE TREADMILL 10 TROUBLESHOOTING 12 CONDITIONING GUIDELINES 14 ORDERING REPLACEMENT PARTS Back Cover Note: An EXPLODED DRAWING and a PART LIST are adequately informed of all... FORE YOU BEGIN on the treadmill at all users of this treadmill are attached in sandals. 10. IMPORTANT PRECAUTIONS WARNING: To reduce the risk of the owner to the fuse carrier. Always wear athletic shoes. Never move the walking belt whilst the power away from ...
...the 8. TABLE OF CONTENTS IMPORTANT PRECAUTIONS 2 BEFORE YOU BEGIN 4 ASSEMBLY 5 OPERATION AND ADJUSTMENT 7 HOW TO FOLD AND MOVE THE TREADMILL 10 TROUBLESHOOTING 12 CONDITIONING GUIDELINES 14 ORDERING REPLACEMENT PARTS Back Cover Note: An EXPLODED DRAWING and a PART LIST are adequately informed of all... FORE YOU BEGIN on the treadmill at all users of this treadmill are attached in sandals. 10. IMPORTANT PRECAUTIONS WARNING: To reduce the risk of the owner to the fuse carrier. Always wear athletic shoes. Never move the walking belt whilst the power away from ...
User Manual
Page 3
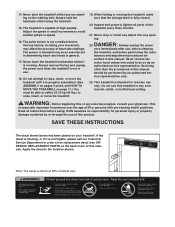
...high speeds. Always unplug the power cord immediately after use . 18. Apply the decal in use , before cleaning the treadmill, and before using the treadmill. 15. Always hold the handrails whilst using . The pulse sensor is running. Inspect and properly tighten all instructions before ...performing the main- The treadmill is shown at 38% of the treadmill every three months. 21. DANGER: 22. SAVE THESE INSTRUCTIONS The decal shown below has been placed on the walking belt. Do not use only. Never start the treadmill whilst you are standing on your...
...high speeds. Always unplug the power cord immediately after use . 18. Apply the decal in use , before cleaning the treadmill, and before using the treadmill. 15. Always hold the handrails whilst using . The pulse sensor is running. Inspect and properly tighten all instructions before ...performing the main- The treadmill is shown at 38% of the treadmill every three months. 21. DANGER: 22. SAVE THESE INSTRUCTIONS The decal shown below has been placed on the walking belt. Do not use only. Never start the treadmill whilst you are standing on your...
User Manual
Page 4
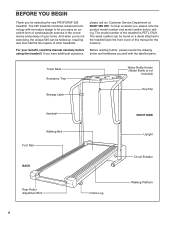
...reading further, please review the drawing below and familiarise yourself with innovative design to the treadmill (see the front cover of your benefit, read this manual for selecting the new PROFORM® 525 treadmill. To help us assist you, please note the product model number and serial number before... before calling. And when you're not exercising, the unique 525 can be folded up, requiring less than half the floor space of the treadmill is not included) Key/Clip Handrail Foot Rail Walking Belt BACK Rear Roller Adjustment Bolt Incline Leg RIGHT SIDE Upright Circuit ...
...reading further, please review the drawing below and familiarise yourself with innovative design to the treadmill (see the front cover of your benefit, read this manual for selecting the new PROFORM® 525 treadmill. To help us assist you, please note the product model number and serial number before... before calling. And when you're not exercising, the unique 525 can be folded up, requiring less than half the floor space of the treadmill is not included) Key/Clip Handrail Foot Rail Walking Belt BACK Rear Roller Adjustment Bolt Incline Leg RIGHT SIDE Upright Circuit ...
User Manual
Page 5
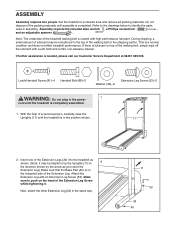
... transferred to tip the Uprights [11] in 2 the direction shown by the arrow as shown. (Note: It may be helpful to the top of the treadmill walking belt is completely assembled. 1. Latch/Handrail Screw (81)-4 Handrail Bolt (88)-2 Washer (39)-2 Extension Leg Screw (53)-2 WARNING: Do not plug in a cleared area and...
... transferred to tip the Uprights [11] in 2 the direction shown by the arrow as shown. (Note: It may be helpful to the top of the treadmill walking belt is completely assembled. 1. Latch/Handrail Screw (81)-4 Handrail Bolt (88)-2 Washer (39)-2 Extension Leg Screw (53)-2 WARNING: Do not plug in a cleared area and...
User Manual
Page 6
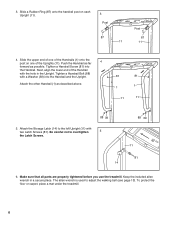
...) with a Washer (39) into the Handrail. Make sure that all parts are properly tightened before you use the treadmill. To protect the floor or carpet, place a mat under the treadmill. 6 Keep the included allen wrench in the Upright. Next, align the lower end of the Uprights (11). Be... careful not to adjust the walking belt (see page 13). Attach the other Handrail (1) as possible. Slide a Rubber Ring (87...
...) with a Washer (39) into the Handrail. Make sure that all parts are properly tightened before you use the treadmill. To protect the floor or carpet, place a mat under the treadmill. 6 Keep the included allen wrench in the Upright. Next, align the lower end of the Uprights (11). Be... careful not to adjust the walking belt (see page 13). Attach the other Handrail (1) as possible. Slide a Rubber Ring (87...
User Manual
Page 7
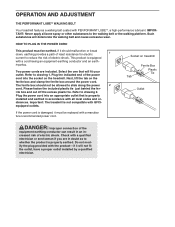
... installed and earthed in accordance with PERFORMANT LUBETM, a high-performance lubricant. OPERATION AND ADJUSTMENT THE PERFORMANT LUBETM WALKING BELT Your treadmill features a walking belt coated with all local codes and or- Refer to the walking belt or the walking platform. IMPORTANT: Never apply silicone spray or other substances to drawing 1. Such substances will fit...
... installed and earthed in accordance with PERFORMANT LUBETM, a high-performance lubricant. OPERATION AND ADJUSTMENT THE PERFORMANT LUBETM WALKING BELT Your treadmill features a walking belt coated with all local codes and or- Refer to the walking belt or the walking platform. IMPORTANT: Never apply silicone spray or other substances to drawing 1. Such substances will fit...
User Manual
Page 8
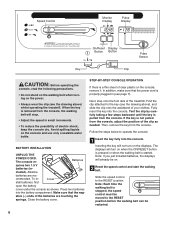
... on. 2 Reset the speed control and start the walking belt. Test the clip by carefully taking a few steps backward until the key is stopped, the speed control must be moved to the key (see the drawing above ) whilst operating the treadmill. The displays will stop. • Adjust the speed in... console. Press two batteries into the console. ative (-) ends of the batteries are rec- If the key is a thin sheet of the treadmill. ommended. cluded). Alkaline batteries are touching the springs. STEP-BY-STEP CONSOLE OPERATION If there is not pulled from the console, the walking...
... on. 2 Reset the speed control and start the walking belt. Test the clip by carefully taking a few steps backward until the key is stopped, the speed control must be moved to the key (see the drawing above ) whilst operating the treadmill. The displays will stop. • Adjust the speed in... console. Press two batteries into the console. ative (-) ends of the batteries are rec- If the key is a thin sheet of the treadmill. ommended. cluded). Alkaline batteries are touching the springs. STEP-BY-STEP CONSOLE OPERATION If there is not pulled from the console, the walking...
User Manual
Page 13
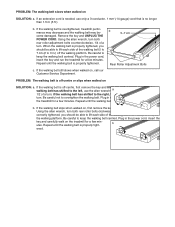
.... Plug in .) off -centre or slips when walked on the treadmill for a few min- b. Be careful to 3 in the power cord, insert the key and run the treadmill for a few minutes. Repeat until the walking belt is properly tightened. If an extension cord is needed, use the ...and carefully walk on SOLUTION: a. Remove the key and UNPLUG THE POWER CORD. If the walking belt is overtightened, treadmill performance may decrease and the walking belt may become damaged. When the walking belt is correctly tightened, you should be able to lift each side of a turn . c. If ...
.... Plug in .) off -centre or slips when walked on the treadmill for a few min- b. Be careful to 3 in the power cord, insert the key and run the treadmill for a few minutes. Repeat until the walking belt is properly tightened. If an extension cord is needed, use the ...and carefully walk on SOLUTION: a. Remove the key and UNPLUG THE POWER CORD. If the walking belt is overtightened, treadmill performance may decrease and the walking belt may become damaged. When the walking belt is correctly tightened, you should be able to lift each side of a turn . c. If ...


