
English Manual
Page 1
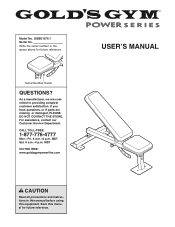
... instructions in the space above for future reference. Serial Number Decal QUESTIONS? For assistance, contact our Customer Service Department. Save this equipment. As a manufacturer, we are missing or damaged, PLEASE DO NOT CONTACT THE STORE. MST Sat. 8 a.m.-4 p.m. USER'S MANUAL Write the serial number in this manual before using this manual for future reference. GGBE1076.1 Serial No. CALL TOLL-FREE: 1-877-776-4777 Mon.-Fri. 6 a.m.-6 p.m. Model...
... instructions in the space above for future reference. Serial Number Decal QUESTIONS? For assistance, contact our Customer Service Department. Save this equipment. As a manufacturer, we are missing or damaged, PLEASE DO NOT CONTACT THE STORE. MST Sat. 8 a.m.-4 p.m. USER'S MANUAL Write the serial number in this manual before using this manual for future reference. GGBE1076.1 Serial No. CALL TOLL-FREE: 1-877-776-4777 Mon.-Fri. 6 a.m.-6 p.m. Model...
English Manual
Page 2
... YOU BEGIN 4 PART IDENTIFICATION CHART 5 ASSEMBLY 6 ADJUSTMENT 10 EXERCISE GUIDELINES 11 PART LIST 14 EXPLODED DRAWING 15 ORDERING REPLACEMENT PARTS Back Cover LIMITED WARRANTY Back Cover WARNING DECAL PLACEMENT The decals shown here have been applied to the weight bench. GOLD'S GYM is a registered trademark of this manual and request a free replacement decal. Note: The decals may not be shown at actual size. Apply the decal in the location shown. This...
... YOU BEGIN 4 PART IDENTIFICATION CHART 5 ASSEMBLY 6 ADJUSTMENT 10 EXERCISE GUIDELINES 11 PART LIST 14 EXPLODED DRAWING 15 ORDERING REPLACEMENT PARTS Back Cover LIMITED WARRANTY Back Cover WARNING DECAL PLACEMENT The decals shown here have been applied to the weight bench. GOLD'S GYM is a registered trademark of this manual and request a free replacement decal. Note: The decals may not be shown at actual size. Apply the decal in the location shown. This...
English Manual
Page 3
.... Before beginning any worn parts immediately. 8. Place the weight bench on the weight bench before using the weight bench. Make sure that all users of the weight bench are adequately informed of serious injury, read all warnings on a level surface, with pre-existing health problems. 2. Note: The weight bench does not include weights. 11. If you feel pain or dizziness at all parts regularly. Replace any exercise program, consult your physician...
.... Before beginning any worn parts immediately. 8. Place the weight bench on the weight bench before using the weight bench. Make sure that all users of the weight bench are adequately informed of serious injury, read all warnings on a level surface, with pre-existing health problems. 2. Note: The weight bench does not include weights. 11. If you feel pain or dizziness at all parts regularly. Replace any exercise program, consult your physician...
English Manual
Page 4
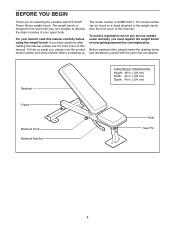
... , please note the product model number and serial number before using the weight bench. Backrest ASSEMBLED DIMENSIONS: Height: 48 in. (122 cm) Width: 24 in. (122 cm) Depth: 49 in. (124 cm) Frame Backrest Knob Backrest Bracket Seat Seat Pin 4 Before reading further, please review the drawing below and familiarize yourself with your own weights to the weight bench (see the front cover of this manual. To avoid a registration...
... , please note the product model number and serial number before using the weight bench. Backrest ASSEMBLED DIMENSIONS: Height: 48 in. (122 cm) Width: 24 in. (122 cm) Depth: 49 in. (124 cm) Frame Backrest Knob Backrest Bracket Seat Seat Pin 4 Before reading further, please review the drawing below and familiarize yourself with your own weights to the weight bench (see the front cover of this manual. To avoid a registration...
English Manual
Page 5
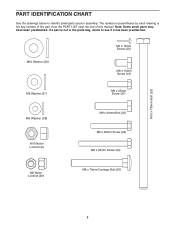
... Nylon Locknut (2) M8 x 40mm Bolt (25) M6 x 45mm Screw (22) M6 x 60mm Screw (24) M8 Nylon Locknut (29) M8 x 70mm Carriage Bolt (26) 5 If a part is not in parentheses by each drawing is the key number of the part, from the PART LIST near the end of this manual. Note: Some small parts may have been preattached. PART IDENTIFICATION CHART See the drawings below...
... Nylon Locknut (2) M8 x 40mm Bolt (25) M6 x 45mm Screw (22) M6 x 60mm Screw (24) M8 Nylon Locknut (29) M8 x 70mm Carriage Bolt (26) 5 If a part is not in parentheses by each drawing is the key number of the part, from the PART LIST near the end of this manual. Note: Some small parts may have been preattached. PART IDENTIFICATION CHART See the drawings below...
English Manual
Page 6
... following information and instructions: • To hire an authorized service technician to the Base (4) with four M4 x 15mm Screws (20). Insert two M8 x 70mm Carriage Bolts (26) up through the Base (4). Before beginning assembly, carefully read and understand the information in a cleared area and remove the packing materials. By setting aside plenty of its size, the weight bench should be assembled in the location...
... following information and instructions: • To hire an authorized service technician to the Base (4) with four M4 x 15mm Screws (20). Insert two M8 x 70mm Carriage Bolts (26) up through the Base (4). Before beginning assembly, carefully read and understand the information in a cleared area and remove the packing materials. By setting aside plenty of its size, the weight bench should be assembled in the location...

English Manual
Page 7
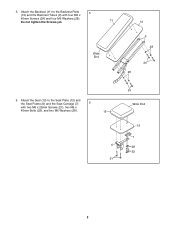
...27), and four M8 Nylon Locknuts (29). Attach the Frame (1) to the Backrest Tubes (9) with the two 2 M8 x 70mm Carriage Bolts (26) and two M8 Nylon Locknuts (29). Attach the Front Stabilizer (3) to the top of the Backrest Tubes. See step 2 and tighten the M8 Nylon 1 Locknuts (29). 3... 19 19 4. Orient the Backrest Tubes (9) so that the indicated holes are closer to the Frame (1) 3 with four M8 x 15mm Screws ...
...27), and four M8 Nylon Locknuts (29). Attach the Frame (1) to the Backrest Tubes (9) with the two 2 M8 x 70mm Carriage Bolts (26) and two M8 Nylon Locknuts (29). Attach the Front Stabilizer (3) to the top of the Backrest Tubes. See step 2 and tighten the M8 Nylon 1 Locknuts (29). 3... 19 19 4. Orient the Backrest Tubes (9) so that the indicated holes are closer to the Frame (1) 3 with four M8 x 15mm Screws ...
English Manual
Page 8
Attach the Seat (13) to the Backrest Plate 5 (10) and the Backrest Tubes (9) with two M6 x 25mm Screws (21), two M6 x 45mm Bolts (22), and two M6 Washers (28). 13 6 21 24 Wide End 12 7 28 22 8 5. Do not tighten the Screws yet. 11 Wide End 10 9 28 24 28 6. Attach the Backrest (11) to the Seat Plate (12) and the Seat Frame (6) and the Seat Carriage (7) 6 with four M6 x 60mm Screws (24) and four M6 Washers (28).
Attach the Seat (13) to the Backrest Plate 5 (10) and the Backrest Tubes (9) with two M6 x 25mm Screws (21), two M6 x 45mm Bolts (22), and two M6 Washers (28). 13 6 21 24 Wide End 12 7 28 22 8 5. Do not tighten the Screws yet. 11 Wide End 10 9 28 24 28 6. Attach the Backrest (11) to the Seat Plate (12) and the Seat Frame (6) and the Seat Carriage (7) 6 with four M6 x 60mm Screws (24) and four M6 Washers (28).
English Manual
Page 9
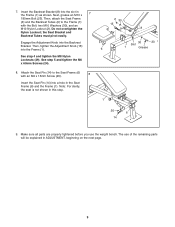
Next, grease an M10 x 180mm Bolt (23). Attach the Seat Pin (14) to the Frame (1) with an M4 x 15mm Screw (20). Make sure all parts are properly tightened before you use of the remaining parts will be explained in this step. 2 30 15 9 8 30 23 Slot 6 1 Grease 1 20 6 14 9. Then, attach the Seat Frame (6) and the Backrest Tubes (9) to the Seat Frame (6) 8 with the Bolt, two M10...
Next, grease an M10 x 180mm Bolt (23). Attach the Seat Pin (14) to the Frame (1) with an M4 x 15mm Screw (20). Make sure all parts are properly tightened before you use of the remaining parts will be explained in this step. 2 30 15 9 8 30 23 Slot 6 1 Grease 1 20 6 14 9. Then, attach the Seat Frame (6) and the Backrest Tubes (9) to the Seat Frame (6) 8 with the Bolt, two M10...
English Manual
Page 10
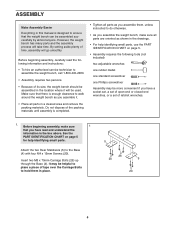
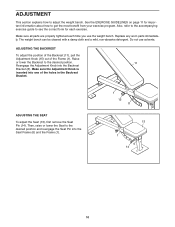
... accompanying exercise guide to see the correct form for important information about how to adjust the weight bench. Make sure all parts are properly tightened each exercise. The weight bench can be cleaned with a damp cloth and a mild, non-abrasive detergent. ADJUSTING THE SEAT To adjust the Seat (13), first remove the Seat Pin (14). ADJUSTMENT This section explains how to get the most benefit from your exercise program. See the EXERCISE GUIDELINES...
... accompanying exercise guide to see the correct form for important information about how to adjust the weight bench. Make sure all parts are properly tightened each exercise. The weight bench can be cleaned with a damp cloth and a mild, non-abrasive detergent. ADJUSTING THE SEAT To adjust the Seat (13), first remove the Seat Pin (14). ADJUSTMENT This section explains how to get the most benefit from your exercise program. See the EXERCISE GUIDELINES...
English Manual
Page 11
... exercises. Weight Loss To lose weight, use a low amount of resistance and increase the number of repetitions in each repetition should include 6 to your exercise program. Remember that is an individual matter. You must gauge your body's signals. Once you find the names of the muscles. You can tone your breath. 11 Complete as many sets of 15 to their capacity...
... exercises. Weight Loss To lose weight, use a low amount of resistance and increase the number of repetitions in each repetition should include 6 to your exercise program. Remember that is an individual matter. You must gauge your body's signals. Once you find the names of the muscles. You can tone your breath. 11 Complete as many sets of 15 to their capacity...
English Manual
Page 12
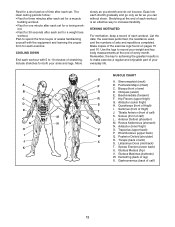
... back) T. Gastrocnemius (back of sets and repetitions completed. List the date, the exercises performed, the resistance used, and the numbers of calf) 12 Use the logs to record your weight and key body measurements at the end of each workout is to increase flexibility. Sartorius (front of every month. Rhomboideus (upper back) Q. Abductor (outer thigh) H. Triceps (back of arm) S. Brachioradials (forearm) F. Posterior...
... back) T. Gastrocnemius (back of sets and repetitions completed. List the date, the exercises performed, the resistance used, and the numbers of calf) 12 Use the logs to record your weight and key body measurements at the end of each workout is to increase flexibility. Sartorius (front of every month. Rhomboideus (upper back) Q. Abductor (outer thigh) H. Triceps (back of arm) S. Brachioradials (forearm) F. Posterior...
English Manual
Page 13
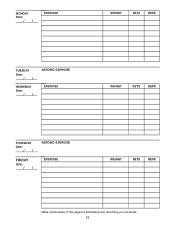
MONDAY Date: // EXERCISE WEIGHT SETS REPS TUESDAY Date: // WEDNESDAY Date: // AEROBIC EXERCISE EXERCISE WEIGHT SETS REPS THURSDAY Date: // FRIDAY Date: // AEROBIC EXERCISE EXERCISE WEIGHT SETS REPS Make photocopies of this page for scheduling and recording your workouts. 13
MONDAY Date: // EXERCISE WEIGHT SETS REPS TUESDAY Date: // WEDNESDAY Date: // AEROBIC EXERCISE EXERCISE WEIGHT SETS REPS THURSDAY Date: // FRIDAY Date: // AEROBIC EXERCISE EXERCISE WEIGHT SETS REPS Make photocopies of this page for scheduling and recording your workouts. 13
English Manual
Page 14
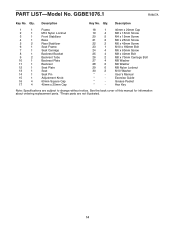
...of this manual for information about ordering replacement parts. *These parts are subject to change without notice. Qty. Exercise Guide * - Hex Key Note: Specifications are not illustrated. 14 Grease Packet * - PART LIST-Model No. GGBE1076.1 R0607A Key No. Qty. Description 1 1 Frame 2 1 M10 Nylon Locknut 3 1 Front Stabilizer 4 1 Base 5 2 Rear Stabilizer 6 1 Seat Frame 7 1 Seat Carriage 8 1 Backrest Bracket 9 2 Backrest Tube 10 1 Backrest Plate 11 1 Backrest 12 1 Seat Plate 13 1 Seat 14 1 Seat Pin 15 1 Adjustment Knob 16...
...of this manual for information about ordering replacement parts. *These parts are subject to change without notice. Qty. Exercise Guide * - Hex Key Note: Specifications are not illustrated. 14 Grease Packet * - PART LIST-Model No. GGBE1076.1 R0607A Key No. Qty. Description 1 1 Frame 2 1 M10 Nylon Locknut 3 1 Front Stabilizer 4 1 Base 5 2 Rear Stabilizer 6 1 Seat Frame 7 1 Seat Carriage 8 1 Backrest Bracket 9 2 Backrest Tube 10 1 Backrest Plate 11 1 Backrest 12 1 Seat Plate 13 1 Seat 14 1 Seat Pin 15 1 Adjustment Knob 16...
English Manual
Page 15
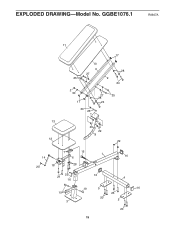
EXPLODED DRAWING-Model No. GGBE1076.1 R0607A 11 17 10 9 28 27 25 9 24 2 30 17 27 25 28 24 30 23 13 12 29 29 8 29 7 15 1 14 6 16 20 18 28 22 21 16 4 16 19 3 19 5 16 26 20 5 20 15
EXPLODED DRAWING-Model No. GGBE1076.1 R0607A 11 17 10 9 28 27 25 9 24 2 30 17 27 25 28 24 30 23 13 12 29 29 8 29 7 15 1 14 6 16 20 18 28 22 21 16 4 16 19 3 19 5 16 26 20 5 20 15
English Manual
Page 16
...; the model number and serial number of the product (see the front cover of the manual) • the name of the product (see the front cover of this manual) • the key number and description of the part(s) (see the front cover of this manual. ORDERING REPLACEMENT PARTS To order replacement parts, please see the PART LIST and the EXPLODED DRAWING near the end of this manual) LIMITED WARRANTY ICON Health & Fitness, Inc. (ICON) warrants this...
...; the model number and serial number of the product (see the front cover of the manual) • the name of the product (see the front cover of this manual) • the key number and description of the part(s) (see the front cover of this manual. ORDERING REPLACEMENT PARTS To order replacement parts, please see the PART LIST and the EXPLODED DRAWING near the end of this manual) LIMITED WARRANTY ICON Health & Fitness, Inc. (ICON) warrants this...


