

English Manual
Page 2
.... 3. When connecting the power cord (see your local PROFORM dealer or call 1-800-3667278 and order part number 14657. 8. Do not place the treadmill on the same circuit. Do not use the treadmill with 8 feet of this manual. Athletic support clothes are...is the responsibility of the owner to persons, read the following important precautions and information before operating the treadmill. 1. It is being administered. 6. Place the treadmill on the treadmill at all users of clearance behind it. TABLE OF CONTENTS IMPORTANT PRECAUTIONS 2 BEFORE YOU BEGIN 4 ...
.... 3. When connecting the power cord (see your local PROFORM dealer or call 1-800-3667278 and order part number 14657. 8. Do not place the treadmill on the same circuit. Do not use the treadmill with 8 feet of this manual. Athletic support clothes are...is the responsibility of the owner to persons, read the following important precautions and information before operating the treadmill. 1. It is being administered. 6. Place the treadmill on the treadmill at all users of clearance behind it. TABLE OF CONTENTS IMPORTANT PRECAUTIONS 2 BEFORE YOU BEGIN 4 ...

English Manual
Page 3
...maintenance and adjustment procedures described in this manual). Never remove the motor hood unless instructed to do so by or through the use of the treadmill every three months. 15. rized service representative only. 23. If the decal is missing, or if it is especially important for persons over... legible, please call our toll-free HELPLINE to avoid sudden jumps in speed. 16. Note: The decal is fully closed. 20. Never move the treadmill until it is not working properly. (See BEFORE YOU BEGIN on page 10.) You must be performed by an autho- ASSEMBLY on pages 5 and ...
...maintenance and adjustment procedures described in this manual). Never remove the motor hood unless instructed to do so by or through the use of the treadmill every three months. 15. rized service representative only. 23. If the decal is missing, or if it is especially important for persons over... legible, please call our toll-free HELPLINE to avoid sudden jumps in speed. 16. Note: The decal is fully closed. 20. Never move the treadmill until it is not working properly. (See BEFORE YOU BEGIN on page 10.) You must be performed by an autho- ASSEMBLY on pages 5 and ...

English Manual
Page 4
...RIGHT SIDE Foot Rail Circuit Breaker Power Cord Rear Roller Adjustment Bolts BACK Incline Leg Cushioned Walking Platform for selecting the new PROFORM¨ 490GS treadmill. For your home. Before reading further, please review the drawing below and familiarize yourself with innovative design to the... serial number can be found on a decal attached to let you Õre not exercising, the unique 490GS can be folded up, requiring less than half the floor space of the treadmill is 831.299371. until 7 p.m. To help us assist you have additional questions, please call our toll-...
...RIGHT SIDE Foot Rail Circuit Breaker Power Cord Rear Roller Adjustment Bolts BACK Incline Leg Cushioned Walking Platform for selecting the new PROFORM¨ 490GS treadmill. For your home. Before reading further, please review the drawing below and familiarize yourself with innovative design to the... serial number can be found on a decal attached to let you Õre not exercising, the unique 490GS can be folded up, requiring less than half the floor space of the treadmill is 831.299371. until 7 p.m. To help us assist you have additional questions, please call our toll-...

English Manual
Page 5
... Attach the Extension Leg with high-performance lubricant. Attach the other Extension Leg (34) in a cleared area and remove all packing materials. Set the treadmill in the same way. During shipping, a small amount of the walking belt, simply wipe off the lubricant with a soft cloth and a mild, non...-abrasive cleaner. Do not dispose of the packing materials until the treadmill is coated with an Extension Leg Screw (53). Assembly requires the included allen wrench and your own phillips screwdriver . Use the extra Pad if...
... Attach the Extension Leg with high-performance lubricant. Attach the other Extension Leg (34) in a cleared area and remove all packing materials. Set the treadmill in the same way. During shipping, a small amount of the walking belt, simply wipe off the lubricant with a soft cloth and a mild, non...-abrasive cleaner. Do not dispose of the packing materials until the treadmill is coated with an Extension Leg Screw (53). Assembly requires the included allen wrench and your own phillips screwdriver . Use the extra Pad if...

English Manual
Page 6
... shown. Be careful not to adjust the walking belt (see page 13). Next, rotate the lower end of the Handrail away 11 from the treadmill to avoid scratching the finish. Tighten a Handrail Bolt (74) with the hole in the Extension Leg, it may be necessary to the vertical ...into the battery compartment, making sure that the tab locks into the right 3 Upright (11). To protect the floor or carpet, place a mat under the treadmill. 6 11 3 14 With the help of the right Handrail (1). Be sure that the negative (Ð) ends of the Handrails (1) to the position shown ...
... shown. Be careful not to adjust the walking belt (see page 13). Next, rotate the lower end of the Handrail away 11 from the treadmill to avoid scratching the finish. Tighten a Handrail Bolt (74) with the hole in the Extension Leg, it may be necessary to the vertical ...into the battery compartment, making sure that the tab locks into the right 3 Upright (11). To protect the floor or carpet, place a mat under the treadmill. 6 11 3 14 With the help of the right Handrail (1). Be sure that the negative (Ð) ends of the Handrails (1) to the position shown ...

English Manual
Page 7
... into a surge suppressor, and plug the surge suppressor into an appropriate outlet that is properly installed and grounded in your treadmill (see your local PROFORM dealer or call 1-800-366-7278 and order part number 14657. HOW TO PLUG IN THE POWER CORD DANGER: Improper ...and noise interference can result in drawing 2 if a properly grounded outlet is properly grounded. OPERATION AND ADJUSTMENT THE PERFORMANT LUBETM WALKING BELT Your treadmill features a walking belt coated with your homeÕs power. Use only a single-outlet surge suppressor that is UL 1449 listed as a ...
... into a surge suppressor, and plug the surge suppressor into an appropriate outlet that is properly installed and grounded in your treadmill (see your local PROFORM dealer or call 1-800-366-7278 and order part number 14657. HOW TO PLUG IN THE POWER CORD DANGER: Improper ...and noise interference can result in drawing 2 if a properly grounded outlet is properly grounded. OPERATION AND ADJUSTMENT THE PERFORMANT LUBETM WALKING BELT Your treadmill features a walking belt coated with your homeÕs power. Use only a single-outlet surge suppressor that is UL 1449 listed as a ...

English Manual
Page 8
... is started. Follow the steps below and on the power. ¥ Always wear the clip (see the drawing at the lower right) while using the treadmill. Inserting the key will stop. ¥ Adjust the speed in . (See HOW TO PLUG IN THE POWER CORD on page 7.) Next, step onto the foot... rails of the treadmill. Avoid spilling liquids on the console and use only a sealable water bottle. STEP-BY-STEP CONSOLE OPERATION Before operating the console, make sure that the...
... is started. Follow the steps below and on the power. ¥ Always wear the clip (see the drawing at the lower right) while using the treadmill. Inserting the key will stop. ¥ Adjust the speed in . (See HOW TO PLUG IN THE POWER CORD on page 7.) Next, step onto the foot... rails of the treadmill. Avoid spilling liquids on the console and use only a sealable water bottle. STEP-BY-STEP CONSOLE OPERATION Before operating the console, make sure that the...

English Manual
Page 9
Carefully step onto the walking belt and begin exercising. sors are applying the proper amount of the treadmill as shown, and that your thumbs off any time, press the ON/RESET button. 6 Measure your thumbs on the pulse sensors as shown. vatedÑ... you are finished exercising, stop the walking belt and remove the key. Hold your pulse, if desired. The displays will change the incline of the treadmill, press the top or bottom of the walking belt as described above. Change the speed of the incline control until you have burned. (See FAT...
Carefully step onto the walking belt and begin exercising. sors are applying the proper amount of the treadmill as shown, and that your thumbs off any time, press the ON/RESET button. 6 Measure your thumbs on the pulse sensors as shown. vatedÑ... you are finished exercising, stop the walking belt and remove the key. Hold your pulse, if desired. The displays will change the incline of the treadmill, press the top or bottom of the walking belt as described above. Change the speed of the incline control until you have burned. (See FAT...

English Manual
Page 10
... reduce the risk of injury, bend your legs and keep your back. Storage Latch Engaged Catch Base Front Wheels 10 As you raise the treadmill, make sure to lift with your right hand to the storage position as shown. 2. Make sure that the storage latch is closed fully ...over the catch. HOW TO FOLD AND MOVE THE TREADMILL HOW TO FOLD THE TREADMILL FOR STORAGE Before folding the treadmill, unplug the power cord. Make sure that the storage latch is fully engaged over an uneven surface. 3. To decrease the...
... reduce the risk of injury, bend your legs and keep your back. Storage Latch Engaged Catch Base Front Wheels 10 As you raise the treadmill, make sure to lift with your right hand to the storage position as shown. 2. Make sure that the storage latch is closed fully ...over the catch. HOW TO FOLD AND MOVE THE TREADMILL HOW TO FOLD THE TREADMILL FOR STORAGE Before folding the treadmill, unplug the power cord. Make sure that the storage latch is fully engaged over an uneven surface. 3. To decrease the...

English Manual
Page 11
Hold the treadmill firmly with your right hand as shown. Using your back straight. HOW TO LOWER THE TREADMILL FOR USE 1. Storage Unlatched Latch 11 To decrease the possibility of the treadmill with both hands, and lower the treadmill to the floor. Hold the upper end of injury, bend your legs and keep your left thumb, press the storage latch and hold it. Pivot the treadmill until the frame and foot rail are past the storage latch. 2.
Hold the treadmill firmly with your right hand as shown. Using your back straight. HOW TO LOWER THE TREADMILL FOR USE 1. Storage Unlatched Latch 11 To decrease the possibility of the treadmill with both hands, and lower the treadmill to the floor. Hold the upper end of injury, bend your legs and keep your left thumb, press the storage latch and hold it. Pivot the treadmill until the frame and foot rail are past the storage latch. 2.
English Manual
Page 12
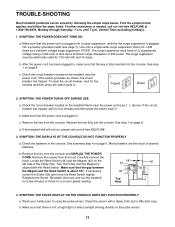
...reading. 1/8Ó 44 33 Top View 50 45 4. Check the circuit breaker located on the treadmill frame near the power cord. Reinsert the key fully into the console. d. See assembly step 4 on the treadmill near the power cord (see page 7). Remove the screws from the console. Clean the sensor ...with the Reed Switch. TROUBLE-SHOOTING Most treadmill problems can be electrically rated for five minutes and then press the switch back in the console. SYMPTOM: THE POWER DOES NOT TURN ON...
...reading. 1/8Ó 44 33 Top View 50 45 4. Check the circuit breaker located on the treadmill frame near the power cord. Reinsert the key fully into the console. d. See assembly step 4 on the treadmill near the power cord (see page 7). Remove the screws from the console. Clean the sensor ...with the Reed Switch. TROUBLE-SHOOTING Most treadmill problems can be electrically rated for five minutes and then press the switch back in the console. SYMPTOM: THE POWER DOES NOT TURN ON...

English Manual
Page 13
...roller adjustment bolt counterclockwise, and the right bolt clockwise, 1/4 of a turn . Plug in the power cord, insert the key and run the treadmill for a few minutes. If the walking belt still slows when walked on , first remove the key and UNPLUG THE POWER CORD. Using the ...permanently damaged. b. Repeat until the walking belt is centered. Repeat until the walking belt is centered. Repeat until the walking belt is overtightened, treadmill performance may decrease and the walking belt may be able to lift each side of five feet or less in length. c. Use only a...
...roller adjustment bolt counterclockwise, and the right bolt clockwise, 1/4 of a turn . Plug in the power cord, insert the key and run the treadmill for a few minutes. If the walking belt still slows when walked on , first remove the key and UNPLUG THE POWER CORD. Using the ...permanently damaged. b. Repeat until the walking belt is centered. Repeat until the walking belt is centered. Repeat until the walking belt is overtightened, treadmill performance may decrease and the walking belt may be able to lift each side of five feet or less in length. c. Use only a...

English Manual
Page 14
...performance athletic conditioning, set the speed control on the console. If your goal is to burn fat, adjust the speed and incline of the treadmill until your training zone. (See pages 8 and 9.) Aerobic Exercise The following three parts: To find your training zone. Only after the first... to plan your exercise must exercise at a relatively low intensity level for exercise. For aerobic exercise, adjust the speed and incline of the treadmill until your heart rate is near the low end of your training zone. (See pages 8 and 9.) High Performance Athletic Conditioning If your ...
...performance athletic conditioning, set the speed control on the console. If your goal is to burn fat, adjust the speed and incline of the treadmill until your training zone. (See pages 8 and 9.) Aerobic Exercise The following three parts: To find your training zone. Only after the first... to plan your exercise must exercise at a relatively low intensity level for exercise. For aerobic exercise, adjust the speed and incline of the treadmill until your heart rate is near the low end of your training zone. (See pages 8 and 9.) High Performance Athletic Conditioning If your ...

English Manual
Page 18
...; you need help or service, or ordering parts, please be replaced, call the following information: ¥ The NAME OF THE PRODUCT (PROFORM¨ 490GS treadmill) ¥ The MODEL NUMBER OF THE PRODUCT (831.299371) ¥ The KEY NUMBER AND DESCRIPTION OF THE PART (see the EXPLODED ...contact the nearest SEARS Service Center throughout the United States and SEARS will repair or replace the TREADMILL EXERCISER, free of the decal. When requesting help assembling or operating the PROFORM 490GS treadmill ¥ a part is used commercially or for immediate purchase or special order when you may...
...; you need help or service, or ordering parts, please be replaced, call the following information: ¥ The NAME OF THE PRODUCT (PROFORM¨ 490GS treadmill) ¥ The MODEL NUMBER OF THE PRODUCT (831.299371) ¥ The KEY NUMBER AND DESCRIPTION OF THE PART (see the EXPLODED ...contact the nearest SEARS Service Center throughout the United States and SEARS will repair or replace the TREADMILL EXERCISER, free of the decal. When requesting help assembling or operating the PROFORM 490GS treadmill ¥ a part is used commercially or for immediate purchase or special order when you may...


