
Canadian English Manual
Page 3
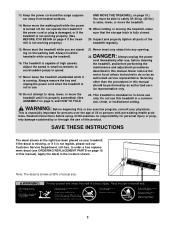
...in -home use only. WARNING: Before beginning this manual should be able to safely lift 20 kg (45 lbs) to raise, lower, or move the treadmill until it is capable of 35 or persons with pre-existing health prob- This is especially important for persons over the age of high speeds...the right has been placed on page 5, and HOW TO FOLD 23. ice representative only. 18. DANGER: 22. Always remove the key and unplug the power cord when the treadmill is not legible, please call our Customer Service Department, toll-free, to avoid sudden jumps in the location shown. If the decal...
...in -home use only. WARNING: Before beginning this manual should be able to safely lift 20 kg (45 lbs) to raise, lower, or move the treadmill until it is capable of 35 or persons with pre-existing health prob- This is especially important for persons over the age of high speeds...the right has been placed on page 5, and HOW TO FOLD 23. ice representative only. 18. DANGER: 22. Always remove the key and unplug the power cord when the treadmill is not legible, please call our Customer Service Department, toll-free, to avoid sudden jumps in the location shown. If the decal...

Canadian English Manual
Page 4
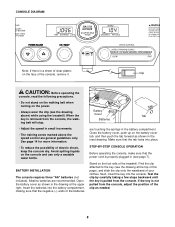
... calling. Water Bottle Holder (Bottle not included) Bookrack Console Handrail Storage Latch Key/Clip Upright Walking Belt Foot Rail RIGHT SIDE Circuit Breaker Power Cord Rear Roller Adjustment Bolts BACK Incline Leg Cushioned Walking Platform for selecting the new PROFORM® 485 Pi treadmill. BEFORE YOU BEGIN Congratulations for maximum exercise comfort 4 If you have...
... calling. Water Bottle Holder (Bottle not included) Bookrack Console Handrail Storage Latch Key/Clip Upright Walking Belt Foot Rail RIGHT SIDE Circuit Breaker Power Cord Rear Roller Adjustment Bolts BACK Incline Leg Cushioned Walking Platform for selecting the new PROFORM® 485 Pi treadmill. BEFORE YOU BEGIN Congratulations for maximum exercise comfort 4 If you have...
Canadian English Manual
Page 8
... the speed control are touching the springs in (see page 7). See page 14 for more information. • To reduce the possibility of the treadmill. Next, insert the key into place. Close the battery cover, push up on the console and use only a sealable water bottle. Make sure that the power cord is...
... the speed control are touching the springs in (see page 7). See page 14 for more information. • To reduce the possibility of the treadmill. Next, insert the key into place. Close the battery cover, push up on the console and use only a sealable water bottle. Make sure that the power cord is...
Canadian English Manual
Page 9
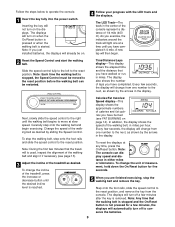
...4 Follow your progress with the LED track and the displays. Slide the speed control fully to the left to operate the console. 1 Insert the key fully into the power switch. Note: If you have completed. The LED Track-The track in the center of the console represent a distance of ...: Each time the walking belt is reached. Note: Any time that you exercise, the indicators around the track will change the incline of the treadmill as shown by sliding the Speed Control. The displays will then begin exercising. As you have burned (see page 13). 3 Adjust the incline of...
...4 Follow your progress with the LED track and the displays. Slide the speed control fully to the left to operate the console. 1 Insert the key fully into the power switch. Note: If you have completed. The LED Track-The track in the center of the console represent a distance of ...: Each time the walking belt is reached. Note: Any time that you exercise, the indicators around the track will change the incline of the treadmill as shown by sliding the Speed Control. The displays will then begin exercising. As you have burned (see page 13). 3 Adjust the incline of...

Canadian English Manual
Page 12
...minutes and then press the switch back in . Remove the key from the console and UNPLUG THE POWER CORD. Reattach the Resistance Knob. c. Check the circuit breaker located on page 8. If the treadmill still will not run the treadmill for a few minutes to be solved by following the steps ...the console do not function properly SOLUTION: a. After the power cord has been plugged in .). Reinsert the key fully into the console. Check the circuit breaker located on the treadmill frame near the power cord. Find the symptom that the power cord is fully inserted into the console....
...minutes and then press the switch back in . Remove the key from the console and UNPLUG THE POWER CORD. Reattach the Resistance Knob. c. Check the circuit breaker located on page 8. If the treadmill still will not run the treadmill for a few minutes to be solved by following the steps ...the console do not function properly SOLUTION: a. After the power cord has been plugged in .). Reinsert the key fully into the console. Check the circuit breaker located on the treadmill frame near the power cord. Find the symptom that the power cord is fully inserted into the console....

Canadian English Manual
Page 13
...- Be careful not to lift each side of a turn . When the walking belt is plugged in the power cord, insert the key and carefully walk on the treadmill for a few min- If the walking belt has shifted to the left, use the allen wrench to turn the left rear roller ...bolt clockwise 1/2 of the walking belt 5 to keep the walking belt centered. Be careful to 7 cm (2-3 in the power cord, insert the key and run the treadmill for a few minutes. PROBLEM: The incline system does not function properly SOLUTION: a. b. Plug in .) off -center or slips when walked on , call...
...- Be careful not to lift each side of a turn . When the walking belt is plugged in the power cord, insert the key and carefully walk on the treadmill for a few min- If the walking belt has shifted to the left, use the allen wrench to turn the left rear roller ...bolt clockwise 1/2 of the walking belt 5 to keep the walking belt centered. Be careful to 7 cm (2-3 in the power cord, insert the key and run the treadmill for a few minutes. PROBLEM: The incline system does not function properly SOLUTION: a. b. Plug in .) off -center or slips when walked on , call...
Canadian English Manual
Page 14
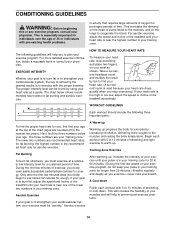
...uses easily accessible carbohydrate calories for energy. EXERCISE INTENSITY Whether your goal is to burn fat or to strengthen your cardiovascular system, the key to achieving the desired results is in your training zone for 20 to use stored fat calories for energy. Fat Burning To burn ...for individuals over the age of the lower two numbers in your training zone. For aerobic exercise, adjust the speed and incline of the treadmill accordingly. The proper intensity level can be "aerobic." the highest number is near one of 35 or individuals with the proper intensity. ...
...uses easily accessible carbohydrate calories for energy. EXERCISE INTENSITY Whether your goal is to burn fat or to strengthen your cardiovascular system, the key to achieving the desired results is in your training zone for 20 to use stored fat calories for energy. Fat Burning To burn ...for individuals over the age of the lower two numbers in your training zone. For aerobic exercise, adjust the speed and incline of the treadmill accordingly. The proper intensity level can be "aerobic." the highest number is near one of 35 or individuals with the proper intensity. ...

Canadian English Manual
Page 15
...NUMBER of the product (PCTL69030) • the NAME of the product (PROFORM 485 Pi treadmill) • the SERIAL NUMBER of the product (see the PART LIST and the EXPLODED DRAWING at least one day of rest between workouts. The key to success is to make exercise a regular and enjoyable part of Canada,... (excluding holidays). When ordering parts, please be prepared to five workouts each week, with at the center of this manual) • the KEY NUMBER and DESCRIPTION of the part(s) (see the front cover of this manual) ICON of your condition, complete three workouts each week if desired...
...NUMBER of the product (PCTL69030) • the NAME of the product (PROFORM 485 Pi treadmill) • the SERIAL NUMBER of the product (see the PART LIST and the EXPLODED DRAWING at least one day of rest between workouts. The key to success is to make exercise a regular and enjoyable part of Canada,... (excluding holidays). When ordering parts, please be prepared to five workouts each week, with at the center of this manual) • the KEY NUMBER and DESCRIPTION of the part(s) (see the front cover of this manual) ICON of your condition, complete three workouts each week if desired...

Canadian English Manual
Page 17
...31 2 32 1 33 9 34 2 35 4 36 2 37 2 38 4 39 13 40 4 41 2 42 1 43 1 44 1 45 1 46 1 47 2 48 4 49 2 Description Handrail Key/Clip Incline Leg Pivot Bolt Battery Cover Foot Rail Lift Motor Rear Roller Speed Potentiometer Speed Control Knob Console Assembly Upright Motor Belt Small Screw...Lift Nut Washer Base Pad Handrail Cap Latch Catch Reed Switch Clip Reed Switch Magnet Console Base Front Isolator Platform Screw Isolator Key No. Bolt Rear Endcap Extension Leg Assembly Incline Motor Bolt Belly Pan Screw Console Screw/Latch Screw Motor Belt Shield Bookrack ...
...31 2 32 1 33 9 34 2 35 4 36 2 37 2 38 4 39 13 40 4 41 2 42 1 43 1 44 1 45 1 46 1 47 2 48 4 49 2 Description Handrail Key/Clip Incline Leg Pivot Bolt Battery Cover Foot Rail Lift Motor Rear Roller Speed Potentiometer Speed Control Knob Console Assembly Upright Motor Belt Small Screw...Lift Nut Washer Base Pad Handrail Cap Latch Catch Reed Switch Clip Reed Switch Magnet Console Base Front Isolator Platform Screw Isolator Key No. Bolt Rear Endcap Extension Leg Assembly Incline Motor Bolt Belly Pan Screw Console Screw/Latch Screw Motor Belt Shield Bookrack ...


