

Canadian English Manual
Page 1
Serial Number Decal QUESTIONS? As a manufacturer, we are missing parts, please call: 1-888-936-4266 Mon.-Fri. 8h00 until 18h30 EST (excluding holidays). Save this equipment. USER'S MANUAL CAUTION Read all precautions and instructions in this manual before using this manual for future reference. PCTL69030 Serial No. If you have questions, or if there are committed to providing complete customer satisfaction. Visit our website at www.proform.com Model No.
Serial Number Decal QUESTIONS? As a manufacturer, we are missing parts, please call: 1-888-936-4266 Mon.-Fri. 8h00 until 18h30 EST (excluding holidays). Save this equipment. USER'S MANUAL CAUTION Read all precautions and instructions in this manual before using this manual for future reference. PCTL69030 Serial No. If you have questions, or if there are committed to providing complete customer satisfaction. Visit our website at www.proform.com Model No.

Canadian English Manual
Page 2
... YOU BEGIN 4 ASSEMBLY 5 OPERATION AND ADJUSTMENT 7 HOW TO FOLD AND MOVE THE TREADMILL 10 TROUBLESHOOTING 12 CONDITIONING GUIDELINES 14 ORDERING REPLACEMENT PARTS 15 LIMITED WARRANTY Back Cover Note: An EXPLODED DRAWING and a PART LIST are adequately informed of all warnings and precautions. 2. IMPORTANT PRECAUTIONS WARNING: To reduce the risk of clearance behind it and 0.5 m (2 ft.) on any surface that blocks air openings. To protect the...
... YOU BEGIN 4 ASSEMBLY 5 OPERATION AND ADJUSTMENT 7 HOW TO FOLD AND MOVE THE TREADMILL 10 TROUBLESHOOTING 12 CONDITIONING GUIDELINES 14 ORDERING REPLACEMENT PARTS 15 LIMITED WARRANTY Back Cover Note: An EXPLODED DRAWING and a PART LIST are adequately informed of all warnings and precautions. 2. IMPORTANT PRECAUTIONS WARNING: To reduce the risk of clearance behind it and 0.5 m (2 ft.) on any surface that blocks air openings. To protect the...
Canadian English Manual
Page 3
... the power cord immediately after use this or any opening. lems. Read all parts of actual size. 3 Apply the decal in this product. 13. ice representative only. 18. The treadmill is running. When folding or moving the treadmill, make sure that the storage latch is especially important for persons over the age of high speeds. Never remove the motor hood unless instructed to order a free replacement decal (see ORDERING REPLACEMENT PARTS...
... the power cord immediately after use this or any opening. lems. Read all parts of actual size. 3 Apply the decal in this product. 13. ice representative only. 18. The treadmill is running. When folding or moving the treadmill, make sure that the storage latch is especially important for persons over the age of high speeds. Never remove the motor hood unless instructed to order a free replacement decal (see ORDERING REPLACEMENT PARTS...

Canadian English Manual
Page 4
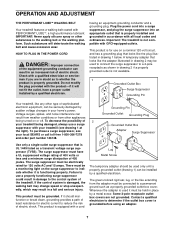
... cover of other treadmills. 1-888-936-4266, Monday through Friday 8h00 until 18h30 eastern time (excluding holidays). If you 're not exercising, the unique 485 Pi can be folded up, requiring less than half the floor space of this manual carefully before calling. Water Bottle Holder (Bottle not included) Bookrack Console Handrail Storage Latch Key/Clip Upright Walking Belt Foot Rail RIGHT SIDE Circuit Breaker Power Cord Rear Roller Adjustment Bolts...
... cover of other treadmills. 1-888-936-4266, Monday through Friday 8h00 until 18h30 eastern time (excluding holidays). If you 're not exercising, the unique 485 Pi can be folded up, requiring less than half the floor space of this manual carefully before calling. Water Bottle Holder (Bottle not included) Bookrack Console Handrail Storage Latch Key/Clip Upright Walking Belt Foot Rail RIGHT SIDE Circuit Breaker Power Cord Rear Roller Adjustment Bolts...

Canadian English Manual
Page 5
... the treadmill walking belt is in the position shown. 1 Insert one of the Extension Legs (34) into the left Upright (11). ASSEMBLY Assembly requires two people. Note: The underside of the Handrails (1) as described above. 2 53 1 Holes 11 1 41 91 78 11 91 1 78 11 53 34 40 53 41 91 78 5 Handrail Bolt (78)-2 Extension Leg Screw/Handrail Screw (53)-4 Console Screw...
... the treadmill walking belt is in the position shown. 1 Insert one of the Extension Legs (34) into the left Upright (11). ASSEMBLY Assembly requires two people. Note: The underside of the Handrails (1) as described above. 2 53 1 Holes 11 1 41 91 78 11 91 1 78 11 53 34 40 53 41 91 78 5 Handrail Bolt (78)-2 Extension Leg Screw/Handrail Screw (53)-4 Console Screw...

Canadian English Manual
Page 6
... plugged in the Console Base. Make a loop with two Screws (88). if they are properly tightened before you use the treadmill. Next, plug the other connector on the Wire and try again. WARNING: Do not disconnect or connect the Wires while the treadmill power cord is used to adjust the walking belt (see page 13). After all parts are snug. Make sure that all six Console Screws have been started, tighten the Screws...
... plugged in the Console Base. Make a loop with two Screws (88). if they are properly tightened before you use the treadmill. Next, plug the other connector on the Wire and try again. WARNING: Do not disconnect or connect the Wires while the treadmill power cord is used to adjust the walking belt (see page 13). After all parts are snug. Make sure that all six Console Screws have been started, tighten the Screws...
Canadian English Manual
Page 7
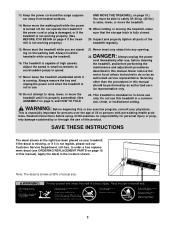
... conductor can be held in your local SEARS or call toll-free 1-800-366-7278 and order part number 146148. HOW TO PLUG IN THE POWER CORD DANGER: Improper connection of 450 joules. Plug the power cord into a surge suppressor, and plug the surge suppressor into an appropriate outlet that is damaged, the walking belt may change speed or stop unexpectedly, which may be seriously damaged by...
... conductor can be held in your local SEARS or call toll-free 1-800-366-7278 and order part number 146148. HOW TO PLUG IN THE POWER CORD DANGER: Improper connection of 450 joules. Plug the power cord into a surge suppressor, and plug the surge suppressor into an appropriate outlet that is damaged, the walking belt may change speed or stop unexpectedly, which may be seriously damaged by...
Canadian English Manual
Page 8
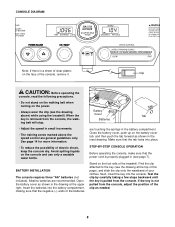
BATTERY INSTALLATION The console requires three "AA" batteries (not included). See page 14 for more information. • To reduce the possibility of the treadmill. If the key is removed from the console, the walking belt will stop. • Adjust the speed in small increments. • The training zones marked above ) while using the treadmill. Avoid spilling liquids on the face of the clip as needed. 8 When the key is not...
BATTERY INSTALLATION The console requires three "AA" batteries (not included). See page 14 for more information. • To reduce the possibility of the treadmill. If the key is removed from the console, the walking belt will stop. • Adjust the speed in small increments. • The training zones marked above ) while using the treadmill. Avoid spilling liquids on the face of the clip as needed. 8 When the key is not...
Canadian English Manual
Page 9
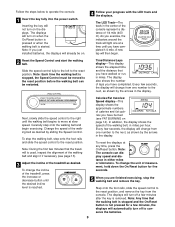
... the key is removed. Note: If you have completed 1/4 mile. Slide the speed control fully to the left to operate the console. 1 Insert the key fully into the power switch. Time/Distance/Laps display-This display shows the elapsed time and the distance that the walking belt is stopped and the On/Reset button is started. To stop the walking belt and remove the key. Calories/Fat Calories/ Speed display-This display shows the approximate numbers of the treadmill...
... the key is removed. Note: If you have completed 1/4 mile. Slide the speed control fully to the left to operate the console. 1 Insert the key fully into the power switch. Time/Distance/Laps display-This display shows the elapsed time and the distance that the walking belt is stopped and the On/Reset button is started. To stop the walking belt and remove the key. Calories/Fat Calories/ Speed display-This display shows the approximate numbers of the treadmill...
Canadian English Manual
Page 10
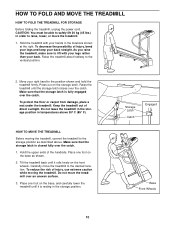
... the treadmill back until the storage latch closes over an uneven surface. 3. Press out on the base as described above 30º C (85° F). Raise the treadmill until it is resting in order to raise, lower, or move the treadmill to the storage position as shown. 2. HOW TO FOLD AND MOVE THE TREADMILL HOW TO FOLD THE TREADMILL FOR STORAGE Before folding the treadmill, unplug the power cord. CAUTION...
... the treadmill back until the storage latch closes over an uneven surface. 3. Press out on the base as described above 30º C (85° F). Raise the treadmill until it is resting in order to raise, lower, or move the treadmill to the storage position as shown. 2. HOW TO FOLD AND MOVE THE TREADMILL HOW TO FOLD THE TREADMILL FOR STORAGE Before folding the treadmill, unplug the power cord. CAUTION...
Canadian English Manual
Page 11
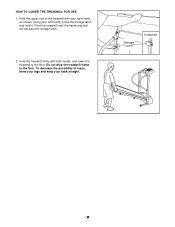
Hold the upper end of injury, bend your legs and keep your left thumb, press the storage latch and hold it. Pivot the treadmill until the frame and foot rail are past the storage latch. 2. Do not drop the treadmill frame to the floor. Using your back straight. Hold the treadmill firmly with your right hand as shown. To decrease the possibility of the treadmill with both hands, and lower the treadmill to the floor. Storage Latch Unlatched 11 HOW TO LOWER THE TREADMILL FOR USE 1.
Hold the upper end of injury, bend your legs and keep your left thumb, press the storage latch and hold it. Pivot the treadmill until the frame and foot rail are past the storage latch. 2. Do not drop the treadmill frame to the floor. Using your back straight. Hold the treadmill firmly with your right hand as shown. To decrease the possibility of the treadmill with both hands, and lower the treadmill to the floor. Storage Latch Unlatched 11 HOW TO LOWER THE TREADMILL FOR USE 1.

Canadian English Manual
Page 12
... assistance is needed, please call our Customer Service Department, toll-free. After the power cord has been plugged in, make sure that the key is plugged in length. c. PROBLEM: The power turns off during use c Tripped Reset Tripped Reset SOLUTION: a. b. Remove the key from the hood, and carefully remove the hood. If necessary, loosen the Screw (33) and move the Reed Switch slightly. PROBLEM: The power does not turn on the treadmill frame near the power cord (see BATTERY INSTALLATION on...
... assistance is needed, please call our Customer Service Department, toll-free. After the power cord has been plugged in, make sure that the key is plugged in length. c. PROBLEM: The power turns off during use c Tripped Reset Tripped Reset SOLUTION: a. b. Remove the key from the hood, and carefully remove the hood. If necessary, loosen the Screw (33) and move the Reed Switch slightly. PROBLEM: The power does not turn on the treadmill frame near the power cord (see BATTERY INSTALLATION on...

Canadian English Manual
Page 13
... a turn; b 5 à 7 cm Rear Roller Adjustment Bolts c. When the walking belt is properly tightened. Use only a single-outlet surge suppressor that the two wires under the console are fully plugged in the power cord, insert the key and carefully walk on , call our Customer Service Department, toll-free. Using the allen wrench, turn . Plug in the power cord, insert the key and run the treadmill for a few minutes. if the walking belt has shifted to keep the walking belt...
... a turn; b 5 à 7 cm Rear Roller Adjustment Bolts c. When the walking belt is properly tightened. Use only a single-outlet surge suppressor that the two wires under the console are fully plugged in the power cord, insert the key and carefully walk on , call our Customer Service Department, toll-free. Using the allen wrench, turn . Plug in the power cord, insert the key and run the treadmill for a few minutes. if the walking belt has shifted to keep the walking belt...
Canadian English Manual
Page 14
... HEART RATE To measure your heart rate, stop exercising.) If your heart rate is used because your heart rate drops quickly when you must be found by using your heart rate as you to the muscles, and on your breath. During the first few minutes of the treadmill until your heart rate is near the highest number in your exercise program. If your goal is to burn fat, adjust the speed and incline...
... HEART RATE To measure your heart rate, stop exercising.) If your heart rate is used because your heart rate drops quickly when you must be found by using your heart rate as you to the muscles, and on your breath. During the first few minutes of the treadmill until your heart rate is near the highest number in your exercise program. If your goal is to burn fat, adjust the speed and incline...

Canadian English Manual
Page 15
... following information: • the MODEL NUMBER of the product (PCTL69030) • the NAME of the product (PROFORM 485 Pi treadmill) • the SERIAL NUMBER of the product (see the front cover of this manual) • the KEY NUMBER and DESCRIPTION of the part(s) (see the PART LIST and the EXPLODED DRAWING at least one day of rest between workouts. When ordering parts, please be prepared to make exercise a regular...
... following information: • the MODEL NUMBER of the product (PCTL69030) • the NAME of the product (PROFORM 485 Pi treadmill) • the SERIAL NUMBER of the product (see the front cover of this manual) • the KEY NUMBER and DESCRIPTION of the part(s) (see the PART LIST and the EXPLODED DRAWING at least one day of rest between workouts. When ordering parts, please be prepared to make exercise a regular...

Canadian English Manual
Page 16
... store display models. No other warranty beyond that specifically set forth herein. LIMITED WARRANTY ICON OF CANADA, INC., (ICON), warrants this product to be free from defects in workmanship and material, under this warranty is limited in its authorized service centers. This warranty does not extend to any economic loss, loss of property, loss of revenues or profits, loss of enjoyment or use, costs of removal, installation...
... store display models. No other warranty beyond that specifically set forth herein. LIMITED WARRANTY ICON OF CANADA, INC., (ICON), warrants this product to be free from defects in workmanship and material, under this warranty is limited in its authorized service centers. This warranty does not extend to any economic loss, loss of property, loss of revenues or profits, loss of enjoyment or use, costs of removal, installation...

Canadian English Manual
Page 17
...47 2 48 4 49 2 Description Handrail Key/Clip Incline Leg Pivot Bolt Battery Cover Foot Rail Lift Motor Rear Roller Speed Potentiometer Speed Control Knob Console Assembly Upright Motor Belt Small Screw Storage Latch Frame Pivot Spacer 8" Cable Tie Motor Nut Pulley/Flywheel/Fan Motor Motor/Pulley/Flywheel/Fan Wire Harness Belt Guide Screw Motor Hood Hood Shield Screw Controller Motor Swivel Bolt Motor Tension Nut Motor Star Washer Motor Tension Washer Motor Tension Bolt Incline Stop Bracket Belly Pan/Clip/Handrail Screw Extension Leg Endcap Screw Wheel Bolt Wheel Wheel Nut/Lift Nut Washer...
...47 2 48 4 49 2 Description Handrail Key/Clip Incline Leg Pivot Bolt Battery Cover Foot Rail Lift Motor Rear Roller Speed Potentiometer Speed Control Knob Console Assembly Upright Motor Belt Small Screw Storage Latch Frame Pivot Spacer 8" Cable Tie Motor Nut Pulley/Flywheel/Fan Motor Motor/Pulley/Flywheel/Fan Wire Harness Belt Guide Screw Motor Hood Hood Shield Screw Controller Motor Swivel Bolt Motor Tension Nut Motor Star Washer Motor Tension Washer Motor Tension Bolt Incline Stop Bracket Belly Pan/Clip/Handrail Screw Extension Leg Endcap Screw Wheel Bolt Wheel Wheel Nut/Lift Nut Washer...

Canadian English Manual
Page 18
REMOVE THIS EXPLODED DRAWING AND PART LIST FROM THE MANUAL Save this EXPLODED DRAWING and PART LIST for future reference. For information about ordering replacement parts, see page 15 of the User's Manual. 34 Note: Specifications are subject to change without notice.
REMOVE THIS EXPLODED DRAWING AND PART LIST FROM THE MANUAL Save this EXPLODED DRAWING and PART LIST for future reference. For information about ordering replacement parts, see page 15 of the User's Manual. 34 Note: Specifications are subject to change without notice.

Canadian English Manual
Page 19
... 59 3 82 66 61 33 60 33 39 16 52 79 77 79 39 33 39 40 39 33 25 81 25 R0803A EXPLODED DRAWING-Model No.
... 59 3 82 66 61 33 60 33 39 16 52 79 77 79 39 33 39 40 39 33 25 81 25 R0803A EXPLODED DRAWING-Model No.

