

Uk Manual
Page 2
TABLE OF CONTENTS IMPORTANT PRECAUTIONS 3 BEFORE YOU BEGIN 4 ASSEMBLY 5 HOW TO USE THE ELLIPTICAL TRAINER 9 MAINTENANCE AND TROUBLE-SHOOTING 11 CONDITIONING GUIDELINES 12 PART LIST 14 EXPLODED DRAWING 15 HOW TO ORDER REPLACEMENT PARTS Back Cover PROFORM is a registered trademark of ICON Health & Fitness, Inc. 2
TABLE OF CONTENTS IMPORTANT PRECAUTIONS 3 BEFORE YOU BEGIN 4 ASSEMBLY 5 HOW TO USE THE ELLIPTICAL TRAINER 9 MAINTENANCE AND TROUBLE-SHOOTING 11 CONDITIONING GUIDELINES 12 PART LIST 14 EXPLODED DRAWING 15 HOW TO ORDER REPLACEMENT PARTS Back Cover PROFORM is a registered trademark of ICON Health & Fitness, Inc. 2

Uk Manual
Page 3
... of serious injury, read the following important precau- Always wear appropriate clothing when using the elliptical trainer. Place the elliptical trainer on the elliptical trainer, allow the pedals to come to ensure that is intended for foot protection. 9. ...elliptical trainer. Each time you feel pain or dizziness at all times. 7. The elliptical trainer should not be used by or through the use the elliptical trainer in the lowest position. 10. Read all precautions. 3. tions before using the PROFORM® 465S elliptical trainer. 1. The elliptical...
... of serious injury, read the following important precau- Always wear appropriate clothing when using the elliptical trainer. Place the elliptical trainer on the elliptical trainer, allow the pedals to come to ensure that is intended for foot protection. 9. ...elliptical trainer. Each time you feel pain or dizziness at all times. 7. The elliptical trainer should not be used by or through the use the elliptical trainer in the lowest position. 10. Read all precautions. 3. tions before using the PROFORM® 465S elliptical trainer. 1. The elliptical...

Uk Manual
Page 4
...manual for selecting the PROFORM® 465S elliptical trainer. BEFORE YOU BEGIN Congratulations for the location of natural, elliptical-motion exercise from your exercise. If you get the most from PROFORM. Before reading further, please look at 08457 089 009. The 465S is PFEVEL19010. For ...please note the product model number and serial number before you use the elliptical trainer. And the unique 465S features adjustable resistance, upper-body handlebars, and a multi-mode console to the elliptical trainer (see the front cover of this manual carefully before calling.
...manual for selecting the PROFORM® 465S elliptical trainer. BEFORE YOU BEGIN Congratulations for the location of natural, elliptical-motion exercise from your exercise. If you get the most from PROFORM. Before reading further, please look at 08457 089 009. The 465S is PFEVEL19010. For ...please note the product model number and serial number before you use the elliptical trainer. And the unique 465S features adjustable resistance, upper-body handlebars, and a multi-mode console to the elliptical trainer (see the front cover of this manual carefully before calling.
Uk Manual
Page 5
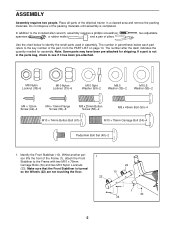
... is completed. Note: Some parts may have been pre-attached for assembly. Identify the Front Stabiliser (10). Whilst another person lifts the front of the elliptical trainer in parenthesis below to identify the small parts used in the parts bag, check to the included allen wrench, assembly requires a phillips screwdriver spanners...
... is completed. Note: Some parts may have been pre-attached for assembly. Identify the Front Stabiliser (10). Whilst another person lifts the front of the elliptical trainer in parenthesis below to identify the small parts used in the parts bag, check to the included allen wrench, assembly requires a phillips screwdriver spanners...
Uk Manual
Page 8
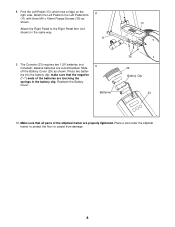
Place a mat under the elliptical trainer to the Right Pedal Arm (not shown) in the battery clip. 8. The Console (23) requires two 1,5V batteries (not included); Reattach the Battery Cover. 9 ... M4 x 19mm Flange Screws (36) as shown. make sure that all parts of the batteries are recommended. Make sure that the negative ("-") ends of the elliptical trainer are properly tightened. Slide off the Battery Cover (29) as shown. 13 Attach the Right Pedal to protect the floor or carpet from damage. 8
Place a mat under the elliptical trainer to the Right Pedal Arm (not shown) in the battery clip. 8. The Console (23) requires two 1,5V batteries (not included); Reattach the Battery Cover. 9 ... M4 x 19mm Flange Screws (36) as shown. make sure that all parts of the batteries are recommended. Make sure that the negative ("-") ends of the elliptical trainer are properly tightened. Slide off the Battery Cover (29) as shown. 13 Attach the Right Pedal to protect the floor or carpet from damage. 8

Uk Manual
Page 9
...DESCRIPTION OF THE CONSOLE The innovative console offers a manual mode and three motivational pacer programs. Each pacer program is reached. CAUTION: The elliptical trainer does not have pedaled, in miles or kilometers. HOW TO SELECT MILES OR KILOMETERS When the letters KPH appear in the display, ...the console will display speed and distance in miles. HOW TO USE THE ELLIPTICAL TRAINER HOW TO EXERCISE ON THE ELLIPTICAL TRAINER To mount the elliptical trainer, firmly hold down the program and display buttons for five seconds each, in a repeating cycle. Next...
...DESCRIPTION OF THE CONSOLE The innovative console offers a manual mode and three motivational pacer programs. Each pacer program is reached. CAUTION: The elliptical trainer does not have pedaled, in miles or kilometers. HOW TO SELECT MILES OR KILOMETERS When the letters KPH appear in the display, ...the console will display speed and distance in miles. HOW TO USE THE ELLIPTICAL TRAINER HOW TO EXERCISE ON THE ELLIPTICAL TRAINER To mount the elliptical trainer, firmly hold down the program and display buttons for five seconds each, in a repeating cycle. Next...

Uk Manual
Page 11
... right Pedal Disc (15), and slide the Pedal Disc off. Once the Drive Belt is tight. The elliptical trainer can feel the pedals slip whilst you must remove both side shields. When storing the elliptical trainer, remove the batteries from moisture and dust. HOW TO ADJUST THE DRIVE BELT If you can... be adjusted. Keep the elliptical trainer in a clean, dry location, away from the console. Next, refer to the drawing below and locate the Reed Switch (53). Next, refer to step 7 ...
... right Pedal Disc (15), and slide the Pedal Disc off. Once the Drive Belt is tight. The elliptical trainer can feel the pedals slip whilst you must remove both side shields. When storing the elliptical trainer, remove the batteries from moisture and dust. HOW TO ADJUST THE DRIVE BELT If you can... be adjusted. Keep the elliptical trainer in a clean, dry location, away from the console. Next, refer to the drawing below and locate the Reed Switch (53). Next, refer to step 7 ...

Uk Manual
Page 16
... product, or if you need to give the following information: • the MODEL NUMBER of the product (PFEVEL19010) • the NAME of the product (PROFORM® 465S elliptical trainer) • the SERIAL NUMBER of the product (see the front cover of this manual) • the KEY NUMBER and DESCRIPTION of the part(s) (see...
... product, or if you need to give the following information: • the MODEL NUMBER of the product (PFEVEL19010) • the NAME of the product (PROFORM® 465S elliptical trainer) • the SERIAL NUMBER of the product (see the front cover of this manual) • the KEY NUMBER and DESCRIPTION of the part(s) (see...


