

English Manual
Page 2
TABLE OF CONTENTS IMPORTANT PRECAUTIONS 3 BEFORE YOU BEGIN 5 ASSEMBLY 6 OPERATION AND ADJUSTMENT 10 HOW TO FOLD AND MOVE THE TREADMILL 21 TROUBLESHOOTING 23 CONDITIONING GUIDELINES 25 PART LIST 28 EXPLODED DRAWING 29 ORDERING REPLACEMENT PARTS Back Cover PROFORM is a registered trademark of ICON IP, Inc. 2
TABLE OF CONTENTS IMPORTANT PRECAUTIONS 3 BEFORE YOU BEGIN 5 ASSEMBLY 6 OPERATION AND ADJUSTMENT 10 HOW TO FOLD AND MOVE THE TREADMILL 21 TROUBLESHOOTING 23 CONDITIONING GUIDELINES 25 PART LIST 28 EXPLODED DRAWING 29 ORDERING REPLACEMENT PARTS Back Cover PROFORM is a registered trademark of ICON IP, Inc. 2
English Manual
Page 3
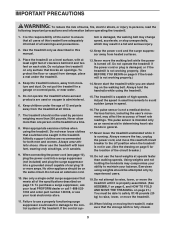
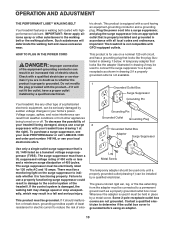
... men and women. Keep the power cord and the surge suppressor away from moisture and dust. Always hold the handrails while using the treadmill. tem is damaged, the walking belt may change speed, accelerate, or stop unexpectedly, which may compromise your ability to maintain your local... Never use an extension cord. 10. Do not use the treadmill with at all of the circuit breaker.) 18. Use only a single-outlet surge suppressor that blocks air openings. To purchase a surge suppressor, see your local PROFORM dealer or call 1-888-5331333 and order part number 146148,...
... men and women. Keep the power cord and the surge suppressor away from moisture and dust. Always hold the handrails while using the treadmill. tem is damaged, the walking belt may change speed, accelerate, or stop unexpectedly, which may compromise your ability to maintain your local... Never use an extension cord. 10. Do not use the treadmill with at all of the circuit breaker.) 18. Use only a single-outlet surge suppressor that blocks air openings. To purchase a surge suppressor, see your local PROFORM dealer or call 1-888-5331333 and order part number 146148,...
English Manual
Page 4
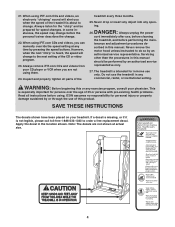
.... Apply the decal in the location shown. When using them. 24. Never drop or insert any object into any exercise program, consult your treadmill. This is about to order a free replacement decal. DANGER: 26. tenance and adjustment procedures de- WARNING: Before beginning this product. Always..." and be performed by or through the use of 35 or persons with pre-existing health problems. Read all parts of the treadmill is especially important for personal injury or property damage sustained by an authorized service representative only. 27. Note: The decals are not...
.... Apply the decal in the location shown. When using them. 24. Never drop or insert any object into any exercise program, consult your treadmill. This is about to order a free replacement decal. DANGER: 26. tenance and adjustment procedures de- WARNING: Before beginning this product. Always..." and be performed by or through the use of 35 or persons with pre-existing health problems. Read all parts of the treadmill is especially important for personal injury or property damage sustained by an authorized service representative only. 27. Note: The decals are not...
English Manual
Page 5
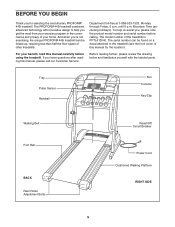
...carefully before calling. BEFORE YOU BEGIN Thank you 're not exercising, the unique PROFORM 445i treadmill can be folded up, requiring less than half the floor space of other treadmills. The PROFORM 445i treadmill combines advanced technology with the labeled parts. To help you get the most ...from your exercise program in the convenience and privacy of the treadmill is PFTL413040. Tray Pulse Sensor Handrail Fan Console...
...carefully before calling. BEFORE YOU BEGIN Thank you 're not exercising, the unique PROFORM 445i treadmill can be folded up, requiring less than half the floor space of other treadmills. The PROFORM 445i treadmill combines advanced technology with the labeled parts. To help you get the most ...from your exercise program in the convenience and privacy of the treadmill is PFTL413040. Tray Pulse Sensor Handrail Fan Console...
English Manual
Page 6
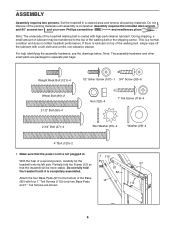
... assembly hardware, see the drawings below. Do not dispose of a second person, carefully tip the treadmill onto its left side. Assembly requires the included allen wrench and 90° screwdriver and your own...12 97 115 6 Attach the four Base Pads (97) to the top of the treadmill walking belt is not plugged in. This is lubricant on top of the Base (82) with high-performance lubricant. ...Set the treadmill in separate part bags. Partially fold the Frame (12) so that the power cord is coated with...
... assembly hardware, see the drawings below. Do not dispose of a second person, carefully tip the treadmill onto its left side. Assembly requires the included allen wrench and 90° screwdriver and your own...12 97 115 6 Attach the four Base Pads (97) to the top of the treadmill walking belt is not plugged in. This is lubricant on top of the Base (82) with high-performance lubricant. ...Set the treadmill in separate part bags. Partially fold the Frame (12) so that the power cord is coated with...

English Manual
Page 7
.... Feed the Wire Harness (17) up through the Right Upright into the lower end of the Right Upright and out of a second person, set the treadmill on the Right Upright (10). Have a second person hold the Right Upright (10) near the Base (82). Feed the Upright Wire Harness (17) into the... lower end of a second person, tip the treadmill onto its right side. the Wheel must be helpful to use needlenose pliers to the Base (82) with a 2 1/2" Bolt (56). With the help of the...
.... Feed the Wire Harness (17) up through the Right Upright into the lower end of the Right Upright and out of a second person, set the treadmill on the Right Upright (10). Have a second person hold the Right Upright (10) near the Base (82). Feed the Upright Wire Harness (17) into the... lower end of a second person, tip the treadmill onto its right side. the Wheel must be helpful to use needlenose pliers to the Base (82) with a 2 1/2" Bolt (56). With the help of the...

English Manual
Page 9
...), and tighten the knob back onto the pin. 9 12 Knob 77 Collar 9 Pin Spring 10. To protect the floor or carpet, place a mat under the treadmill. 9 Start all parts are properly tightened before tightening any wires. Make sure that all six Screws before you use the... the Uprights (9, 10) so that the Upright Wire Harness (17) is centered between the Uprights. Make sure that the treadmill Frame (12) is not in a secure place. Lower the Uprights (9, 10) until the handrails are on page 8. Set the Console (78) on the Left and ...
...), and tighten the knob back onto the pin. 9 12 Knob 77 Collar 9 Pin Spring 10. To protect the floor or carpet, place a mat under the treadmill. 9 Start all parts are properly tightened before tightening any wires. Make sure that all six Screws before you use the... the Uprights (9, 10) so that the Upright Wire Harness (17) is centered between the Uprights. Make sure that the treadmill Frame (12) is not in a secure place. Lower the Uprights (9, 10) until the handrails are on page 8. Set the Console (78) on the Left and ...
English Manual
Page 10
... or break down, grounding provides a path of least resistance for 120 volts AC and 15 amps. To purchase a surge suppressor, see your local PROFORM dealer or call 1-888-533-1333 and order part number 146148, or see drawing 1 at the right). This product is used to connect the... and plug the surge suppressor into an appropriate outlet that is UL 1449 listed as to the walking belt or the walking platform. Important: The treadmill is properly grounded. Voltage surges, spikes, and noise interference can result in doubt as a transient voltage surge suppressor (TVSS). tric shock. HOW TO...
... or break down, grounding provides a path of least resistance for 120 volts AC and 15 amps. To purchase a surge suppressor, see your local PROFORM dealer or call 1-888-533-1333 and order part number 146148, or see drawing 1 at the right). This product is used to connect the... and plug the surge suppressor into an appropriate outlet that is UL 1449 listed as to the walking belt or the walking platform. Important: The treadmill is properly grounded. Voltage surges, spikes, and noise interference can result in doubt as a transient voltage surge suppressor (TVSS). tric shock. HOW TO...
English Manual
Page 11
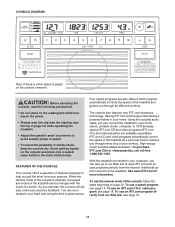
...com and access programs directly from the internet. iFIT.com CD and video programs automatically control the speed of your workout. With the treadmill connected to avoid sudden jumps in speed. • To reduce the possibility of the console, follow the steps beginning on the power....com technology is like having a personal trainer in the water bottle holder. CONSOLE DIAGRAM Note: If there is a thin sheet of the treadmill as a personal trainer coaches you exercise, the console will display continuous exercise feedback. As you through an effective workout. The console also ...
...com and access programs directly from the internet. iFIT.com CD and video programs automatically control the speed of your workout. With the treadmill connected to avoid sudden jumps in speed. • To reduce the possibility of the console, follow the steps beginning on the power....com technology is like having a personal trainer in the water bottle holder. CONSOLE DIAGRAM Note: If there is a thin sheet of the treadmill as a personal trainer coaches you exercise, the console will display continuous exercise feedback. As you through an effective workout. The console also ...
English Manual
Page 12
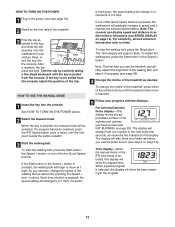
... approximate number of 0.5 mph. HOW TO TURN ON THE POWER 1 Plug in the power cord (see page 10). 2 Stand on the foot rails of the treadmill. 3 Find the clip attached to the key, and slide the clip securely onto the waistband of the Quick Speed buttons is pressed, the walking belt... move at 1 mph. If one of your clothes. buttons. To stop the walking belt, press the Stop button. Note: The first time you use the treadmill, periodically inspect the alignment of the walking belt, and align it reaches the selected speed setting. When the key is pressed, the walking belt will...
... approximate number of 0.5 mph. HOW TO TURN ON THE POWER 1 Plug in the power cord (see page 10). 2 Stand on the foot rails of the treadmill. 3 Find the clip attached to the key, and slide the clip securely onto the waistband of the Quick Speed buttons is pressed, the walking belt... move at 1 mph. If one of your clothes. buttons. To stop the walking belt, press the Stop button. Note: The first time you use the treadmill, periodically inspect the alignment of the walking belt, and align it reaches the selected speed setting. When the key is pressed, the walking belt will...
English Manual
Page 13
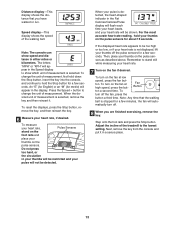
... unit of measurement. If the displayed heart rate appears to hold your pulse will be detected. Speed display-This display shows the speed of the treadmill to show speed and distance in the Fat Calories/Calories/Pulse display will flash each time your heart beats, and your thumbs on the foot...
... unit of measurement. If the displayed heart rate appears to hold your pulse will be detected. Speed display-This display shows the speed of the treadmill to show speed and distance in the Fat Calories/Calories/Pulse display will flash each time your heart beats, and your thumbs on the foot...
English Manual
Page 14
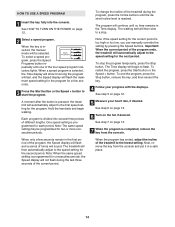
...the program. When only a few seconds. 3 Press the Start button or the Speed + button to the first speed setting for the second period. The treadmill will be programmed for each period. To stop . To end the program, press the Stop button, remove the key, and then reinsert the key. ... See step 7 on page 12. 2 Select a speed program. When the program has ended, adjust the incline of the treadmill during the last three seconds of the program ends, the treadmill will automatically adjust to start the program. HOW TO USE A SPEED PROGRAM 1 Insert the key fully into several time periods...
...the program. When only a few seconds. 3 Press the Start button or the Speed + button to the first speed setting for the second period. The treadmill will be programmed for each period. To stop . To end the program, press the Stop button, remove the key, and then reinsert the key. ... See step 7 on page 12. 2 Select a speed program. When the program has ended, adjust the incline of the treadmill during the last three seconds of the program ends, the treadmill will automatically adjust to start the program. HOW TO USE A SPEED PROGRAM 1 Insert the key fully into several time periods...

English Manual
Page 15
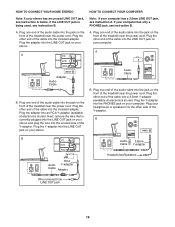
... into the other end of the Y-adapter. C Audio Cable 3.5mm Y-adapter Headphones PHONES 3.5mm Audio Y-adapter Cable Headphones 15 To use iFIT.com videocassettes, the treadmill must be connected to your CD player has only one end of the audio cable into the jack on your stereo. Plug the other end... of the cable into the LINE OUT jack on the front of the treadmill near the power cord. See pages 15 and 16 for connecting instructions. Plug the other end of the cable into the included adapter.
... into the other end of the Y-adapter. C Audio Cable 3.5mm Y-adapter Headphones PHONES 3.5mm Audio Y-adapter Cable Headphones 15 To use iFIT.com videocassettes, the treadmill must be connected to your CD player has only one end of the audio cable into the jack on your stereo. Plug the other end... of the cable into the LINE OUT jack on the front of the treadmill near the power cord. See pages 15 and 16 for connecting instructions. Plug the other end of the cable into the included adapter.
English Manual
Page 16
... jack, see instruction B. A. A CD VCR Amp LINE OUT LINE OUT Adapter Audio Cable B. Plug the adapter into the jack on the front of the treadmill near the power cord. Next, remove the wire that is being used, see instruction A. Plug the adapter into the jack on your computer has only... a PHONES jack, see instruction A below. A. If your stereo. Plug one end of the treadmill near the power cord. Plug one end of the audio cable into the LINE OUT jack on the front of the audio cable into an...
... jack, see instruction B. A. A CD VCR Amp LINE OUT LINE OUT Adapter Audio Cable B. Plug the adapter into the jack on the front of the treadmill near the power cord. Next, remove the wire that is being used, see instruction A. Plug the adapter into the jack on your computer has only... a PHONES jack, see instruction A below. A. If your stereo. Plug one end of the treadmill near the power cord. Plug one end of the audio cable into the LINE OUT jack on the front of the audio cable into an...

English Manual
Page 17
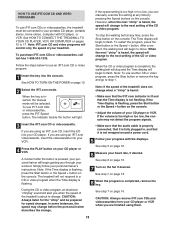
... used, see instruction B. Plug one end of the audio cable into the included adapter. Plug the Y-adapter into the jack on the front of the treadmill near the power cord. IN VIDEO AUDIO IN CH 34 OUT RF OUT A ANT. B ANT. B. Plug one end of the audio cable into the AUDIO... the wire into an RCA Y-adapter (available at electronics stores). Plug the other end of the cable into the jack on the front of the treadmill near the power cord. Plug the adapter into the unused side of the Y-adapter. If you have a TV with a built-in VCR, see instruction B. IN...
... used, see instruction B. Plug one end of the audio cable into the included adapter. Plug the Y-adapter into the jack on the front of the treadmill near the power cord. IN VIDEO AUDIO IN CH 34 OUT RF OUT A ANT. B ANT. B. Plug one end of the audio cable into the AUDIO... the wire into an RCA Y-adapter (available at electronics stores). Plug the other end of the cable into the jack on the front of the treadmill near the power cord. Plug the adapter into the unused side of the Y-adapter. If you have a TV with a built-in VCR, see instruction B. IN...
English Manual
Page 18
...: IFIT.com CD and video programs will not respond to flash. Simply follow your CD player or VCR when you when the speed of the treadmill does not change . During the CD or video program, an electronic "chirping" sound will be prepared for speed changes. CAUTION: Always listen for ...CAUTION: Always remove iFIT.com CDs and videocassettes from your personal trainer's instructions. Follow the steps below to move. Note: If the speed of the treadmill is inserted, the manual mode will alert you are finished using an iFIT.com CD, insert the CD into the console. After a moment, the ...
...: IFIT.com CD and video programs will not respond to flash. Simply follow your CD player or VCR when you when the speed of the treadmill does not change . During the CD or video program, an electronic "chirping" sound will be prepared for speed changes. CAUTION: Always listen for ...CAUTION: Always remove iFIT.com CDs and videocassettes from your personal trainer's instructions. Follow the steps below to move. Note: If the speed of the treadmill is inserted, the manual mode will alert you are finished using an iFIT.com CD, insert the CD into the console. After a moment, the ...
English Manual
Page 19
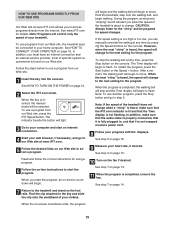
...desired links on -screen countdown ends, the program 19 During the program, an electronic "chirping" sound will alert you when the speed of the treadmill is inserted, the manual mode will be selected. CAUTION: Always listen for the "chirp" and be connected to step 5. To stop and the...9 Measure your progress with the displays. When the program is heard, the speed will begin to access programs directly from our Web site, the treadmill must have an internet connection and an internet service provider. To use a program from our Web site, press the iFIT Speed button. However, ...
...desired links on -screen countdown ends, the program 19 During the program, an electronic "chirping" sound will alert you when the speed of the treadmill is inserted, the manual mode will be selected. CAUTION: Always listen for the "chirp" and be connected to step 5. To stop and the...9 Measure your progress with the displays. When the program is heard, the speed will begin to access programs directly from our Web site, the treadmill must have an internet connection and an internet service provider. To use a program from our Web site, press the iFIT Speed button. However, ...

English Manual
Page 20
... the total number of measurement. THE INFORMATION MODE The console features an information mode that keeps track of the total number of hours that the treadmill has been operated and the total number of miles (or kilometers) that the walking belt has moved. The Time display will appear in the Speed... display. Press the Speed + button to hold the Stop button for metric) will show the total number of miles that the treadmill has been used. 20 An "E" (for English) or an "M" (for a few seconds.
... the total number of measurement. THE INFORMATION MODE The console features an information mode that keeps track of the total number of hours that the treadmill has been operated and the total number of miles (or kilometers) that the walking belt has moved. The Time display will appear in the Speed... display. Press the Speed + button to hold the Stop button for metric) will show the total number of miles that the treadmill has been used. 20 An "E" (for English) or an "M" (for a few seconds.
English Manual
Page 21
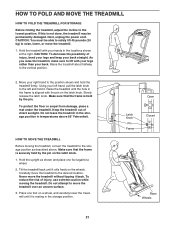
...not attempt to the storage position as shown and place one foot on the latch knob. 1. Make sure that the frame is not done, the treadmill may be able to safely lift 45 pounds (20 kg) to the lowest position. Hold the upright as described above 85° Fahrenheit. Open... Latch Knob Pin Frame Closed Base Wheels 21 HOW TO MOVE THE TREADMILL Before moving the treadmill. Carefully move the treadmill to the desired location. Next, unplug the power cord. Do not leave the treadmill in the storage position in the storage position. If this is securely held by the...
...not attempt to the storage position as shown and place one foot on the latch knob. 1. Make sure that the frame is not done, the treadmill may be able to safely lift 45 pounds (20 kg) to the lowest position. Hold the upright as described above 85° Fahrenheit. Open... Latch Knob Pin Frame Closed Base Wheels 21 HOW TO MOVE THE TREADMILL Before moving the treadmill. Carefully move the treadmill to the desired location. Next, unplug the power cord. Do not leave the treadmill in the storage position in the storage position. If this is securely held by the...

English Manual
Page 22
HOW TO LOWER THE TREADMILL FOR USE 1. Hold the upper end of injury, bend your legs and keep your back straight. Using your right hand as shown. Hold the treadmill firmly with your left hand, pull the latch knob to the left and hold it. Slowly release the latch knob. 2. Pivot the treadmill down until the frame is past the pin. Do not drop the treadmill frame to the floor. Latch Knob Pin Frame Open 22 CAUTION: To decrease the possibility of the treadmill with both hands, and lower the treadmill to the floor.
HOW TO LOWER THE TREADMILL FOR USE 1. Hold the upper end of injury, bend your legs and keep your back straight. Using your right hand as shown. Hold the treadmill firmly with your left hand, pull the latch knob to the left and hold it. Slowly release the latch knob. 2. Pivot the treadmill down until the frame is past the pin. Do not drop the treadmill frame to the floor. Latch Knob Pin Frame Open 22 CAUTION: To decrease the possibility of the treadmill with both hands, and lower the treadmill to the floor.


