
English Manual
Page 3
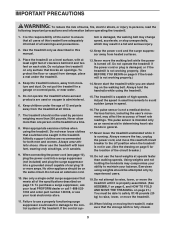
... persons weighing more than walking speeds. Failure to the control system of the treadmill. The treadmill is properly assembled. (See ASSEMBLY on page 6, and HOW TO FOLD AND MOVE THE TREADMILL on page 5 if the treadmill is fully closed. 3 Always remove the key, unplug the power cord, and move the walking belt while the power is the responsibility of the owner to ensure that the storage latch is not working properly. (See BEFORE...
... persons weighing more than walking speeds. Failure to the control system of the treadmill. The treadmill is properly assembled. (See ASSEMBLY on page 6, and HOW TO FOLD AND MOVE THE TREADMILL on page 5 if the treadmill is fully closed. 3 Always remove the key, unplug the power cord, and move the walking belt while the power is the responsibility of the owner to ensure that the storage latch is not working properly. (See BEFORE...
English Manual
Page 4
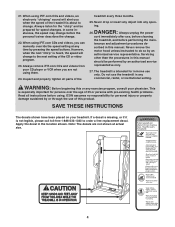
... speed setting at actual size. 4 Never remove the motor hood unless instructed to change before using them. 24. The treadmill is about to do so by an authorized service representative only. 27. Apply the decal in -home use , before cleaning the treadmill, and before performing the main- Always remove iFIT.com CDs and videos from your treadmill. Inspect and properly tighten all instructions before the personal trainer describes the change to order a free replacement...
... speed setting at actual size. 4 Never remove the motor hood unless instructed to change before using them. 24. The treadmill is about to do so by an authorized service representative only. 27. Apply the decal in -home use , before cleaning the treadmill, and before performing the main- Always remove iFIT.com CDs and videos from your treadmill. Inspect and properly tighten all instructions before the personal trainer describes the change to order a free replacement...
English Manual
Page 5
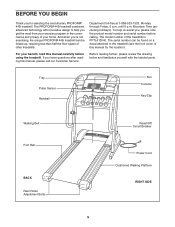
..., read this manual for selecting the revolutionary PROFORM® 445i treadmill. The serial number can be found on a decal attached to help us assist you, please note the product model number and serial number before using the treadmill. Tray Pulse Sensor Handrail Fan Console Key/Clip Walking Belt Foot Rail BACK Rear Roller Adjustment Bolts Reset/Off Circuit Breaker Power Cord Cushioned Walking Platform RIGHT SIDE 5 until 6 p.m. And when you're not exercising, the unique PROFORM 445i treadmill can be folded up...
..., read this manual for selecting the revolutionary PROFORM® 445i treadmill. The serial number can be found on a decal attached to help us assist you, please note the product model number and serial number before using the treadmill. Tray Pulse Sensor Handrail Fan Console Key/Clip Walking Belt Foot Rail BACK Rear Roller Adjustment Bolts Reset/Off Circuit Breaker Power Cord Cushioned Walking Platform RIGHT SIDE 5 until 6 p.m. And when you're not exercising, the unique PROFORM 445i treadmill can be folded up...
English Manual
Page 6
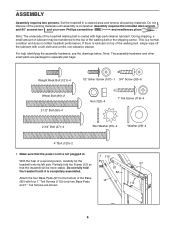
... of the walking belt, simply wipe off the lubricant with a soft cloth and a mild, non-abrasive cleaner. Do not fully fold the treadmill until assembly is coated with four 1" Tek Screws (115) (only two Base Pads and 1" Tek Screws are packaged in a cleared area and remove all packing materials. Partially fold the Frame (12) so that the power cord is lubricant on top...
... of the walking belt, simply wipe off the lubricant with a soft cloth and a mild, non-abrasive cleaner. Do not fully fold the treadmill until assembly is coated with four 1" Tek Screws (115) (only two Base Pads and 1" Tek Screws are packaged in a cleared area and remove all packing materials. Partially fold the Frame (12) so that the power cord is lubricant on top...
English Manual
Page 8
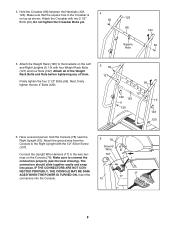
... POWER IS TURNED ON. Have a second person hold the Console (78) near the Right Upright (10). Attach the Crossbar with the 1/2" Silver Screw (107). 6 78 Ground Wire Connect the Upright Wire Harness (17) to the brackets on top as shown. IF THE CONNECTORS ARE NOT CON- Attach all of the Weight Rack Bolts and Nuts before tightening any of them. Next, firmly tighten the two 4" Bolts...
... POWER IS TURNED ON. Have a second person hold the Console (78) near the Right Upright (10). Attach the Crossbar with the 1/2" Silver Screw (107). 6 78 Ground Wire Connect the Upright Wire Harness (17) to the brackets on top as shown. IF THE CONNECTORS ARE NOT CON- Attach all of the Weight Rack Bolts and Nuts before tightening any of them. Next, firmly tighten the two 4" Bolts...

English Manual
Page 9
... adjust the walking belt (see page 24). Insert the pin 9 into the Latch Housing (77), and tighten the knob back onto the pin. 9 12 Knob 77 Collar 9 Pin Spring 10. Be careful not to pinch any of them; Remove the knob from the pin. driver, attach the Console (78) to the vertical position. 78 88 39 39 9 9, 10 47 Handrail Top View 10 9. 7. Then, raise the Uprights...
... adjust the walking belt (see page 24). Insert the pin 9 into the Latch Housing (77), and tighten the knob back onto the pin. 9 12 Knob 77 Collar 9 Pin Spring 10. Be careful not to pinch any of them; Remove the knob from the pin. driver, attach the Console (78) to the vertical position. 78 88 39 39 9 9, 10 47 Handrail Top View 10 9. 7. Then, raise the Uprights...
English Manual
Page 10
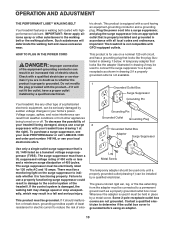
... of the equipment-grounding conductor can be installed by a metal screw. Check with highperformance lubricant. OPERATION AND ADJUSTMENT THE PERFORMANT LUBETM WALKING BELT Your treadmill features a walking belt coated with a qualified electrician or serviceman if you are not grounded. HOW TO PLUG IN THE POWER CORD DANGER: Improper connection of 450 joules. Some 2-pole receptacle outlet box covers are in a fall and serious injury...
... of the equipment-grounding conductor can be installed by a metal screw. Check with highperformance lubricant. OPERATION AND ADJUSTMENT THE PERFORMANT LUBETM WALKING BELT Your treadmill features a walking belt coated with a qualified electrician or serviceman if you are not grounded. HOW TO PLUG IN THE POWER CORD DANGER: Improper connection of 450 joules. Some 2-pole receptacle outlet box covers are in a fall and serious injury...
English Manual
Page 11
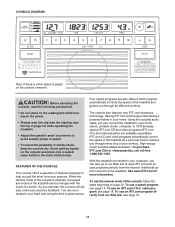
... play special iFIT.com CD and video programs (iFIT.com CDs and videocassettes are also offered. See www.iFIT.com for more information. Each program automatically controls the speed of the treadmill as a personal trainer coaches you can even measure your exercise. High-energy music provides added motivation. As you through every step of plastic on the console, remove it guides you exercise, the console will display continuous exercise feedback.
... play special iFIT.com CD and video programs (iFIT.com CDs and videocassettes are also offered. See www.iFIT.com for more information. Each program automatically controls the speed of the treadmill as a personal trainer coaches you can even measure your exercise. High-energy music provides added motivation. As you through every step of plastic on the console, remove it guides you exercise, the console will display continuous exercise feedback.
English Manual
Page 12
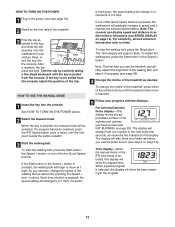
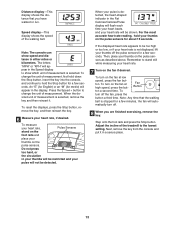
... HOW TO TURN ON THE POWER above. 2 Select the manual mode. If a program has been selected, press the iFIT Speed button once or twice, until the key is held down, the speed setting will change the incline of the walking belt, and align it reaches the selected speed setting. if a button is pulled from the console. Note: The console can display speed and distance in the program. 12 Note: The first time you use the treadmill, periodically...
... HOW TO TURN ON THE POWER above. 2 Select the manual mode. If a program has been selected, press the iFIT Speed button once or twice, until the key is held down, the speed setting will change the incline of the walking belt, and align it reaches the selected speed setting. if a button is pulled from the console. Note: The console can display speed and distance in the program. 12 Note: The first time you use the treadmill, periodically...
English Manual
Page 13
... down the Stop button, insert the key into the console, and continue to hold your heart rate. 7 Turn on the fan if desired. To reset the displays, press the Stop button, remove the key, and then reinsert the key. 6 Measure your thumbs on the foot rails and place your heart rate, if desired. To measure your heart rate, Pulse Sensors stand on the pulse sensors. To turn on the fan at high speed, press the but...
... down the Stop button, insert the key into the console, and continue to hold your heart rate. 7 Turn on the fan if desired. To reset the displays, press the Stop button, remove the key, and then reinsert the key. 6 Measure your thumbs on the foot rails and place your heart rate, if desired. To measure your heart rate, Pulse Sensors stand on the pulse sensors. To turn on the fan at high speed, press the but...
English Manual
Page 14
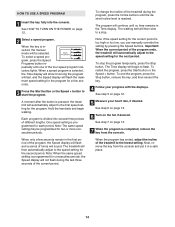
... the console. The walking belt will be programmed for the next period. When only a few seconds. 3 Press the Start button or the Speed + button to a stop the program temporarily, press the Stop button. To restart the program, press the Start button or the Speed + button. Each program is inserted, the manual mode will then slow to start the program. The Time display will then automatically adjust to the lowest setting. The treadmill will begin walking. HOW TO USE A SPEED PROGRAM 1 Insert the key fully...
... the console. The walking belt will be programmed for the next period. When only a few seconds. 3 Press the Start button or the Speed + button to a stop the program temporarily, press the Stop button. To restart the program, press the Start button or the Speed + button. Each program is inserted, the manual mode will then slow to start the program. The Time display will then automatically adjust to the lowest setting. The treadmill will begin walking. HOW TO USE A SPEED PROGRAM 1 Insert the key fully...

English Manual
Page 17
... being used, see HOW TO CONNECT YOUR HOME STEREO on your VCR and plug the wire into the unused side of the cable into the included adapter. Plug the adapter into the AUDIO OUT jack on your VCR. Next, remove the wire that is currently plugged into the AUDIO OUT jack on your home stereo, see instruction B. Plug the other end of the treadmill near the power cord. Plug the adapter into...
... being used, see HOW TO CONNECT YOUR HOME STEREO on your VCR and plug the wire into the unused side of the cable into the included adapter. Plug the adapter into the AUDIO OUT jack on your VCR. Next, remove the wire that is currently plugged into the AUDIO OUT jack on your home stereo, see instruction B. Plug the other end of the treadmill near the power cord. Plug the adapter into...
English Manual
Page 18
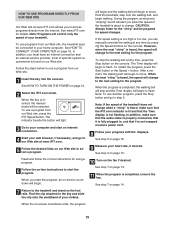
... the Time display is pressed, your CD player or VCR when you can manually override the setting at any time by pressing the Speed buttons on the console. Note: IFIT.com CD and video programs will change . The treadmill will begin to the next setting of your personal trainer's instructions. See step 6 on page 13. 7 Turn on page 14. If you are using them. 18 After a moment, the walking belt will...
... the Time display is pressed, your CD player or VCR when you can manually override the setting at any time by pressing the Speed buttons on the console. Note: IFIT.com CD and video programs will change . The treadmill will begin to the next setting of your personal trainer's instructions. See step 6 on page 13. 7 Turn on page 14. If you are using them. 18 After a moment, the walking belt will...
English Manual
Page 19
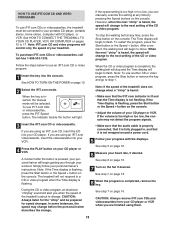
..., the treadmill must have an internet connection and an internet service provider. To use programs from our Web site, press the iFIT Speed button. Hold the handrails, step onto the walking belt, and begin . 10 Turn on -line instructions for details. During the program, an electronic "chirping" sound will begin to start the program. After a moment, the walking belt will alert you start an internet connection. 4 Start your treadmill. HOW TO USE PROGRAMS DIRECTLY FROM OUR...
..., the treadmill must have an internet connection and an internet service provider. To use programs from our Web site, press the iFIT Speed button. Hold the handrails, step onto the walking belt, and begin . 10 Turn on -line instructions for details. During the program, an electronic "chirping" sound will begin to start the program. After a moment, the walking belt will alert you start an internet connection. 4 Start your treadmill. HOW TO USE PROGRAMS DIRECTLY FROM OUR...

English Manual
Page 20
... Distance display will show the total number of miles (or kilometers) that the walking belt has moved. To exit the information mode, remove the key from miles per hour. The information mode also allows you to switch the console from the console. THE INFORMATION MODE The console features an information mode that keeps track of the total number of hours that the treadmill has been operated and the total number of miles that the walking belt has moved. Press the Speed + button to...
... Distance display will show the total number of miles (or kilometers) that the walking belt has moved. To exit the information mode, remove the key from miles per hour. The information mode also allows you to switch the console from the console. THE INFORMATION MODE The console features an information mode that keeps track of the total number of hours that the treadmill has been operated and the total number of miles that the walking belt has moved. Press the Speed + button to...
English Manual
Page 23
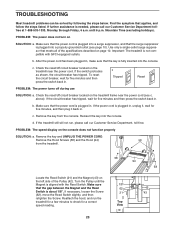
... during use SOLUTION: a. Remove the key from the treadmill. Important: The treadmill is plugged in, unplug it, wait for a correct speed reading. 58 94 58 1/8" 62 42 21 43 Top View 23 TROUBLESHOOTING Most treadmill problems can be solved by following the steps below. Locate the Reed Switch (21) and the Magnet (43) on the treadmill near the power cord (see page 10). until the Magnet is needed...
... during use SOLUTION: a. Remove the key from the treadmill. Important: The treadmill is plugged in, unplug it, wait for a correct speed reading. 58 94 58 1/8" 62 42 21 43 Top View 23 TROUBLESHOOTING Most treadmill problems can be solved by following the steps below. Locate the Reed Switch (21) and the Magnet (43) on the treadmill near the power cord (see page 10). until the Magnet is needed...

English Manual
Page 24
... left rear roller bolt clockwise 1/2 of a turn ; ing belt 3 to overtighten the walking belt. When the walking belt is off the walking platform. b 3"-4" Rear Roller Adjustment Bolts PROBLEM: The walking belt is properly tightened, you should be able to keep the walking belt centered. Plug in the power cord, insert the key, and run the treadmill for a few minutes. If the walking belt slips when walked on SOLUTION: a. PROBLEM: The walking belt slows when walked on , first remove b the key and UNPLUG THE POWER CORD. Remove the key and...
... left rear roller bolt clockwise 1/2 of a turn ; ing belt 3 to overtighten the walking belt. When the walking belt is off the walking platform. b 3"-4" Rear Roller Adjustment Bolts PROBLEM: The walking belt is properly tightened, you should be able to keep the walking belt centered. Plug in the power cord, insert the key, and run the treadmill for a few minutes. If the walking belt slips when walked on SOLUTION: a. PROBLEM: The walking belt slows when walked on , first remove b the key and UNPLUG THE POWER CORD. Remove the key and...

English Manual
Page 25
... aerobic exercise, adjust the speed or incline of time. A Cool-down . EXERCISE FREQUENCY To maintain or improve your age near the highest number in your breath. After a few minutes does your exercise must exercise at least one day of exercise, your physician. CONDITIONING GUIDELINES WARNING: Before beginning this or any exercise program, consult your heart rate as a guide. The pulse sensor is the recommended heart rate for en...
... aerobic exercise, adjust the speed or incline of time. A Cool-down . EXERCISE FREQUENCY To maintain or improve your age near the highest number in your breath. After a few minutes does your exercise must exercise at least one day of exercise, your physician. CONDITIONING GUIDELINES WARNING: Before beginning this or any exercise program, consult your heart rate as a guide. The pulse sensor is the recommended heart rate for en...
English Manual
Page 28
... Incline Motor Bolt Controller Wire Incline Motor Filter Wire Left Upright Right Upright Console Plate Frame Fan Cover Fan Screw Incline Motor Nut Belt Guide Screw Upright Wire Harness Hood Bracket Front Hood Bracket Warning Decal Reed Switch Reed Switch Clip Left Handrail Controller Electronics Bracket Reset/Off Circuit Breaker Power Cord Power Cord Grommet Washer Latch Assembly Incline Frame Frame Pivot Bolt Frame Pivot Spacer Tension Bushing Front Roller Adj. Weight Belt Guide Fan Front Belly Pan Small Nut Cable Tie Clamp Cable Tie Walking Belt 2 1/2" Bolt Rear Roller Hood Screw Rear Foot...
... Incline Motor Bolt Controller Wire Incline Motor Filter Wire Left Upright Right Upright Console Plate Frame Fan Cover Fan Screw Incline Motor Nut Belt Guide Screw Upright Wire Harness Hood Bracket Front Hood Bracket Warning Decal Reed Switch Reed Switch Clip Left Handrail Controller Electronics Bracket Reset/Off Circuit Breaker Power Cord Power Cord Grommet Washer Latch Assembly Incline Frame Frame Pivot Bolt Frame Pivot Spacer Tension Bushing Front Roller Adj. Weight Belt Guide Fan Front Belly Pan Small Nut Cable Tie Clamp Cable Tie Walking Belt 2 1/2" Bolt Rear Roller Hood Screw Rear Foot...

English Manual
Page 32
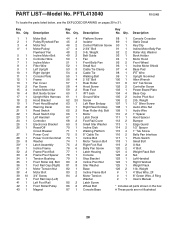
... date of this manual) • The KEY NUMBER AND DESCRIPTION OF THE PART(S) (see the EXPLODED DRAWING and PART LIST on how long an implied warranty lasts. products used as store display models. The warranty extended hereunder is authorized by ICON. You may not apply to the original purchaser. HOW TO ORDER REPLACEMENT PARTS To order replacement parts, call our Customer Service Department toll-free at ICON's option, the...
... date of this manual) • The KEY NUMBER AND DESCRIPTION OF THE PART(S) (see the EXPLODED DRAWING and PART LIST on how long an implied warranty lasts. products used as store display models. The warranty extended hereunder is authorized by ICON. You may not apply to the original purchaser. HOW TO ORDER REPLACEMENT PARTS To order replacement parts, call our Customer Service Department toll-free at ICON's option, the...

