
English Manual
Page 1
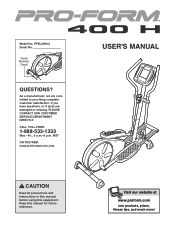
Model No. Serial Number Decal QUESTIONS? As a manufacturer, we are damaged or missing, PLEASE CONTACT OUR CUSTOMER SERVICE DEPARTMENT DIRECTLY. USER'S MANUAL Visit our website at www.proform.com new products, prizes, fitness tips, and much more! PFEL3906.0 Serial No. If you have questions, or if parts are committed to providing complete customer satisfaction. Keep this equipment. CALL TOLL-FREE: 1-888-533-1333...
Model No. Serial Number Decal QUESTIONS? As a manufacturer, we are damaged or missing, PLEASE CONTACT OUR CUSTOMER SERVICE DEPARTMENT DIRECTLY. USER'S MANUAL Visit our website at www.proform.com new products, prizes, fitness tips, and much more! PFEL3906.0 Serial No. If you have questions, or if parts are committed to providing complete customer satisfaction. Keep this equipment. CALL TOLL-FREE: 1-888-533-1333...
English Manual
Page 2
TABLE OF CONTENTS IMPORTANT PRECAUTIONS 3 BEFORE YOU BEGIN 4 ASSEMBLY 5 HOW TO USE THE ELLIPTICAL EXERCISER 12 MAINTENANCE AND TROUBLESHOOTING 17 CONDITIONING GUIDELINES 18 PART LIST 21 EXPLODED DRAWING 22 HOW TO ORDER REPLACEMENT PARTS Back Cover LIMITED WARRANTY Back Cover PROFORM is a registered trademark of ICON IP, Inc. 2
TABLE OF CONTENTS IMPORTANT PRECAUTIONS 3 BEFORE YOU BEGIN 4 ASSEMBLY 5 HOW TO USE THE ELLIPTICAL EXERCISER 12 MAINTENANCE AND TROUBLESHOOTING 17 CONDITIONING GUIDELINES 18 PART LIST 21 EXPLODED DRAWING 22 HOW TO ORDER REPLACEMENT PARTS Back Cover LIMITED WARRANTY Back Cover PROFORM is a registered trademark of ICON IP, Inc. 2
English Manual
Page 3
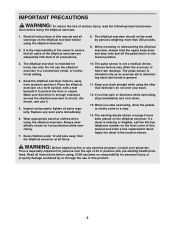
... home use the elliptical exerciser in the location shown. Keep children under 12 and pets away from moisture and dust. The pulse sensor is the responsibility of the owner to mount, dismount, and use of all instructions before using the elliptical exerciser; lems. Read all precautions. 8. ICON assumes no responsibility for persons over the age of this manual and order a free replacement decal. Read all instructions in this manual...
... home use the elliptical exerciser in the location shown. Keep children under 12 and pets away from moisture and dust. The pulse sensor is the responsibility of the owner to mount, dismount, and use of all instructions before using the elliptical exerciser; lems. Read all precautions. 8. ICON assumes no responsibility for persons over the age of this manual and order a free replacement decal. Read all instructions in this manual...
English Manual
Page 4
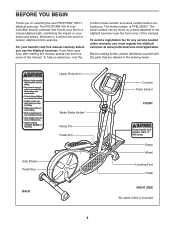
... serial number can be found on your benefit, read this manual. Upper Body Arm Water Bottle Holder* Ramp Pin Pedal Arm Side Shield Pedal Disc BACK Console Pulse Sensor FRONT Ramp Wheel Leveling Foot Pedal RIGHT SIDE *No water bottle is PFEL3906.0. If you must register the elliptical exerciser at www.proformservice.com/registration. The model number is included 4 To help us assist you for any service needed under warranty...
... serial number can be found on your benefit, read this manual. Upper Body Arm Water Bottle Holder* Ramp Pin Pedal Arm Side Shield Pedal Disc BACK Console Pulse Sensor FRONT Ramp Wheel Leveling Foot Pedal RIGHT SIDE *No water bottle is PFEL3906.0. If you must register the elliptical exerciser at www.proformservice.com/registration. The model number is included 4 To help us assist you for any service needed under warranty...
English Manual
Page 5
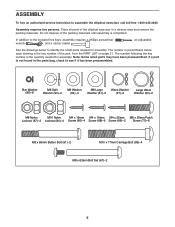
...)-2 M8 Nylon M10 Nylon M4 x 16mm M4 x 19mm M4 x 22mm M8 x 25mm Patch Locknut (87)-2 Locknut (84)-4 Screw (60)-4 Screw (68)-6 Screw (66)-2 Screw (70)-6 M8 x 69mm Button Bolt (91)-2 M10 x 77mm Carriage Bolt (58)-4 M8 x 63mm Bolt Set (67)-2 5 The number in the parts bag, check to assemble the elliptical exerciser, call toll-free 1-800-445-2480. In addition to identify the small parts needed for assembly.
...)-2 M8 Nylon M10 Nylon M4 x 16mm M4 x 19mm M4 x 22mm M8 x 25mm Patch Locknut (87)-2 Locknut (84)-4 Screw (60)-4 Screw (68)-6 Screw (66)-2 Screw (70)-6 M8 x 69mm Button Bolt (91)-2 M10 x 77mm Carriage Bolt (58)-4 M8 x 63mm Bolt Set (67)-2 5 The number in the parts bag, check to assemble the elliptical exerciser, call toll-free 1-800-445-2480. In addition to identify the small parts needed for assembly.

English Manual
Page 6
To make assembly easier, read the information on page 5 before you begin assembling the elliptical exerciser. Attach the Rear Stabilizer (35) to the Frame (1) with two M10 x 77mm Carriage Bolts (58) and two M10 Nylon Locknuts (84). 1 58 35 2. 1. Attach the Front Stabilizer (3) to the Frame (1) with two M10 x 77mm Carriage 2 Bolts (58) and two M10 Nylon Locknuts (84). 58 3 58 1 84 84 84 1 6
To make assembly easier, read the information on page 5 before you begin assembling the elliptical exerciser. Attach the Rear Stabilizer (35) to the Frame (1) with two M10 x 77mm Carriage Bolts (58) and two M10 Nylon Locknuts (84). 1 58 35 2. 1. Attach the Front Stabilizer (3) to the Frame (1) with two M10 x 77mm Carriage 2 Bolts (58) and two M10 Nylon Locknuts (84). 58 3 58 1 84 84 84 1 6
English Manual
Page 7
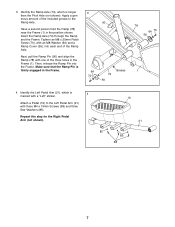
...Frame. Make sure that the Ramp Pin is 4 marked with a "Left" sticker. Identify the Left Pedal Arm (21), which is longer than the Pivot Axle (not shown). Then, release the Ramp Pin into each end of the Ramp Axle. Repeat this step for the Right Pedal Arm (not shown). 19 21 85 85...(1). Tighten an M8 x 25mm Patch Screw (70), with three M4 x 19mm Screws (68) and three Star Washers (85). Next, pull the Ramp Pin (90) and align the Ramp (78) with one of the included grease to the Left Pedal Arm (21) with an M8 Washer (64) and a Ramp Cover (59), into the Frame. Attach a Pedal (...
...Frame. Make sure that the Ramp Pin is 4 marked with a "Left" sticker. Identify the Left Pedal Arm (21), which is longer than the Pivot Axle (not shown). Then, release the Ramp Pin into each end of the Ramp Axle. Repeat this step for the Right Pedal Arm (not shown). 19 21 85 85...(1). Tighten an M8 x 25mm Patch Screw (70), with three M4 x 19mm Screws (68) and three Star Washers (85). Next, pull the Ramp Pin (90) and align the Ramp (78) with one of the included grease to the Left Pedal Arm (21) with an M8 Washer (64) and a Ramp Cover (59), into the Frame. Attach a Pedal (...
English Manual
Page 8
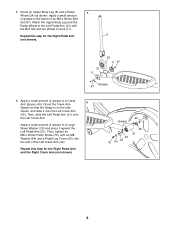
... Bolt Set (67). Repeat this step for the Right Pedal Arm and the Right Crank Arm (not shown). 42 Grease 20 70 64 23 45 21 8 Attach the Upper Body Leg and the Ramp Wheel to a Large Wave Washer (20) and press it onto the Left Crank Arm (42). 5. Then, tighten an M8 x 25mm Patch Screw (70), with the Bolt Set and two Wheel Covers (11). Orient the Crank Arm Spacer...
... Bolt Set (67). Repeat this step for the Right Pedal Arm and the Right Crank Arm (not shown). 42 Grease 20 70 64 23 45 21 8 Attach the Upper Body Leg and the Ramp Wheel to a Large Wave Washer (20) and press it onto the Left Crank Arm (42). 5. Then, tighten an M8 x 25mm Patch Screw (70), with the Bolt Set and two Wheel Covers (11). Orient the Crank Arm Spacer...
English Manual
Page 9
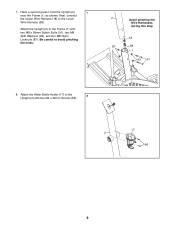
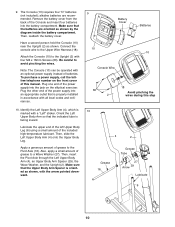
Be careful to the Lower Wire Harness (38). 7. Next, connect the Upper Wire Harness (18) to avoid pinching the wires. 2 Avoid pinching the Wire Harnesses during this step 18 87 38 1 93 91 8. Attach the Water Bottle Holder (17) to the Frame (1) with two M4 x 22mm Screws (66). 17 2 66 9 Attach the Upright (2) to the 8 Upright (2) with two M8 x 69mm Button Bolts (91), two M8 Split Washers (93), and two M8 Nylon Locknuts (87). Have a second person hold the Upright (2) 7 near the Frame (1) as shown.
Be careful to the Lower Wire Harness (38). 7. Next, connect the Upper Wire Harness (18) to avoid pinching the wires. 2 Avoid pinching the Wire Harnesses during this step 18 87 38 1 93 91 8. Attach the Water Bottle Holder (17) to the Frame (1) with two M4 x 22mm Screws (66). 17 2 66 9 Attach the Upright (2) to the 8 Upright (2) with two M8 x 69mm Button Bolts (91), two M8 Split Washers (93), and two M8 Nylon Locknuts (87). Have a second person hold the Upright (2) 7 near the Frame (1) as shown.
English Manual
Page 10
... number on the elliptical exerciser. Plug one end of the power supply into the jack on the front cover of the Console and insert four batteries into an appropriate outlet that the Upper Body Arm Spacer is facing inward. Lubricate the upper end of the left Upper Body Leg (6) using a small amount of the power supply into the battery compartment. Connect the console wire to avoid pinching the wires. The Console...
... number on the elliptical exerciser. Plug one end of the power supply into the jack on the front cover of the Console and insert four batteries into an appropriate outlet that the Upper Body Arm Spacer is facing inward. Lubricate the upper end of the left Upper Body Leg (6) using a small amount of the power supply into the battery compartment. Connect the console wire to avoid pinching the wires. The Console...
English Manual
Page 11
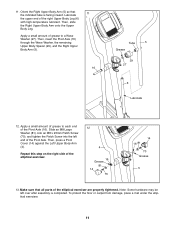
..., press a Pivot Cover (14) against the Left Upper Body Arm (4). Then, slide the Right Upper Body Arm onto the Upper Body Leg. Slide an M8 Large Washer (81) onto an M8 x 25mm Patch Screw (70), and tighten the Patch Screw into the left over after assembly is facing inward. Note: Some hardware may be left end of the elliptical exerciser are properly tightened. Repeat this step...
..., press a Pivot Cover (14) against the Left Upper Body Arm (4). Then, slide the Right Upper Body Arm onto the Upper Body Leg. Slide an M8 Large Washer (81) onto an M8 x 25mm Patch Screw (70), and tighten the Patch Screw into the left over after assembly is facing inward. Note: Some hardware may be left end of the elliptical exerciser are properly tightened. Repeat this step...
English Manual
Page 12
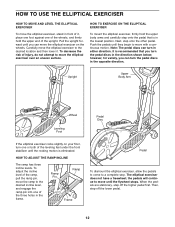
.... Upright Upper Body Arm Wheel Leveling Foot Pedal Disc If the elliptical exerciser rocks slightly on the wheels. HOW TO USE THE ELLIPTICAL EXERCISER HOW TO MOVE AND LEVEL THE ELLIPTICAL EXERCISER To move the elliptical exerciser, stand in front of it . It is recommended that is eliminated. To adjust the incline level of the ramp, pull the ramp pin, move the ramp to a complete stop. When the pedals are stationary, step...
.... Upright Upper Body Arm Wheel Leveling Foot Pedal Disc If the elliptical exerciser rocks slightly on the wheels. HOW TO USE THE ELLIPTICAL EXERCISER HOW TO MOVE AND LEVEL THE ELLIPTICAL EXERCISER To move the elliptical exerciser, stand in front of it . It is recommended that is eliminated. To adjust the incline level of the ramp, pull the ramp pin, move the ramp to a complete stop. When the pedals are stationary, step...

English Manual
Page 13
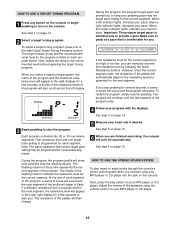
... guides you exercise. To use a target toning program, see page 16. You can also connect your MP3 player or CD player to the console's stereo sound system and listen to increase or decrease your workouts more effective and enjoyable. When you select the manual mode of the pedals and prompts you to your heart rate using the handgrip pulse sensor. Each program automatically changes the resistance of the console...
... guides you exercise. To use a target toning program, see page 16. You can also connect your MP3 player or CD player to the console's stereo sound system and listen to increase or decrease your workouts more effective and enjoyable. When you select the manual mode of the pedals and prompts you to your heart rate using the handgrip pulse sensor. Each program automatically changes the resistance of the console...
English Manual
Page 14
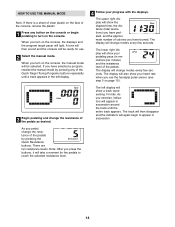
... As you pedal, change modes every few seconds. As you exercise, indicators will light. The upper right display will show your heart rate when you turn on the console. The display will also show the elapsed time, the distance (total revolutions) you have selected a program, reselect the manual mode by pressing the Quick Resistance buttons. When you use . 2 Select the manual mode. There are ten resistance levels. The lower right display will be...
... As you pedal, change modes every few seconds. As you exercise, indicators will light. The upper right display will show your heart rate when you turn on the console. The display will also show the elapsed time, the distance (total revolutions) you have selected a program, reselect the manual mode by pressing the Quick Resistance buttons. When you use . 2 Select the manual mode. There are ten resistance levels. The lower right display will be...
English Manual
Page 15
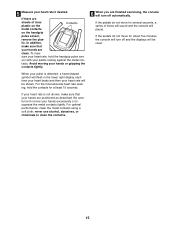
... the pedals do not move for about five minutes, the console will be shown. To mea- For optimal performance, clean the metal contacts using a soft cloth; When your pulse is not shown, make sure that your heart rate, hold the contacts for several seconds, a series of clear plastic on the Contacts metal contacts on the handgrip pulse sensor, remove the plas...
... the pedals do not move for about five minutes, the console will be shown. To mea- For optimal performance, clean the metal contacts using a soft cloth; When your pulse is not shown, make sure that your heart rate, hold the contacts for several seconds, a series of clear plastic on the Contacts metal contacts on the handgrip pulse sensor, remove the plas...
English Manual
Page 16
... program. Note: Adjust the ramp to start the program. When a left display. Adjust the volume of the pedals will turn on the console. Each program is listed on each program button. One resistance level and one -minute segments. HOW TO USE THE STEREO SOUND SYSTEM To play button on your current pace. See step 5 on page 15. 6 When you exercise, plug your heart rate if desired. HOW TO USE A TARGET TONING PROGRAM 1 Press any button...
... program. Note: Adjust the ramp to start the program. When a left display. Adjust the volume of the pedals will turn on the console. Each program is listed on each program button. One resistance level and one -minute segments. HOW TO USE THE STEREO SOUND SYSTEM To play button on your current pace. See step 5 on page 15. 6 When you exercise, plug your heart rate if desired. HOW TO USE A TARGET TONING PROGRAM 1 Press any button...

English Manual
Page 17
... or solvents to clean the contacts. 17 Replace any worn parts immediately. To replace the batteries, see assembly step 9 on page 15. When storing the elliptical exerciser, remove the batteries from moisture and dust. Be careful not to move your hands are positioned as described in a clean, dry location, away from the console. HANDGRIP PULSE SENSOR TROUBLESHOOTING If the handgrip pulse sensor does not function properly, make sure...
... or solvents to clean the contacts. 17 Replace any worn parts immediately. To replace the batteries, see assembly step 9 on page 15. When storing the elliptical exerciser, remove the batteries from moisture and dust. Be careful not to move your hands are positioned as described in a clean, dry location, away from the console. HANDGRIP PULSE SENSOR TROUBLESHOOTING If the handgrip pulse sensor does not function properly, make sure...
English Manual
Page 18
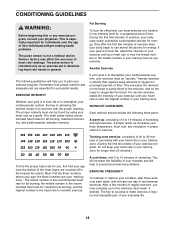
.... Training zone exercise, consisting of exercising with at a relatively low intensity level for maximum fat burning; The lowest number is to strengthen your cardiovascular system, your body begin to 30 minutes of 20 to use stored fat calories for fat burning; the middle number is intended only as a guide. The pulse sensor is the recommended heart rate for a sustained period of the chart...
.... Training zone exercise, consisting of exercising with at a relatively low intensity level for maximum fat burning; The lowest number is to strengthen your cardiovascular system, your body begin to 30 minutes of 20 to use stored fat calories for fat burning; the middle number is intended only as a guide. The pulse sensor is the recommended heart rate for a sustained period of the chart...
English Manual
Page 21
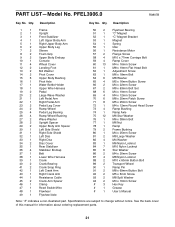
... Pivot Axle Water Bottle Holder Upper Wire Harness Pedal Large Wave Washer Left Pedal Arm Right Pedal Arm Pedal Leg Cover Ramp Wheel Pedal Leg Bearing Ramp Wheel Bushing Wave Washer Upright Spacer Upper Body Arm Spacer Left Side Shield Right Side Shield Left Disc Right Disc Disc Cover Rear Stabilizer Stabilizer Endcap Belt Lower Wire Harness Crank Crank Bearing Crank Snap Ring Left Crank Arm Right Crank Arm Resistance Cable Crank Arm Spacer Clamp Reed Switch/Wire Flywheel Flywheel Axle 50 2 51...
... Pivot Axle Water Bottle Holder Upper Wire Harness Pedal Large Wave Washer Left Pedal Arm Right Pedal Arm Pedal Leg Cover Ramp Wheel Pedal Leg Bearing Ramp Wheel Bushing Wave Washer Upright Spacer Upper Body Arm Spacer Left Side Shield Right Side Shield Left Disc Right Disc Disc Cover Rear Stabilizer Stabilizer Endcap Belt Lower Wire Harness Crank Crank Bearing Crank Snap Ring Left Crank Arm Right Crank Arm Resistance Cable Crank Arm Spacer Clamp Reed Switch/Wire Flywheel Flywheel Axle 50 2 51...
English Manual
Page 24
...; 2007 ICON IP, Inc. products used as store display models. Accordingly, the above limitation may not apply to provide the following information when contacting us: • the MODEL NUMBER of the product (PFEL3906.0) • the NAME of the product (PROFORM 400 H elliptical exerciser) • the SERIAL NUMBER of the product (see the front cover of this manual. ICON's obligation under normal use , costs of removal or installation or other warranties and...
...; 2007 ICON IP, Inc. products used as store display models. Accordingly, the above limitation may not apply to provide the following information when contacting us: • the MODEL NUMBER of the product (PFEL3906.0) • the NAME of the product (PROFORM 400 H elliptical exerciser) • the SERIAL NUMBER of the product (see the front cover of this manual. ICON's obligation under normal use , costs of removal or installation or other warranties and...

