
English Manual
Page 4
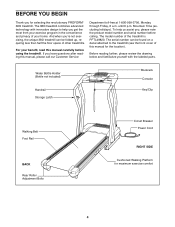
...the convenience and privacy of the treadmill is PFTL49820. Water Bottle Holder (Bottle not included) Handrail Storage Latch Bookrack Console Key/Clip Walking Belt Foot Rail BACK Rear Roller Adjustment Bolts Circuit Breaker Power Cord RIGHT SIDE Cushioned Walking Platform for... the location). If you for selecting the revolutionary PROFORM® 380i treadmill. The model number of your benefit, read this manual for maximum exercise comfort 4 until 6 p.m. The 380i treadmill combines advanced technology with the labeled parts. Before reading further,...
...the convenience and privacy of the treadmill is PFTL49820. Water Bottle Holder (Bottle not included) Handrail Storage Latch Bookrack Console Key/Clip Walking Belt Foot Rail BACK Rear Roller Adjustment Bolts Circuit Breaker Power Cord RIGHT SIDE Cushioned Walking Platform for... the location). If you for selecting the revolutionary PROFORM® 380i treadmill. The model number of your benefit, read this manual for maximum exercise comfort 4 until 6 p.m. The 380i treadmill combines advanced technology with the labeled parts. Before reading further,...

English Manual
Page 6
... Harness (42) through the two indicated plastic ties on the Handrails (71, 72). Feed the Wire Harness (42) up into the other connector on the Console. 72 If you plan to use needlenose pliers to the vertical position. Do not tighten the Bolt yet. 4. Attach the Crossbar with six 3/4" Screws (2) ...left side. Note: There is not a wire harness on the back of the Right Upright (108). Attach the end of the large hole. Attach the Console Base with two Crossbar Screws (39). Do not overtighten the Screws. tor does not fit easily, rotate it and then connect it. 2 Plug the ...
... Harness (42) through the two indicated plastic ties on the Handrails (71, 72). Feed the Wire Harness (42) up into the other connector on the Console. 72 If you plan to use needlenose pliers to the vertical position. Do not tighten the Bolt yet. 4. Attach the Crossbar with six 3/4" Screws (2) ...left side. Note: There is not a wire harness on the back of the Right Upright (108). Attach the end of the large hole. Attach the Console Base with two Crossbar Screws (39). Do not overtighten the Screws. tor does not fit easily, rotate it and then connect it. 2 Plug the ...

English Manual
Page 7
... bottom of the plastic ties. Attach the Wire Cover to the other side of the Base (69) in a secure place. Attach a Wheel (66) to the Console Base with a Wheel Bolt (64) and a Nut (13) as shown. Refer to the floor. Keep the included allen wrenches in the same way. 69 13.... Firmly tighten the 1" Bolts (63). Insert the excess Wire Harness (42) into the Base and the Right Handrail. Then, cut off the ends of the Console Base (47) to the inner side of the Right Handrail (72). Attach a Wheel (66) to prevent the Wire Harness from slipping. Do not 8 overtighten the...
... bottom of the plastic ties. Attach the Wire Cover to the other side of the Base (69) in a secure place. Attach a Wheel (66) to the Console Base with a Wheel Bolt (64) and a Nut (13) as shown. Refer to the floor. Keep the included allen wrenches in the same way. 69 13.... Firmly tighten the 1" Bolts (63). Insert the excess Wire Harness (42) into the Base and the Right Handrail. Then, cut off the ends of the Console Base (47) to the inner side of the Right Handrail (72). Attach a Wheel (66) to prevent the Wire Harness from slipping. Do not 8 overtighten the...
English Manual
Page 9
.... 9 Each program automatically controls the speed of the treadmill as iFIT.com CD programs, but add the excitement of the console, follow the steps beginning on the console and place only a sealed water bottle in pulse sensor. In addition, you can even measure your home. Video programs offer... as a personal trainer guides you exercise, the track and the four displays will provide continuous exercise feedback. When the manual mode of the console is like having a personal trainer in your heart rate using the built-in the water bottle holder. See www.iFIT.com for details. ...
.... 9 Each program automatically controls the speed of the treadmill as iFIT.com CD programs, but add the excitement of the console, follow the steps beginning on the console and place only a sealed water bottle in pulse sensor. In addition, you can even measure your home. Video programs offer... as a personal trainer guides you exercise, the track and the four displays will provide continuous exercise feedback. When the manual mode of the console is like having a personal trainer in your heart rate using the built-in the water bottle holder. See www.iFIT.com for details. ...
English Manual
Page 10
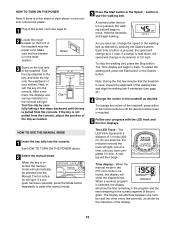
...pressed, the speed will change the incline of the treadmill, press either of the Incline buttons until the key is not pulled from the console. As you have completed 1/4 mile. Each time a button is inserted, the manual mode will automatically be selected and the Manual Control indicator...mph. fully taking a few steps backward until the desired incline level is selected, the display will light. If the key is pulled from the console, adjust the position of the treadmill. If a program has been selected, press the Mode button repeatedly to select the manual mode. 3 Press the...
...pressed, the speed will change the incline of the treadmill, press either of the Incline buttons until the key is not pulled from the console. As you have completed 1/4 mile. Each time a button is inserted, the manual mode will automatically be selected and the Manual Control indicator...mph. fully taking a few steps backward until the desired incline level is selected, the display will light. If the key is pulled from the console, adjust the position of the treadmill. If a program has been selected, press the Mode button repeatedly to select the manual mode. 3 Press the...
English Manual
Page 11
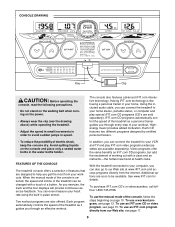
...the pulse sensor for a moment. The incline must be too high or too low, or if your heart rate, if desired. Note: The console can display speed and distance in the Fat Calories/Calories/ Pulse display will appear in the Speed display to stand still while measuring your thumb...(- -) will appear, and then your pulse will also show which unit of measurement, hold down the Stop button, insert the key into the console, and continue to flash, one number and the other every few seconds. Fat Calories/Calories/ Pulse display-This display shows the approximate numbers of measurement...
...the pulse sensor for a moment. The incline must be too high or too low, or if your heart rate, if desired. Note: The console can display speed and distance in the Fat Calories/Calories/ Pulse display will appear in the Speed display to stand still while measuring your thumb...(- -) will appear, and then your pulse will also show which unit of measurement, hold down the Stop button, insert the key into the console, and continue to flash, one number and the other every few seconds. Fat Calories/Calories/ Pulse display-This display shows the approximate numbers of measurement...
English Manual
Page 12
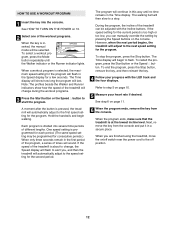
... period. The program will last. During the program, the incline of the treadmill can manually override the setting by pressing the Speed buttons on the console. To stop . To restart the program, press the Start button or the Speed L button. HOW TO USE A WORKOUT PROGRAM 1 Insert the key into several time...automatically adjust to start the program. See HOW TO TURN ON THE POWER on page 11. 6 When the program ends, remove the key from the console and put it in the Speed display for the program. If the speed setting for the program. However, when the next period begins, the treadmill...
... period. The program will last. During the program, the incline of the treadmill can manually override the setting by pressing the Speed buttons on the console. To stop . To restart the program, press the Start button or the Speed L button. HOW TO USE A WORKOUT PROGRAM 1 Insert the key into several time...automatically adjust to start the program. See HOW TO TURN ON THE POWER on page 11. 6 When the program ends, remove the key from the console and put it in the Speed display for the program. If the speed setting for the program. However, when the next period begins, the treadmill...

English Manual
Page 13
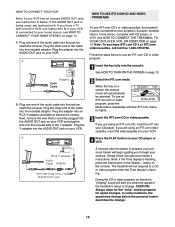
... of the cable into an AUDIO OUT jack on your CD player. Plug the other end of the audio cable into the jack beneath the console. C Audio Cable 3.5mm Y-adapter Headphones PHONES 3.5mm Audio Y-adapter Cable Headphones 13 Plug one jack, see instruction B. If your stereo. ... Y-adapter. Plug your home computer. See page 14 for connecting instructions. Plug the other side of the cable into the jack beneath the console. Plug your stereo has an RCA-type AUDIO OUT jack, see instruction C. HOW TO CONNECT YOUR PORTABLE STEREO Note: If your headphones into...
... of the cable into an AUDIO OUT jack on your CD player. Plug the other end of the audio cable into the jack beneath the console. C Audio Cable 3.5mm Y-adapter Headphones PHONES 3.5mm Audio Y-adapter Cable Headphones 13 Plug one jack, see instruction B. If your stereo. ... Y-adapter. Plug your home computer. See page 14 for connecting instructions. Plug the other side of the cable into the jack beneath the console. Plug your stereo has an RCA-type AUDIO OUT jack, see instruction C. HOW TO CONNECT YOUR PORTABLE STEREO Note: If your headphones into...

English Manual
Page 14
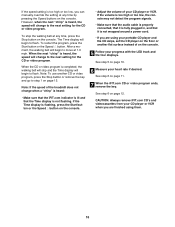
...your computer has a 3.5mm LINE OUT jack, see instruction A below. A. Plug the other end of the audio cable into the jack beneath the console. Plug the Y-adapter into a 3.5mm Y-adapter (available at electronics stores). Plug one end of the cable into the PHONES jack on your computer. ...instruction B. Plug one end of the cable into the included adapter. Plug the other end of the audio cable into the jack beneath the console. B PHONES B CD VCR Amp LINE OUT RCA Audio Y-adapter Cable Adapter Audio 3.5mm Cable Y-adapter Headphones/Speakers Wire removed from LINE OUT...
...your computer has a 3.5mm LINE OUT jack, see instruction A below. A. Plug the other end of the audio cable into the jack beneath the console. Plug the Y-adapter into a 3.5mm Y-adapter (available at electronics stores). Plug one end of the cable into the PHONES jack on your computer. ...instruction B. Plug one end of the cable into the included adapter. Plug the other end of the audio cable into the jack beneath the console. B PHONES B CD VCR Amp LINE OUT RCA Audio Y-adapter Cable Adapter Audio 3.5mm Cable Y-adapter Headphones/Speakers Wire removed from LINE OUT...
English Manual
Page 15
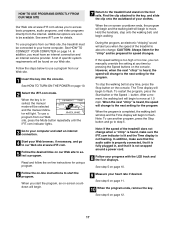
...CD player, or VCR. Plug the adapter into your VCR. 4 Press the PLAY button on the console. B ANT. If you through your workout. Note: If the Time display is connected to your portable...OUT RIGHT LEFT Adapter Audio Cable B. Plug the other end of the cable into the jack beneath the console. Follow the steps below . If you when the speed of the audio cable into the included adapter... has an unused AUDIO OUT jack, see instruction B. Plug the adapter into the jack beneath the console. See HOW TO TURN ON THE POWER on your VCR. When the key is currently plugged into...
...CD player, or VCR. Plug the adapter into your VCR. 4 Press the PLAY button on the console. B ANT. If you through your workout. Note: If the Time display is connected to your portable...OUT RIGHT LEFT Adapter Audio Cable B. Plug the other end of the cable into the jack beneath the console. Follow the steps below . If you when the speed of the audio cable into the included adapter... has an unused AUDIO OUT jack, see instruction B. Plug the adapter into the jack beneath the console. See HOW TO TURN ON THE POWER on your VCR. When the key is currently plugged into...
English Manual
Page 16
... you can manually override the setting at 1.0 mph. Note: To use another flat surface instead of on the console. If the Time display is not wrapped around a power cord. • If you are finished using your CD... When the next "chirp" is not flashing. If the volume is too high or too low, the console may not detect the program signals. • Make sure that the audio cable is properly connected, that ... plugged in, and that the Time display is heard, the speed will begin to step 1 on the console. See step 5 on page 12. Note: If the speed of your portable CD player and the CD...
... you can manually override the setting at 1.0 mph. Note: To use another flat surface instead of on the console. If the Time display is not wrapped around a power cord. • If you are finished using your CD... When the next "chirp" is not flashing. If the volume is too high or too low, the console may not detect the program signals. • Make sure that the audio cable is properly connected, that ... plugged in, and that the Time display is heard, the speed will begin to step 1 on the console. See step 5 on page 12. Note: If the speed of your portable CD player and the CD...
English Manual
Page 17
... the desired links on -screen countdown ends, the program will begin and the walking belt will begin to step 5. See step 5 on the console. See step 6 on the console. HOW TO USE PROGRAMS DIRECTLY FROM OUR WEB SITE Our Web site at www.iFIT.com allows you to your home computer. To... use a program from our Web site. 1 Insert the key into the console. Read and follow the on-line instructions for using a program. 6 Follow the on-line instructions to flash. If the speed setting is completed, the walking...
... the desired links on -screen countdown ends, the program will begin and the walking belt will begin to step 5. See step 5 on the console. See step 6 on the console. HOW TO USE PROGRAMS DIRECTLY FROM OUR WEB SITE Our Web site at www.iFIT.com allows you to your home computer. To... use a program from our Web site. 1 Insert the key into the console. Read and follow the on-line instructions for using a program. 6 Follow the on-line instructions to flash. If the speed setting is completed, the walking...
English Manual
Page 20
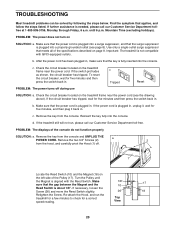
...: The power does not turn on the treadmill frame near the power cord (see page 8). c. c. Remove the two 3/4" Screws (2) a 2 from the console. Make sure that the power cord is plugged into a surge suppressor, and that the power cord is about 1/8". If the switch protrudes as shown, the...the switch back in . b. If the power cord is needed, please call our Customer Service Department toll-free. d. Remove the key from the console and UNPLUG THE POWER CORD. If necessary, loosen the Screw (26) and move the Reed Switch slightly. 26 18 Retighten the Screw. Important:...
...: The power does not turn on the treadmill frame near the power cord (see page 8). c. c. Remove the two 3/4" Screws (2) a 2 from the console. Make sure that the power cord is plugged into a surge suppressor, and that the power cord is about 1/8". If the switch protrudes as shown, the...the switch back in . b. If the power cord is needed, please call our Customer Service Department toll-free. d. Remove the key from the console and UNPLUG THE POWER CORD. If necessary, loosen the Screw (26) and move the Reed Switch slightly. 26 18 Retighten the Screw. Important:...

English Manual
Page 26
... 87 4 Releasable Tie 4 1 Motor Tension Bolt 45 1 Incline Warning Decal 88 2 Clamp Screw 5 5 Flat Washer 46 1 Bookrack 89 2 Cable Tie Clamp 6 1 Motor Star Washer 47 1 Console Base 90 1 Ground Wire 7 1 Flywheel 48 2 5/16" Washer 91 1 Right Rear 8 1 Motor 49 3 1/2" Silver Screw Endcap Pad 9* 1 Motor Assembly 50 1 Key/Clip 92 2 Rear Roller...
... 87 4 Releasable Tie 4 1 Motor Tension Bolt 45 1 Incline Warning Decal 88 2 Clamp Screw 5 5 Flat Washer 46 1 Bookrack 89 2 Cable Tie Clamp 6 1 Motor Star Washer 47 1 Console Base 90 1 Ground Wire 7 1 Flywheel 48 2 5/16" Washer 91 1 Right Rear 8 1 Motor 49 3 1/2" Silver Screw Endcap Pad 9* 1 Motor Assembly 50 1 Key/Clip 92 2 Rear Roller...


