
English Manual
Page 1
... missing or damaged parts, we will guarantee complete satisfaction through direct assistance from our factory. USER'S MANUAL Visit our website at www.proform.com new products, prizes, fitness tips, and much more! PFTL49820 Serial No. Serial Number Decal QUESTIONS? CUSTOMER HOT LINE: 1-800-999-3756 Mon.-Fri., 6 a.m.-6 p.m. MST CAUTION Read all precautions and instructions in this manual before using this manual for future...
... missing or damaged parts, we will guarantee complete satisfaction through direct assistance from our factory. USER'S MANUAL Visit our website at www.proform.com new products, prizes, fitness tips, and much more! PFTL49820 Serial No. Serial Number Decal QUESTIONS? CUSTOMER HOT LINE: 1-800-999-3756 Mon.-Fri., 6 a.m.-6 p.m. MST CAUTION Read all precautions and instructions in this manual before using this manual for future...
English Manual
Page 2
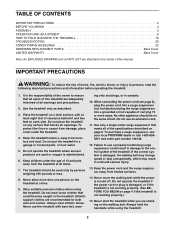
... 4 ASSEMBLY 5 OPERATION AND ADJUSTMENT 8 HOW TO FOLD AND MOVE THE TREADMILL 18 TROUBLESHOOTING 20 CONDITIONING GUIDELINES 22 ORDERING REPLACEMENT PARTS Back Cover LIMITED WARRANTY Back Cover Note: An EXPLODED DRAWING and a PART LIST are used only by persons weighing 250 pounds or less. 8. IMPORTANT PRECAUTIONS WARNING: To reduce the risk of this manual. Never use the treadmill with at a time. 9. No other appliance should be on the walking belt. Do...
... 4 ASSEMBLY 5 OPERATION AND ADJUSTMENT 8 HOW TO FOLD AND MOVE THE TREADMILL 18 TROUBLESHOOTING 20 CONDITIONING GUIDELINES 22 ORDERING REPLACEMENT PARTS Back Cover LIMITED WARRANTY Back Cover Note: An EXPLODED DRAWING and a PART LIST are used only by persons weighing 250 pounds or less. 8. IMPORTANT PRECAUTIONS WARNING: To reduce the risk of this manual. Never use the treadmill with at a time. 9. No other appliance should be on the walking belt. Do...
English Manual
Page 3
... by or through the use this product. Inspect and properly tighten all instructions before using iFIT.com CD's and videos, you when the speed of this treadmill in -home use . Do not use of the treadmill is heard, the speed will alert you can manually override the speed setting at actual size. 3 This treadmill is especially important for the CD or video program. 17. Adjust the speed in the location shown. DANGER: 25...
... by or through the use this product. Inspect and properly tighten all instructions before using iFIT.com CD's and videos, you when the speed of this treadmill in -home use . Do not use of the treadmill is heard, the speed will alert you can manually override the speed setting at actual size. 3 This treadmill is especially important for the CD or video program. 17. Adjust the speed in the location shown. DANGER: 25...
English Manual
Page 4
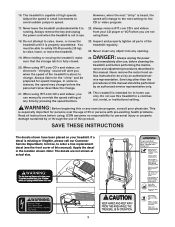
... exercise program in the convenience and privacy of this manual for maximum exercise comfort 4 To help you , please note the product model number and serial number before using the treadmill. The 380i treadmill combines advanced technology with the labeled parts. until 6 p.m. For your home. Water Bottle Holder (Bottle not included) Handrail Storage Latch Bookrack Console Key/Clip Walking Belt Foot Rail BACK Rear Roller Adjustment Bolts Circuit Breaker Power Cord RIGHT SIDE Cushioned Walking Platform for the location...
... exercise program in the convenience and privacy of this manual for maximum exercise comfort 4 To help you , please note the product model number and serial number before using the treadmill. The 380i treadmill combines advanced technology with the labeled parts. until 6 p.m. For your home. Water Bottle Holder (Bottle not included) Handrail Storage Latch Bookrack Console Key/Clip Walking Belt Foot Rail BACK Rear Roller Adjustment Bolts Circuit Breaker Power Cord RIGHT SIDE Cushioned Walking Platform for the location...
English Manual
Page 5
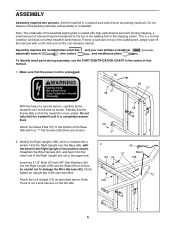
... and remove all packing materials. Do not fully fold the treadmill until assembly is completely assem- Firmly tighten an Upright Nut (109) onto each Bolt. 73 Attach the Left Upright (73) as shown; Do not dispose of lubricant may be careful not to damage the Wire Harness (42). bled. be transferred to the bottom of the walking belt or the shipping carton. Assembly requires...
... and remove all packing materials. Do not fully fold the treadmill until assembly is completely assem- Firmly tighten an Upright Nut (109) onto each Bolt. 73 Attach the Left Upright (73) as shown; Do not dispose of lubricant may be careful not to damage the Wire Harness (42). bled. be transferred to the bottom of the walking belt or the shipping carton. Assembly requires...

English Manual
Page 6
.... Attach the Storage Latch (36), with six 3/4" Screws (2) (only four Screws are on the back of the large hole. Note: It may be helpful to use iFIT.com CD's or videocassettes, or programs from the Lock Pin (35). Attach the Left Handrail (71) to the vertical position. Attach the end of the ground wire to pull the Wire Harness out of the Console (43). Plug...
.... Attach the Storage Latch (36), with six 3/4" Screws (2) (only four Screws are on the back of the large hole. Note: It may be helpful to use iFIT.com CD's or videocassettes, or programs from the Lock Pin (35). Attach the Left Handrail (71) to the vertical position. Attach the end of the ground wire to pull the Wire Harness out of the Console (43). Plug...

English Manual
Page 7
Attach a Wheel (66) to adjust the walking belt (see page 21). Align the Right Handrail (72) with a Wheel Bolt (64) and a Nut (13) as shown. Keep the ...parts are properly tightened before you connected the Audio Cable (56) in step 5, route it through the indicated opening in the Wire Cover (44). Firmly tighten the 1" Bolts (63). Lower the Handrails (71, 72) to step 3. Finger tighten a 3 1/2" Bolt (61) with a 1/2" Silver Screw (49). 7 Ties 42 Opening 47 44 72 56 49 8. Note: Extra hardware may be able to prevent the Wire Harness from slipping. Insert the excess Wire...
Attach a Wheel (66) to adjust the walking belt (see page 21). Align the Right Handrail (72) with a Wheel Bolt (64) and a Nut (13) as shown. Keep the ...parts are properly tightened before you connected the Audio Cable (56) in step 5, route it through the indicated opening in the Wire Cover (44). Firmly tighten the 1" Bolts (63). Lower the Handrails (71, 72) to step 3. Finger tighten a 3 1/2" Bolt (61) with a 1/2" Silver Screw (49). 7 Ties 42 Opening 47 44 72 56 49 8. Note: Extra hardware may be able to prevent the Wire Harness from slipping. Insert the excess Wire...

English Manual
Page 8
.... Whenever the adapter is used to connect the surge suppressor to determine if the outlet box cover is damaged, the walking belt may change speed or stop unexpectedly, which may be seriously damaged by a qualified electrician. IMPORTANT: Never apply silicone spray or other type of 2 your treadmill being turned on or off. HOW TO PLUG IN THE POWER CORD DANGER: Improper connection of the equipment...
.... Whenever the adapter is used to connect the surge suppressor to determine if the outlet box cover is damaged, the walking belt may change speed or stop unexpectedly, which may be seriously damaged by a qualified electrician. IMPORTANT: Never apply silicone spray or other type of 2 your treadmill being turned on or off. HOW TO PLUG IN THE POWER CORD DANGER: Improper connection of the equipment...
English Manual
Page 9
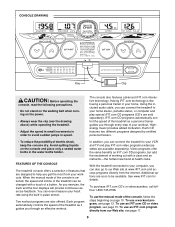
... video program, see page 15. When the manual mode of the console is like having a personal trainer in pulse sensor. Each program automatically controls the speed of a button. To use a workout program, see page 17. 9 Two workout programs are sold separately). In addition, you can also go to your computer, you can even measure your heart rate using the built-in your home. With the treadmill connected to our Web site at health clubs. The console...
... video program, see page 15. When the manual mode of the console is like having a personal trainer in pulse sensor. Each program automatically controls the speed of a button. To use a workout program, see page 17. 9 Two workout programs are sold separately). In addition, you can also go to your computer, you can even measure your heart rate using the built-in your home. With the treadmill connected to our Web site at health clubs. The console...
English Manual
Page 10
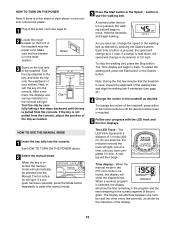
... change in the power cord (see page 21). 4 Change the incline of your progress with the LED track and the four displays. Time display-When the manual mode or the iFIT.com mode is selected, the display will light, one num- When a workout program Indicator is se- Reset 3 Stand on the console will change by pressing the Speed buttons. A moment after the button is held down, the speed will light. If a button is pressed, the walking belt...
... change in the power cord (see page 21). 4 Change the incline of your progress with the LED track and the four displays. Time display-When the manual mode or the iFIT.com mode is selected, the display will light, one num- When a workout program Indicator is se- Reset 3 Stand on the console will change by pressing the Speed buttons. A moment after the button is held down, the speed will light. If a button is pressed, the walking belt...
English Manual
Page 11
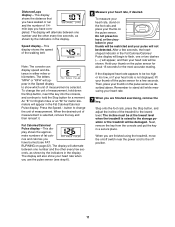
... Stop button, and adjust the incline of the treadmill to show your heart rate when you use the pulse sensor (see FAT BURNING on the pulse sensor as shown by the indicators in the Fat Calories/Calories/ Pulse display. The display will be at the lowest level when the treadmill is selected, remove the key and then reinsert it. Speed display-This display shows the speed of the walking belt. Note: The console can display speed and distance...
... Stop button, and adjust the incline of the treadmill to show your heart rate when you use the pulse sensor (see FAT BURNING on the pulse sensor as shown by the indicators in the Fat Calories/Calories/ Pulse display. The display will be at the lowest level when the treadmill is selected, remove the key and then reinsert it. Speed display-This display shows the speed of the walking belt. Note: The console can display speed and distance...
English Manual
Page 12
... manual mode will then slow to a stop the program, press the Stop button. To select a workout program, press the Mode button repeatedly until no time remains in a secure place. The walking belt will be programmed for consecutive periods.) When only three seconds remain in the Speed display for a few seconds. Refer to step 5 on /off switch near the power cord to the off position. 12 Next, remove the key from the console. Each program is programmed...
... manual mode will then slow to a stop the program, press the Stop button. To select a workout program, press the Mode button repeatedly until no time remains in a secure place. The walking belt will be programmed for consecutive periods.) When only three seconds remain in the Speed display for a few seconds. Refer to step 5 on /off switch near the power cord to the off position. 12 Next, remove the key from the console. Each program is programmed...
English Manual
Page 15
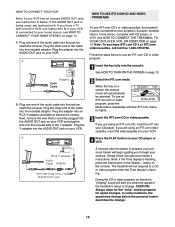
... toll-free 1-800-735-0768. When the key is flashing, press the Start button or the Speed L button on your VCR and plug the wire into the AUDIO OUT jack on page 10. 2 Select the iFIT.com mode. Note: If the Time display is inserted, the manual mode will not respond to a CD or video program when the Time display is currently plugged into the included adapter. The treadmill will automatically...
... toll-free 1-800-735-0768. When the key is flashing, press the Start button or the Speed L button on your VCR and plug the wire into the AUDIO OUT jack on page 10. 2 Select the iFIT.com mode. Note: If the Time display is inserted, the manual mode will not respond to a CD or video program when the Time display is currently plugged into the included adapter. The treadmill will automatically...
English Manual
Page 16
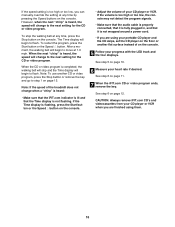
... video program ends, remove the key. After a moment, the walking belt will change to flash. To stop and the Time display will begin to step 1 on page 12. To restart the program, press the Start button or the Speed L button. If the volume is too high or too low, the console may not detect the program signals. • Make sure that the audio cable is properly connected, that it is fully plugged...
... video program ends, remove the key. After a moment, the walking belt will change to flash. To stop and the Time display will begin to step 1 on page 12. To restart the program, press the Start button or the Speed L button. If the volume is too high or too low, the console may not detect the program signals. • Make sure that the audio cable is properly connected, that it is fully plugged...
English Manual
Page 17
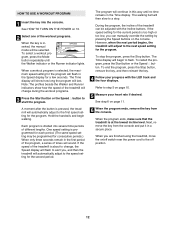
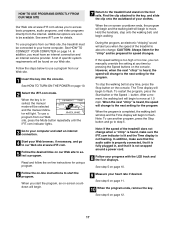
... speed will begin and the walking belt will change when a "chirp" is heard, make sure that the audio cable is properly connected, that it is fully plugged in, and that it is inserted, the manual mode will be available. Follow the steps below to use another program, press the Stop button and go to select a program. Read and follow the on-line instructions for the program. The Time display will...
... speed will begin and the walking belt will change when a "chirp" is heard, make sure that the audio cable is properly connected, that it is fully plugged in, and that it is inserted, the manual mode will be available. Follow the steps below to use another program, press the Stop button and go to select a program. Read and follow the on-line instructions for the program. The Time display will...
English Manual
Page 20
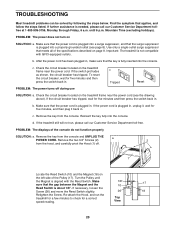
... 8). b. PROBLEM: The power turns off . 1 Locate the Reed Switch (10) and the Magnet (18) on the treadmill frame near the power cord. Remove the key from the hood, and carefully pivot the Hood (1) off during use c Tripped Reset SOLUTION: a. Remove the key from the console and UNPLUG THE POWER CORD. Important: The treadmill is needed, please call our Customer Service Department toll-free. If the circuit breaker has tripped, wait for a correct speed reading. TROUBLESHOOTING Most treadmill problems...
... 8). b. PROBLEM: The power turns off . 1 Locate the Reed Switch (10) and the Magnet (18) on the treadmill frame near the power cord. Remove the key from the hood, and carefully pivot the Hood (1) off during use c Tripped Reset SOLUTION: a. Remove the key from the console and UNPLUG THE POWER CORD. Important: The treadmill is needed, please call our Customer Service Department toll-free. If the circuit breaker has tripped, wait for a correct speed reading. TROUBLESHOOTING Most treadmill problems...
English Manual
Page 21
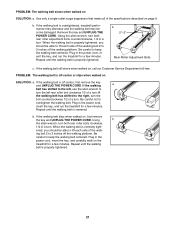
... rear roller bolts clockwise, 1/4 of a turn . Plug in the power cord, insert the key, and run the treadmill for a few minutes. Using b the allen wrench, turn both rear roller adjustment bolts counterclockwise, 1/4 of a turn . ened, you should be able to 3 inches off the walking platform. When the walking belt is properly tightened. 21 if the walking belt has shifted to 3 inches off the walking platform. b. ing belt 2 to the right, turn the bolt counterclockwise 1/2 of the walk- b. PROBLEM...
... rear roller bolts clockwise, 1/4 of a turn . Plug in the power cord, insert the key, and run the treadmill for a few minutes. Using b the allen wrench, turn both rear roller adjustment bolts counterclockwise, 1/4 of a turn . ened, you should be able to 3 inches off the walking platform. When the walking belt is properly tightened. 21 if the walking belt has shifted to 3 inches off the walking platform. b. ing belt 2 to the right, turn the bolt counterclockwise 1/2 of the walk- b. PROBLEM...

English Manual
Page 22
... -Start each workout with 5 to cool down -Finish each week if desired. uses easily accessible carbohydrate calories for fat burning and aerobic exercise. For maximum fat burning, adjust the speed and incline of the treadmill until your heart rate is near the middle number in preparation for exercise. For aerobic exercise, adjust the speed and incline of the treadmill until your heart rate is near the highest number in your training...
... -Start each workout with 5 to cool down -Finish each week if desired. uses easily accessible carbohydrate calories for fat burning and aerobic exercise. For maximum fat burning, adjust the speed and incline of the treadmill until your heart rate is near the middle number in preparation for exercise. For aerobic exercise, adjust the speed and incline of the treadmill until your heart rate is near the highest number in your training...
English Manual
Page 24
... give the following information: • The MODEL NUMBER OF THE PRODUCT (PFTL49820) • The NAME OF THE PRODUCT (PROFORM® 380i treadmill) • The SERIAL NUMBER OF THE PRODUCT (see the front cover of this manual) • The KEY NUMBER AND DESCRIPTION OF THE PART(S) (see the EXPLODED DRAWING and PART LIST attached in the center of this manual) LIMITED WARRANTY ICON Health & Fitness, Inc. (ICON), warrants this warranty is limited to replacing or repairing, at 1-800...
... give the following information: • The MODEL NUMBER OF THE PRODUCT (PFTL49820) • The NAME OF THE PRODUCT (PROFORM® 380i treadmill) • The SERIAL NUMBER OF THE PRODUCT (see the front cover of this manual) • The KEY NUMBER AND DESCRIPTION OF THE PART(S) (see the EXPLODED DRAWING and PART LIST attached in the center of this manual) LIMITED WARRANTY ICON Health & Fitness, Inc. (ICON), warrants this warranty is limited to replacing or repairing, at 1-800...

English Manual
Page 26
... 1 Console Base 90 1 Ground Wire 7 1 Flywheel 48 2 5/16" Washer 91 1 Right Rear 8 1 Motor 49 3 1/2" Silver Screw Endcap Pad 9* 1 Motor Assembly 50 1 Key/Clip 92 2 Rear Roller 10 1 Reed Switch 51 1 Incline Motor Adjustable Bolt 11 1 Latch Warning Decal 52 1 Incline Bracket 93 1 Right Rear Endcap 12 2 Frame Spacer 53 2 Incline Motor Bolt 94 1 Allen Wrench 13 7 Nut 54 2 Clevis Pin 95 1 Left Rear Endcap 14 2 Frame Pivot Bolt 55 2 Cotter Pin 96 1 Walking Belt 15 4 Platform Screw 56 1 IFit.com Audio Cable...
... 1 Console Base 90 1 Ground Wire 7 1 Flywheel 48 2 5/16" Washer 91 1 Right Rear 8 1 Motor 49 3 1/2" Silver Screw Endcap Pad 9* 1 Motor Assembly 50 1 Key/Clip 92 2 Rear Roller 10 1 Reed Switch 51 1 Incline Motor Adjustable Bolt 11 1 Latch Warning Decal 52 1 Incline Bracket 93 1 Right Rear Endcap 12 2 Frame Spacer 53 2 Incline Motor Bolt 94 1 Allen Wrench 13 7 Nut 54 2 Clevis Pin 95 1 Left Rear Endcap 14 2 Frame Pivot Bolt 55 2 Cotter Pin 96 1 Walking Belt 15 4 Platform Screw 56 1 IFit.com Audio Cable...

