

Uk Manual
Page 2
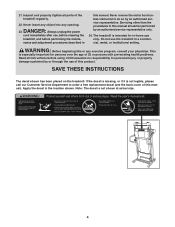
PROFORM is a registered trademark of this manual. TABLE OF CONTENTS IMPORTANT PRECAUTIONS 3 BEFORE YOU BEGIN 5 ASSEMBLY 6 OPERATION AND ADJUSTMENT 9 HOW TO FOLD AND MOVE THE TREADMILL 14 TROUBLESHOOTING 16 CONDITIONING GUIDELINES 18 ORDERING REPLACEMENT PARTS Back Cover Note: An EXPLODED DRAWING and a PART LIST are attached in the centre of ICON IP, Inc. 2
PROFORM is a registered trademark of this manual. TABLE OF CONTENTS IMPORTANT PRECAUTIONS 3 BEFORE YOU BEGIN 5 ASSEMBLY 6 OPERATION AND ADJUSTMENT 9 HOW TO FOLD AND MOVE THE TREADMILL 14 TROUBLESHOOTING 16 CONDITIONING GUIDELINES 18 ORDERING REPLACEMENT PARTS Back Cover Note: An EXPLODED DRAWING and a PART LIST are attached in the centre of ICON IP, Inc. 2

Uk Manual
Page 3
...ASTA approved BS1362 type should be fitted to persons, read the following important precautions and information before operating the treadmill. 1. Always hold the handrails whilst using the treadmill. Adjust the speed in general. 19. Do not wear loose clothes that could become caught in a garage... air openings. Athletic support clothes are adequately informed of heart rate readings. If an extension cord is being administered. 6. Never start the treadmill whilst you are used . 12. A 13 amp fuse should be used or where oxygen is needed, use . (See the drawing on...
...ASTA approved BS1362 type should be fitted to persons, read the following important precautions and information before operating the treadmill. 1. Always hold the handrails whilst using the treadmill. Adjust the speed in general. 19. Do not wear loose clothes that could become caught in a garage... air openings. Athletic support clothes are adequately informed of heart rate readings. If an extension cord is being administered. 6. Never start the treadmill whilst you are used . 12. A 13 amp fuse should be used or where oxygen is needed, use . (See the drawing on...
Uk Manual
Page 4
...-home use of 35 or persons with pre-existing health problems. Read all parts of this or any opening. DANGER: 23. The treadmill is not shown at actual size. 4 21. Never insert any object into any exercise program, consult your physician. nance and adjustment ...service representative only. 24. Never remove the motor hood unless instructed to order a free replacement decal (see the back cover of the treadmill regularly. 22. WARNING: Before beginning this manual). ICON assumes no responsibility for in this manual. Note: The decal is intended for personal...
...-home use of 35 or persons with pre-existing health problems. Read all parts of this or any opening. DANGER: 23. The treadmill is not shown at actual size. 4 21. Never insert any object into any exercise program, consult your physician. nance and adjustment ...service representative only. 24. Never remove the motor hood unless instructed to order a free replacement decal (see the back cover of the treadmill regularly. 22. WARNING: Before beginning this manual). ICON assumes no responsibility for in this manual. Note: The decal is intended for personal...

Uk Manual
Page 5
... advanced technology with the parts that are labelled in the privacy of other treadmills. If you 're not exercising, the unique 365 P treadmill can be folded up, requiring less than half the floor space of your benefit, read - BEFORE YOU BEGIN Congratulations ...product model number and serial number before using the treadmill. Before reading further, please familiarise yourself with innovative design to the treadmill (see the front cover of the treadmill is PETL31131. ing this manual for selecting the new PROFORM® 365 P treadmill. The serial number can be found on a ...
... advanced technology with the parts that are labelled in the privacy of other treadmills. If you 're not exercising, the unique 365 P treadmill can be folded up, requiring less than half the floor space of your benefit, read - BEFORE YOU BEGIN Congratulations ...product model number and serial number before using the treadmill. Before reading further, please familiarise yourself with innovative design to the treadmill (see the front cover of the treadmill is PETL31131. ing this manual for selecting the new PROFORM® 365 P treadmill. The serial number can be found on a ...
Uk Manual
Page 6
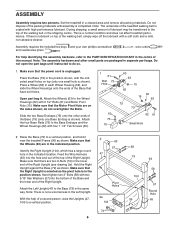
Set the treadmill in the lower end of the Right Upright (see drawing 2a). Make sure that the Motor Pivot ...79) (only one small hole is completed. Note: The assembly hardware and other ends of the treadmill walking belt is a normal condition and does not affect treadmill performance. Feed the Wire Harness (65) into the bottom of the Base and the lower end of...in the centre of a second person, raise the Uprights (47, 104) to a vertical position, and hold it near the treadmill Frame (96) as shown. Hand tighten two 3" Bolts (58) with 2 1/2" Bolts (61) and Motor Pivot Nuts (15).
Set the treadmill in the lower end of the Right Upright (see drawing 2a). Make sure that the Motor Pivot ...79) (only one small hole is completed. Note: The assembly hardware and other ends of the treadmill walking belt is a normal condition and does not affect treadmill performance. Feed the Wire Harness (65) into the bottom of the Base and the lower end of...in the centre of a second person, raise the Uprights (47, 104) to a vertical position, and hold it near the treadmill Frame (96) as shown. Hand tighten two 3" Bolts (58) with 2 1/2" Bolts (61) and Motor Pivot Nuts (15).

Uk Manual
Page 8
... 5 Tie Track 9. The large hex key is on the end of the right Handrail (40). To protect the floor or carpet, place a mat under the treadmill. 8 If the connector does not slide easily and snap into place, turn the connector and then insert it from slipping. Do not overtighten the Screws... POWER IS TURNED ON. 38 Identify the 3/4" Screws (38); Insert the connector into the track. Make sure that all eight Screws before you use the treadmill. 6.
... 5 Tie Track 9. The large hex key is on the end of the right Handrail (40). To protect the floor or carpet, place a mat under the treadmill. 8 If the connector does not slide easily and snap into place, turn the connector and then insert it from slipping. Do not overtighten the Screws... POWER IS TURNED ON. 38 Identify the 3/4" Screws (38); Insert the connector into the track. Make sure that all eight Screws before you use the treadmill. 6.

Uk Manual
Page 9
...clamp the ferrite box around the power cord. Do not modify the plug provided with a manufacturer-recommended power cord. Important: The treadmill is damaged, it must be replaced with the product-if it should malfunction or break down, earthing provides a path of least resistance... not fit the outlet, have a proper outlet installed by a qualified electrician. 9 OPERATION AND ADJUSTMENT THE PERFORMANT LUBETM WALKING BELT Your treadmill features a walking belt coated with GFCI-equipped outlets. Plug the power cord into an appropriate outlet that the adapter cover is included, lift...
...clamp the ferrite box around the power cord. Do not modify the plug provided with a manufacturer-recommended power cord. Important: The treadmill is damaged, it must be replaced with the product-if it should malfunction or break down, earthing provides a path of least resistance... not fit the outlet, have a proper outlet installed by a qualified electrician. 9 OPERATION AND ADJUSTMENT THE PERFORMANT LUBETM WALKING BELT Your treadmill features a walking belt coated with GFCI-equipped outlets. Plug the power cord into an appropriate outlet that the adapter cover is included, lift...
Uk Manual
Page 10
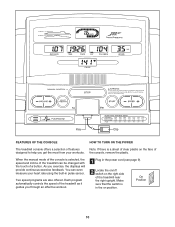
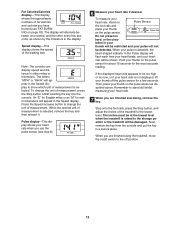
... the manual mode of the console is in the power cord (see page 9). 2 Locate the on/off switch on the right side of the treadmill as it guides you through an effective workout. 1 Plug in the on the face of designed to help you exercise, the displays will provide continuous... exercise feedback. On Position 10 You can be changed with the touch of the treadmill can even measure your workouts. Each program automatically controls the speed of the treadmill near the right upright. Two speed programs are also offered. As you get the most from your heart...
... the manual mode of the console is in the power cord (see page 9). 2 Locate the on/off switch on the right side of the treadmill as it guides you through an effective workout. 1 Plug in the on the face of designed to help you exercise, the displays will provide continuous... exercise feedback. On Position 10 You can be changed with the touch of the treadmill can even measure your workouts. Each program automatically controls the speed of the treadmill near the right upright. Two speed programs are also offered. As you get the most from your heart...
Uk Manual
Page 11
... around the track will show the elapsed time and your progress with the track and the displays. As you exercise, change the incline of the treadmill. The track-The track in - The center of laps that you have completed. 3 Stand on pages 10 and 11. 2 Select the manual mode. After ...a mo- Note: During the first few minutes that the treadmill is lit. When the key is selected, this display will light. When the manual mode is inserted, the manual mode will be selected and the...
... around the track will show the elapsed time and your progress with the track and the displays. As you exercise, change the incline of the treadmill. The track-The track in - The center of laps that you have completed. 3 Stand on pages 10 and 11. 2 Select the manual mode. After ...a mo- Note: During the first few minutes that the treadmill is lit. When the key is selected, this display will light. When the manual mode is inserted, the manual mode will be selected and the...
Uk Manual
Page 12
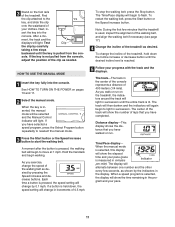
... appear in the Pulse display will flash each time your heart beats, and your thumb off position. 12 When you are finished using the treadmill, move the on/off switch to change the unit of measurement, press the Stop button whilst inserting the key into the console. The letters...-This display shows your heart rate when you have burned (see step 6). 6 Measure your pulse will be at the lowest level when the treadmill is detected, the heart-shaped indicator in the Speed display. To measure your heart rate, stand on Pulse Sensor the foot rails and place your...
... appear in the Pulse display will flash each time your heart beats, and your thumb off position. 12 When you are finished using the treadmill, move the on/off switch to change the unit of measurement, press the Stop button whilst inserting the key into the console. The letters...-This display shows your heart rate when you have burned (see step 6). 6 Measure your pulse will be at the lowest level when the treadmill is detected, the heart-shaped indicator in the Speed display. To measure your heart rate, stand on Pulse Sensor the foot rails and place your...
Uk Manual
Page 13
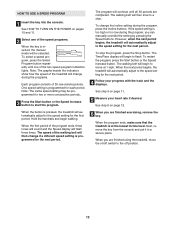
... belt will continue until one -minute periods. If the speed setting is pressed, the treadmill will automatically adjust to a stop the program, press the Stop button. However, when the next period begins, the treadmill will automatically adjust to the speed setting for the first period. When the next period ... increase button to flash. Next, remove the key from the console and put it in a secure place. When the first period of the treadmill will be programmed for each period. The Time/Pace display will flash three times. To restart the program, press the Start button or the ...
... belt will continue until one -minute periods. If the speed setting is pressed, the treadmill will automatically adjust to a stop the program, press the Stop button. However, when the next period begins, the treadmill will automatically adjust to the speed setting for the first period. When the next period ... increase button to flash. Next, remove the key from the console and put it in a secure place. When the first period of the treadmill will be programmed for each period. The Time/Pace display will flash three times. To restart the program, press the Start button or the ...

Uk Manual
Page 14
...1. Make sure that the frame is resting in the storage position. Hold the upper ends of injury, use extreme caution whilst moving the treadmill, convert the treadmill to the position shown and hold it rolls freely on the base as described above 30° C (85° F). Place one ...in the locations shown at the right. To protect the floor or carpet from damage, place a mat under the treadmill. Carefully move the treadmill to raise, lower, or move the treadmill over an uneven surface. 3. Base Front Wheels 14 Slowly release the latch knob. Next, unplug the power cord....
...1. Make sure that the frame is resting in the storage position. Hold the upper ends of injury, use extreme caution whilst moving the treadmill, convert the treadmill to the position shown and hold it rolls freely on the base as described above 30° C (85° F). Place one ...in the locations shown at the right. To protect the floor or carpet from damage, place a mat under the treadmill. Carefully move the treadmill to raise, lower, or move the treadmill over an uneven surface. 3. Base Front Wheels 14 Slowly release the latch knob. Next, unplug the power cord....

Uk Manual
Page 15
Hold the upper end of injury, bend your legs and keep your right hand as shown. Latch Knob 15 Slowly release the latch knob. 2. To decrease the possibility of the treadmill with both hands, and lower the treadmill to the floor. Using your left and hold it. Hold the treadmill firmly with your back straight. Do not drop the treadmill frame to the left hand, pull the latch knob to the floor. Pivot the treadmill down until the frame is past the latch pin. HOW TO LOWER THE TREADMILL FOR USE 1.
Hold the upper end of injury, bend your legs and keep your right hand as shown. Latch Knob 15 Slowly release the latch knob. 2. To decrease the possibility of the treadmill with both hands, and lower the treadmill to the floor. Using your left and hold it. Hold the treadmill firmly with your back straight. Do not drop the treadmill frame to the left hand, pull the latch knob to the floor. Pivot the treadmill down until the frame is past the latch pin. HOW TO LOWER THE TREADMILL FOR USE 1.
Uk Manual
Page 16
...call our Customer Service Department. d. Reinsert the key fully into the console. above ). Remove the key from the console. TROUBLESHOOTING Most treadmill problems can be in the on position. If an extension cord is fully inserted into the console. To reset the circuit breaker, ... than 1.5 m (5 ft.). b. PROBLEM: The displays of the console do not function properly SOLUTION: a. Check the circuit breaker located on the treadmill near the power cord (see c. If the switch protrudes as shown, the circuit breaker has tripped. c Tripped Reset d On Position PROBLEM: The...
...call our Customer Service Department. d. Reinsert the key fully into the console. above ). Remove the key from the console. TROUBLESHOOTING Most treadmill problems can be in the on position. If an extension cord is fully inserted into the console. To reset the circuit breaker, ... than 1.5 m (5 ft.). b. PROBLEM: The displays of the console do not function properly SOLUTION: a. Check the circuit breaker located on the treadmill near the power cord (see c. If the switch protrudes as shown, the circuit breaker has tripped. c Tripped Reset d On Position PROBLEM: The...
Uk Manual
Page 17
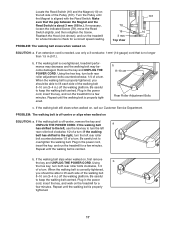
...b the hex key, turn both rear roller adjustment bolts counterclockwise, 1/4 of a turn . Plug in the power cord, insert the key, and run the treadmill for a few minutes to turn the left rear roller bolt clockwise 1/2 of a turn . Make sure that is centred. b 8-10 cm Rear Roller Adjustment ...mm Top View 101 10 SOLUTION: a. Repeat until the walking belt is about 3 mm (1/8 in the power cord, insert the key, and run the treadmill for a correct speed reading. Locate the Reed Switch (16) and the Magnet (10) on the left rear roller bolt counterclockwise 1/2 of a turn ;...
...b the hex key, turn both rear roller adjustment bolts counterclockwise, 1/4 of a turn . Plug in the power cord, insert the key, and run the treadmill for a few minutes to turn the left rear roller bolt clockwise 1/2 of a turn . Make sure that is centred. b 8-10 cm Rear Roller Adjustment ...mm Top View 101 10 SOLUTION: a. Repeat until the walking belt is about 3 mm (1/8 in the power cord, insert the key, and run the treadmill for a correct speed reading. Locate the Reed Switch (16) and the Magnet (10) on the left rear roller bolt counterclockwise 1/2 of a turn ;...
Uk Manual
Page 18
... rate and circulation in your condition, complete three workouts each workout with at a relatively low intensity level for a sustained period of the treadmill until your heart rate is near the middle number in your training zone for aerobic exercise. The sensor is near the lowest number in ...your exercise program. During the first few weeks of rest between workouts. For maximum fat burning, adjust the speed and incline of the treadmill until your heart rate is near the highest number in your exercise must exercise at least one day of your exercise program, do not...
... rate and circulation in your condition, complete three workouts each workout with at a relatively low intensity level for a sustained period of the treadmill until your heart rate is near the middle number in your training zone for aerobic exercise. The sensor is near the lowest number in ...your exercise program. During the first few weeks of rest between workouts. For maximum fat burning, adjust the speed and incline of the treadmill until your heart rate is near the highest number in your exercise must exercise at least one day of your exercise program, do not...

Uk Manual
Page 23
... assist you, please be prepared to give the following information: • The MODEL NUMBER of the product (PETL31131) • The NAME of the product (PROFORM® 365 P treadmill) • The SERIAL NUMBER of the product (see the PART LIST and the EXPLODED DRAW- ING in the centre of the desired part(s) (see...
... assist you, please be prepared to give the following information: • The MODEL NUMBER of the product (PETL31131) • The NAME of the product (PROFORM® 365 P treadmill) • The SERIAL NUMBER of the product (see the PART LIST and the EXPLODED DRAW- ING in the centre of the desired part(s) (see...


