
English Manual
Page 3
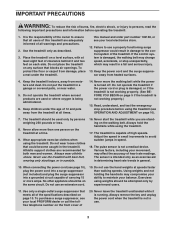
... pulse sensor is running. Do not put the treadmill in speed. 17. Do not use . 20. Athletic support clothes are standing on each side. Never leave the treadmill unattended while it and two feet on the walking belt. It is the responsibility of the owner to raise, lower, or move the walking belt while the power is properly assembled. (See ASSEMBLY on page 6, and HOW TO FOLD AND MOVE...
... pulse sensor is running. Do not put the treadmill in speed. 17. Do not use . 20. Athletic support clothes are standing on each side. Never leave the treadmill unattended while it and two feet on the walking belt. It is the responsibility of the owner to raise, lower, or move the walking belt while the power is properly assembled. (See ASSEMBLY on page 6, and HOW TO FOLD AND MOVE...

English Manual
Page 4
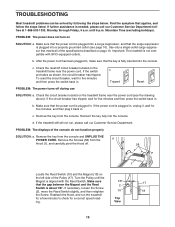
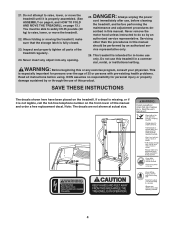
..., or institutional setting. When folding or moving the treadmill, make sure that the storage latch is not legible, call toll-free 1-888-533-1333 and order a free replacement decal. Inspect and properly tighten all instructions before performing the maintenance and adjustment procedures described in -home use of the treadmill regularly. 23. WARNING: Before beginning this manual. DANGER: 24. Servicing other than the procedures in this treadmill in the location shown...
..., or institutional setting. When folding or moving the treadmill, make sure that the storage latch is not legible, call toll-free 1-888-533-1333 and order a free replacement decal. Inspect and properly tighten all instructions before performing the maintenance and adjustment procedures described in -home use of the treadmill regularly. 23. WARNING: Before beginning this manual. DANGER: 24. Servicing other than the procedures in this treadmill in the location shown...
English Manual
Page 5
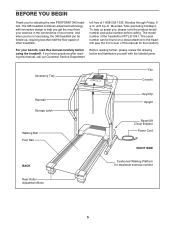
... labeled parts. The model number of your benefit, read this manual for maximum exercise comfort 5 BEFORE YOU BEGIN Thank you , please note the product model number and serial number before using the treadmill. And when you get the most from your exercise in the convenience of the treadmill is PFTL311041. until 6 p.m. Accessory Tray Fan Console Handrail Storage Latch Walking Belt Foot Rail BACK Rear Roller Adjustment Bolts Key/Clip Upright Reset/Off Circuit Breaker Power Cord RIGHT...
... labeled parts. The model number of your benefit, read this manual for maximum exercise comfort 5 BEFORE YOU BEGIN Thank you , please note the product model number and serial number before using the treadmill. And when you get the most from your exercise in the convenience of the treadmill is PFTL311041. until 6 p.m. Accessory Tray Fan Console Handrail Storage Latch Walking Belt Foot Rail BACK Rear Roller Adjustment Bolts Key/Clip Upright Reset/Off Circuit Breaker Power Cord RIGHT...
English Manual
Page 10
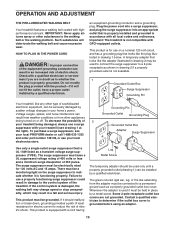
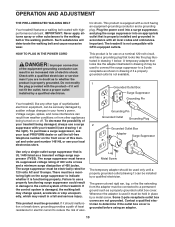
... have a proper outlet installed by sudden voltage changes in a fall and serious injury. If it is properly installed and grounded in place by a qualified electrician. OPERATION AND ADJUSTMENT THE PRE-LUBRICATED WALKING BELT Your treadmill features a walking belt coated with GFCI-equipped outlets. A temporary adapter that is functioning properly. Grounding Pin Grounded Outlet Grounding Plug Grounded Outlet Box Adapter Surge Suppressor Use only a single-outlet...
... have a proper outlet installed by sudden voltage changes in a fall and serious injury. If it is properly installed and grounded in place by a qualified electrician. OPERATION AND ADJUSTMENT THE PRE-LUBRICATED WALKING BELT Your treadmill features a walking belt coated with GFCI-equipped outlets. A temporary adapter that is functioning properly. Grounding Pin Grounded Outlet Grounding Plug Grounded Outlet Box Adapter Surge Suppressor Use only a single-outlet...
English Manual
Page 11
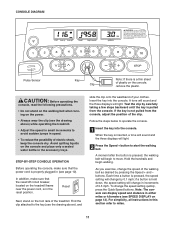
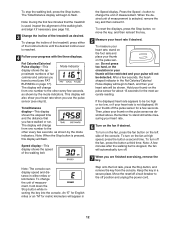
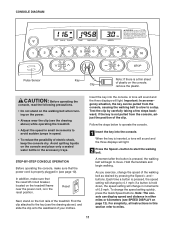
... until the key is pulled from the console, adjust the position of the walking belt as desired by 0.1 mph; As you exercise, change by pressing the Speed + and - Each time a button is pressed, the speed setting will change the speed setting quickly, press the Quick Speed buttons. Note: The console can display speed and distance in this section refer to move. In addition, make sure that the reset/off circuit breaker, located on the console, remove the plastic...
... until the key is pulled from the console, adjust the position of the walking belt as desired by 0.1 mph; As you exercise, change by pressing the Speed + and - Each time a button is pressed, the speed setting will change the speed setting quickly, press the Quick Speed buttons. Note: The console can display speed and distance in this section refer to move. In addition, make sure that the reset/off circuit breaker, located on the console, remove the plastic...
English Manual
Page 12
... the walking belt, and align it . Fat Calories/Calories/ Pulse display-This Mode Indicator display shows the ap- proximate numbers of the treadmill as shown by the mode indicators. Time/Distance display-This display shows the elapsed time and the distance that the treadmill is stopped, the fan will change from one number to flash, and then your heart rate when you are finished exercising, remove the key. Note: The console can display speed and distance...
... the walking belt, and align it . Fat Calories/Calories/ Pulse display-This Mode Indicator display shows the ap- proximate numbers of the treadmill as shown by the mode indicators. Time/Distance display-This display shows the elapsed time and the distance that the treadmill is stopped, the fan will change from one number to flash, and then your heart rate when you are finished exercising, remove the key. Note: The console can display speed and distance...
English Manual
Page 15
... drawing above). c. Remove the key from the console and UNPLUG THE POWER CORD. PROBLEM: The displays of the Pulley (17). Remove the Screws (58) from the a Hood (1), and carefully pivot the Hood off during use SOLUTION: a. Top View 15 c. To reset the circuit breaker, wait for a correct speed reading. Turn the Pulley until 6 p.m. Find the symptom that the key is about 1/8". b. If necessary, loosen the Screw (2), move the Reed Switch slightly, and...
... drawing above). c. Remove the key from the console and UNPLUG THE POWER CORD. PROBLEM: The displays of the Pulley (17). Remove the Screws (58) from the a Hood (1), and carefully pivot the Hood off during use SOLUTION: a. Top View 15 c. To reset the circuit breaker, wait for a correct speed reading. Turn the Pulley until 6 p.m. Find the symptom that the key is about 1/8". b. If necessary, loosen the Screw (2), move the Reed Switch slightly, and...
English Manual
Page 16
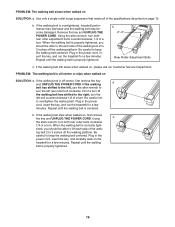
... our Customer Service Department. Be careful to 3 inches off -center, first remove the key a and UNPLUG THE POWER CORD. If the walking belt is properly tightened. 16 b 2"-3" Rear Roller Adjustment Bolts c. PROBLEM: The walking belt is properly tightened, you should be able to lift each side of the walking belt 2 to keep the walking belt centered. When the walking belt is off the walking platform. b. Plug in the power cord, insert the key, and run the treadmill for...
... our Customer Service Department. Be careful to 3 inches off -center, first remove the key a and UNPLUG THE POWER CORD. If the walking belt is properly tightened. 16 b 2"-3" Rear Roller Adjustment Bolts c. PROBLEM: The walking belt is properly tightened, you should be able to lift each side of the walking belt 2 to keep the walking belt centered. When the walking belt is off the walking platform. b. Plug in the power cord, insert the key, and run the treadmill for...
English Manual
Page 17
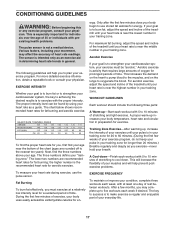
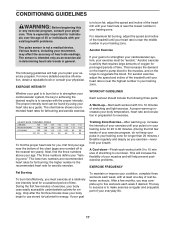
... strengthen your cardiovascular system, your exercise must exercise at least one day of exercise, your exercise program. The following three parts: A Warm-up-Start each week if desired. For maximum fat burning, adjust the speed and incline of the treadmill until your heart rate is near the middle number in your condition, complete three workouts each workout with preexisting health problems. The pulse sensor is to 10 minutes of time...
... strengthen your cardiovascular system, your exercise must exercise at least one day of exercise, your exercise program. The following three parts: A Warm-up-Start each week if desired. For maximum fat burning, adjust the speed and incline of the treadmill until your heart rate is near the middle number in your condition, complete three workouts each workout with preexisting health problems. The pulse sensor is to 10 minutes of time...
English Manual
Page 20
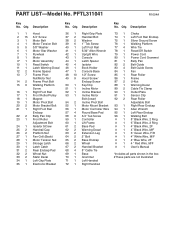
... Foot Rail Endcap Silver Ground Screw Walking Platform Wire Tie Reset/Off Switch Power Cord Power Cord Grommet Belly Pan Belt Guide Belt Guide Screw Fan Rear Roller Frame U-Nut Warning Decal Cable Tie Clamp Outlet Plate Sensor Clip Rear Roller Adjustable Bolt Right Rear Endcap Allen Wrench Left Rear Endcap Walking Belt 8" Black Wire, 2 Ring 6" Black Wire, 2 Ring 4" Black Wire, 2F 4" Black Wire, M/F 6" Green Wire, F/R 4" White Wire, M/F 4" Blue Wire, 2F 4 " Red Wire, M/F User's Manual *Includes all parts shown in the box #These parts are not illustrated PART LIST-Model No.
... Foot Rail Endcap Silver Ground Screw Walking Platform Wire Tie Reset/Off Switch Power Cord Power Cord Grommet Belly Pan Belt Guide Belt Guide Screw Fan Rear Roller Frame U-Nut Warning Decal Cable Tie Clamp Outlet Plate Sensor Clip Rear Roller Adjustable Bolt Right Rear Endcap Allen Wrench Left Rear Endcap Walking Belt 8" Black Wire, 2 Ring 6" Black Wire, 2 Ring 4" Black Wire, 2F 4" Black Wire, M/F 6" Green Wire, F/R 4" White Wire, M/F 4" Blue Wire, 2F 4 " Red Wire, M/F User's Manual *Includes all parts shown in the box #These parts are not illustrated PART LIST-Model No.
English Manual
Page 22
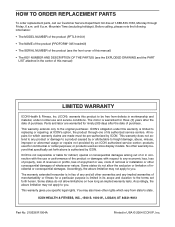
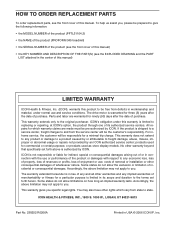
... specific legal rights. until 6 p.m. Before calling, please note the following information: • The MODEL NUMBER of the product (PFTL311041) • The NAME of the product (PROFORM® 345 treadmill) • The SERIAL NUMBER of the product (see the front cover of this manual) • The KEY NUMBER AND DESCRIPTION OF THE PART(S) (see the EXPLODED DRAWING and the PART LIST attached in the center of this manual) LIMITED WARRANTY ICON Health & Fitness, Inc. (ICON...
... specific legal rights. until 6 p.m. Before calling, please note the following information: • The MODEL NUMBER of the product (PFTL311041) • The NAME of the product (PROFORM® 345 treadmill) • The SERIAL NUMBER of the product (see the front cover of this manual) • The KEY NUMBER AND DESCRIPTION OF THE PART(S) (see the EXPLODED DRAWING and the PART LIST attached in the center of this manual) LIMITED WARRANTY ICON Health & Fitness, Inc. (ICON...
Uk Manual
Page 3
... specifications described on the walking belt. Do not use an extension cord. 19. If the control system is intended only as described. 3. Do not put the treadmill in a fall and serious injury. 13. Keep children under the treadmill. Use only a single-outlet surge suppressor that all warnings and precautions. 2. Use the treadmill only as an exercise aid in determining heart rate trends in speed. 18. Adjust...
... specifications described on the walking belt. Do not use an extension cord. 19. If the control system is intended only as described. 3. Do not put the treadmill in a fall and serious injury. 13. Keep children under the treadmill. Use only a single-outlet surge suppressor that all warnings and precautions. 2. Use the treadmill only as an exercise aid in determining heart rate trends in speed. 18. Adjust...
Uk Manual
Page 4
When folding or moving the treadmill, make sure that the storage latch is not legible, call the toll-free telephone number on the front cover of this treadmill in -home use , before cleaning the treadmill, and before using. Always unplug the power cord immediately after use only. This treadmill is intended for in a commercial, rental, or institutional setting. DANGER: 25. Never remove the motor hood unless instructed to do so by an authorized...
When folding or moving the treadmill, make sure that the storage latch is not legible, call the toll-free telephone number on the front cover of this treadmill in -home use , before cleaning the treadmill, and before using. Always unplug the power cord immediately after use only. This treadmill is intended for in a commercial, rental, or institutional setting. DANGER: 25. Never remove the motor hood unless instructed to do so by an authorized...

Uk Manual
Page 5
... use the treadmill. Accessory Tray Fan Console Handrail Storage Latch Walking Belt Foot Rail BACK Rear Roller Adjustment Bolts Key/Clip Upright Reset/Off Circuit Breaker Power Cord RIGHT SIDE Cushioned Walking Platform for selecting the new PROFORM® 345 treadmill. BEFORE YOU BEGIN Thank you for maximum exercise comfort 5 For your benefit, read this manual carefully before calling. If you , note the product model number and serial number before you 're not exercising, the 345 treadmill can be folded...
... use the treadmill. Accessory Tray Fan Console Handrail Storage Latch Walking Belt Foot Rail BACK Rear Roller Adjustment Bolts Key/Clip Upright Reset/Off Circuit Breaker Power Cord RIGHT SIDE Cushioned Walking Platform for selecting the new PROFORM® 345 treadmill. BEFORE YOU BEGIN Thank you for maximum exercise comfort 5 For your benefit, read this manual carefully before calling. If you , note the product model number and serial number before you 're not exercising, the 345 treadmill can be folded...
Uk Manual
Page 10
... installed by sudden voltage changes in accordance with GFCI-equipped outlets. This product is grounded before using an adapter. 10 If it must be connected to the walking belt or the walking platform. Such substances will not fit the outlet, have a UL suppressed voltage rating of 400 volts or less and a minimum surge dissipation of your treadmill being turned on the front cover...
... installed by sudden voltage changes in accordance with GFCI-equipped outlets. This product is grounded before using an adapter. 10 If it must be connected to the walking belt or the walking platform. Such substances will not fit the outlet, have a UL suppressed voltage rating of 400 volts or less and a minimum surge dissipation of your treadmill being turned on the front cover...
Uk Manual
Page 11
... operate the console. 1 Insert the key into the console. CONSOLE DIAGRAM Pulse Sensor Key Clip Note: If there is properly plugged in (see page 10). As you exercise, change the speed setting quickly, press the Quick Speed buttons. Note: The console can be pulled from the console, adjust the position of the treadmill. CAUTION: Before operating the console, read the following precautions. • Do not stand on the walking belt when turning on the...
... operate the console. 1 Insert the key into the console. CONSOLE DIAGRAM Pulse Sensor Key Clip Note: If there is properly plugged in (see page 10). As you exercise, change the speed setting quickly, press the Quick Speed buttons. Note: The console can be pulled from the console, adjust the position of the treadmill. CAUTION: Before operating the console, read the following precautions. • Do not stand on the walking belt when turning on the...

Uk Manual
Page 12
... console can display speed and distance in your thumb will be restricted and your pulse will also show your progress with the three displays. Press the Speed + button to the off position and unplug the power cord. 12 Then, place your heart rate if desired. To turn off the fan, press the button a third time. Move the reset/off the pulse sensor for a few minutes after the walking belt is selected, remove the key...
... console can display speed and distance in your thumb will be restricted and your pulse will also show your progress with the three displays. Press the Speed + button to the off position and unplug the power cord. 12 Then, place your heart rate if desired. To turn off the fan, press the button a third time. Move the reset/off the pulse sensor for a few minutes after the walking belt is selected, remove the key...

Uk Manual
Page 16
.... b 2"-3" Rear Roller Bolts c. if the walking belt has shifted to the right, turn the left rear roller bolt clockwise 1/2 of the walking belt 2 to keep the walking belt centered. Using b the allen wrench, turn both rear roller bolts counterclockwise, 1/4 of the walk- Be careful to 3 inches off the walking platform. If the walking belt slips when walked on SOLUTION: a. PROBLEM: The walking belt is properly tightened. Plug in the power cord, insert the key, and run the treadmill for a few minutes. Remove the key and...
.... b 2"-3" Rear Roller Bolts c. if the walking belt has shifted to the right, turn the left rear roller bolt clockwise 1/2 of the walking belt 2 to keep the walking belt centered. Using b the allen wrench, turn both rear roller bolts counterclockwise, 1/4 of the walk- Be careful to 3 inches off the walking platform. If the walking belt slips when walked on SOLUTION: a. PROBLEM: The walking belt is properly tightened. Plug in the power cord, insert the key, and run the treadmill for a few minutes. Remove the key and...
Uk Manual
Page 17
... five workouts each workout with preexisting health problems. The pulse sensor is near the middle number in general. Next, find the proper heart rate for fat burning; This will increase the flexibility of the treadmill until your heart rate is not a medical device. Various factors, including your training zone. For maximum fat burning, adjust the speed and incline of your muscles and will help prevent postexercise problems. EXERCISE...
... five workouts each workout with preexisting health problems. The pulse sensor is near the middle number in general. Next, find the proper heart rate for fat burning; This will increase the flexibility of the treadmill until your heart rate is not a medical device. Various factors, including your training zone. For maximum fat burning, adjust the speed and incline of your muscles and will help prevent postexercise problems. EXERCISE...
Uk Manual
Page 23
... limited in its authorized service centers. To help us assist you specific legal rights. All repairs for a particular purpose is authorized by ICON. This warranty gives you , please be prepared to give the following information: • the MODEL NUMBER of the product (PFTL31104.2) • the NAME of the product (PROFORM 345 treadmill) • the SERIAL NUMBER of the product (see the front cover of this manual...
... limited in its authorized service centers. To help us assist you specific legal rights. All repairs for a particular purpose is authorized by ICON. This warranty gives you , please be prepared to give the following information: • the MODEL NUMBER of the product (PFTL31104.2) • the NAME of the product (PROFORM 345 treadmill) • the SERIAL NUMBER of the product (see the front cover of this manual...


