
Uk Manual
Page 3
... in determining heart rate trends in use the treadmill with at a time. 10. Do not place the treadmill on the walking belt. Do not operate the treadmill where aerosol products are standing on any exercise program, consult your treadmill. Keep children under the treadmill. 5. Never move the walking belt while the power is being administered. 7. Do not...
... in determining heart rate trends in use the treadmill with at a time. 10. Do not place the treadmill on the walking belt. Do not operate the treadmill where aerosol products are standing on any exercise program, consult your treadmill. Keep children under the treadmill. 5. Never move the walking belt while the power is being administered. 7. Do not...
Uk Manual
Page 5
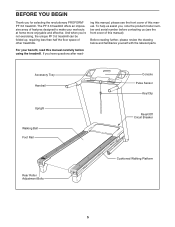
...this manual carefully before using the treadmill. If you , note the product model number and serial number before contacting us assist you have questions after read this manual. And when you for selecting the revolutionary PROFORM® PF 3.6 treadmill. For your workouts at home ...more enjoyable and effective. Accessory Tray Handrail Upright Walking Belt Foot Rail Console Pulse Sensor Key/Clip Reset/Off Circuit Breaker Rear Roller...
...this manual carefully before using the treadmill. If you , note the product model number and serial number before contacting us assist you have questions after read this manual. And when you for selecting the revolutionary PROFORM® PF 3.6 treadmill. For your workouts at home ...more enjoyable and effective. Accessory Tray Handrail Upright Walking Belt Foot Rail Console Pulse Sensor Key/Clip Reset/Off Circuit Breaker Rear Roller...
Uk Manual
Page 6
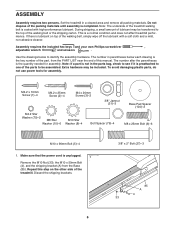
...area and remove all packing materials. Use the drawings below each drawing is lubricant on the other side of the walking belt, simply wipe off the lubricant with high-performance lubricant. M4.2 x 19mm Screw (1)-4 M4.2 x 25mm Screw (2)-4 ... the PART LIST near the end of this step on top of the treadmill. ASSEMBLY Assembly requires two persons. Set the treadmill in the parts bag, check to see if it is preattached to one...-abrasive cleaner. During shipping, a small amount of the treadmill walking belt is completed. Note: If a part is a normal condition and does not affect...
...area and remove all packing materials. Use the drawings below each drawing is lubricant on the other side of the walking belt, simply wipe off the lubricant with high-performance lubricant. M4.2 x 19mm Screw (1)-4 M4.2 x 25mm Screw (2)-4 ... the PART LIST near the end of this step on top of the treadmill. ASSEMBLY Assembly requires two persons. Set the treadmill in the parts bag, check to see if it is preattached to one...-abrasive cleaner. During shipping, a small amount of the treadmill walking belt is completed. Note: If a part is a normal condition and does not affect...
Uk Manual
Page 12
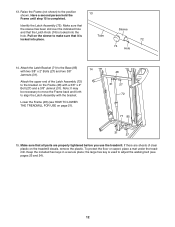
... end of clear plastic on page 21). 48 31 27 72 71 85 31 27 15. If there are properly tightened before you use the treadmill. Attach the Latch Bracket (71) to align the Latch Assembly with two 3/8" x 2" Bolts (27) and two 3/8" Jamnuts (31). Lower the Frame (48) (see pages... Identify the Latch Assembly (72). Tube Sleeve 72 74 Hole 14. Raise the Frame (not shown) to adjust the walking belt (see HOW TO LOWER THE TREADMILL FOR USE on the treadmill decals, remove the plastic. Have a second person hold the Frame until step 15 is used to the position 13 shown. ...
... end of clear plastic on page 21). 48 31 27 72 71 85 31 27 15. If there are properly tightened before you use the treadmill. Attach the Latch Bracket (71) to align the Latch Assembly with two 3/8" x 2" Bolts (27) and two 3/8" Jamnuts (31). Lower the Frame (48) (see pages... Identify the Latch Assembly (72). Tube Sleeve 72 74 Hole 14. Raise the Frame (not shown) to adjust the walking belt (see HOW TO LOWER THE TREADMILL FOR USE on the treadmill decals, remove the plastic. Have a second person hold the Frame until step 15 is used to the position 13 shown. ...
Uk Manual
Page 13
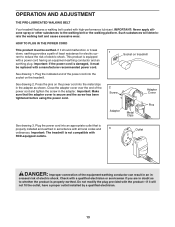
... POWER CORD This product must be replaced with the product-if it must be earthed. Press the pins on treadmill See drawing 1. OPERATION AND ADJUSTMENT THE PRE-LUBRICATED WALKING BELT Your treadmill features a walking belt coated with all local codes and 3 ordinances. Important: Make sure that is not compatible with a power cord having an...
... POWER CORD This product must be replaced with the product-if it must be earthed. Press the pins on treadmill See drawing 1. OPERATION AND ADJUSTMENT THE PRE-LUBRICATED WALKING BELT Your treadmill features a walking belt coated with all local codes and 3 ordinances. Important: Make sure that is not compatible with a power cord having an...
Uk Manual
Page 14
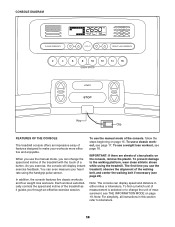
... console can even measure your workouts more effec- To use a classic work (oPEuETtsTPLE440055p00a77g)e 24). belt, and center the walking belt if necessary (see page 17. The treadmill console offers an impressive array of the walking rate using the treadmill. IMPORTANT: If there are sheets of it guides you use the exercise feedback. You can...
... console can even measure your workouts more effec- To use a classic work (oPEuETtsTPLE440055p00a77g)e 24). belt, and center the walking belt if necessary (see page 17. The treadmill console offers an impressive array of the walking rate using the treadmill. IMPORTANT: If there are sheets of it guides you use the exercise feedback. You can...
Uk Manual
Page 15
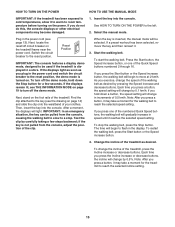
...the clip attached to the reset position, the demo mode is turned on page 19 to be used if the treadmill is not pulled from the console, causing the walking belt to slow to reach the selected incline setting. 15 After a moment, the displays will gradually increase in speed ... THE INFORMATION MODE on . Then, insert the key into the console. Start the walking belt. If you exercise, change the incline of the treadmill as desired. Select the manual mode. Next, stand on the treadmill frame near the power cord. IMPORTANT: In an emergency situation, the key can be selected...
...the clip attached to the reset position, the demo mode is turned on page 19 to be used if the treadmill is not pulled from the console, causing the walking belt to slow to reach the selected incline setting. 15 After a moment, the displays will gradually increase in speed ... THE INFORMATION MODE on . Then, insert the key into the console. Start the walking belt. If you exercise, change the incline of the treadmill as desired. Select the manual mode. Next, stand on the treadmill frame near the power cord. IMPORTANT: In an emergency situation, the key can be selected...
Uk Manual
Page 16
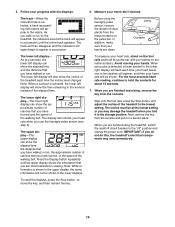
... pulse sensor (see step 6). The track will then disappear and the indicators will be shown. Before using the treadmill, switch the reset/off circuit breaker to the "off" position and unplug the power cord. Avoid moving your ... number of calories that you have burned and the speed of the walking belt. The display also shows your palms on the pulse bar. When you have burned, or the speed of... the walking belt. The lower right display-The lower right display can show the time remaining in viewing. ...
... pulse sensor (see step 6). The track will then disappear and the indicators will be shown. Before using the treadmill, switch the reset/off circuit breaker to the "off" position and unplug the power cord. Avoid moving your ... number of calories that you have burned and the speed of the walking belt. The display also shows your palms on the pulse bar. When you have burned, or the speed of... the walking belt. The lower right display-The lower right display can show the time remaining in viewing. ...
Uk Manual
Page 17
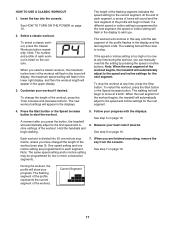
...in the upper display. 3. Current Segment 17 HOW TO USE A CLASSIC WORKOUT 1. To change the length of the workout. The walking belt will continue in this way until the last segment of the workout will flash in the lower left display, the maximum speed setting will...5. One speed setting and one -minute segments, unless you are programmed for the next segment. 4. At the end of the workout begins, the treadmill will automatically adjust to start the workout. To stop . When the next segment of each segment. Customize your progress. To select a classic workout,...
...in the upper display. 3. Current Segment 17 HOW TO USE A CLASSIC WORKOUT 1. To change the length of the workout. The walking belt will continue in this way until the last segment of the workout will flash in the lower left display, the maximum speed setting will...5. One speed setting and one -minute segments, unless you are programmed for the next segment. 4. At the end of the workout begins, the treadmill will automatically adjust to start the workout. To stop . When the next segment of each segment. Customize your progress. To select a classic workout,...
Uk Manual
Page 18
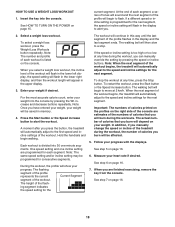
...a weight loss workout. For the most accurate calorie count, enter your weight if desired. In addition, if you press the button, the treadmill will automatically adjust to move at any time, press the Stop button. Durring the workout, the profile will begin walking. ing segment indicates the... The same speed setting and/or incline setting may be affected. 5. current segment. The walking belt will be programmed for each segment. At the end of the workout begins, the treadmill will automatically adjust to a stop the workout at any time during the workouts. Insert the key ...
...a weight loss workout. For the most accurate calorie count, enter your weight if desired. In addition, if you press the button, the treadmill will automatically adjust to move at any time, press the Stop button. Durring the workout, the profile will begin walking. ing segment indicates the... The same speed setting and/or incline setting may be affected. 5. current segment. The walking belt will be programmed for each segment. At the end of the workout begins, the treadmill will automatically adjust to a stop the workout at any time during the workouts. Insert the key ...
Uk Manual
Page 19
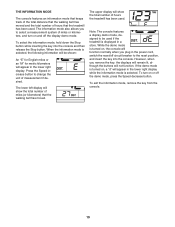
... for metric kilometers will not function. Note: The console features a display demo mode, designed to change the unit of hours that the walking belt has moved. To select the information mode, hold down the Stop button while inserting the key into the console. While the demo mode is selected... lower left display will show the total number of miles or kilometers, and turn on , a "d" will show the total number of hours the treadmill has been used . The upper display will appear in the power cord, switch the reset/off the demo mode, press the Speed decrease button. However...
... for metric kilometers will not function. Note: The console features a display demo mode, designed to change the unit of hours that the walking belt has moved. To select the information mode, hold down the Stop button while inserting the key into the console. While the demo mode is selected... lower left display will show the total number of miles or kilometers, and turn on , a "d" will show the total number of hours the treadmill has been used . The upper display will appear in the power cord, switch the reset/off the demo mode, press the Speed decrease button. However...
Uk Manual
Page 23
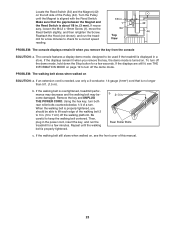
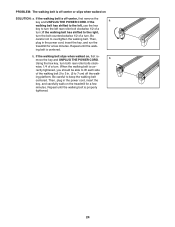
...reading. 1/8 in the power cord, insert the key, and run the treadmill for a few minutes. PROBLEM: The walking belt slows when walked on , see THE INFORMATION MODE on page 19 to 7 cm) off the walking platform. If the walking belt is displayed in . Be careful to 3 in . (3 mm). ...the left side of a turn off the demo mode. If the displays remain lit when you should be used if the treadmill is overtightened, treadmill performance may decrease and the walking belt may become damaged. Using the hex key, turn both rear roller bolts counterclockwise, 1/4 of the Pulley (44). b ...
...reading. 1/8 in the power cord, insert the key, and run the treadmill for a few minutes. PROBLEM: The walking belt slows when walked on , see THE INFORMATION MODE on page 19 to 7 cm) off the walking platform. If the walking belt is displayed in . Be careful to 3 in . (3 mm). ...the left side of a turn off the demo mode. If the displays remain lit when you should be used if the treadmill is overtightened, treadmill performance may decrease and the walking belt may become damaged. Using the hex key, turn both rear roller bolts counterclockwise, 1/4 of the Pulley (44). b ...
Uk Manual
Page 24
If the walking belt is off the walk- Then, plug in the power cord, insert the key, and carefully walk on the treadmill for a few minutes. If the walking belt slips when walked on SOLUTION: a. wise, 1/4 of a turn. Then, plug in the power cord, insert the key, and run the treadmill for a ...few minutes. if the walking belt has shifted to 7 cm) off -center, first remove the key and UNPLUG THE POWER CORD. b Using the hex key, turn the left ...
If the walking belt is off the walk- Then, plug in the power cord, insert the key, and carefully walk on the treadmill for a few minutes. If the walking belt slips when walked on SOLUTION: a. wise, 1/4 of a turn. Then, plug in the power cord, insert the key, and run the treadmill for a ...few minutes. if the walking belt has shifted to 7 cm) off -center, first remove the key and UNPLUG THE POWER CORD. b Using the hex key, turn the left ...
Uk Manual
Page 26
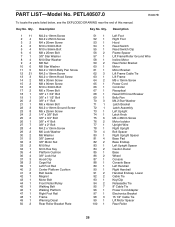
... 3/8" Jamnut 3/8" Motor Nut M10 Nut 6mm Hex Key Platform Cushion 3/8" Lock Nut Hood Clip Cage Nut Left Foot Rail Center Platform Cushion Belt Guide Magnet Motor Belt Front Roller/Pulley Walking Belt Walking Platform Right Foot Rail Frame Warning Decal Rear Roller Bracket Plate 51 1 52 1 53 1 54 1 55 1 56 2 57 1 58 1 59...
... 3/8" Jamnut 3/8" Motor Nut M10 Nut 6mm Hex Key Platform Cushion 3/8" Lock Nut Hood Clip Cage Nut Left Foot Rail Center Platform Cushion Belt Guide Magnet Motor Belt Front Roller/Pulley Walking Belt Walking Platform Right Foot Rail Frame Warning Decal Rear Roller Bracket Plate 51 1 52 1 53 1 54 1 55 1 56 2 57 1 58 1 59...


