
Uk Manual
Page 1
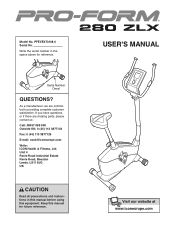
... Write: ICON Health & Fitness, Ltd. Keep this equipment. PFEVEX73108.0 Serial No. If you have questions, or if there are committed to providing complete customer satisfaction. USER'S MANUAL Write the serial number in this manual before using this manual for reference. Unit 4 Revie Road Industrial Estate Revie Road, Beeston Leeds, LS11 8JG UK CAUTION Read all precautions and instructions in the space above for...
... Write: ICON Health & Fitness, Ltd. Keep this equipment. PFEVEX73108.0 Serial No. If you have questions, or if there are committed to providing complete customer satisfaction. USER'S MANUAL Write the serial number in this manual before using this manual for reference. Unit 4 Revie Road Industrial Estate Revie Road, Beeston Leeds, LS11 8JG UK CAUTION Read all precautions and instructions in the space above for...
Uk Manual
Page 2
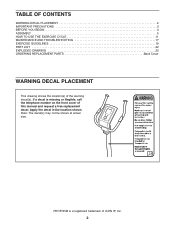
... actual size. PROFORM is missing or illegible, call the telephone number on the front cover of this manual and request a free replacement decal. TABLE OF CONTENTS WARNING DECAL PLACEMENT 2 IMPORTANT PRECAUTIONS 3 BEFORE YOU BEGIN 4 ASSEMBLY 5 HOW TO USE THE EXERCISE CYCLE 11 MAINTENANCE AND TROUBLESHOOTING 17 EXERCISE GUIDELINES 19 PART LIST 22 EXPLODED DRAWING 23 ORDERING REPLACEMENT PARTS Back Cover WARNING DECAL PLACEMENT This drawing shows the location(s) of ICON...
... actual size. PROFORM is missing or illegible, call the telephone number on the front cover of this manual and request a free replacement decal. TABLE OF CONTENTS WARNING DECAL PLACEMENT 2 IMPORTANT PRECAUTIONS 3 BEFORE YOU BEGIN 4 ASSEMBLY 5 HOW TO USE THE EXERCISE CYCLE 11 MAINTENANCE AND TROUBLESHOOTING 17 EXERCISE GUIDELINES 19 PART LIST 22 EXPLODED DRAWING 23 ORDERING REPLACEMENT PARTS Back Cover WARNING DECAL PLACEMENT This drawing shows the location(s) of ICON...
Uk Manual
Page 3
... manual. 7. Place your exercise cycle on your exercise cycle before using your exercise cycle. Make sure that there is the responsibility of the owner to mount, dismount, and use your back. 11. Replace any exercise program, consult your exercise cycle only as an exercise aid in determining heart rate trends in general. 9. do not wear loose clothes that all users of the exercise cycle are adequately informed...
... manual. 7. Place your exercise cycle on your exercise cycle before using your exercise cycle. Make sure that there is the responsibility of the owner to mount, dismount, and use your back. 11. Replace any exercise program, consult your exercise cycle only as an exercise aid in determining heart rate trends in general. 9. do not wear loose clothes that all users of the exercise cycle are adequately informed...
Uk Manual
Page 4
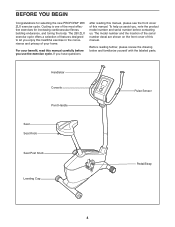
... , note the product model number and serial number before contacting us assist you use the exercise cycle. To help us . Handlebar Console Pivot Handle Pulse Sensor Seat Seat Knob Seat Post Knob Leveling Cap Pedal/Strap 4 BEFORE YOU BEGIN Congratulations for increasing cardiovascular fitness, building endurance, and toning the body. Before reading further, please review the drawing below and familiarize yourself with the labeled parts. For your home. If you have...
... , note the product model number and serial number before contacting us assist you use the exercise cycle. To help us . Handlebar Console Pivot Handle Pulse Sensor Seat Seat Knob Seat Post Knob Leveling Cap Pedal/Strap 4 BEFORE YOU BEGIN Congratulations for increasing cardiovascular fitness, building endurance, and toning the body. Before reading further, please review the drawing below and familiarize yourself with the labeled parts. For your home. If you have...
Uk Manual
Page 5
... the key number of the part, from the PART LIST near the end of this manual. The number in the hardware kit, check to see if it has been preassembled. If a part is completed. M8 Split Washer (42)-3 M4 x 15mm Screw (48)-5 M8 x 16mm Patch Screw (34)-3 M8 x 60mm Patch Screw (30)-4 M10 x 70mm Patch Screw (33)-2 5 Do not dispose of the exercise...
... the key number of the part, from the PART LIST near the end of this manual. The number in the hardware kit, check to see if it has been preassembled. If a part is completed. M8 Split Washer (42)-3 M4 x 15mm Screw (48)-5 M8 x 16mm Patch Screw (34)-3 M8 x 60mm Patch Screw (30)-4 M10 x 70mm Patch Screw (33)-2 5 Do not dispose of the exercise...
Uk Manual
Page 7
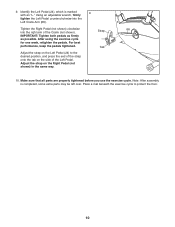
... Upright (13), turn it counterclockwise, push it toward the Upright, and then turn it clockwise again. While another person holds the Handlebar (50) near the Frame (1), connect the Upper Wire 3 Harness (23) to the Lower Wire Harness (68). Repeat this process until the Pivot Handle is tight. Note: The Pivot Handle (55) functions like a ratchet. Attach the Rear Cover (3) to the Upright...
... Upright (13), turn it counterclockwise, push it toward the Upright, and then turn it clockwise again. While another person holds the Handlebar (50) near the Frame (1), connect the Upper Wire 3 Harness (23) to the Lower Wire Harness (68). Repeat this process until the Pivot Handle is tight. Note: The Pivot Handle (55) functions like a ratchet. Attach the Rear Cover (3) to the Upright...
Uk Manual
Page 8
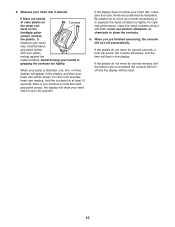
... cold temperatures, allow it to warm to the Pulse Wires (59). Remove the screw, remove the battery cover, and insert the batteries into the Upright (13). Screw Battery Cover Batteries 6. Next, connect the console pulse wires to room temperature before inserting batteries. Tip: Avoid pinching the wires. Make sure to orient the batteries as shown by the diagram inside the battery compart- nents. Otherwise, you may damage the console displays or other electronic compo- 5.
... cold temperatures, allow it to warm to the Pulse Wires (59). Remove the screw, remove the battery cover, and insert the batteries into the Upright (13). Screw Battery Cover Batteries 6. Next, connect the console pulse wires to room temperature before inserting batteries. Tip: Avoid pinching the wires. Make sure to orient the batteries as shown by the diagram inside the battery compart- nents. Otherwise, you may damage the console displays or other electronic compo- 5.
Uk Manual
Page 9
... hole in the Frame into the hole in the Seat Post. Look underneath the Seat (12) and locate the Seat Block (57) inside the Seat Carriage (58). Make sure that the Seat Post Knob is located on the Seat Post (5). Set the Seat Carriage (58) in the Seat Post (5). 58 57 1 Adjustment Holes 5 Hole 9 9 Adjust the Seat Post to the desired height and insert the...
... hole in the Frame into the hole in the Seat Post. Look underneath the Seat (12) and locate the Seat Block (57) inside the Seat Carriage (58). Make sure that the Seat Post Knob is located on the Seat Post (5). Set the Seat Carriage (58) in the Seat Post (5). 58 57 1 Adjustment Holes 5 Hole 9 9 Adjust the Seat Post to the desired height and insert the...
Uk Manual
Page 10
... pedals. Make sure that all parts are properly tightened before you use the exercise cycle. Note: After assembly is marked with an "L." Using an adjustable wrench, firmly 9 tighten the Left Pedal counterclockwise into the right arm of the Left Pedal. Tab Adjust the strap on the Left Pedal (24) to protect the floor. 10 Adjust the strap on the side of the Crank (not shown). Identify the Left Pedal...
... pedals. Make sure that all parts are properly tightened before you use the exercise cycle. Note: After assembly is marked with an "L." Using an adjustable wrench, firmly 9 tighten the Left Pedal counterclockwise into the right arm of the Left Pedal. Tab Adjust the strap on the Left Pedal (24) to protect the floor. 10 Adjust the strap on the side of the Crank (not shown). Identify the Left Pedal...
Uk Manual
Page 11
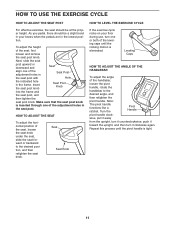
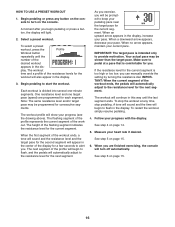
Insert the seat post knob Seat Post Knob into the frame and the seat post, and then tighten the seat post knob. wise, pull it away from the upright, turn it counterclockwise, push it clockwise again. Seat Seat Knob HOW TO LEVEL THE EXERCISE CYCLE If the exercise cycle rocks on your knees when the pedals are in the seat post. Note: The pivot handle functions like a ratchet...
Insert the seat post knob Seat Post Knob into the frame and the seat post, and then tighten the seat post knob. wise, pull it away from the upright, turn it counterclockwise, push it clockwise again. Seat Seat Knob HOW TO LEVEL THE EXERCISE CYCLE If the exercise cycle rocks on your knees when the pedals are in the seat post. Note: The pivot handle functions like a ratchet...
Uk Manual
Page 12
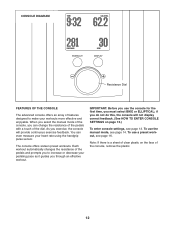
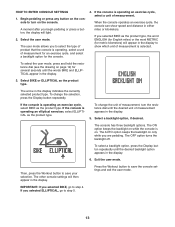
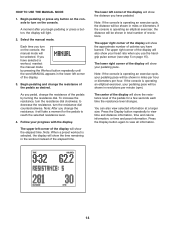
... display correct feedback. (See HOW TO ENTER CONSOLE SETTINGS on the face of the pedals and prompts you to make your heart rate using the handgrip pulse sensor. As you through an effective workout. Each workout automatically changes the resistance of the console, remove the plastic. 12 To use a preset workout, see page 14. You can change the resistance of the pedals with a touch of the console, you must select BIKE or ELLIPTICAL...
... display correct feedback. (See HOW TO ENTER CONSOLE SETTINGS on the face of the pedals and prompts you to make your heart rate using the handgrip pulse sensor. As you through an effective workout. Each workout automatically changes the resistance of the console, remove the plastic. 12 To use a preset workout, see page 14. You can change the resistance of the pedals with a touch of the console, you must select BIKE or ELLIPTICAL...
Uk Manual
Page 13
... in the display. 6. The arrow in either miles or kilometers. To change the selection, press the Display button repeatedly. Press the Workout button to step 4. Select the user mode. If you selected BIKE, go to save the console settings and exit the user mode. To change the unit of measurement, turn on the console to select the type of measurement appears in the display to show speed and distance in the display indicates the...
... in the display. 6. The arrow in either miles or kilometers. To change the selection, press the Display button repeatedly. Press the Workout button to step 4. Select the user mode. If you selected BIKE, go to save the console settings and exit the user mode. To change the unit of measurement, turn on the console to select the type of measurement appears in the display to show speed and distance in the display indicates the...
Uk Manual
Page 14
... approximate number of calories you have selected a workout, reselect the manual mode by turning the resistance dial. The lower right corner of the display will show your pedaling pace will be shown in the lower left corner of the display will also show the elapsed time. Note: If the console is operating an elliptical exerciser, the distance will light. 2. A moment after you use the handgrip pulse sensor (see step...
... approximate number of calories you have selected a workout, reselect the manual mode by turning the resistance dial. The lower right corner of the display will show your pedaling pace will be shown in the lower left corner of the display will also show the elapsed time. Note: If the console is operating an elliptical exerciser, the distance will light. 2. A moment after you use the handgrip pulse sensor (see step...
Uk Manual
Page 15
... be reset. 15 never use alcohol, abrasives, or chemicals to hold the handgrip pulse sensor, the display will appear in the display. If the pedals do not move for several minutes and the buttons are positioned as described. If there are finished exercising, the console will be shown. For the most accurate heart rate reading, hold the hand- If the pedals do not move your...
... be reset. 15 never use alcohol, abrasives, or chemicals to hold the handgrip pulse sensor, the display will appear in the display. If the pedals do not move for several minutes and the buttons are positioned as described. If there are finished exercising, the console will be shown. For the most accurate heart rate reading, hold the hand- If the pedals do not move your...
Uk Manual
Page 16
... to start the workout. If the resistance level for the current segment. To stop pedaling. See step 5 on page 15. 16 Begin pedaling or press any time, stop the workout at any button on the console to pedal at a pace that is divided into several one target pace (speed) are finished exercising, the console will be programmed for each segment. Make sure to turn off automatically. Begin pedaling to...
... to start the workout. If the resistance level for the current segment. To stop pedaling. See step 5 on page 15. 16 Begin pedaling or press any time, stop the workout at any button on the console to pedal at a pace that is divided into several one target pace (speed) are finished exercising, the console will be programmed for each segment. Make sure to turn off automatically. Begin pedaling to...
Uk Manual
Page 17
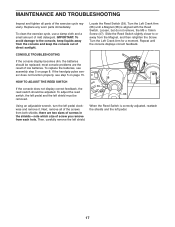
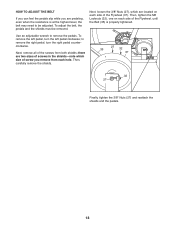
... adjusted. Next, remove all parts of the exercise cycle regularly. there are the result of direct sunlight. To clean the exercise cycle, use a damp cloth and a small amount of screw you remove from the Magnet, and then retighten the Screw. To adjust the reed switch, the left pedal and the left pedal clockwise and remove it. Then, carefully remove the left pedal. 17 To replace the batteries, see step 5 on page 8. CONSOLE TROUBLESHOOTING...
... adjusted. Next, remove all parts of the exercise cycle regularly. there are the result of direct sunlight. To clean the exercise cycle, use a damp cloth and a small amount of screw you remove from the Magnet, and then retighten the Screw. To adjust the reed switch, the left pedal and the left pedal clockwise and remove it. Then, carefully remove the left pedal. 17 To replace the batteries, see step 5 on page 8. CONSOLE TROUBLESHOOTING...
Uk Manual
Page 18
... left pedal, turn the right pedal counterclockwise. Next, remove all of screw you are pedaling, even when the resistance is properly tightened. To remove the left pedal clockwise; Then, tighten the M6 Locknuts (32), one on each side of the Flywheel, until the Belt (35) is at the highest level, the belt may need to be removed. HOW TO ADJUST THE BELT If you can feel the pedals slip...
... left pedal, turn the right pedal counterclockwise. Next, remove all of screw you are pedaling, even when the resistance is properly tightened. To remove the left pedal clockwise; Then, tighten the M6 Locknuts (32), one on each side of the Flywheel, until the Belt (35) is at the highest level, the belt may need to be removed. HOW TO ADJUST THE BELT If you can feel the pedals slip...
Uk Manual
Page 19
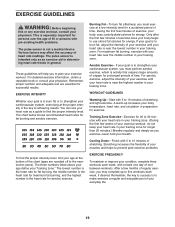
... your body begin to 30 minutes with pre-existing health problems. The pulse sensor is activity that requires large amounts of oxygen for prolonged periods of your exercise until your training zone. Only after the first few weeks of your exercise workout, do not keep your heart rate in your breath. For aerobic exercise, adjust the intensity of time. Training Zone Exercise-Exercise for 20 to use...
... your body begin to 30 minutes with pre-existing health problems. The pulse sensor is activity that requires large amounts of oxygen for prolonged periods of your exercise until your training zone. Only after the first few weeks of your exercise workout, do not keep your heart rate in your breath. For aerobic exercise, adjust the intensity of time. Training Zone Exercise-Exercise for 20 to use...
Uk Manual
Page 22
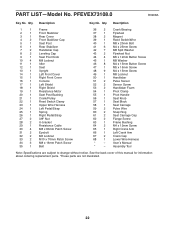
... 1 Seat Block 58 1 Seat Carriage 59 2 Pulse Wire 60 2 Snap Ring 61 2 Seat Carriage Cap 62 2 Flange Screw 63 1 Frame Bushing 64 2 M4 x 12mm Screw 65 1 Right Crank Arm 66 1 Left Crank Arm 67 2 Crank Cap 68 1 Lower Wire Harness * - Assembly Tool Note: Specifications are not illustrated. 22 Userʼs Manual * - PFEVEX73108.0 R0908A Key No. See the back cover of this manual for information about ordering replacement parts. *These parts are subject to change without notice. PART LIST-Model...
... 1 Seat Block 58 1 Seat Carriage 59 2 Pulse Wire 60 2 Snap Ring 61 2 Seat Carriage Cap 62 2 Flange Screw 63 1 Frame Bushing 64 2 M4 x 12mm Screw 65 1 Right Crank Arm 66 1 Left Crank Arm 67 2 Crank Cap 68 1 Lower Wire Harness * - Assembly Tool Note: Specifications are not illustrated. 22 Userʼs Manual * - PFEVEX73108.0 R0908A Key No. See the back cover of this manual for information about ordering replacement parts. *These parts are subject to change without notice. PART LIST-Model...
Uk Manual
Page 24
ORDERING REPLACEMENT PARTS To order replacement parts, please see the PART LIST and the EXPLODED DRAWING near the end of this manual) Part No. 269244 R0908A Printed in China © 2008 ICON IP, Inc. To help us assist you, be prepared to provide the following information when contacting us: • the model number and serial number of the product (see the front cover of this manual) • the name of the product (see the front cover of this manual) • the key number and description of the replacement part(s) (see the front cover of this manual.
ORDERING REPLACEMENT PARTS To order replacement parts, please see the PART LIST and the EXPLODED DRAWING near the end of this manual) Part No. 269244 R0908A Printed in China © 2008 ICON IP, Inc. To help us assist you, be prepared to provide the following information when contacting us: • the model number and serial number of the product (see the front cover of this manual) • the name of the product (see the front cover of this manual) • the key number and description of the replacement part(s) (see the front cover of this manual.


