
English Manual
Page 2
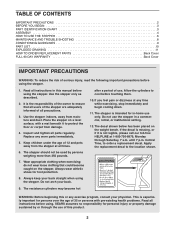
...TABLE OF CONTENTS IMPORTANT PRECAUTIONS 2 BEFORE YOU BEGIN 3 PART IDENTIFICATION CHART 3 ASSEMBLY 4 HOW TO USE THE STEPPER 6 MAINTENANCE AND TROUBLE-SHOOTING 8 CONDITIONING GUIDELINES 9 PART LIST 10 EXPLODED DRAWING 11 HOW TO ORDER REPLACEMENT PARTS Back Cover FULL 90 DAY WARRANTY Back Cover IMPORTANT PRECAUTIONS...responsibility of the owner to ensure that could become hot WARNING: Before beginning this product. 2 Use the stepper indoors, away from the stepper at any worn parts immediately. 5. It is missing, or if it to cool before using . Always keep your back....
...TABLE OF CONTENTS IMPORTANT PRECAUTIONS 2 BEFORE YOU BEGIN 3 PART IDENTIFICATION CHART 3 ASSEMBLY 4 HOW TO USE THE STEPPER 6 MAINTENANCE AND TROUBLE-SHOOTING 8 CONDITIONING GUIDELINES 9 PART LIST 10 EXPLODED DRAWING 11 HOW TO ORDER REPLACEMENT PARTS Back Cover FULL 90 DAY WARRANTY Back Cover IMPORTANT PRECAUTIONS...responsibility of the owner to ensure that could become hot WARNING: Before beginning this product. 2 Use the stepper indoors, away from the stepper at any worn parts immediately. 5. It is missing, or if it to cool before using . Always keep your back....
English Manual
Page 3
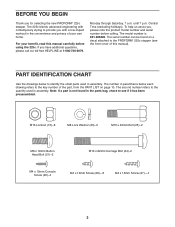
The model number is not found on page 10. The number in parenthesis below to identify the small parts used in the parts bag, check to the PROFORM¨ 225c stepper (see if it has been preassembled. BEFORE YOU BEGIN Thank you have additional questions, please call our toll-free HELPLINE at 1-800-736-6879, Monday...
The model number is not found on page 10. The number in parenthesis below to identify the small parts used in the parts bag, check to the PROFORM¨ 225c stepper (see if it has been preassembled. BEFORE YOU BEGIN Thank you have additional questions, please call our toll-free HELPLINE at 1-800-736-6879, Monday...
English Manual
Page 4
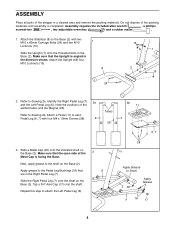
Make sure that the Upright is facing the Base. Identify the Right Pedal Leg (7) 2a and the Left Pedal Leg (6). Note the positions of the stepper in the direction shown. Attach the Upright with two M10 x 82mm Carriage Bolts (24) and two M10 1 Locknuts (15). Refer to drawing 2a. Next, ...onto the indicated shaft on the Base (2). Make sure that 6 are in the Base (2). Tap a 3/4Ó Axle Cap (17) onto the shaft. ASSEMBLY Place all parts of the welded tubes and the Magnet (26). Refer to drawing 2b. Slide the Right Pedal Leg (7) onto the shaft on the Base (2). Do not...
Make sure that the Upright is facing the Base. Identify the Right Pedal Leg (7) 2a and the Left Pedal Leg (6). Note the positions of the stepper in the direction shown. Attach the Upright with two M10 x 82mm Carriage Bolts (24) and two M10 1 Locknuts (15). Refer to drawing 2a. Next, ...onto the indicated shaft on the Base (2). Make sure that 6 are in the Base (2). Tap a 3/4Ó Axle Cap (17) onto the shaft. ASSEMBLY Place all parts of the welded tubes and the Magnet (26). Refer to drawing 2b. Slide the Right Pedal Leg (7) onto the shaft on the Base (2). Do not...
English Manual
Page 5
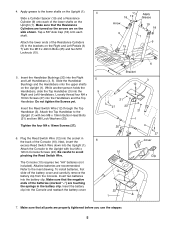
...yet. Be careful to the Upright with four M4 x 12mm Console Screws (22). Alkaline batteries are properly tightened before you use the stepper. 5 Make sure that the Resistance Cylinders are turned so the arrows are touching the springs in the battery clip. Slide the Handlebar Bushings... person holds the Handlebars, slide the Top Handlebar (3) into the Console and reattach the battery cover. 12 22 1 7. 4. Make sure that all parts are recommended. Tighten the four M4 x 16mm Screws (27). Insert the battery clip into the 5 Right and Left Handlebars. Next, insert the excess...
...yet. Be careful to the Upright with four M4 x 12mm Console Screws (22). Alkaline batteries are properly tightened before you use the stepper. 5 Make sure that the Resistance Cylinders are turned so the arrows are touching the springs in the battery clip. Slide the Handlebar Bushings... person holds the Handlebars, slide the Top Handlebar (3) into the Console and reattach the battery cover. 12 22 1 7. 4. Make sure that all parts are recommended. Tighten the four M4 x 16mm Screws (27). Insert the battery clip into the 5 Right and Left Handlebars. Next, insert the excess...
English Manual
Page 8
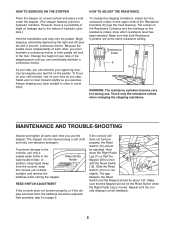
...the resistance collars on the resistance collars show which resistance level has been selected. MAINTENANCE AND TROUBLE-SHOOTING Inspect and tighten all parts each other, you exercise. The arrows on the Resistance Cylinders and the markings on the upper ends of slight oil leakage...soft cloth and mild, non-abrasive detergent. Because the pedals move independently of direct sunlight, and remove the batteries when storing the stepper. Stand erect or lean forward slightly as you can be adjusted. Begin stepping, alternately depressing the right and left pedals with the...
...the resistance collars on the resistance collars show which resistance level has been selected. MAINTENANCE AND TROUBLE-SHOOTING Inspect and tighten all parts each other, you exercise. The arrows on the Resistance Cylinders and the markings on the upper ends of slight oil leakage...soft cloth and mild, non-abrasive detergent. Because the pedals move independently of direct sunlight, and remove the batteries when storing the stepper. Stand erect or lean forward slightly as you can be adjusted. Begin stepping, alternately depressing the right and left pedals with the...
English Manual
Page 12
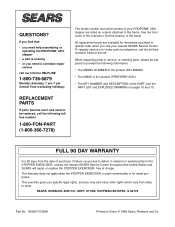
...of charge. When requesting help assembling or operating the PROFORM¨ 225c stepper ¥ a part is used commercially or for immediate purchase or special order when you visit your PROFORM¨ 225c stepper are available for rental purposes. All replacement parts are listed on pages 10 and 11). SEARS, ...ROEBUCK AND CO., DEPT. 817WA, HOFFMAN ESTATES, IL 60179 Part No. 152065 R1298A Printed in this manual to...
...of charge. When requesting help assembling or operating the PROFORM¨ 225c stepper ¥ a part is used commercially or for immediate purchase or special order when you visit your PROFORM¨ 225c stepper are available for rental purposes. All replacement parts are listed on pages 10 and 11). SEARS, ...ROEBUCK AND CO., DEPT. 817WA, HOFFMAN ESTATES, IL 60179 Part No. 152065 R1298A Printed in this manual to...


