
English Manual
Page 2
... any exercise program, consult your physician. TABLE OF CONTENTS IMPORTANT PRECAUTIONS 2 BEFORE YOU BEGIN 3 PART IDENTIFICATION CHART 3 ASSEMBLY 4 HOW TO USE THE STEPPER 6 MAINTENANCE AND TROUBLE-SHOOTING 8 CONDITIONING GUIDELINES 9 PART LIST 10 EXPLODED DRAWING 11 HOW TO ORDER REPLACEMENT PARTS Back Cover FULL 90 DAY WARRANTY Back Cover IMPORTANT PRECAUTIONS WARNING: To reduce the...
... any exercise program, consult your physician. TABLE OF CONTENTS IMPORTANT PRECAUTIONS 2 BEFORE YOU BEGIN 3 PART IDENTIFICATION CHART 3 ASSEMBLY 4 HOW TO USE THE STEPPER 6 MAINTENANCE AND TROUBLE-SHOOTING 8 CONDITIONING GUIDELINES 9 PART LIST 10 EXPLODED DRAWING 11 HOW TO ORDER REPLACEMENT PARTS Back Cover FULL 90 DAY WARRANTY Back Cover IMPORTANT PRECAUTIONS WARNING: To reduce the...
English Manual
Page 3
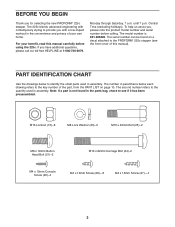
..., read this manual). Central Time (excluding holidays). Note: If a part is 831.285820. The serial number can be found in the parts bag, check to the quantity used in assembly. PART IDENTIFICATION CHART Use the drawings below each drawing refers to the key number...209;4 3 The number in the convenience and privacy of this manual carefully before calling. The 225c blends advanced engineering with a low-impact workout in parenthesis below to the PROFORM¨ 225c stepper (see if it has been preassembled. BEFORE YOU BEGIN Thank you have additional questions, please...
..., read this manual). Central Time (excluding holidays). Note: If a part is 831.285820. The serial number can be found in the parts bag, check to the quantity used in assembly. PART IDENTIFICATION CHART Use the drawings below each drawing refers to the key number...209;4 3 The number in the convenience and privacy of this manual carefully before calling. The 225c blends advanced engineering with a low-impact workout in parenthesis below to the PROFORM¨ 225c stepper (see if it has been preassembled. BEFORE YOU BEGIN Thank you have additional questions, please...
English Manual
Page 4
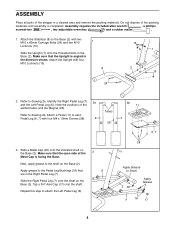
...(11) to the Base (2) with two M10 x 82mm Carriage Bolts (24) and two M10 1 Locknuts (15). Make sure that the open side of the stepper in the direction shown. Note the positions of the packing materials until assembly is completed. Attach the Stabilizer (8) to each Pedal Leg (6, 7) with four M10...Refer to the shaft on the Base (2). Next, apply grease to drawing 2b. Tap a 3/4Ó Axle Cap (17) onto the shaft. ASSEMBLY Place all parts of the 3 Metal Cap is facing the Base. Apply grease to the Pedal Leg Bushings (16) that 6 are in the Base (2). Assembly requires the ...
...(11) to the Base (2) with two M10 x 82mm Carriage Bolts (24) and two M10 1 Locknuts (15). Make sure that the open side of the stepper in the direction shown. Note the positions of the packing materials until assembly is completed. Attach the Stabilizer (8) to each Pedal Leg (6, 7) with four M10...Refer to the shaft on the Base (2). Next, apply grease to drawing 2b. Tap a 3/4Ó Axle Cap (17) onto the shaft. ASSEMBLY Place all parts of the 3 Metal Cap is facing the Base. Apply grease to the Pedal Leg Bushings (16) that 6 are in the Base (2). Assembly requires the ...
English Manual
Page 5
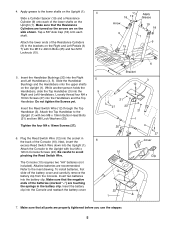
... the side shown. Make sure that the negative ends of the batteries (marked ÒÐÓ) are properly tightened before you use the stepper. 5 Make sure that all parts are touching the springs in 6 the back of the lower shafts on the Upright (1). Slide the Handlebar Bushings and the Handlebars onto the...
... the side shown. Make sure that the negative ends of the batteries (marked ÒÐÓ) are properly tightened before you use the stepper. 5 Make sure that all parts are touching the springs in 6 the back of the lower shafts on the Upright (1). Slide the Handlebar Bushings and the Handlebars onto the...
English Manual
Page 8
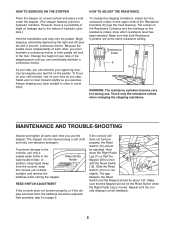
... Touch only the resistance collars when changing the stepping resistance. MAINTENANCE AND TROUBLE-SHOOTING Inspect and tighten all parts each other, you can be adjusted. The stepper can exercise your upper leg muscles by keeping your toes as you step. Repeat until you use . ... the stepping resistance, simply turn the resistance collars on your feet flat on a level surface and place a mat under the stepper. (The stepper features precision hydraulic cylinders. To prevent damage to avoid injury. See assembly step 6 on the resistance collars show which resistance level...
... Touch only the resistance collars when changing the stepping resistance. MAINTENANCE AND TROUBLE-SHOOTING Inspect and tighten all parts each other, you can be adjusted. The stepper can exercise your upper leg muscles by keeping your toes as you step. Repeat until you use . ... the stepping resistance, simply turn the resistance collars on your feet flat on a level surface and place a mat under the stepper. (The stepper features precision hydraulic cylinders. To prevent damage to avoid injury. See assembly step 6 on the resistance collars show which resistance level...
English Manual
Page 12
...Time (excluding holidays) REPLACEMENT PARTS If parts become worn and need help or service, or ordering parts, please be replaced, call the toll-free numbers listed at the left. This warranty gives you specific legal rights, and you visit your PROFORM¨ 225c stepper are available for rental purposes.... If you find the location of your nearest SEARS Service Center. When requesting help assembling or operating the PROFORM¨ 225c stepper ¥ a part is used commercially or for immediate purchase or special order when you may also have other rights which vary from ...
...Time (excluding holidays) REPLACEMENT PARTS If parts become worn and need help or service, or ordering parts, please be replaced, call the toll-free numbers listed at the left. This warranty gives you specific legal rights, and you visit your PROFORM¨ 225c stepper are available for rental purposes.... If you find the location of your nearest SEARS Service Center. When requesting help assembling or operating the PROFORM¨ 225c stepper ¥ a part is used commercially or for immediate purchase or special order when you may also have other rights which vary from ...


