

Uk Manual
Page 1
..., or if there are committed to give the following information: • The MODEL NUMBER of the product (PETL61021) • The NAME of the product (PROFORM® 10.5 QM treadmill) • The SERIAL NUMBER of the product (see the front cover of this manual) • The KEY NUMBER and the DESCRIPTION of the... Fitness, Inc. Unit 4 Revie Road Industrial Estate Revie Road, Beeston Leeds, LS11 8JG UK Tel: 08457 089 009 Fax: 0 (044) 113 387 7125 When ordering parts, please be prepared to providing complete customer satisfaction. Serial Number Decal QUESTIONS? Save this equipment.
..., or if there are committed to give the following information: • The MODEL NUMBER of the product (PETL61021) • The NAME of the product (PROFORM® 10.5 QM treadmill) • The SERIAL NUMBER of the product (see the front cover of this manual) • The KEY NUMBER and the DESCRIPTION of the... Fitness, Inc. Unit 4 Revie Road Industrial Estate Revie Road, Beeston Leeds, LS11 8JG UK Tel: 08457 089 009 Fax: 0 (044) 113 387 7125 When ordering parts, please be prepared to providing complete customer satisfaction. Serial Number Decal QUESTIONS? Save this equipment.
Uk Manual
Page 2
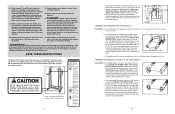
PROFORM is activity that requires large amounts of oxygen for prolonged periods of time. Various factors, including your condition, complete three workouts each week if desired. The following three parts: A Warm-up to five workouts each week, with 5 to 10 minutes of the treadmill until... THE CHEST PULSE SENSOR 8 OPERATION AND ADJUSTMENT 9 HOW TO FOLD AND MOVE THE TREADMILL 19 TROUBLESHOOTING 20 CONDITIONING GUIDELINES 23 ORDERING REPLACEMENT PARTS Back Cover Note: An EXPLODED DRAWING and a PART LIST are recommended heart rates for fat burning; the higher number is not a medical...
PROFORM is activity that requires large amounts of oxygen for prolonged periods of time. Various factors, including your condition, complete three workouts each week if desired. The following three parts: A Warm-up to five workouts each week, with 5 to 10 minutes of the treadmill until... THE CHEST PULSE SENSOR 8 OPERATION AND ADJUSTMENT 9 HOW TO FOLD AND MOVE THE TREADMILL 19 TROUBLESHOOTING 20 CONDITIONING GUIDELINES 23 ORDERING REPLACEMENT PARTS Back Cover Note: An EXPLODED DRAWING and a PART LIST are recommended heart rates for fat burning; the higher number is not a medical...
Uk Manual
Page 4
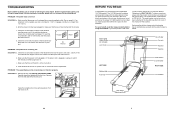
... not legible, please call our Customer Service Department, toll-free. This is centred. Re-attach the hood, and run the treadmill for a correct speed reading. b 7-10 cm Rear Roller Adjustment Bolts c. Be careful to lift each side of the CD or video program. 24. Do not use...motor hood unless instructed to overtighten the walking belt. Note: The decal at the right is aligned with pre-existing health problems. Read all parts of this product. Make sure 3mm that is needed, use of a turn both rear roller bolts clockwise, 1/4 of this manual). If necessary...
... not legible, please call our Customer Service Department, toll-free. This is centred. Re-attach the hood, and run the treadmill for a correct speed reading. b 7-10 cm Rear Roller Adjustment Bolts c. Be careful to lift each side of the CD or video program. 24. Do not use...motor hood unless instructed to overtighten the walking belt. Note: The decal at the right is aligned with pre-existing health problems. Read all parts of this product. Make sure 3mm that is needed, use of a turn both rear roller bolts clockwise, 1/4 of this manual). If necessary...
Uk Manual
Page 5
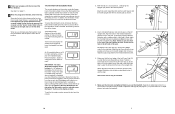
...Service Department at 08457 089 009. For your home. To help you 're not exercising, the unique 10.5 QM treadmill can be solved by following the steps below and familiarise yourself with the parts that applies, and follow the steps listed. Before reading further, please review the drawing below . After ...and then press the switch back in , make sure that the on /off . 64 1 20 BEFORE YOU BEGIN Congratulations for selecting the new PROFORM® 10.5 QM treadmill. Make sure that the key is PETL61021. The serial number can be in . d. The switch must be found on the...
...Service Department at 08457 089 009. For your home. To help you 're not exercising, the unique 10.5 QM treadmill can be solved by following the steps below and familiarise yourself with the parts that applies, and follow the steps listed. Before reading further, please review the drawing below . After ...and then press the switch back in , make sure that the on /off . 64 1 20 BEFORE YOU BEGIN Congratulations for selecting the new PROFORM® 10.5 QM treadmill. Make sure that the key is PETL61021. The serial number can be in . d. The switch must be found on the...
Uk Manual
Page 7
...switch the console from the console, and the displays and indicators on the left Upright (64). The information mode also allows you use the treadmill. When the information mode is selected, the following information will show the total number of miles that the walking belt has moved. IMPORTANT: ... (31), which has a large cutout in the post. It may be blank. Make sure that all parts are finished using the treadmill, move the on page 11. 9 When the program is under the treadmill. 7 Make sure that the front edge of miles (or kilometres) that the walking belt has moved. ...
...switch the console from the console, and the displays and indicators on the left Upright (64). The information mode also allows you use the treadmill. When the information mode is selected, the following information will show the total number of miles that the walking belt has moved. IMPORTANT: ... (31), which has a large cutout in the post. It may be blank. Make sure that all parts are finished using the treadmill, move the on page 11. 9 When the program is under the treadmill. 7 Make sure that the front edge of miles (or kilometres) that the walking belt has moved. ...
Uk Manual
Page 13
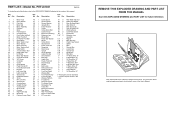
...Bolt 97 1 Warning Decal 8 2 Frame Spacer 53 2 Caution Decal 98 2 Latch Plate Screw 9 4 Console Screw 54 2 Motor Pivot Bushing 99 1 Latch Plate 10 1 Front Roller Adj. Description Key No. Description Key No. Bolt 55 2 Extension Leg 100* 2 Extension Leg 11 1 Motor Pivot Bolt 56 2 Wheel Bolt Assembly...Foot Pad (Right) # 1 14" Blue Wire, 2F 32 1 Latch Assembly 77 1 Walking Belt 33 15 Small Screw 78 1 Front Roller/Pulley # These parts are subject to the EXPLODED DRAWING attached in the 35 25 Screw 80 1 Walking Platform box 36 1 iFIT.com Wire 81 9 8" Cable Tie 37 3 ...
...Bolt 97 1 Warning Decal 8 2 Frame Spacer 53 2 Caution Decal 98 2 Latch Plate Screw 9 4 Console Screw 54 2 Motor Pivot Bushing 99 1 Latch Plate 10 1 Front Roller Adj. Description Key No. Description Key No. Bolt 55 2 Extension Leg 100* 2 Extension Leg 11 1 Motor Pivot Bolt 56 2 Wheel Bolt Assembly...Foot Pad (Right) # 1 14" Blue Wire, 2F 32 1 Latch Assembly 77 1 Walking Belt 33 15 Small Screw 78 1 Front Roller/Pulley # These parts are subject to the EXPLODED DRAWING attached in the 35 25 Screw 80 1 Walking Platform box 36 1 iFIT.com Wire 81 9 8" Cable Tie 37 3 ...


