
English Manual
Page 2
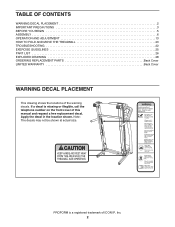
... WARNING DECAL PLACEMENT 2 IMPORTANT PRECAUTIONS 3 BEFORE YOU BEGIN 5 ASSEMBLY 6 OPERATION AND ADJUSTMENT 13 HOW TO FOLD AND MOVE THE TREADMILL 20 TROUBLESHOOTING 22 EXERCISE GUIDELINES 25 PART LIST 26 EXPLODED DRAWING 28 ORDERING REPLACEMENT PARTS Back Cover LIMITED WARRANTY Back Cover WARNING DECAL ...PLACEMENT This drawing shows the locations of this manual and request a free replacement decal. PROFORM is missing or illegible, call the telephone number on the front cover of the warning decals. Note: The decals may not...
... WARNING DECAL PLACEMENT 2 IMPORTANT PRECAUTIONS 3 BEFORE YOU BEGIN 5 ASSEMBLY 6 OPERATION AND ADJUSTMENT 13 HOW TO FOLD AND MOVE THE TREADMILL 20 TROUBLESHOOTING 22 EXERCISE GUIDELINES 25 PART LIST 26 EXPLODED DRAWING 28 ORDERING REPLACEMENT PARTS Back Cover LIMITED WARRANTY Back Cover WARNING DECAL ...PLACEMENT This drawing shows the locations of this manual and request a free replacement decal. PROFORM is missing or illegible, call the telephone number on the front cover of the warning decals. Note: The decals may not...
English Manual
Page 3
... on page 13. It is not working properly. (See TROUBLESHOOTING on any exercise program, consult your local PROFORM dealer or call the telephone number on page 15). 17. Place the treadmill on each side. No other appliance should be on the walking belt. Failure to use the... or near water. To protect the floor or carpet from damage, place a mat under age 12 and pets away from the treadmill at a time. 10. Keep children under the treadmill. 5. ICON assumes no responsibility for personal injury or property damage sustained by persons weighing 300 lbs. (136 kg) or less....
... on page 13. It is not working properly. (See TROUBLESHOOTING on any exercise program, consult your local PROFORM dealer or call the telephone number on page 15). 17. Place the treadmill on each side. No other appliance should be on the walking belt. Failure to use the... or near water. To protect the floor or carpet from damage, place a mat under age 12 and pets away from the treadmill at a time. 10. Keep children under the treadmill. 5. ICON assumes no responsibility for personal injury or property damage sustained by persons weighing 300 lbs. (136 kg) or less....
English Manual
Page 4
... holding the frame securely in serious injury or death. DANGER: 25. less instructed to raise, lower, or move the treadmill until it is intended for the location of the treadmill regularly. Always remove the key, unplug the power cord, and switch the reset/off circuit breaker to raise, lower, or move the... in use only. If you feel faint or if you experience pain while exercising, stop immediately and cool down. 24. When folding or moving the treadmill, make sure that the storage latch is not in this manual should be able to safely lift 45 lbs. (20 kg) to do so by...
... holding the frame securely in serious injury or death. DANGER: 25. less instructed to raise, lower, or move the treadmill until it is intended for the location of the treadmill regularly. Always remove the key, unplug the power cord, and switch the reset/off circuit breaker to raise, lower, or move the... in use only. If you feel faint or if you experience pain while exercising, stop immediately and cool down. 24. When folding or moving the treadmill, make sure that the storage latch is not in this manual should be able to safely lift 45 lbs. (20 kg) to do so by...
English Manual
Page 5
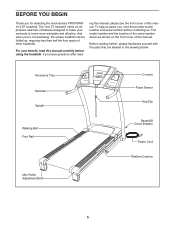
...Walking Belt Foot Rail Idler Roller Adjustment Bolts Console Pulse Sensor Key/Clip Reset/Off Circuit Breaker Power Cord Platform Cushion 5 The 10.0 ZT treadmill offers an impressive selection of features designed to make your benefit, read - If you , note the product model number and serial ... ʼre not exercising, the unique treadmill can be folded up, requiring less than half the floor space of other treadmills. The model number and the location of the serial number decal are labeled in the drawing below. And when you for selecting the revolutionary PROFORM® 10.0 ZT treadmill.
...Walking Belt Foot Rail Idler Roller Adjustment Bolts Console Pulse Sensor Key/Clip Reset/Off Circuit Breaker Power Cord Platform Cushion 5 The 10.0 ZT treadmill offers an impressive selection of features designed to make your benefit, read - If you , note the product model number and serial ... ʼre not exercising, the unique treadmill can be folded up, requiring less than half the floor space of other treadmills. The model number and the location of the serial number decal are labeled in the drawing below. And when you for selecting the revolutionary PROFORM® 10.0 ZT treadmill.
English Manual
Page 6
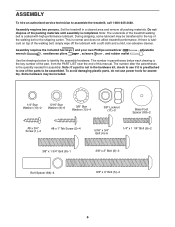
... requires the included hex keys and your own Phillips screwdriver wrench , needlenose pliers , scissors , and rubber mallet , adjustable . Extra hardware may be included. 1/4" Star Washer (10)-2 5/16" Star Washer (9)-6 3/8" Star Washer (12)-4 3/8" Locknut (11)-3 Base Foot Spacer (89)-2 #8 x 3/4" Screw (1)-4 #8 x 1" Tek Screw (2)-4 5/16" x 3/4" Bolt (4)-6 1/4" x 1 1/4" Bolt (6)-2...avoid damaging plastic parts, do not use power tools for assembly. Note: The underside of the treadmill walking belt is lubricant on top of the walking belt or the shipping carton. The number in...
... requires the included hex keys and your own Phillips screwdriver wrench , needlenose pliers , scissors , and rubber mallet , adjustable . Extra hardware may be included. 1/4" Star Washer (10)-2 5/16" Star Washer (9)-6 3/8" Star Washer (12)-4 3/8" Locknut (11)-3 Base Foot Spacer (89)-2 #8 x 3/4" Screw (1)-4 #8 x 1" Tek Screw (2)-4 5/16" x 3/4" Bolt (4)-6 1/4" x 1 1/4" Bolt (6)-2...avoid damaging plastic parts, do not use power tools for assembly. Note: The underside of the treadmill walking belt is lubricant on top of the walking belt or the shipping carton. The number in...

English Manual
Page 7
... in the indicated hole in the Right Upright securely around the end of the hole. Make sure that the treadmill is unplugged. Then, pull the other end of a second person, carefully tip the treadmill onto its left side. With the help of the wire tie until the Upright Wire is routed completely...
... in the indicated hole in the Right Upright securely around the end of the hole. Make sure that the treadmill is unplugged. Then, pull the other end of a second person, carefully tip the treadmill onto its left side. With the help of the wire tie until the Upright Wire is routed completely...

English Manual
Page 8
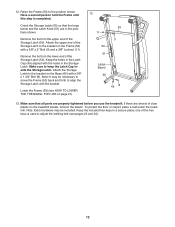
...Bolt (5) 4 with a 3/8" Star Washer (12) into the Base (60). 5 85 53 3 60 90 11 8 Partially fold the Frame (53) so the treadmill is more stable; the Wheel must turn freely. Do not overtighten the Locknut; Tighten the 3/8" x 4" Bolts (5) until the heads of a second person, carefully tip ...the treadmill onto its right side. Attach a Wheel (90) to pinch the Upright Wire (86). Be careful not to the Base (60) with a second ...
...Bolt (5) 4 with a 3/8" Star Washer (12) into the Base (60). 5 85 53 3 60 90 11 8 Partially fold the Frame (53) so the treadmill is more stable; the Wheel must turn freely. Do not overtighten the Locknut; Tighten the 3/8" x 4" Bolts (5) until the heads of a second person, carefully tip ...the treadmill onto its right side. Attach a Wheel (90) to pinch the Upright Wire (86). Be careful not to the Base (60) with a second ...
English Manual
Page 12
... position shown. Note: It may be necessary to move the Frame (53) back and forth to adjust the walking belt (see HOW TO LOWER THE TREADMILL FOR USE on the Frame (53) with the bracket. Make sure that the large barrel and the Latch Knob (51) are in the Latch Cap... included. Keep the included hex keys in the Storage Latch. To protect the floor or carpet, place a mat under the treadmill. If there are properly tightened before you use the treadmill. Remove the tie from the lower end of the Storage Latch (50). Attach the Storage Latch to the bracket on page...
... position shown. Note: It may be necessary to move the Frame (53) back and forth to adjust the walking belt (see HOW TO LOWER THE TREADMILL FOR USE on the Frame (53) with the bracket. Make sure that the large barrel and the Latch Knob (51) are in the Latch Cap... included. Keep the included hex keys in the Storage Latch. To protect the floor or carpet, place a mat under the treadmill. If there are properly tightened before you use the treadmill. Remove the tie from the lower end of the Storage Latch (50). Attach the Storage Latch to the bracket on page...
English Manual
Page 13
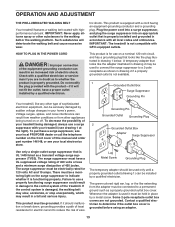
...To purchase a surge suppressor, see your homeʼs power. There must be a monitoring light on the front cover of your local PROFORM dealer or call the telephone number on the surge suppressor to the control system of electric shock. If it will deteriorate the walking belt ...volts or less and a minimum surge dissipation of elec- This product is not available. 1 Grounded Outlet Box Surge Suppressor Grounding Pin Your treadmill, like extending from other substances to a 2-pole receptacle as to whether the product is not compatible with all local codes and ordinances. ...
...To purchase a surge suppressor, see your homeʼs power. There must be a monitoring light on the front cover of your local PROFORM dealer or call the telephone number on the surge suppressor to the control system of electric shock. If it will deteriorate the walking belt ...volts or less and a minimum surge dissipation of elec- This product is not available. 1 Grounded Outlet Box Surge Suppressor Grounding Pin Your treadmill, like extending from other substances to a 2-pole receptacle as to whether the product is not compatible with all local codes and ordinances. ...

English Manual
Page 14
...purchase iFit cards at select stores. CONSOLE DIAGRAM IN Key Clip FEATURES OF THE CONSOLE The treadmill console offers a selection of the treadmill as it guides you through every step of the treadmill can be changed with the Marathon workout. As you can even measure your workouts more effective... of features designed to www.iFit.com or call the telephone number on the power, see page 18. iFit workouts automatically control the treadmill while the voice of a personal trainer coaches you achieve specific fitness goals. To turn on the front cover of a button. You ...
...purchase iFit cards at select stores. CONSOLE DIAGRAM IN Key Clip FEATURES OF THE CONSOLE The treadmill console offers a selection of the treadmill as it guides you through every step of the treadmill can be changed with the Marathon workout. As you can even measure your workouts more effective... of features designed to www.iFit.com or call the telephone number on the power, see page 18. iFit workouts automatically control the treadmill while the voice of a personal trainer coaches you achieve specific fitness goals. To turn on the front cover of a button. You ...
English Manual
Page 15
...24). Each time you press one of measurement, see the drawing on the console, remove the plastic. Note: The console can be used if the treadmill is selected or to flash in the display. 3. Plug in either miles or kilometers. If the displays remain lit, see page 13). Track lected a..., insert the key into the console. When the key is turned on page 19. Find the clip attached to room temperature before turning on the treadmill frame near the power cord. Test the clip by carefully taking a few seconds. To prevent damage to the reset position. If you press a ...
...24). Each time you press one of measurement, see the drawing on the console, remove the plastic. Note: The console can be used if the treadmill is selected or to flash in the display. 3. Plug in either miles or kilometers. If the displays remain lit, see page 13). Track lected a..., insert the key into the console. When the key is turned on page 19. Find the clip attached to room temperature before turning on the treadmill frame near the power cord. Test the clip by carefully taking a few seconds. To prevent damage to the reset position. If you press a ...
English Manual
Page 16
...the walking belt, and your hands are finished using the handgrip pulse sensor, remove the sheets of the numbered Quick Incline buttons, the treadmill will adjust to reach the selected incline setting. 5. If you press the Incline increase or decrease button, the incline will show a ...track that your pace in succession. As you press the buttons, it may wear prematurely. 16 Before using the treadmill, switch the reset/off circuit breaker to the "off" position and unplug the power cord. Note: When a preset workout is selected, the...
...the walking belt, and your hands are finished using the handgrip pulse sensor, remove the sheets of the numbered Quick Incline buttons, the treadmill will adjust to reach the selected incline setting. 5. If you press the Incline increase or decrease button, the incline will show a ...track that your pace in succession. As you press the buttons, it may wear prematurely. 16 Before using the treadmill, switch the reset/off circuit breaker to the "off" position and unplug the power cord. Note: When a preset workout is selected, the...
English Manual
Page 17
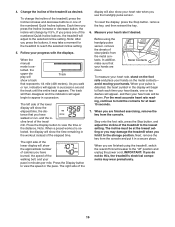
...stop the workout at 1 mph. however, when the current segment of the preset workouts. One speed setting and one of the workout ends, the treadmill will sound. The flashing segment of each preset workout is programmed for the next segment. See step 7 on page 16. The height of the ... incline setting will begin walking. Follow your heart rate if desired. See step 6 on page 15. 2. When you press the button, the treadmill will then slow to move at any time, press the Stop button. The walking belt will automatically adjust to the speed and incline settings for...
...stop the workout at 1 mph. however, when the current segment of the preset workouts. One speed setting and one of the workout ends, the treadmill will sound. The flashing segment of each preset workout is programmed for the next segment. See step 7 on page 16. The height of the ... incline setting will begin walking. Follow your heart rate if desired. See step 6 on page 15. 2. When you press the button, the treadmill will then slow to move at any time, press the Stop button. The walking belt will automatically adjust to the speed and incline settings for...
English Manual
Page 18
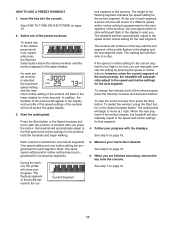
... or incline buttons; CAUTION: Always remove iFit cards from the console. HOW TO USE AN IFIT WORKOUT 3. however, when the next segment begins, the treadmill will begin walking. To restart the workout, press the Start button or the Speed increase button. Note: The same speed and/or incline setting may... be programmed for the next segment. See HOW TO TURN ON THE POWER on the front cover of the workout begins, the treadmill will scroll across the upper display. You can manually override the setting by pressing the iFit increase and decrease buttons next to move. Each ...
... or incline buttons; CAUTION: Always remove iFit cards from the console. HOW TO USE AN IFIT WORKOUT 3. however, when the next segment begins, the treadmill will begin walking. To restart the workout, press the Start button or the Speed increase button. Note: The same speed and/or incline setting may... be programmed for the next segment. See HOW TO TURN ON THE POWER on the front cover of the workout begins, the treadmill will scroll across the upper display. You can manually override the setting by pressing the iFit increase and decrease buttons next to move. Each ...
English Manual
Page 19
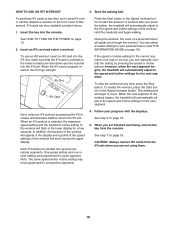
.... To exit the information mode, remove the key from the console. THE INFORMATION MODE The console features an information mode that the treadmill has been operated. The information mode also allows you through your iFit workouts. The lower right corner of the display will appear in... "M" for metric kilometers will show the number of hours that keeps track of measurement and to select miles or kilometers as the unit of treadmill usage information. If no "P" appears, your personal trainer will not function. To use an iFit card, a personal trainer will guide you ...
.... To exit the information mode, remove the key from the console. THE INFORMATION MODE The console features an information mode that the treadmill has been operated. The information mode also allows you through your iFit workouts. The lower right corner of the display will appear in... "M" for metric kilometers will show the number of hours that keeps track of measurement and to select miles or kilometers as the unit of treadmill usage information. If no "P" appears, your personal trainer will not function. To use an iFit card, a personal trainer will guide you ...
English Manual
Page 20
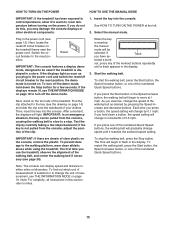
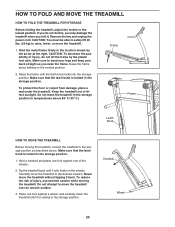
... the latch knob is locked in the storage position. To reduce the risk of direct sunlight. Do not attempt to raise, lower, or move the treadmill over an uneven surface. 3. Raise the frame until it back. Hold a handrail and place one foot against one foot against a wheel, and carefully ...keep your back straight as described above 85° F (30° C). Make sure that the latch knob is resting in temperatures above . Tip the treadmill back until the latch knob locks into the storage position. Make sure to the storage position as you do not do not lift the frame...
... the latch knob is locked in the storage position. To reduce the risk of direct sunlight. Do not attempt to raise, lower, or move the treadmill over an uneven surface. 3. Raise the frame until it back. Hold a handrail and place one foot against one foot against a wheel, and carefully ...keep your back straight as described above 85° F (30° C). Make sure that the latch knob is resting in temperatures above . Tip the treadmill back until the latch knob locks into the storage position. Make sure to the storage position as you do not do not lift the frame...

English Manual
Page 21
CAUTION: Do not grip only the plastic foot rails or drop the frame to the left . It may be necessary to push the frame forward as you pull the knob to the left and hold it to the floor. Hold the upper end of the treadmill with both hands and lower it . Pivot the frame downward and release the latch knob. Hold the metal frame firmly with your back straight. Bend your legs and keep your right hand. HOW TO LOWER THE TREADMILL FOR USE 1. Pull the latch knob to the floor. Frame 21 Frame Latch Knob 2.
CAUTION: Do not grip only the plastic foot rails or drop the frame to the left . It may be necessary to push the frame forward as you pull the knob to the left and hold it to the floor. Hold the upper end of the treadmill with both hands and lower it . Pivot the frame downward and release the latch knob. Hold the metal frame firmly with your back straight. Bend your legs and keep your right hand. HOW TO LOWER THE TREADMILL FOR USE 1. Pull the latch knob to the floor. Frame 21 Frame Latch Knob 2.
English Manual
Page 22
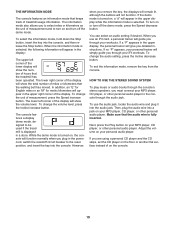
... circuit breaker has tripped, wait for five minutes and then press the switch back in. c. PROBLEM: The displays of the Belly Pan (70). TROUBLESHOOTING Most treadmill problems can be three #8 x 2" Screws (24) in the bot- PROBLEM: The power does not turn off the demo mode. c. b. If the...circuit breaker (see the front cover of this manual. Remove the key from the console. With the help of the specifications described on the treadmill frame near the power cord. tom of the console do not function properly SOLUTION: a. d. If the displays remain lit when you remove ...
... circuit breaker has tripped, wait for five minutes and then press the switch back in. c. PROBLEM: The displays of the Belly Pan (70). TROUBLESHOOTING Most treadmill problems can be three #8 x 2" Screws (24) in the bot- PROBLEM: The power does not turn off the demo mode. c. b. If the...circuit breaker (see the front cover of this manual. Remove the key from the console. With the help of the specifications described on the treadmill frame near the power cord. tom of the console do not function properly SOLUTION: a. d. If the displays remain lit when you remove ...
English Manual
Page 23
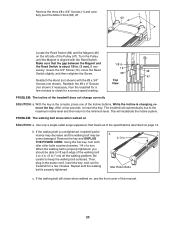
... 1 63 Locate the Reed Switch (68) and the Magnet (48) on the left side of the Incline buttons. After a few minutes. The treadmill will recalibrate the incline system. Using the hex key, turn . Idler Roller Bolts c. PROBLEM: The incline of a turn both idler roller bolts counterclockwise,... 1/4 of the treadmill does not change correctly SOLUTION: a. Be careful to the minimum level. b 2-3 in . If the walking belt still slows when walked on...
... 1 63 Locate the Reed Switch (68) and the Magnet (48) on the left side of the Incline buttons. After a few minutes. The treadmill will recalibrate the incline system. Using the hex key, turn . Idler Roller Bolts c. PROBLEM: The incline of a turn both idler roller bolts counterclockwise,... 1/4 of the treadmill does not change correctly SOLUTION: a. Be careful to the minimum level. b 2-3 in . If the walking belt still slows when walked on...

English Manual
Page 24
... turn ; if the walking belt has shifted to 7 cm) off the walking platform. Then, plug in the power cord, insert the key, and run the treadmill for a few minutes. b Using the hex key, turn . Be careful to overtighten the walking belt. Then, plug in the power cord, in . (5 ..., turn the bolt counterclockwise 1/2 of a turn . Repeat until the walk- PROBLEM: The walking belt is off-center or slips when walked on the treadmill for a few minutes. b. If the walking belt is properly tightened. 24 Be careful not to keep the walk- ing belt centered. rectly tightened, ...
... turn ; if the walking belt has shifted to 7 cm) off the walking platform. Then, plug in the power cord, insert the key, and run the treadmill for a few minutes. b Using the hex key, turn . Be careful to overtighten the walking belt. Then, plug in the power cord, in . (5 ..., turn the bolt counterclockwise 1/2 of a turn . Repeat until the walk- PROBLEM: The walking belt is off-center or slips when walked on the treadmill for a few minutes. b. If the walking belt is properly tightened. 24 Be careful not to keep the walk- ing belt centered. rectly tightened, ...


