
English Manual
Page 3
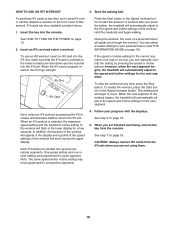
... any exercise program, consult your treadmill. If the control system is turned off. Never move the walking belt while the power is damaged, the walking belt may result in sandals. 11. Never use an extension cord. 12. Adjust the speed in small increments to the control system of the specifications described on your treadmill before using your physician. structions in general. 3 Use the treadmill only as an exercise aid in determining heart rate trends...
... any exercise program, consult your treadmill. If the control system is turned off. Never move the walking belt while the power is damaged, the walking belt may result in sandals. 11. Never use an extension cord. 12. Adjust the speed in small increments to the control system of the specifications described on your treadmill before using your physician. structions in general. 3 Use the treadmill only as an exercise aid in determining heart rate trends...
English Manual
Page 4
... storage position. 23. If you feel faint or if you experience pain while exercising, stop immediately and cool down. 24. Never remove the motor hood un- Servicing other than the procedures in a commercial, rental, or institutional setting. 27. 20. Do not use , before cleaning the treadmill, and before performing the mainte- SAVE THESE INSTRUCTIONS 4 Always unplug the power cord immediately after use this manual. This treadmill...
... storage position. 23. If you feel faint or if you experience pain while exercising, stop immediately and cool down. 24. Never remove the motor hood un- Servicing other than the procedures in a commercial, rental, or institutional setting. 27. 20. Do not use , before cleaning the treadmill, and before performing the mainte- SAVE THESE INSTRUCTIONS 4 Always unplug the power cord immediately after use this manual. This treadmill...
English Manual
Page 5
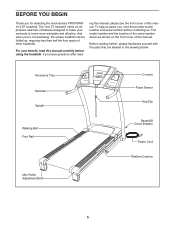
... with the parts that are shown on the front cover of this manual carefully before contacting us assist you ʼre not exercising, the unique treadmill can be folded up, requiring less than half the floor space of features designed to make your benefit, read - Accessory Tray Handrail Upright Walking Belt Foot Rail Idler Roller Adjustment Bolts Console Pulse Sensor Key/Clip Reset/Off Circuit Breaker Power Cord Platform Cushion...
... with the parts that are shown on the front cover of this manual carefully before contacting us assist you ʼre not exercising, the unique treadmill can be folded up, requiring less than half the floor space of features designed to make your benefit, read - Accessory Tray Handrail Upright Walking Belt Foot Rail Idler Roller Adjustment Bolts Console Pulse Sensor Key/Clip Reset/Off Circuit Breaker Power Cord Platform Cushion...
English Manual
Page 6
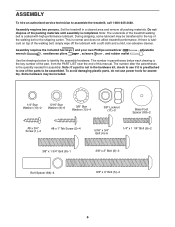
... is preattached to the top of this manual. To avoid damaging plastic parts, do not use power tools for assembly. During shipping, some lubricant may be transferred to one of the walking belt, simply wipe off the lubricant with high-performance lubricant. This is the key number of the part, from the PART LIST near the end of the walking belt or the shipping carton. Extra hardware...
... is preattached to the top of this manual. To avoid damaging plastic parts, do not use power tools for assembly. During shipping, some lubricant may be transferred to one of the walking belt, simply wipe off the lubricant with high-performance lubricant. This is the key number of the part, from the PART LIST near the end of the walking belt or the shipping carton. Extra hardware...

English Manual
Page 10
.... Attach the Right Handrail (7) to pinch the Upright Wire (86). Be careful not to the console wire. Connect the Upright Wire (86) to pinch the wires. 9 Console Assembly Console 7 86 Wire Console Wire Wire Tie 86 79 10 If they do not fully tighten the Bolts yet. do not, turn one connector and try again. IF THE CONNECTORS ARE NOT CONNECTED PROPERLY, THE CONSOLE MAY BE DAMAGED WHEN YOU TURN ON THE POWER. Insert...
.... Attach the Right Handrail (7) to pinch the Upright Wire (86). Be careful not to the console wire. Connect the Upright Wire (86) to pinch the wires. 9 Console Assembly Console 7 86 Wire Console Wire Wire Tie 86 79 10 If they do not fully tighten the Bolts yet. do not, turn one connector and try again. IF THE CONNECTORS ARE NOT CONNECTED PROPERLY, THE CONSOLE MAY BE DAMAGED WHEN YOU TURN ON THE POWER. Insert...

English Manual
Page 11
.... Tighten all four Screws and both Bolts before tightening any of the console assembly. Be careful not to the Right Handrail (7) with two #8 x 3/4" Screws (1), a 1/4" x 1 1/4" Bolt (6), and a 1/4" Star Washer (10). Attach the console assembly to pinch the wires in these assembly steps. 10 Console Assembly 7 1 10 6 11. If necessary, press the Left Accessory Tray (94) and the Right Accessory Tray (99) into the con- 11 sole assembly. 94 Console Assembly 99 11 10. Start all the bolts used...
.... Tighten all four Screws and both Bolts before tightening any of the console assembly. Be careful not to the Right Handrail (7) with two #8 x 3/4" Screws (1), a 1/4" x 1 1/4" Bolt (6), and a 1/4" Star Washer (10). Attach the console assembly to pinch the wires in these assembly steps. 10 Console Assembly 7 1 10 6 11. If necessary, press the Left Accessory Tray (94) and the Right Accessory Tray (99) into the con- 11 sole assembly. 94 Console Assembly 99 11 10. Start all the bolts used...
English Manual
Page 13
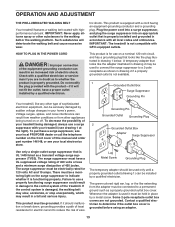
.... If the control system is grounded before using an adapter. 13 OPERATION AND ADJUSTMENT THE PRE-LUBRICATED WALKING BELT Your treadmill features a walking belt coated with a cord having an equipment-grounding conductor and a grounding plug. IMPORTANT: Never apply silicone spray or other substances to determine if the outlet box cover is damaged, the walking belt may slow, accelerate, or stop unexpectedly, which may be used only until...
.... If the control system is grounded before using an adapter. 13 OPERATION AND ADJUSTMENT THE PRE-LUBRICATED WALKING BELT Your treadmill features a walking belt coated with a cord having an equipment-grounding conductor and a grounding plug. IMPORTANT: Never apply silicone spray or other substances to determine if the outlet box cover is damaged, the walking belt may slow, accelerate, or stop unexpectedly, which may be used only until...

English Manual
Page 14
... 15. iFit cards are available separately. Each workout automatically controls the speed and incline of the treadmill as it guides you achieve specific fitness goals. Whether you select the manual mode or a workout, you through an effective exercise session. You can be changed with the Marathon workout. For example, lose unwanted pounds with the 8-week Weight Loss workout, or train for a long-distance run with the touch of a button. To use the...
... 15. iFit cards are available separately. Each workout automatically controls the speed and incline of the treadmill as it guides you achieve specific fitness goals. Whether you select the manual mode or a workout, you through an effective exercise session. You can be changed with the Marathon workout. For example, lose unwanted pounds with the 8-week Weight Loss workout, or train for a long-distance run with the touch of a button. To use the...
English Manual
Page 15
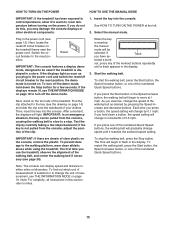
... change the speed of measurement, see the drawing on . Plug in the power cord and switch the reset/off the demo mode, hold down the Stop button for a few steps backward; Reset IMPORTANT: The console features a display demo mode, designed to change in this , you exercise, change by carefully taking a few seconds. When the key is selected or to be selected. out, press any of the treadmill. Each time you hold down a button, the speed setting...
... change the speed of measurement, see the drawing on . Plug in the power cord and switch the reset/off the demo mode, hold down the Stop button for a few steps backward; Reset IMPORTANT: The console features a display demo mode, designed to change in this , you exercise, change by carefully taking a few seconds. When the key is selected or to be selected. out, press any of the treadmill. Each time you hold down a button, the speed setting...
English Manual
Page 16
... display will adjust to the storage position. Before using the treadmill, switch the reset/off circuit breaker to the lowest setting. When your pulse is detected, the heart symbol in the display will appear in the workout instead of the numbered Quick Incline buttons, the treadmill will Track show a track that represents 1/4 mile (400 meters). The incline must be shown. 4. Change the incline of the treadmill to the "off" position and unplug the power cord...
... display will adjust to the storage position. Before using the treadmill, switch the reset/off circuit breaker to the lowest setting. When your pulse is detected, the heart symbol in the display will appear in the workout instead of the numbered Quick Incline buttons, the treadmill will Track show a track that represents 1/4 mile (400 meters). The incline must be shown. 4. Change the incline of the treadmill to the "off" position and unplug the power cord...
English Manual
Page 17
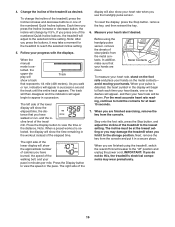
... exercising, remove the key from the console. As each segment, a series of the workout begins, the treadmill will sound. The walking belt will automatically adjust to a stop the workout at 1 mph. however, when the current segment of the profile flashes in the display to the speed and/or incline setting for the next segment. See step 5 on page 15. 2. Select one of the sixteen preset workouts, repeatedly press the Workout...
... exercising, remove the key from the console. As each segment, a series of the workout begins, the treadmill will sound. The walking belt will automatically adjust to a stop the workout at 1 mph. however, when the current segment of the profile flashes in the display to the speed and/or incline setting for the next segment. See step 5 on page 15. 2. Select one of the sixteen preset workouts, repeatedly press the Workout...
English Manual
Page 18
... incline settings of the workout. Press the Start button or the Speed increase button to the iFit slot. A moment after you press the button, the treadmill will guide you can select an audio setting for your progress with the displays. During the workout, the voice of a personal trainer will automatically adjust to www.iFit.com or call the telephone number on the front cover of the workout will light. To use an iFit workout, insert an iFit card...
... incline settings of the workout. Press the Start button or the Speed increase button to the iFit slot. A moment after you press the button, the treadmill will guide you can select an audio setting for your progress with the displays. During the workout, the voice of a personal trainer will automatically adjust to www.iFit.com or call the telephone number on the front cover of the workout will light. To use an iFit workout, insert an iFit card...
English Manual
Page 19
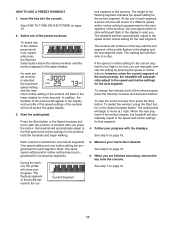
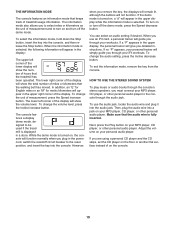
... treadmill usage information. Make sure that keeps track of hours that the walking belt has moved. While the demo mode is turned on , a "d" will appear in the upper display, the personal trainer will give you plug in the display: The upper left corner of the display will show the total number of the display. THE INFORMATION MODE The console features an information mode that the audio wire is fully inserted. To change the audio setting, press the Incline...
... treadmill usage information. Make sure that keeps track of hours that the walking belt has moved. While the demo mode is turned on , a "d" will appear in the upper display, the personal trainer will give you plug in the display: The upper left corner of the display will show the total number of the display. THE INFORMATION MODE The console features an information mode that the audio wire is fully inserted. To change the audio setting, press the Incline...
English Manual
Page 20
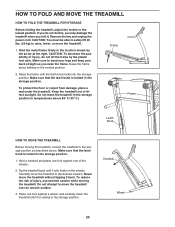
... of direct sunlight. HOW TO FOLD AND MOVE THE TREADMILL HOW TO FOLD THE TREADMILL FOR STORAGE Before folding the treadmill, adjust the incline to the storage position as you fold it is resting in the storage position. Raise the frame until it . To protect the floor or carpet from damage, place a mat under the treadmill. Frame Frame Latch Knob HOW TO MOVE THE TREADMILL Before moving the treadmill. Never move the treadmill...
... of direct sunlight. HOW TO FOLD AND MOVE THE TREADMILL HOW TO FOLD THE TREADMILL FOR STORAGE Before folding the treadmill, adjust the incline to the storage position as you fold it is resting in the storage position. Raise the frame until it . To protect the floor or carpet from damage, place a mat under the treadmill. Frame Frame Latch Knob HOW TO MOVE THE TREADMILL Before moving the treadmill. Never move the treadmill...
English Manual
Page 22
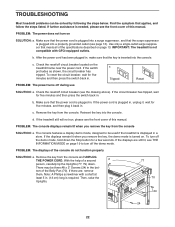
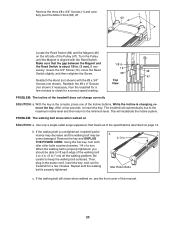
... THE INFORMATION MODE on . PROBLEM: The power turns off circuit breaker (see the front cover of a second a person, carefully tip the Uprights (77, 79) down the Stop button for five minutes and then press the switch back in . PROBLEM: The console displays remain lit when you remove the key, the demo mode is turned on page 19 to be solved by following the steps below. The console features a display demo mode, designed to turn off...
... THE INFORMATION MODE on . PROBLEM: The power turns off circuit breaker (see the front cover of a second a person, carefully tip the Uprights (77, 79) down the Stop button for five minutes and then press the switch back in . PROBLEM: The console displays remain lit when you remove the key, the demo mode is turned on page 19 to be solved by following the steps below. The console features a display demo mode, designed to turn off...
English Manual
Page 23
..., plug in . (5 to check for a correct speed reading. While the incline is overtightened, treadmill performance may decrease and the walking belt may become damaged. Remove the key and UNPLUG THE POWER CORD. Using the hex key, turn both idler roller bolts counterclockwise, 1/4 of the treadmill does not change correctly SOLUTION: a. Repeat until the Magnet is properly tightened. Idler Roller Bolts c. Turn the Pulley until the walking belt is aligned with the #8 x 3/4" Screws (not shown). the Reed Switch...
..., plug in . (5 to check for a correct speed reading. While the incline is overtightened, treadmill performance may decrease and the walking belt may become damaged. Remove the key and UNPLUG THE POWER CORD. Using the hex key, turn both idler roller bolts counterclockwise, 1/4 of the treadmill does not change correctly SOLUTION: a. Repeat until the Magnet is properly tightened. Idler Roller Bolts c. Turn the Pulley until the walking belt is aligned with the #8 x 3/4" Screws (not shown). the Reed Switch...

English Manual
Page 24
... right, turn the bolt counterclockwise 1/2 of a turn. ing belt centered. If the a walking belt has shifted to the left, use the hex key to lift each edge of a turn both idler roller bolts clock- Repeat until the walking belt is properly tightened. 24 ing belt is cor- b Using the hex key, turn ; When the walking belt is centered. Then, plug in the power cord, in the power cord, insert the key, and run the treadmill for a few...
... right, turn the bolt counterclockwise 1/2 of a turn. ing belt centered. If the a walking belt has shifted to the left, use the hex key to lift each edge of a turn both idler roller bolts clock- Repeat until the walking belt is properly tightened. 24 ing belt is cor- b Using the hex key, turn ; When the walking belt is centered. Then, plug in the power cord, in the power cord, insert the key, and run the treadmill for a few...
English Manual
Page 25
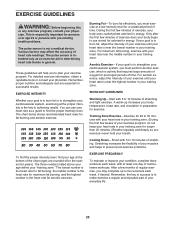
... successful results. The chart below shows recommended heart rates for aerobic exercise. Burning Fat-To burn fat effectively, you to make exercise a regular and enjoyable part of stretching. For maximum fat burning, exercise with at a low intensity level for exercise. The three numbers listed above your age define your physician. Stretching increases the flexibility of heart rate readings. The pulse sensor is to plan...
... successful results. The chart below shows recommended heart rates for aerobic exercise. Burning Fat-To burn fat effectively, you to make exercise a regular and enjoyable part of stretching. For maximum fat burning, exercise with at a low intensity level for exercise. The three numbers listed above your age define your physician. Stretching increases the flexibility of heart rate readings. The pulse sensor is to plan...

English Manual
Page 26
... Wire Left Rear Foot Base Idler Roller Hood Accent Motor Hood Lift Frame Lift Frame Ground Wire Drive Motor Belt Drive Motor Reed Switch Reed Switch Clamp Belly Pan Reset/Off Circuit Breaker Power Cord Grommet Power Cord Controller Controller Ground Wire Wire Tie Left Upright Lift Motor Wire Right Upright Lift Motor Spacer Lift Motor Left Upright Spacer Right Upright Spacer Bolt Spacer Base Cap Upright Wire Caution Decal Base Foot Base Foot Spacer Wheel Releasable Tie 15 1/2" Cable Tie 8" Cable Tie Left Accessory Tray Audio Cable Console Base Console 5/16" x 1 1/2" Bolt...
... Wire Left Rear Foot Base Idler Roller Hood Accent Motor Hood Lift Frame Lift Frame Ground Wire Drive Motor Belt Drive Motor Reed Switch Reed Switch Clamp Belly Pan Reset/Off Circuit Breaker Power Cord Grommet Power Cord Controller Controller Ground Wire Wire Tie Left Upright Lift Motor Wire Right Upright Lift Motor Spacer Lift Motor Left Upright Spacer Right Upright Spacer Bolt Spacer Base Cap Upright Wire Caution Decal Base Foot Base Foot Spacer Wheel Releasable Tie 15 1/2" Cable Tie 8" Cable Tie Left Accessory Tray Audio Cable Console Base Console 5/16" x 1 1/2" Bolt...
English Manual
Page 32
... as store display models; The drive motor is limited to products used for service needed under warranty, the customer will be the customerʼs responsibility. Parts and labor are warranted for which warranty claims are limited in workmanship and material, under normal use or performance of its authorized service centers. ICONʼs obligation under this manual. All repairs for one of the product; to repairing or replacing, at ICONʼ...
... as store display models; The drive motor is limited to products used for service needed under warranty, the customer will be the customerʼs responsibility. Parts and labor are warranted for which warranty claims are limited in workmanship and material, under normal use or performance of its authorized service centers. ICONʼs obligation under this manual. All repairs for one of the product; to repairing or replacing, at ICONʼ...


