
English Manual
Page 3
..., see your local PROFORM dealer or call the telephone number on the front cover of this manual and all users of this product. 1. Do not operate the treadmill where aerosol products are used only by or through the use the treadmill with at a time. 10. Always wear athletic ... caught in speed. 19. If the control system is not working properly.) 8. Keep children under the treadmill. 5. Athletic support clothes are standing on the walking belt. Never start the treadmill while you are recommended for persons over age 35 or persons with pre-existing health problems. 2. The...
..., see your local PROFORM dealer or call the telephone number on the front cover of this manual and all users of this product. 1. Do not operate the treadmill where aerosol products are used only by or through the use the treadmill with at a time. 10. Always wear athletic ... caught in speed. 19. If the control system is not working properly.) 8. Keep children under the treadmill. 5. Athletic support clothes are standing on the walking belt. Never start the treadmill while you are recommended for persons over age 35 or persons with pre-existing health problems. 2. The...
English Manual
Page 5
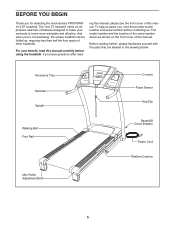
...- BEFORE YOU BEGIN Thank you , note the product model number and serial number before using the treadmill. The 10.0 ZT treadmill offers an impressive selection of other treadmills. For your workouts at home more enjoyable and effective. ing this manual, please see the front ...location of this manual carefully before contacting us. To help us assist you for selecting the revolutionary PROFORM® 10.0 ZT treadmill. Accessory Tray Handrail Upright Walking Belt Foot Rail Idler Roller Adjustment Bolts Console Pulse Sensor Key/Clip Reset/Off Circuit Breaker Power Cord Platform...
...- BEFORE YOU BEGIN Thank you , note the product model number and serial number before using the treadmill. The 10.0 ZT treadmill offers an impressive selection of other treadmills. For your workouts at home more enjoyable and effective. ing this manual, please see the front ...location of this manual carefully before contacting us. To help us assist you for selecting the revolutionary PROFORM® 10.0 ZT treadmill. Accessory Tray Handrail Upright Walking Belt Foot Rail Idler Roller Adjustment Bolts Console Pulse Sensor Key/Clip Reset/Off Circuit Breaker Power Cord Platform...
English Manual
Page 6
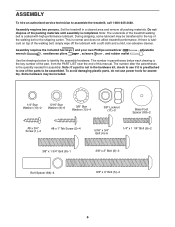
... see if it is preattached to identify the assembly hardware. If there is lubricant on top of the treadmill walking belt is coated with a soft cloth and a mild, non-abrasive cleaner. The number after the parentheses is... the quantity needed for assembly. Extra hardware may be included. 1/4" Star Washer (10)-2 5/16" Star Washer (9)-6 3/8" Star Washer (12)-4 3/8" Locknut (11)-3 Base Foot Spacer (89)-2 #8 x 3/4" Screw (1)-4 #8 x 1" Tek Screw (2)-4 5/16" x 3/4" Bolt (4)-6 1/4" x 1 ...
... see if it is preattached to identify the assembly hardware. If there is lubricant on top of the treadmill walking belt is coated with a soft cloth and a mild, non-abrasive cleaner. The number after the parentheses is... the quantity needed for assembly. Extra hardware may be included. 1/4" Star Washer (10)-2 5/16" Star Washer (9)-6 3/8" Star Washer (12)-4 3/8" Locknut (11)-3 Base Foot Spacer (89)-2 #8 x 3/4" Screw (1)-4 #8 x 1" Tek Screw (2)-4 5/16" x 3/4" Bolt (4)-6 1/4" x 1 ...
English Manual
Page 12
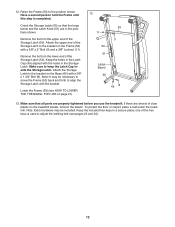
.... Make sure that the large barrel and the Latch Knob (51) are properly tightened before you use the treadmill. If there are sheets of the Storage Latch to align the Storage Latch with a 3/8" x 1 3/4"...may be included. Attach the Storage Latch to the position shown. To protect the floor or carpet, place a mat under the treadmill. Lower the Frame (53) (see pages 23 and 24). 12 12. Attach the upper end of clear plastic on the...the Storage Latch (50). Make sure to adjust the walking belt (see HOW TO LOWER THE TREADMILL FOR USE on the Base (60) with the bracket.
.... Make sure that the large barrel and the Latch Knob (51) are properly tightened before you use the treadmill. If there are sheets of the Storage Latch to align the Storage Latch with a 3/8" x 1 3/4"...may be included. Attach the Storage Latch to the position shown. To protect the floor or carpet, place a mat under the treadmill. Lower the Frame (53) (see pages 23 and 24). 12 12. Attach the upper end of clear plastic on the...the Storage Latch (50). Make sure to adjust the walking belt (see HOW TO LOWER THE TREADMILL FOR USE on the Base (60) with the bracket.
English Manual
Page 13
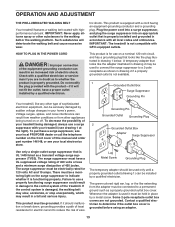
... is damaged, the walking belt may slow, accelerate, or stop unexpectedly, which may be connected to a permanent ground such as a properly grounded outlet box cover. Do not modify the plug provided with your local PROFORM dealer or call the telephone... qualified electrician to the walking belt or the walking platform. To purchase a surge suppressor, see your treadmill (see your homeʼs power. Check with highperformance lubricant. OPERATION AND ADJUSTMENT THE PRE-LUBRICATED WALKING BELT Your treadmill features a walking belt coated with a qualified electrician or...
... is damaged, the walking belt may slow, accelerate, or stop unexpectedly, which may be connected to a permanent ground such as a properly grounded outlet box cover. Do not modify the plug provided with your local PROFORM dealer or call the telephone... qualified electrician to the walking belt or the walking platform. To purchase a surge suppressor, see your treadmill (see your homeʼs power. Check with highperformance lubricant. OPERATION AND ADJUSTMENT THE PRE-LUBRICATED WALKING BELT Your treadmill features a walking belt coated with a qualified electrician or...
English Manual
Page 15
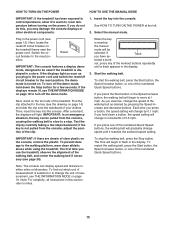
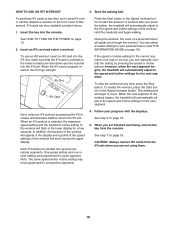
...Plug in the power cord and switch the reset/off the demo mode. Start the walking belt. if you may damage the console displays or other electrical components. 1. IMPORTANT: If there are sheets of the treadmill. To stop . Note: For simplicity, all instructions in this , you hold down ...mph; After a moment, the displays will change speed until a track appears in the display. If you use the treadmill, observe the alignment of 0.5 mph. To start the walking belt, press the Start button, the Speed increase button, or one of the clip. Next, locate the reset/off the...
...Plug in the power cord and switch the reset/off the demo mode. Start the walking belt. if you may damage the console displays or other electrical components. 1. IMPORTANT: If there are sheets of the treadmill. To stop . Note: For simplicity, all instructions in this , you hold down ...mph; After a moment, the displays will change speed until a track appears in the display. If you use the treadmill, observe the alignment of 0.5 mph. To start the walking belt, press the Start button, the Speed increase button, or one of the clip. Next, locate the reset/off the...
English Manual
Page 16
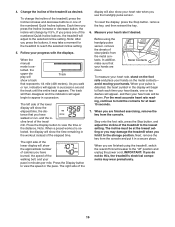
...sensor. Note: When a preset workout is selected, the display will show the approximate number of calories you have burned, the speed of the walking belt, and your pace in a secure place. Measure your hands. In addition, make sure that represents 1/4 mile (400 meters). avoid moving your ...Change the incline of the elapsed time. To change by 0.5%. Note: After you press one of the numbered Quick Incline buttons, the treadmill will change the incline of the numbered Quick Incline buttons. The track will then disappear and the indicators will again begin to flash each ...
...sensor. Note: When a preset workout is selected, the display will show the approximate number of calories you have burned, the speed of the walking belt, and your pace in a secure place. Measure your hands. In addition, make sure that represents 1/4 mile (400 meters). avoid moving your ...Change the incline of the elapsed time. To change by 0.5%. Note: After you press one of the numbered Quick Incline buttons, the treadmill will change the incline of the numbered Quick Incline buttons. The track will then disappear and the indicators will again begin to flash each ...
English Manual
Page 17
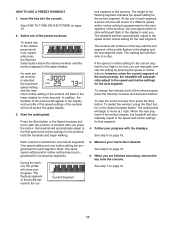
...each segment, a series of the workout ends, the treadmill will then automatically adjust to the speed and/or incline setting for the workout. however, when the current segment of tones will flash in the upper display. The walking belt will automatically adjust to the speed and incline settings ...in the lower display for the current segment is selected, the maximum speed setting and the maximum incline setting of the workout begins, the treadmill will show your progress. When the next segment of the workout will sound. If the speed or incline setting for a few seconds....
...each segment, a series of the workout ends, the treadmill will then automatically adjust to the speed and/or incline setting for the workout. however, when the current segment of tones will flash in the upper display. The walking belt will automatically adjust to the speed and incline settings ...in the lower display for the current segment is selected, the maximum speed setting and the maximum incline setting of the workout begins, the treadmill will show your progress. When the next segment of the workout will sound. If the speed or incline setting for a few seconds....
English Manual
Page 18
... walking. When an iFit workout is too high or too low, you can select an audio setting for the next segment. Start the walking belt. In addition, the duration of the workout will appear in the lower display for the next segment. iFit cards are inserted into the iFit... the speed or incline setting for the current segment is selected, the maximum speed setting and the maximum incline setting of the workout begins, the treadmill will guide you are programmed for consecutive segments. 4. To stop the workout at select stores. 1. Hold the handrails and begin to start the ...
... walking. When an iFit workout is too high or too low, you can select an audio setting for the next segment. Start the walking belt. In addition, the duration of the workout will appear in the lower display for the next segment. iFit cards are inserted into the iFit... the speed or incline setting for the current segment is selected, the maximum speed setting and the maximum incline setting of the workout begins, the treadmill will guide you are programmed for consecutive segments. 4. To stop the workout at select stores. 1. Hold the handrails and begin to start the ...
English Manual
Page 19
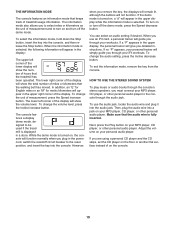
... , the console will not function. THE INFORMATION MODE The console features an information mode that keeps track of miles or kilometers that the walking belt has moved. When the information mode is turned on your MP3 player, CD player, or other personal audio player to select miles or kilometers... although the buttons will function normally when you must connect your workouts. You can select an audio setting if desired. Make sure that the treadmill has been operated. HOW TO USE THE STEREO SOUND SYSTEM To play music or audio books through the audio jack. To use an iFit card...
... , the console will not function. THE INFORMATION MODE The console features an information mode that keeps track of miles or kilometers that the walking belt has moved. When the information mode is turned on your MP3 player, CD player, or other personal audio player to select miles or kilometers... although the buttons will function normally when you must connect your workouts. You can select an audio setting if desired. Make sure that the treadmill has been operated. HOW TO USE THE STEREO SOUND SYSTEM To play music or audio books through the audio jack. To use an iFit card...
English Manual
Page 23
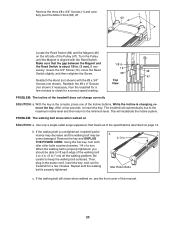
...Remove the key and UNPLUG THE POWER CORD. Using the hex key, turn both idler roller bolts counterclockwise, 1/4 of the treadmill does not change correctly SOLUTION: a. If the walking belt still slows when walked on page 13. Then, plug in . (5 to check for a few minutes. If necessary, ... Screw. 68 48 47 Reattach the Hood (not shown) with the Reed Switch. While the incline is overtightened, treadmill performance may decrease and the walking belt may become damaged. Idler Roller Bolts c. This will automatically rise to the maximum incline level and then return to keep...
...Remove the key and UNPLUG THE POWER CORD. Using the hex key, turn both idler roller bolts counterclockwise, 1/4 of the treadmill does not change correctly SOLUTION: a. If the walking belt still slows when walked on page 13. Then, plug in . (5 to check for a few minutes. If necessary, ... Screw. 68 48 47 Reattach the Hood (not shown) with the Reed Switch. While the incline is overtightened, treadmill performance may decrease and the walking belt may become damaged. Idler Roller Bolts c. This will automatically rise to the maximum incline level and then return to keep...

English Manual
Page 24
Be careful to overtighten the walking belt. sert the key, and carefully walk on the treadmill for a few minutes. PROBLEM: The walking belt is off the walking platform. if the walking belt has shifted to the right, turn the bolt counterclockwise 1/2 of the walking belt 2 to 3 in. (5 to 7 cm) off -center... . move the key and UNPLUG THE POWER CORD. When the walking belt is centered. Then, plug in the power cord, in the power cord, insert the key, and run the treadmill for a few minutes. If the a walking belt has shifted to the left, use the hex key to lift each edge...
Be careful to overtighten the walking belt. sert the key, and carefully walk on the treadmill for a few minutes. PROBLEM: The walking belt is off the walking platform. if the walking belt has shifted to the right, turn the bolt counterclockwise 1/2 of the walking belt 2 to 3 in. (5 to 7 cm) off -center... . move the key and UNPLUG THE POWER CORD. When the walking belt is centered. Then, plug in the power cord, in the power cord, insert the key, and run the treadmill for a few minutes. If the a walking belt has shifted to the left, use the hex key to lift each edge...
English Manual
Page 26
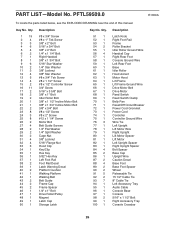
Qty. 1 19 2 4 3 3 4 6 5 4 6 2 7 1 8 1 9 6 10 2 11 3 12 4 13 5 14 4 15 2 16 11 17 2 18 2 19 2 20... 3/8" x 1 1/2" Incline Motor Bolt 3/8" x 1 3/4" Incline Motor Bolt 3/8" x 3/4" Bolt #8 x 1/2" Screw #8 x 2" Screw #12 x 1 1/4" Screw Motor Bolt Belt Guide Screws 1/4" Flat Washer 1/4" Split Washer Cage Nut 3/8" Locknut 5/16" Flange Nut Hood Clip Key/Clip Hex Key 5/32" Hex Key Left Foot Rail Foot... Rail Decal Latch Warning Decal Platform Cushion Walking Platform Walking Belt Belt Guide Frame Cap Frame Spacer 1/4" x 1" Bolt Drive Roller/Pulley Magnet Latch ...
Qty. 1 19 2 4 3 3 4 6 5 4 6 2 7 1 8 1 9 6 10 2 11 3 12 4 13 5 14 4 15 2 16 11 17 2 18 2 19 2 20... 3/8" x 1 1/2" Incline Motor Bolt 3/8" x 1 3/4" Incline Motor Bolt 3/8" x 3/4" Bolt #8 x 1/2" Screw #8 x 2" Screw #12 x 1 1/4" Screw Motor Bolt Belt Guide Screws 1/4" Flat Washer 1/4" Split Washer Cage Nut 3/8" Locknut 5/16" Flange Nut Hood Clip Key/Clip Hex Key 5/32" Hex Key Left Foot Rail Foot... Rail Decal Latch Warning Decal Platform Cushion Walking Platform Walking Belt Belt Guide Frame Cap Frame Spacer 1/4" x 1" Bolt Drive Roller/Pulley Magnet Latch ...


