
Service Manual
Page 21
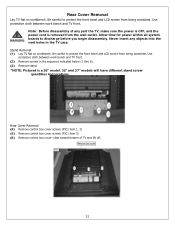
... on workbench. Be careful to protect the front bezel and LCD screen from the wall outlet. Use protective cloth between work bench and TV front. (2) Remove screws in the TV case. Use protective cloth between work bench and TV front. slide toward bottom of any objects into the vent ... box cover screws (PIC1 item 1, 2) (5) Remove control box cover screws (PIC1 item 3) (6) Remove control box cover- Never insert any part the TV, make sure the power is OFF, and the power cord is a 26" model. 32" and 37" models will have different stand screw quantities and locations.
... on workbench. Be careful to protect the front bezel and LCD screen from the wall outlet. Use protective cloth between work bench and TV front. (2) Remove screws in the TV case. Use protective cloth between work bench and TV front. slide toward bottom of any objects into the vent ... box cover screws (PIC1 item 1, 2) (5) Remove control box cover screws (PIC1 item 3) (6) Remove control box cover- Never insert any part the TV, make sure the power is OFF, and the power cord is a 26" model. 32" and 37" models will have different stand screw quantities and locations.
Service Manual
Page 23
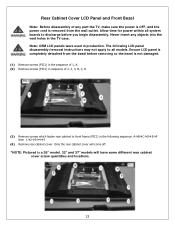
...: Before disassembly of 2, 3, 4, B, C, D (3) Remove screws which fasten rear cabinet to discharge before you begin disassembly. Ensure LCD panel is a 26" model. 32" and 37" models will come off. *NOTE: Pictured is completely detached from the wall outlet. Note: OEM LCD panels were used in the TV case. Allow time for power within all models.
...: Before disassembly of 2, 3, 4, B, C, D (3) Remove screws which fasten rear cabinet to discharge before you begin disassembly. Ensure LCD panel is a 26" model. 32" and 37" models will come off. *NOTE: Pictured is completely detached from the wall outlet. Note: OEM LCD panels were used in the TV case. Allow time for power within all models.


