
Service Manual
Page 21
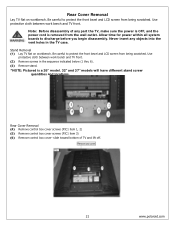
... TV and lift off. 21 www.polaroid.com Never insert any part the TV, make sure the power is OFF, and the power cord is a 26" model. 32" and 37" models will have different stand screw quantities and locations. Rear Cover Removal Lay TV flat on workbench. Stand Removal (1) Lay TV...box cover screws (PIC1 item 3) (6) Remove control box cover- Be careful to protect the front bezel and LCD screen from being scratched. Use protective cloth between work bench and TV front. (2) Remove screws in the TV case. Allow time for power within all system boards to protect the front bezel and...
... TV and lift off. 21 www.polaroid.com Never insert any part the TV, make sure the power is OFF, and the power cord is a 26" model. 32" and 37" models will have different stand screw quantities and locations. Rear Cover Removal Lay TV flat on workbench. Stand Removal (1) Lay TV...box cover screws (PIC1 item 3) (6) Remove control box cover- Be careful to protect the front bezel and LCD screen from being scratched. Use protective cloth between work bench and TV front. (2) Remove screws in the TV case. Allow time for power within all system boards to protect the front bezel and...
Service Manual
Page 23
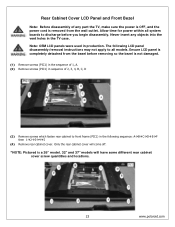
...PIC1) in sequence of any objects into the vent holes in the TV case. Note: OEM LCD panels were used in production. Ensure LCD panel is removed from the bezel before you begin disassembly. The following LCD panel disassembly/removal instructions may not apply to all system boards to discharge... before removing so the bezel is a 26" model. 32" and 37" models will have some different rear cabinet cover screw quantities and locations. 23 www.polaroid.com Rear Cabinet Cover LCD Panel and Front Bezel Note: Before disassembly of 2, 3, 4, B, C, D...
...PIC1) in sequence of any objects into the vent holes in the TV case. Note: OEM LCD panels were used in production. Ensure LCD panel is removed from the bezel before you begin disassembly. The following LCD panel disassembly/removal instructions may not apply to all system boards to discharge... before removing so the bezel is a 26" model. 32" and 37" models will have some different rear cabinet cover screw quantities and locations. 23 www.polaroid.com Rear Cabinet Cover LCD Panel and Front Bezel Note: Before disassembly of 2, 3, 4, B, C, D...
User Guide
Page 6
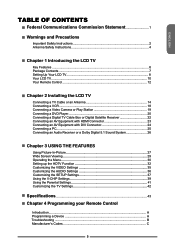
...and Precautions Important Safety Instructions 2 Antenna Safety Instructions 4 Chapter 1 Introducing the LCD TV Key Features...6 Package Contents...7 Setting Up Your LCD TV 8 Your LCD TV...10 Your Remote Control 12 Chapter 2 Installing the LCD TV Connecting a TV Cable or an Antenna 14 Connecting a VCR...18 Connecting a Video Camera ... a Digital TV Cable Box or Digital Satellite Receiver 22 Connecting an AV Equipment with HDMI Connector 23 Connecting an AV Equipment with DVI Connector 24 Connecting a PC...25 Connecting an Audio Receiver or a Dolby Digital 5.1 Sound System 26 Chapter 3 ...
...and Precautions Important Safety Instructions 2 Antenna Safety Instructions 4 Chapter 1 Introducing the LCD TV Key Features...6 Package Contents...7 Setting Up Your LCD TV 8 Your LCD TV...10 Your Remote Control 12 Chapter 2 Installing the LCD TV Connecting a TV Cable or an Antenna 14 Connecting a VCR...18 Connecting a Video Camera ... a Digital TV Cable Box or Digital Satellite Receiver 22 Connecting an AV Equipment with HDMI Connector 23 Connecting an AV Equipment with DVI Connector 24 Connecting a PC...25 Connecting an Audio Receiver or a Dolby Digital 5.1 Sound System 26 Chapter 3 ...
User Guide
Page 10
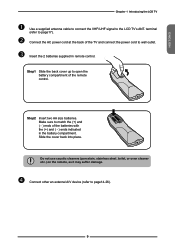
...Insert the 2 batteries supplied in the battery compartment. Slide the cover back into place. Connect the AC power cord at the back of the TV and connect the power cord to open the battery compartment of the batteries with the (+) and ( - ) ends indicated in remote control. terminal... or oven cleaner etc.) on the remote, as it may suffer damage. Connect other an external A/V device (refer to the LCD TV's ANT. Step2 Insert two AA size batteries. ENGLISH Chapter 1 Introducing the LCD TV Use a supplied antenna cable to connect the VHF/UHF signal to page14...
...Insert the 2 batteries supplied in the battery compartment. Slide the cover back into place. Connect the AC power cord at the back of the TV and connect the power cord to open the battery compartment of the batteries with the (+) and ( - ) ends indicated in remote control. terminal... or oven cleaner etc.) on the remote, as it may suffer damage. Connect other an external A/V device (refer to the LCD TV's ANT. Step2 Insert two AA size batteries. ENGLISH Chapter 1 Introducing the LCD TV Use a supplied antenna cable to connect the VHF/UHF signal to page14...

User Guide
Page 13
... universa code setup.For more information on setting up to four devices. Chapter 1 Introducing the LCD TV Your Remote Control This package includes a Polaroid remote that enables control of up your LCD TV: TV/HDTV/VIDEO1/ VIDEO2/VIDEO3/VIDEO4/VIDEO5/ VIDEO6/COMPUTER. In HDTV mode, use ▲▼...seconds. 26 INPUT ▪ Pressing INPUT to display a source list, use with 0-9 and ENTER buttons to select a digital channels. 27 LAST Returns to the video inputs of your remote control, please see the "Programming Your Remote Control" section. 5 3 TV Controls this LCD TV. 6...
... universa code setup.For more information on setting up to four devices. Chapter 1 Introducing the LCD TV Your Remote Control This package includes a Polaroid remote that enables control of up your LCD TV: TV/HDTV/VIDEO1/ VIDEO2/VIDEO3/VIDEO4/VIDEO5/ VIDEO6/COMPUTER. In HDTV mode, use ▲▼...seconds. 26 INPUT ▪ Pressing INPUT to display a source list, use with 0-9 and ENTER buttons to select a digital channels. 27 LAST Returns to the video inputs of your remote control, please see the "Programming Your Remote Control" section. 5 3 TV Controls this LCD TV. 6...
User Guide
Page 27
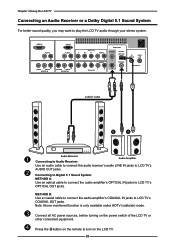
.... METHOD B: Use a coaxial cable to connect the audio amplifier's COAXIAL IN jacks to LCD TV's AUDIO OUT jacks. Connect all AC power sources, before turning on the LCD TV. 26 Press the button on the remote to play the LCD TV audio through your stereo system. HDMI IN AUDIO L R VGA IN AUDIO L R L R VIDEO AUDIO VIDEO...
.... METHOD B: Use a coaxial cable to connect the audio amplifier's COAXIAL IN jacks to LCD TV's AUDIO OUT jacks. Connect all AC power sources, before turning on the LCD TV. 26 Press the button on the remote to play the LCD TV audio through your stereo system. HDMI IN AUDIO L R VGA IN AUDIO L R L R VIDEO AUDIO VIDEO...
User Guide
Page 35
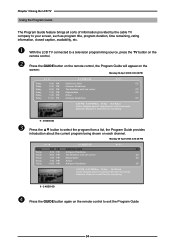
Press the GUIDE button on the remote control, the Program Guide will appear on the remote control. Monday 29 April 2005 2:36:26 PM 9-1 ◄ Today 5:00 PM Today 5:30 PM Today 6:00 PM Today 7:30 PM Today 7:30 PM Today 11:00 PM 9-2 KQED-SD Calfornia... 9 - 2 KOED-SD Press the GUIDE button again on each channel. Chapter 3 Using the LCD TV Using the Program Guide The Program Guide feature brings all sorts of information provided by the cable TV company to your screen, such as program title, program duration, time remaining, rating information, closed caption, availability...
Press the GUIDE button on the remote control, the Program Guide will appear on the remote control. Monday 29 April 2005 2:36:26 PM 9-1 ◄ Today 5:00 PM Today 5:30 PM Today 6:00 PM Today 7:30 PM Today 7:30 PM Today 11:00 PM 9-2 KQED-SD Calfornia... 9 - 2 KOED-SD Press the GUIDE button again on each channel. Chapter 3 Using the LCD TV Using the Program Guide The Program Guide feature brings all sorts of information provided by the cable TV company to your screen, such as program title, program duration, time remaining, rating information, closed caption, availability...


