
Service Manual
Page 2
... of these instructions. (2) Save these instructions. (3) Follow all servicing to normal operation. Do not use this product near water. (6) Do not place this product from overheating, those controls that are not sure of the type of power available, consult your obsolete outlet. This plug will walk on an unstable cart, stand or table. This product should be operated from the wall outlet before...
... of these instructions. (2) Save these instructions. (3) Follow all servicing to normal operation. Do not use this product near water. (6) Do not place this product from overheating, those controls that are not sure of the type of power available, consult your obsolete outlet. This plug will walk on an unstable cart, stand or table. This product should be operated from the wall outlet before...
Service Manual
Page 3
... Service work should be included in the TV case! Never modify any surface. • Wear a grounding wrist strap (available at this television use them. Do not lay components on your workbench or other grounded connection. • Touch a bare metal surface on the outside of antistatic bags because only the inside an LCD or plasma TV are meant to the table...
... Service work should be included in the TV case! Never modify any surface. • Wear a grounding wrist strap (available at this television use them. Do not lay components on your workbench or other grounded connection. • Touch a bare metal surface on the outside of antistatic bags because only the inside an LCD or plasma TV are meant to the table...

Service Manual
Page 5
... Spare Parts Lists - Schematics ...43 10. Block Diagram - Polaroid Display Cell Defect Specification 18 4. Exploded View Diagram ...39 8. Operation ...6 2. Troubleshooting / Flow Charts ...14 3. Disassembly Procedure...20 Rear Cover Removal ...21 Rear Cabinet Cover LCD Panel and Front Bezel 23 A/V Board Removal and Replacement 29 IR Board Removal and Replacement 30 Front/Side Control Buttons Removal and Replacement 31 6. FLM-Series 26, 32, 37 42 9. Go to polaroid.com to the User 19 5. PCB Layout Diagrams ...51 Model Specifications are located in User Manual. FLM-Series 26, 32...
... Spare Parts Lists - Schematics ...43 10. Block Diagram - Polaroid Display Cell Defect Specification 18 4. Exploded View Diagram ...39 8. Operation ...6 2. Troubleshooting / Flow Charts ...14 3. Disassembly Procedure...20 Rear Cover Removal ...21 Rear Cabinet Cover LCD Panel and Front Bezel 23 A/V Board Removal and Replacement 29 IR Board Removal and Replacement 30 Front/Side Control Buttons Removal and Replacement 31 6. FLM-Series 26, 32, 37 42 9. Go to polaroid.com to the User 19 5. PCB Layout Diagrams ...51 Model Specifications are located in User Manual. FLM-Series 26, 32...
Service Manual
Page 12
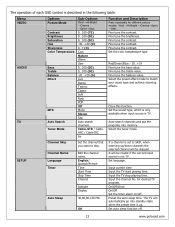
... picture modes: Vivid →Hi-Bright →Cinema→Sport →User. The TV will be skipped. Set auto sleep function off . Set the color temperature type. Select the tuner mode. On/Off/Once On/Off Set the timer alarm on/off . 12 www.polaroid.com Preset the auto sleep time. Fine tune the contrast. Red/Green/Blue: -19...+19 Fine tune the bass value. The operation of each OSD control is TV...
... picture modes: Vivid →Hi-Bright →Cinema→Sport →User. The TV will be skipped. Set auto sleep function off . Set the color temperature type. Select the tuner mode. On/Off/Once On/Off Set the timer alarm on/off . 12 www.polaroid.com Preset the auto sleep time. Fine tune the contrast. Red/Green/Blue: -19...+19 Fine tune the bass value. The operation of each OSD control is TV...

Service Manual
Page 13
... set to SKIP, when scanning up/down channels the selected channel will be skipped. HDTV Closed Caption V-chip Reset Audio Language Time Zone Auto Scan Manual Scan Channel Skip Analog Closed Caption Digital Closed Caption Digital Caption Style Block Channel C1,C2,C3,C4,T1,T2, Set the closed caption value to OFF, Service1, Service2, Service3, Service4, Service5 and Service6. Input the old password first, and then input the new password. Set the Time Zone value to default value. Range mode: To search receivable channels in the setup menu...
... set to SKIP, when scanning up/down channels the selected channel will be skipped. HDTV Closed Caption V-chip Reset Audio Language Time Zone Auto Scan Manual Scan Channel Skip Analog Closed Caption Digital Closed Caption Digital Caption Style Block Channel C1,C2,C3,C4,T1,T2, Set the closed caption value to OFF, Service1, Service2, Service3, Service4, Service5 and Service6. Input the old password first, and then input the new password. Set the Time Zone value to default value. Range mode: To search receivable channels in the setup menu...
Service Manual
Page 14
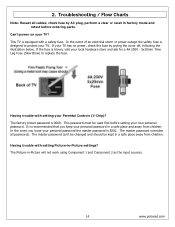
... children. If your personal password the master password is recommended that you loose your TV has no power, check the fuse by AC plug, perform a clear or reset in -Picture will not work using Component 1 and Component 2 as the input sources. 14 www.polaroid.com Troubleshooting / Flow Charts Note: Reseat all passwords. 2. In the event you keep your TV? The master password overrides all cables, check fuse by prying...
... children. If your personal password the master password is recommended that you loose your TV has no power, check the fuse by AC plug, perform a clear or reset in -Picture will not work using Component 1 and Component 2 as the input sources. 14 www.polaroid.com Troubleshooting / Flow Charts Note: Reseat all passwords. 2. In the event you keep your TV? The master password overrides all cables, check fuse by prying...

Service Manual
Page 19
... THE PRODUCT TO THE USER! e. Plug the AC cord directly into a 120 V AC outlet. Under normal operation the product must use the proper polarity. 19 www.polaroid.com b. Measurement points can vary slightly even between the chassis or any metal components including cable connection points, chassis hardware, or antennas (if equipped). DO NOT LEAVE THIS ADAPTER WITH THE USER! Use the following safety...
... THE PRODUCT TO THE USER! e. Plug the AC cord directly into a 120 V AC outlet. Under normal operation the product must use the proper polarity. 19 www.polaroid.com b. Measurement points can vary slightly even between the chassis or any metal components including cable connection points, chassis hardware, or antennas (if equipped). DO NOT LEAVE THIS ADAPTER WITH THE USER! Use the following safety...
Service Manual
Page 20
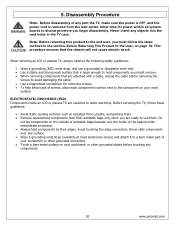
... a bare metal part of any part the TV, make sure the power is OFF, and the power cord is large enough to hold components by their antistatic bags only when you are ready to discharge before removing the screws to avoid damaging the cable. • Use a magnetized screwdriver for power within all system boards to use a grounded or dissipative work mat. • Use a stable and...
... a bare metal part of any part the TV, make sure the power is OFF, and the power cord is large enough to hold components by their antistatic bags only when you are ready to discharge before removing the screws to avoid damaging the cable. • Use a magnetized screwdriver for power within all system boards to use a grounded or dissipative work mat. • Use a stable and...
Service Manual
Page 35
...-GF32WH Rear Cabinet Control Box Cover Black 151-701-GF271XAH Stand Assembly Black 824-015-GF271H Speaker (right or Left) 631-030-GF321XAH LVDS Cable (CMO L01 , L03) 631-N28-GF321XAH Power Inverter Cable (CMO L01, L03) 35 www.polaroid.com Model Version column - Polaroid FLM-2632M Part List Part Number Description 600-181-3200-LIH AC Power Cord 621-181-60002H Audio Cable 621-181-2000H Composite Video Cable 621-181-3020P-1H Component Cable 845...
...-GF32WH Rear Cabinet Control Box Cover Black 151-701-GF271XAH Stand Assembly Black 824-015-GF271H Speaker (right or Left) 631-030-GF321XAH LVDS Cable (CMO L01 , L03) 631-N28-GF321XAH Power Inverter Cable (CMO L01, L03) 35 www.polaroid.com Model Version column - Polaroid FLM-2632M Part List Part Number Description 600-181-3200-LIH AC Power Cord 621-181-60002H Audio Cable 621-181-2000H Composite Video Cable 621-181-3020P-1H Component Cable 845...
Service Manual
Page 38
Polaroid FLM-3734B, FLX-374 Part List Part Number Description 600-181-3200-LIH AC Power Cord 621-181-60002H Audio Cable 621-181-2000H Composite Video Cable 621-181-3020P-1H Component Cable 845-C45-GF1XA-PH Remote Control 909-KS0-GF371XA Control Box Assembly (AUO V1) 899-K00-GF271XAH Front/Side Control Button Bd. 154-500-GF321H Front/Side Control Button Cover Black 899-E00-GF271XAH IR Board 899-A00-GF271XAH Front/Side...
Polaroid FLM-3734B, FLX-374 Part List Part Number Description 600-181-3200-LIH AC Power Cord 621-181-60002H Audio Cable 621-181-2000H Composite Video Cable 621-181-3020P-1H Component Cable 845-C45-GF1XA-PH Remote Control 909-KS0-GF371XA Control Box Assembly (AUO V1) 899-K00-GF271XAH Front/Side Control Button Bd. 154-500-GF321H Front/Side Control Button Cover Black 899-E00-GF271XAH IR Board 899-A00-GF271XAH Front/Side...
User Guide
Page 5
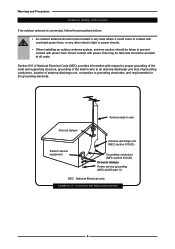
... at all costs. Warnings and Precautions Outdoor Antenna Safety Instructions If an outdoor antenna is connected, follow the precautions below: ▪ An outdoor antenna should not be located in any area where it could come in contact with overhead power lines, or any other electric light or power circuits. ▪ When installing an outdoor antenna system, extreme caution should be taken...
... at all costs. Warnings and Precautions Outdoor Antenna Safety Instructions If an outdoor antenna is connected, follow the precautions below: ▪ An outdoor antenna should not be located in any area where it could come in contact with overhead power lines, or any other electric light or power circuits. ▪ When installing an outdoor antenna system, extreme caution should be taken...
User Guide
Page 6
... Your LCD TV 8 Your LCD TV...10 Your Remote Control 12 Chapter 2 Installing the LCD TV Connecting a TV Cable or an Antenna 14 Connecting a VCR...18 Connecting a Video Camera or Play Station 19 Connecting a DVD Player 20 Connecting a Digital TV Cable Box or Digital Satellite Receiver 22 Connecting an AV Equipment with HDMI Connector 23 Connecting an AV Equipment with DVI Connector 24 Connecting a PC...25 Connecting an Audio Receiver or a Dolby Digital 5.1 Sound System 26 Chapter 3 USING THE FEATURES Using Picture-In-Picture 27 Wide Screen Viewing 29 Operating the Menu 30 Setting up...
... Your LCD TV 8 Your LCD TV...10 Your Remote Control 12 Chapter 2 Installing the LCD TV Connecting a TV Cable or an Antenna 14 Connecting a VCR...18 Connecting a Video Camera or Play Station 19 Connecting a DVD Player 20 Connecting a Digital TV Cable Box or Digital Satellite Receiver 22 Connecting an AV Equipment with HDMI Connector 23 Connecting an AV Equipment with DVI Connector 24 Connecting a PC...25 Connecting an Audio Receiver or a Dolby Digital 5.1 Sound System 26 Chapter 3 USING THE FEATURES Using Picture-In-Picture 27 Wide Screen Viewing 29 Operating the Menu 30 Setting up...

User Guide
Page 7
... of multiple cables used to provide better picture quality. Film-Mode Detection (3:2 Reverse Pull Down) ▪ This function can digitally reduce image noise to connect current A/V systems. HDTV Component Video Inputs ▪ Offers the best video quality for external equipment connection ▪ 2 set of composite A/V input terminals ▪ 1 set of S-VIDEO terminals ▪ 2 set of component Video input terminals ▪ 1 VGA/ Audio input terminal ▪ 1 HDMI/Auido input terminal ▪ 1 sets of Audio(L/R) output terminals ▪ 2 SPDIF output terminal (Optical x 1 /Coaxial...
... of multiple cables used to provide better picture quality. Film-Mode Detection (3:2 Reverse Pull Down) ▪ This function can digitally reduce image noise to connect current A/V systems. HDTV Component Video Inputs ▪ Offers the best video quality for external equipment connection ▪ 2 set of composite A/V input terminals ▪ 1 set of S-VIDEO terminals ▪ 2 set of component Video input terminals ▪ 1 VGA/ Audio input terminal ▪ 1 HDMI/Auido input terminal ▪ 1 sets of Audio(L/R) output terminals ▪ 2 SPDIF output terminal (Optical x 1 /Coaxial...

User Guide
Page 8
If you need to set up and operate the LCD TV in the package. Make sure all you are included in its basic configuration. Package Contents Chapter 1 Introducing the LCD TV Make sure all of the following contents are included. LCD TV Bottom Stand / Screw Driver and 6 Screws ENGLISH Remote Control/ AA Batteries x 2 VIDEO Cable Component Cable Power Cord AUDIO Cable Warranty Card User's Manual Quick Start Guide These...
If you need to set up and operate the LCD TV in the package. Make sure all you are included in its basic configuration. Package Contents Chapter 1 Introducing the LCD TV Make sure all of the following contents are included. LCD TV Bottom Stand / Screw Driver and 6 Screws ENGLISH Remote Control/ AA Batteries x 2 VIDEO Cable Component Cable Power Cord AUDIO Cable Warranty Card User's Manual Quick Start Guide These...

User Guide
Page 12
... S-VIDEO and AUDIO(L/R) output jacks on external video equipment. VHF/UHF IN-HDTV-AIR Connects RF input from VHF/UHF antenna or cable. HDMI IN Connects the all digital AV equipment with HDMI connector.HDMI supports enhanced, high-definition video and two-channel digital audio. S-VIDEO IN Connects to the AC power cord. 11 The AUDIO(L/R) of HDMI IN is for DVI connection. AUDIO OUT-STEREO Connects to the composite VIDEO and AUDIO(L/R) output jacks on external video equipment. Rear View and Jacks Chapter 1 Introducing the LCD TV...
... S-VIDEO and AUDIO(L/R) output jacks on external video equipment. VHF/UHF IN-HDTV-AIR Connects RF input from VHF/UHF antenna or cable. HDMI IN Connects the all digital AV equipment with HDMI connector.HDMI supports enhanced, high-definition video and two-channel digital audio. S-VIDEO IN Connects to the AC power cord. 11 The AUDIO(L/R) of HDMI IN is for DVI connection. AUDIO OUT-STEREO Connects to the composite VIDEO and AUDIO(L/R) output jacks on external video equipment. Rear View and Jacks Chapter 1 Introducing the LCD TV...

User Guide
Page 13
... AUDIO. 1 Turns the LCD TV on and off. 2 1 3 2 SET 4 Remote control universa code setup.For more information on setting up and down. 29 VOL+- In HDTV mode, use ▲▼buttons to select the video equipment connected to four devices. To select a device, simply select one of your remote control, please see the "Programming Your Remote Control" section. 5 3 TV Controls this LCD TV. 6 24 DVD Controls DVD player or Video player. 7 CBL Controls Cable Converter or Satellite 8 9 Receiver. 10 AUX Controls Audio Amplifier 25 0-9/ENTER Pressing a number...
... AUDIO. 1 Turns the LCD TV on and off. 2 1 3 2 SET 4 Remote control universa code setup.For more information on setting up and down. 29 VOL+- In HDTV mode, use ▲▼buttons to select the video equipment connected to four devices. To select a device, simply select one of your remote control, please see the "Programming Your Remote Control" section. 5 3 TV Controls this LCD TV. 6 24 DVD Controls DVD player or Video player. 7 CBL Controls Cable Converter or Satellite 8 9 Receiver. 10 AUX Controls Audio Amplifier 25 0-9/ENTER Pressing a number...
User Guide
Page 34
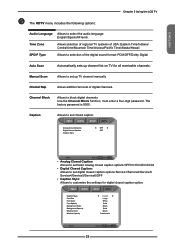
... analog closed caption options:OFF/CC1/CC2/CC3/CC4 ▪ Digital Closed Caption: Allows to set up channel list on TV for digital closed caption option: Caption Style Font Size Font Color Font Opacity Background Color Background Opacity Window Color Window Opacity ◄ Custom ► Large White Solid Black Solid Black Translucent HDTV Select Back 33 Manual Scan Allows to set digital closed caption options:Service1/Service2/Service3/ Service4/Service5/Service6/OFF ▪ Caption Style: Allows to block digital channels. Use the Channel...
... analog closed caption options:OFF/CC1/CC2/CC3/CC4 ▪ Digital Closed Caption: Allows to set up channel list on TV for digital closed caption option: Caption Style Font Size Font Color Font Opacity Background Color Background Opacity Window Color Window Opacity ◄ Custom ► Large White Solid Black Solid Black Translucent HDTV Select Back 33 Manual Scan Allows to set digital closed caption options:Service1/Service2/Service3/ Service4/Service5/Service6/OFF ▪ Caption Style: Allows to block digital channels. Use the Channel...
User Guide
Page 35
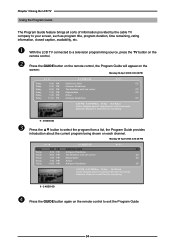
... Not Rated Clubs: Dongwa doesn't communicate with his parents. Press the GUIDE button on the remote control, the Program Guide will appear on the remote control. Chapter 3 Using the LCD TV Using the Program Guide The Program Guide feature brings all sorts of information provided by the cable TV company to your screen, such as program title, program duration, time remaining, rating information, closed caption, availability, etc. With the LCD TV connected to exit the Program Guide 34
... Not Rated Clubs: Dongwa doesn't communicate with his parents. Press the GUIDE button on the remote control, the Program Guide will appear on the remote control. Chapter 3 Using the LCD TV Using the Program Guide The Program Guide feature brings all sorts of information provided by the cable TV company to your screen, such as program title, program duration, time remaining, rating information, closed caption, availability, etc. With the LCD TV connected to exit the Program Guide 34

User Guide
Page 43
... display the Main menu, and use the ◄► buttons changes the setting, and press the MENU exits the menu. Channel Skip Allows addition/removal of channels on TV for all receivable channels. Press the MENU button on . Channel Name Allows channel labels to turn the LCD TV on the remote control to select the TV. Searching Tuner Mode Channel Skip Channel Name Cable-STD On TV Select Exit The TV menu includes the following options: Searching Automatically sets up channel list on the channel list...
... display the Main menu, and use the ◄► buttons changes the setting, and press the MENU exits the menu. Channel Skip Allows addition/removal of channels on TV for all receivable channels. Press the MENU button on . Channel Name Allows channel labels to turn the LCD TV on the remote control to select the TV. Searching Tuner Mode Channel Skip Channel Name Cable-STD On TV Select Exit The TV menu includes the following options: Searching Automatically sets up channel list on the channel list...

User Guide
Page 46
... Universal TV, VCR or DVD, Cable or Satellite Receivers, Amplifier or Tuner, and Auxiliary devices. Enter the first five-digit code for other devices you want to -use the DVD key. 1. If you cannot find a code that works. Press set up the remote using the procedure in "Programming a Device". Enter 9-9-1, then the device group number (0= Cable, 1= TV, 2= VCR, 3= Audio). Press and hold SET until you find out which code is correct, the LED blinks...
... Universal TV, VCR or DVD, Cable or Satellite Receivers, Amplifier or Tuner, and Auxiliary devices. Enter the first five-digit code for other devices you want to -use the DVD key. 1. If you cannot find a code that works. Press set up the remote using the procedure in "Programming a Device". Enter 9-9-1, then the device group number (0= Cable, 1= TV, 2= VCR, 3= Audio). Press and hold SET until you find out which code is correct, the LED blinks...


