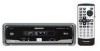
Owner's Manual
Page 4
...Before Using 3 Before Using This Product 3 - In Case of This Player - Resetting the Microprocessor Discs Compatible with the Menu Screen Chapter and Track Advance/Return 20 - What the Marks on DVDs Indicate - Precaution Detaching and Replacing the Front Panel 12 - Important -... 17 Switching Power ON/OFF 17 - Preventing the Battery from Becoming Exhausted - Remote Controller - About This Product - This Product Using the Remote Controller 15 - Switching Power OFF Disc (DVD/Video CD/CD) Playback ........ 19 - Specifying Chapter - Fast Reverse Stopping Playback...
...Before Using 3 Before Using This Product 3 - In Case of This Player - Resetting the Microprocessor Discs Compatible with the Menu Screen Chapter and Track Advance/Return 20 - What the Marks on DVDs Indicate - Precaution Detaching and Replacing the Front Panel 12 - Important -... 17 Switching Power ON/OFF 17 - Preventing the Battery from Becoming Exhausted - Remote Controller - About This Product - This Product Using the Remote Controller 15 - Switching Power OFF Disc (DVD/Video CD/CD) Playback ........ 19 - Specifying Chapter - Fast Reverse Stopping Playback...
Owner's Manual
Page 5
Selecting Audio, Subtitle and Angle Operating with the Information Display of a DVD 30 - Searching for Digital Output (DIGITAL OUTPUT 48 Setting Digital and Analog Audio Output (OUTPUT SELECTION 49 Setting Remote Control Code Type (REMOTE CODE SELECT 50 Others 51 Operating with the Head Unit 51 - Setting Subtitles and Assist Subtitles ON/OFF - Selecting...Specifications 62 2 Selecting Repeat Range - Selecting Audio Output Operating with the Information Display 2 of a CD 35 - Selecting Audio Output Operating with the Information Display of a DVD 32 - Setting Random Play -
Selecting Audio, Subtitle and Angle Operating with the Information Display of a DVD 30 - Searching for Digital Output (DIGITAL OUTPUT 48 Setting Digital and Analog Audio Output (OUTPUT SELECTION 49 Setting Remote Control Code Type (REMOTE CODE SELECT 50 Others 51 Operating with the Head Unit 51 - Setting Subtitles and Assist Subtitles ON/OFF - Selecting...Specifications 62 2 Selecting Repeat Range - Selecting Audio Output Operating with the Information Display 2 of a CD 35 - Selecting Audio Output Operating with the Information Display of a DVD 32 - Setting Random Play -
Owner's Manual
Page 16
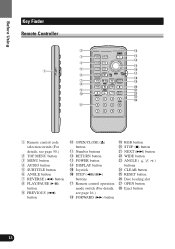
...!3 !4 r AUDIO RTN !5 t S.TITLE DISP !6 y ANGLE BSSM/ BAND DVD TV ch call !7 !8 u RGB !9 i MENU V.SEL @0 o REAR @1 !0 WIDE @2 OPEN/CLOSE ANGLE @3 1 2 3 C @4 CLEAR !1 4 5 6 10 7 8 9 0 q Remote control code selection switch (For details, see page 50.) w TOP MENU button ... (4) button !0 OPEN/CLOSE (0) button !1 Number buttons !2 RETURN button !3 POWER button !4 DISPLAY button !5 Joystick !6 STEP (e)/(E) buttons !7 Remote control operation mode switch (For details, see page 16.) !8 FORWARD (¡) button !9 RGB button @0 STOP (7) button @1 NEXT (¢)...
...!3 !4 r AUDIO RTN !5 t S.TITLE DISP !6 y ANGLE BSSM/ BAND DVD TV ch call !7 !8 u RGB !9 i MENU V.SEL @0 o REAR @1 !0 WIDE @2 OPEN/CLOSE ANGLE @3 1 2 3 C @4 CLEAR !1 4 5 6 10 7 8 9 0 q Remote control code selection switch (For details, see page 50.) w TOP MENU button ... (4) button !0 OPEN/CLOSE (0) button !1 Number buttons !2 RETURN button !3 POWER button !4 DISPLAY button !5 Joystick !6 STEP (e)/(E) buttons !7 Remote control operation mode switch (For details, see page 16.) !8 FORWARD (¡) button !9 RGB button @0 STOP (7) button @1 NEXT (¢)...
Owner's Manual
Page 18
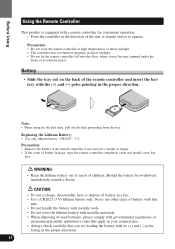
... Always check carefully that you are loading the battery with the (+) and (-) poles pointing in direct sunlight. • Do not let the remote controller fall onto the floor, where it may become jammed under the brake or accelerator pedal. Replacing the Lithium Battery: • Use only .... • Do not handle the battery with metallic tools. • Do not store the lithium battery with metallic materials. • When disposing of the remote controller and insert the battery with its (+) and (-) poles facing in a fire. • Use a CR2025 (3 V) lithium battery only. Battery •...
... Always check carefully that you are loading the battery with the (+) and (-) poles pointing in direct sunlight. • Do not let the remote controller fall onto the floor, where it may become jammed under the brake or accelerator pedal. Replacing the Lithium Battery: • Use only .... • Do not handle the battery with metallic tools. • Do not store the lithium battery with metallic materials. • When disposing of the remote controller and insert the battery with its (+) and (-) poles facing in a fire. • Use a CR2025 (3 V) lithium battery only. Battery •...
Owner's Manual
Page 19
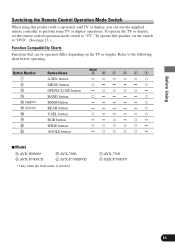
... TV or display. C:AVX-7300 F:GEX-P7000TV 16 Before Using Switching the Remote Control Operation Mode Switch When using this product, set the remote control operation mode switch to "TV". To operate the TV or display, set the switch to "DVD". (See page 13.) Function Compatibility Charts Functions that can use the supplied...
... TV or display. C:AVX-7300 F:GEX-P7000TV 16 Before Using Switching the Remote Control Operation Mode Switch When using this product, set the remote control operation mode switch to "TV". To operate the TV or display, set the switch to "DVD". (See page 13.) Function Compatibility Charts Functions that can use the supplied...
Owner's Manual
Page 20
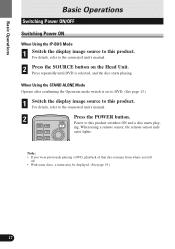
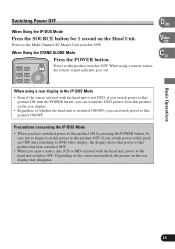
...this product. POWER Power to the connected unit's manual. 2 Press the POWER button. When using a remote sensor, the remote sensor indi- AUDIO RTN cator lights. S.TITLE DISP Note: • If you were previously playing a DVD, playback of that disc resumes from where you left off. • With some discs, a menu may...MENU TOP MENU ing. For details, refer to the connected unit's manual. 2 Press the SOURCE button on the Head Unit. Press repeatedly until DVD is set to DVD. (See page 13.) 1 Switch the display image source to this product switches ON and a disc starts play-
...this product. POWER Power to the connected unit's manual. 2 Press the POWER button. When using a remote sensor, the remote sensor indi- AUDIO RTN cator lights. S.TITLE DISP Note: • If you were previously playing a DVD, playback of that disc resumes from where you left off. • With some discs, a menu may...MENU TOP MENU ing. For details, refer to the connected unit's manual. 2 Press the SOURCE button on the Head Unit. Press repeatedly until DVD is set to DVD. (See page 13.) 1 Switch the display image source to this product switches ON and a disc starts play-
Owner's Manual
Page 21
POWER Power to this product OFF. S.TITLE DISP VD Video CD CD When using a remote sensor, the remote sensor indicator goes out. Basic Operations Precautions concerning the IP-BUS Mode • When you can switch power to this product ON with the head ... you switch power to the head unit switches OFF. If you switch power to this product OFF after switching to DVD video display, the display shows that power to this product has been switched OFF. • When you eject a source disc (CD or MD) selected with ...
POWER Power to this product OFF. S.TITLE DISP VD Video CD CD When using a remote sensor, the remote sensor indicator goes out. Basic Operations Precautions concerning the IP-BUS Mode • When you can switch power to this product ON with the head ... you switch power to the head unit switches OFF. If you switch power to this product OFF after switching to DVD video display, the display shows that power to this product has been switched OFF. • When you eject a source disc (CD or MD) selected with ...
Owner's Manual
Page 32
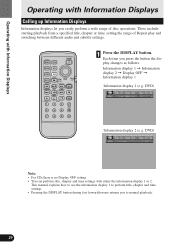
... 1 or 2. MENU AUDIO TOP MENU RTN POWER S.TITLE ANGLE DISP BSSM/ BAND DVD TV ch call RGB MENU V.SEL REAR OPEN/CLOSE 1 ANGLE 2 3 4 5 6 7 8 9 WIDE C CLEAR 10 0 REMOTE CONTROLLER 1 Press the DISPLAY button. DVD) Information display 2 (e.g. Each time you to perform title, chapter and time settings....display 1 to normal playback. 29 These include starting playback from a specified title, chapter or time, setting the range of disc operations. DVD) Note: • For CDs there is no Display OFF setting. • You can perform title, chapter and time settings with ...
... 1 or 2. MENU AUDIO TOP MENU RTN POWER S.TITLE ANGLE DISP BSSM/ BAND DVD TV ch call RGB MENU V.SEL REAR OPEN/CLOSE 1 ANGLE 2 3 4 5 6 7 8 9 WIDE C CLEAR 10 0 REMOTE CONTROLLER 1 Press the DISPLAY button. DVD) Information display 2 (e.g. Each time you to perform title, chapter and time settings....display 1 to normal playback. 29 These include starting playback from a specified title, chapter or time, setting the range of disc operations. DVD) Note: • For CDs there is no Display OFF setting. • You can perform title, chapter and time settings with ...
Owner's Manual
Page 40
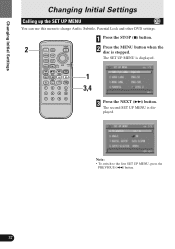
... UP MENU is stopped. MENU AUDIO TOP MENU RTN POWER S.TITLE ANGLE DISP BSSM/ BAND DVD TV ch call RGB MENU V.SEL REAR OPEN/CLOSE 1 ANGLE 23 4 5 6 WIDE C CLEAR 10 7 8 9 0 REMOTE CONTROLLER 1 Press the STOP (7) button. 2 Press the MENU button when the disc is ...displayed. The SET UP MENU is displayed. 3 Press the NEXT (¢) button. Note: • To switch to change Audio, Subtitle, Parental Lock and other DVD settings.
... UP MENU is stopped. MENU AUDIO TOP MENU RTN POWER S.TITLE ANGLE DISP BSSM/ BAND DVD TV ch call RGB MENU V.SEL REAR OPEN/CLOSE 1 ANGLE 23 4 5 6 WIDE C CLEAR 10 7 8 9 0 REMOTE CONTROLLER 1 Press the STOP (7) button. 2 Press the MENU button when the disc is ...displayed. The SET UP MENU is displayed. 3 Press the NEXT (¢) button. Note: • To switch to change Audio, Subtitle, Parental Lock and other DVD settings.
Owner's Manual
Page 53
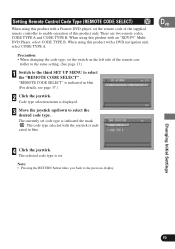
... the third SET UP MENU to the previous display. "REMOTE CODE SELECT" is set. Setting Remote Control Code Type (REMOTE CODE SELECT) VD When using this product with a Pioneer DVD player, set the remote code of the supplied remote controller to select the desired code type. There are two remote codes, CODE TYPE A and CODE TYPE B. Code type selection...
... the third SET UP MENU to the previous display. "REMOTE CODE SELECT" is set. Setting Remote Control Code Type (REMOTE CODE SELECT) VD When using this product with a Pioneer DVD player, set the remote code of the supplied remote controller to select the desired code type. There are two remote codes, CODE TYPE A and CODE TYPE B. Code type selection...
Owner's Manual
Page 55
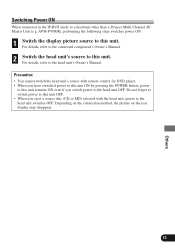
Precaution • You cannot switch the head unit's source with remote control for DVD player. • When you have switched power to this unit ON by pressing the POWER button, power to this unit remains ON even if you eject a ... IP-BUS mode to this unit. AVM-P9000R), performing the following steps switches power ON. 1 Switch the display picture source to a head unit other than a Pioneer Multi-Channel AV Master Unit (e.g.
Precaution • You cannot switch the head unit's source with remote control for DVD player. • When you have switched power to this unit ON by pressing the POWER button, power to this unit remains ON even if you eject a ... IP-BUS mode to this unit. AVM-P9000R), performing the following steps switches power ON. 1 Switch the display picture source to a head unit other than a Pioneer Multi-Channel AV Master Unit (e.g.
Owner's Manual
Page 56
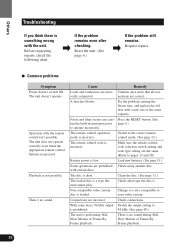
...(See page 15.) Some operations are correct. With some discs, 96 kHz output Switch the output setting to the correct remote control mode. (See page 13.) The remote control code is . Request repairs. 7 Common problems Symptom Power doesn't switch ON. The unit doesn't operate. There...page 11.) The loaded disc is incorrect. Before requesting repairs, check the following chart. \ If the problem remains even after checking. The remote control operation mode is a type this unit cannot play. Check what type the disc is incorrect. Check connections. A fuse has blown. ...
...(See page 15.) Some operations are correct. With some discs, 96 kHz output Switch the output setting to the correct remote control mode. (See page 13.) The remote control code is . Request repairs. 7 Common problems Symptom Power doesn't switch ON. The unit doesn't operate. There...page 11.) The loaded disc is incorrect. Before requesting repairs, check the following chart. \ If the problem remains even after checking. The remote control operation mode is a type this unit cannot play. Check what type the disc is incorrect. Check connections. A fuse has blown. ...
Other Manual
Page 2
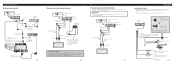
...OFF status of ignition switch position. Note: • The position of the remote control signal is not possible, use a rear display, be connected to watch the DVD or Video CD. This lead must be sure to watch the DVD or Video CD while Driving. IP-BUS White (audio output (Left)) ...STAND ALONE Red (audio output (Right)) This product Yellow (rear video output) RCA cable (supplied) RCA cable (sold separately) IP-BUS cable (supplied with two kinds of a display to enable passengers in remote sensor. Clamp...
...OFF status of ignition switch position. Note: • The position of the remote control signal is not possible, use a rear display, be connected to watch the DVD or Video CD. This lead must be sure to watch the DVD or Video CD while Driving. IP-BUS White (audio output (Left)) ...STAND ALONE Red (audio output (Right)) This product Yellow (rear video output) RCA cable (supplied) RCA cable (sold separately) IP-BUS cable (supplied with two kinds of a display to enable passengers in remote sensor. Clamp...


