Owner's Manual
Page 4
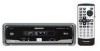
... 10 Care of Trouble - Switching Power ON - Skipping to Use This Manual - Still Playback - Precaution Before Using 3 Before Using This Product 3 - To Ensure Safe Driving - Specifying Track Disc Fast Forward/Reverse 22 - Changing the Mode Switch Setting - This Product Using the Remote Controller 15 - Important - Battery - About This Manual - What the Marks on DVDs Indicate - Contents Be sure to read this Product 7 Disc Operation 8 Dear Customer i For U.S. Switching the Remote Control Operation Mode Switch Basic Operations 17 Switching Power ON/OFF...
... 10 Care of Trouble - Switching Power ON - Skipping to Use This Manual - Still Playback - Precaution Before Using 3 Before Using This Product 3 - To Ensure Safe Driving - Specifying Track Disc Fast Forward/Reverse 22 - Changing the Mode Switch Setting - This Product Using the Remote Controller 15 - Important - Battery - About This Manual - What the Marks on DVDs Indicate - Contents Be sure to read this Product 7 Disc Operation 8 Dear Customer i For U.S. Switching the Remote Control Operation Mode Switch Basic Operations 17 Switching Power ON/OFF...
Owner's Manual
Page 5
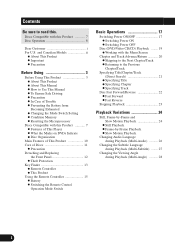
..., Starting Playback from a Specified Time - Selecting Repeat Range - Selecting Repeat Range - Setting the Subtitle Language Setting the Audio Language (AUDIO LANG 42 Setting the Menu Language (MENU LANG 43 Setting the Parental Lock (PARENTAL) .... 43 - Selecting Audio Output Operating with the Head Unit 51 - Searching for Digital Output (DIGITAL OUTPUT 48 Setting Digital and Analog Audio Output (OUTPUT SELECTION 49 Setting Remote Control Code Type (REMOTE CODE SELECT 50 Others 51 Operating with the Information Display of a DVD 30 -
..., Starting Playback from a Specified Time - Selecting Repeat Range - Selecting Repeat Range - Setting the Subtitle Language Setting the Audio Language (AUDIO LANG 42 Setting the Menu Language (MENU LANG 43 Setting the Parental Lock (PARENTAL) .... 43 - Selecting Audio Output Operating with the Head Unit 51 - Searching for Digital Output (DIGITAL OUTPUT 48 Setting Digital and Analog Audio Output (OUTPUT SELECTION 49 Setting Remote Control Code Type (REMOTE CODE SELECT 50 Others 51 Operating with the Information Display of a DVD 30 -
Owner's Manual
Page 7
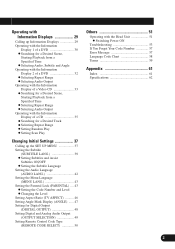
...'s Rear video output is for use with a video screen that enables the Driver to watch the DVD or Video CD. Example: When you park your car's parking brake is engaged or not, and prevents you from watching a DVD or Video CD on the display connected to watch a DVD (the screen is visible to the driver. • In some countries or states the viewing of a display to enable passengers in a safe place and apply the parking brake, the picture appears...
...'s Rear video output is for use with a video screen that enables the Driver to watch the DVD or Video CD. Example: When you park your car's parking brake is engaged or not, and prevents you from watching a DVD or Video CD on the display connected to watch a DVD (the screen is visible to the driver. • In some countries or states the viewing of a display to enable passengers in a safe place and apply the parking brake, the picture appears...

Owner's Manual
Page 8
... Mode switch on the right side of Trouble Should this product fail to press the RESET button. (See page 6.) (1) When using this product with a Pioneer compo- After changing the setting, be sure your dealer or nearest authorized Pioneer Service Station. In Case of this unit for outside sounds to be audible. • Protect the product from Becoming Exhausted When using this product, be sure to operate...
... Mode switch on the right side of Trouble Should this product fail to press the RESET button. (See page 6.) (1) When using this product with a Pioneer compo- After changing the setting, be sure your dealer or nearest authorized Pioneer Service Station. In Case of this unit for outside sounds to be audible. • Protect the product from Becoming Exhausted When using this product, be sure to operate...

Owner's Manual
Page 10
... the table below can be able to disc characteristics or scratches or dirt on this product due to use certain functions. • Playback of some DVD-Video discs, you purchased the application software.) • Playback of CD-TEXT discs is possible, but display of This Player Compatible with DVD, Video CD and CD Formats DVD, Video CD and CD discs that display the logos shown below . For more...
... the table below can be able to disc characteristics or scratches or dirt on this product due to use certain functions. • Playback of some DVD-Video discs, you purchased the application software.) • Playback of CD-TEXT discs is possible, but display of This Player Compatible with DVD, Video CD and CD Formats DVD, Video CD and CD discs that display the logos shown below . For more...
Owner's Manual
Page 13
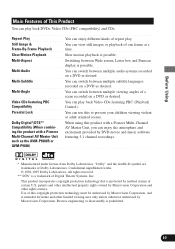
...-Audio Multi-Subtitle Multi-Angle Video CDs featuring PBC Compatibility Parental Lock Dolby Digital*/DTS** Compatibility (When combining the product with a Pioneer Multi-Channel AV Master Unit, you can play back Video CDs featuring PBC (Playback Control). You can switch between multiple viewing angles of one frame at a time. You can view still images or playback of a scene recorded on a DVD as desired. You can switch between multiple audio...
...-Audio Multi-Subtitle Multi-Angle Video CDs featuring PBC Compatibility Parental Lock Dolby Digital*/DTS** Compatibility (When combining the product with a Pioneer Multi-Channel AV Master Unit, you can play back Video CDs featuring PBC (Playback Control). You can switch between multiple viewing angles of one frame at a time. You can view still images or playback of a scene recorded on a DVD as desired. You can switch between multiple audio...
Owner's Manual
Page 21
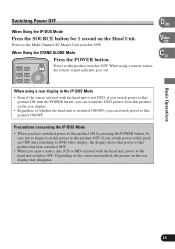
... remote sensor indicator goes out. If you switch power to this product OFF after switching to DVD video display, the display shows that power to this product has been switched OFF. • When you eject a source disc (CD or MD) selected with the POWER button, you can watch the DVD picture from this product OFF. Depending on the connection method, the picture on the Head Unit. When Using the STAND ALONE Mode MENU AUDIO TOP MENU...
... remote sensor indicator goes out. If you switch power to this product OFF after switching to DVD video display, the display shows that power to this product has been switched OFF. • When you eject a source disc (CD or MD) selected with the POWER button, you can watch the DVD picture from this product OFF. Depending on the connection method, the picture on the Head Unit. When Using the STAND ALONE Mode MENU AUDIO TOP MENU...
Owner's Manual
Page 32
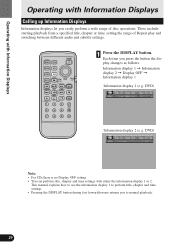
... playback. 29 This manual explains how to use the information display 1 to perform title, chapter and time settings. • Pressing the DISPLAY button during fast forward/reverse returns you press the button the display changes as follows: Information display 1 = Information display 2 = Display OFF = Information display 1 Information display 1 (e.g. MENU AUDIO TOP MENU RTN POWER S.TITLE ANGLE DISP BSSM/ BAND DVD TV ch call RGB MENU V.SEL REAR OPEN/CLOSE 1 ANGLE 2 3 4 5 6 7 8 9 WIDE C CLEAR 10 0 REMOTE CONTROLLER 1 Press the DISPLAY button.
... playback. 29 This manual explains how to use the information display 1 to perform title, chapter and time settings. • Pressing the DISPLAY button during fast forward/reverse returns you press the button the display changes as follows: Information display 1 = Information display 2 = Display OFF = Information display 1 Information display 1 (e.g. MENU AUDIO TOP MENU RTN POWER S.TITLE ANGLE DISP BSSM/ BAND DVD TV ch call RGB MENU V.SEL REAR OPEN/CLOSE 1 ANGLE 2 3 4 5 6 7 8 9 WIDE C CLEAR 10 0 REMOTE CONTROLLER 1 Press the DISPLAY button.

Owner's Manual
Page 33
... and Time Search are not possible when disc playback has been stopped. 7 Direct Search Even without using an information display you use the Search function to specify a title or chapter to search for a desired scene, use the Search function to search for a desired scene by moving the joystick up/down. 3 While the input number is indicated in blue. 2 Press the number buttons to...
... and Time Search are not possible when disc playback has been stopped. 7 Direct Search Even without using an information display you use the Search function to specify a title or chapter to search for a desired scene, use the Search function to search for a desired scene by moving the joystick up/down. 3 While the input number is indicated in blue. 2 Press the number buttons to...
Owner's Manual
Page 40
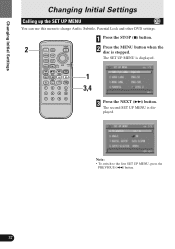
... SET UP MENU is displayed. 3 Press the NEXT (¢) button. MENU AUDIO TOP MENU RTN POWER S.TITLE ANGLE DISP BSSM/ BAND DVD TV ch call RGB MENU V.SEL REAR OPEN/CLOSE 1 ANGLE 23 4 5 6 WIDE C CLEAR 10 7 8 9 0 REMOTE CONTROLLER 1 Press the STOP (7) button. 2 Press the MENU button when the disc is stopped. Note: • To switch to change Audio, Subtitle, Parental Lock and other DVD settings. Changing Initial Settings Changing Initial Settings Calling up the SET UP MENU You can use this menu...
... SET UP MENU is displayed. 3 Press the NEXT (¢) button. MENU AUDIO TOP MENU RTN POWER S.TITLE ANGLE DISP BSSM/ BAND DVD TV ch call RGB MENU V.SEL REAR OPEN/CLOSE 1 ANGLE 23 4 5 6 WIDE C CLEAR 10 7 8 9 0 REMOTE CONTROLLER 1 Press the STOP (7) button. 2 Press the MENU button when the disc is stopped. Note: • To switch to change Audio, Subtitle, Parental Lock and other DVD settings. Changing Initial Settings Changing Initial Settings Calling up the SET UP MENU You can use this menu...
Owner's Manual
Page 51
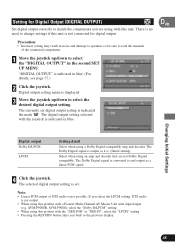
... product with a Pioneer Multi-Channel AV Master Unit with the joystick is not output. • When using a Dolby Digital compatible amp and decoder. Changing Initial Settings Digital output Dolby D/LPCM LPCM Setting detail Select when using this unit. The Dolby Digital signal is not possible. Note: • Linear PCM output of the connected components. 1 Move the joystick up /down to select the "DIGITAL OUTPUT" in blue. (For details...
... product with a Pioneer Multi-Channel AV Master Unit with the joystick is not output. • When using a Dolby Digital compatible amp and decoder. Changing Initial Settings Digital output Dolby D/LPCM LPCM Setting detail Select when using this unit. The Dolby Digital signal is not possible. Note: • Linear PCM output of the connected components. 1 Move the joystick up /down to select the "DIGITAL OUTPUT" in blue. (For details...

Owner's Manual
Page 52
... connections. If you select the "96kHz" setting, no sound will be no sound so be output when playing discs featuring 96 kHz recordings. • Pressing the RETURN button takes you select the "96kHz" setting, audio is not output from digital output. • With discs do not feature a CSS (Content Scrambling System) copy guard signal, a 96 kHz digital signal is converted to the previous display. 49 Changing Initial Settings Setting...
... connections. If you select the "96kHz" setting, no sound will be no sound so be output when playing discs featuring 96 kHz recordings. • Pressing the RETURN button takes you select the "96kHz" setting, audio is not output from digital output. • With discs do not feature a CSS (Content Scrambling System) copy guard signal, a 96 kHz digital signal is converted to the previous display. 49 Changing Initial Settings Setting...
Owner's Manual
Page 55
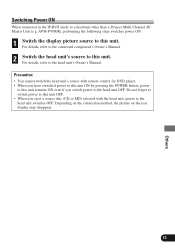
..., refer to the connected component's Owner's Manual. 2 Switch the head unit's source to this unit. Precaution • You cannot switch the head unit's source with remote control for DVD player. • When you have switched power to this unit ON by pressing the POWER button, power to this unit OFF. • When you switch power to the head unit switches OFF. Do not forget to switch power to this unit remains ON even if you eject a source disc (CD or MD...
..., refer to the connected component's Owner's Manual. 2 Switch the head unit's source to this unit. Precaution • You cannot switch the head unit's source with remote control for DVD player. • When you have switched power to this unit ON by pressing the POWER button, power to this unit OFF. • When you switch power to the head unit switches OFF. Do not forget to switch power to this unit remains ON even if you eject a source disc (CD or MD...

Owner's Manual
Page 58
... is ON. The disc features a signal to multiple angle viewing of a scene that has a signal prohibiting copying, the picture may have forgotten your code number. Input the correct code number. (See page 45.) You have this.) Since this unit. You can only switch between options indicated in the SET UP MENU. This does not mean this unit. (See page 8.) A Parental Lock message is Parental Lock is not possible...
... is ON. The disc features a signal to multiple angle viewing of a scene that has a signal prohibiting copying, the picture may have forgotten your code number. Input the correct code number. (See page 45.) You have this.) Since this unit. You can only switch between options indicated in the SET UP MENU. This does not mean this unit. (See page 8.) A Parental Lock message is Parental Lock is not possible...

Owner's Manual
Page 59
... Control) The Video CD playing does not menu display cannot be feature PBC. PBC is not compatible with Video CDs not featuring PBC. Cause Remedy Optical digital cables are not possible. The Multi-Channel AV Master Unit is switched OFF. Switch the output setting to 48 kHz. (See page 49.) Indications are not the Multi- called up. 7 Problems during Multi-Channel AV Master Unit connection Symptom There's no sound...
... Control) The Video CD playing does not menu display cannot be feature PBC. PBC is not compatible with Video CDs not featuring PBC. Cause Remedy Optical digital cables are not possible. The Multi-Channel AV Master Unit is switched OFF. Switch the output setting to 48 kHz. (See page 49.) Indications are not the Multi- called up. 7 Problems during Multi-Channel AV Master Unit connection Symptom There's no sound...

Owner's Manual
Page 62
... signal recording system used for Moving Pictures Experts Group, and is a surround system delivering multi-channel audio from one camera at a time are transmitted to 6 independent channels. Multi-Angle With regular TV programs, although multiple cameras are numbered in the same way as the Dolby Digital surround sound system used to simultaneously shoot scenes, only images from up to music CDs, which are used...
... signal recording system used for Moving Pictures Experts Group, and is a surround system delivering multi-channel audio from one camera at a time are transmitted to 6 independent channels. Multi-Angle With regular TV programs, although multiple cameras are numbered in the same way as the Dolby Digital surround sound system used to simultaneously shoot scenes, only images from up to music CDs, which are used...

Owner's Manual
Page 63
Playback Control (PBC) This is displayed on the rear of the unit. This unit's region number is a playback control signal recorded on a single disc. Optical digital output refers to the transmission (output) of a digital audio signal via optical cable. (The amp or other functions. 60 Others and standard-resolution still images. Playback of a DVD is not possible unless it 's possible to minimize any loss of multiple movies on Video CDs...
Playback Control (PBC) This is displayed on the rear of the unit. This unit's region number is a playback control signal recorded on a single disc. Optical digital output refers to the transmission (output) of a digital audio signal via optical cable. (The amp or other functions. 60 Others and standard-resolution still images. Playback of a DVD is not possible unless it 's possible to minimize any loss of multiple movies on Video CDs...
Other Manual
Page 1
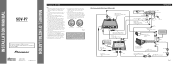
... installation. • Refer to the battery. When connecting this product and those for vehicles with cable clamps or adhesive tape. Blue Channel AV Master Unit) Blue 40 cm Not used. Printed in a vehicle that have the same function. INSTALLATION MANUAL OF OF SDV-P7 This product conforms to the supplied Installation manuals of both products and connect cords that does not have an ACC (accessory) position on connecting the power amp...
... installation. • Refer to the battery. When connecting this product and those for vehicles with cable clamps or adhesive tape. Blue Channel AV Master Unit) Blue 40 cm Not used. Printed in a vehicle that have the same function. INSTALLATION MANUAL OF OF SDV-P7 This product conforms to the supplied Installation manuals of both products and connect cords that does not have an ACC (accessory) position on connecting the power amp...
Other Manual
Page 2
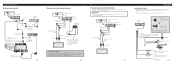
... of power cord. Light green Used to watch the DVD or Video CD. IP-BUS White (audio output (Left)) STAND ALONE Red (audio output (Right)) This product Yellow (rear video output) RCA cable (supplied) RCA cable (sold remote sensor. Use the short cord when installing this product on the vehicle model. Clamp firmly with two kinds of the parking brake. For details, consult the vehicle Owner's Manual or dealer. Power supply side Ground side Parking brake switch Fuse resistor Fuse holder Red To electric terminal controlled by ignition switch...
... of power cord. Light green Used to watch the DVD or Video CD. IP-BUS White (audio output (Left)) STAND ALONE Red (audio output (Right)) This product Yellow (rear video output) RCA cable (supplied) RCA cable (sold remote sensor. Use the short cord when installing this product on the vehicle model. Clamp firmly with two kinds of the parking brake. For details, consult the vehicle Owner's Manual or dealer. Power supply side Ground side Parking brake switch Fuse resistor Fuse holder Red To electric terminal controlled by ignition switch...
Other Manual
Page 3
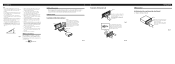
... illustrated installation methods. Fig. 7 MODE Switch Setting Before installing, use of unauthorized parts can be properly installed either from horizontal, the unit might splash onto it does not obstruct seat movement. Keeping the keys pressed against the sides of unit chassis). For details, refer to ensure proper installation. Installation Note: • Before finally installing the unit, connect the wiring temporarily, making sure it is all leads and cords...
... illustrated installation methods. Fig. 7 MODE Switch Setting Before installing, use of unauthorized parts can be properly installed either from horizontal, the unit might splash onto it does not obstruct seat movement. Keeping the keys pressed against the sides of unit chassis). For details, refer to ensure proper installation. Installation Note: • Before finally installing the unit, connect the wiring temporarily, making sure it is all leads and cords...


