Owner's Manual
Page 2
...Terminology 8 - Resetting the microprocessor 11 Basic operation Checking part names and functions 13 Inserting/ejecting a disc 14 - Searching for buying this Pioneer product. Searching for performance and function improvements. Using "Saved Criteria" 29 Searching for POIs by using the data on external storage devices (... Connecting your iPod 16 Flow from the actual screens. Displaying the rear camera image 19 How to read the map screen 20 - How to use the navigation menu screens 18 - The actual screens may differ from startup to termination 16 On first-time startup 16 2 ...
...Terminology 8 - Resetting the microprocessor 11 Basic operation Checking part names and functions 13 Inserting/ejecting a disc 14 - Searching for buying this Pioneer product. Searching for performance and function improvements. Using "Saved Criteria" 29 Searching for POIs by using the data on external storage devices (... Connecting your iPod 16 Flow from the actual screens. Displaying the rear camera image 19 How to read the map screen 20 - How to use the navigation menu screens 18 - The actual screens may differ from startup to termination 16 On first-time startup 16 2 ...

Owner's Manual
Page 3
...read traffic information on MSN Direct Activating the service 46 - Searching for a specified phone 53 - Dialing a phone number on the map 42 Checking the current itinerary 42 Editing waypoints and the destination Editing waypoints 44 - Activating the MSN Direct function 47 Browsing gas ... Making a call 56 - Adding a waypoint 44 - Deleting the entry in "Saved Routes" 45 Deleting the current route 45 Browsing information on the map 51 - Checking your cellular phone 52 - Searching for a movie title by selecting a movie title 48 - Dialing from your mobile phone 54 Connecting...
...read traffic information on MSN Direct Activating the service 46 - Searching for a specified phone 53 - Dialing a phone number on the map 42 Checking the current itinerary 42 Editing waypoints and the destination Editing waypoints 44 - Activating the MSN Direct function 47 Browsing gas ... Making a call 56 - Adding a waypoint 44 - Deleting the entry in "Saved Routes" 45 Deleting the current route 45 Browsing information on the map 51 - Checking your cellular phone 52 - Searching for a movie title by selecting a movie title 48 - Dialing from your mobile phone 54 Connecting...
Owner's Manual
Page 6
Setting the memorized songs 118 - Using the Game Alert function 118 - Map Settings 125 - Manage Track Logs 127 - Set Home 129 - Selecting the language 135 - Adjusting the screen brightness 137 - Displaying the "AV Sound... Setting the rear output 144 - Using the direct traffic announcement function 116 - Manage POI 127 - Route 127 - Adjusting source levels 142 - Displaying the "System Settings" menu 134 - Checking the version information 138 - Warnings 128 - Demo Mode 129 - Adjusting the response positions of the touch panels (touch panel calibration)...
Setting the memorized songs 118 - Using the Game Alert function 118 - Map Settings 125 - Manage Track Logs 127 - Set Home 129 - Selecting the language 135 - Adjusting the screen brightness 137 - Displaying the "AV Sound... Setting the rear output 144 - Using the direct traffic announcement function 116 - Manage POI 127 - Route 127 - Adjusting source levels 142 - Displaying the "System Settings" menu 134 - Checking the version information 138 - Warnings 128 - Demo Mode 129 - Adjusting the response positions of the touch panels (touch panel calibration)...

Owner's Manual
Page 8
...Information for the user" (a separate manual) which contains warnings, cautions, and other notes are indicated like this navigation system. Familiarity with this navigation unit will find the necessary page from the "Contents". About the definition of each item displayed on the ... use the various functions in the built-in ALL CAPITAL, BOLD lettering: e.g.) MENU button, MAP button. ! Items in different menus, screen titles, and functional components are described in this navigation unit will help you should note. References are presented in brackets [ ]: e.g.) [Destination],...
...Information for the user" (a separate manual) which contains warnings, cautions, and other notes are indicated like this navigation system. Familiarity with this navigation unit will find the necessary page from the "Contents". About the definition of each item displayed on the ... use the various functions in the built-in ALL CAPITAL, BOLD lettering: e.g.) MENU button, MAP button. ! Items in different menus, screen titles, and functional components are described in this navigation unit will help you should note. References are presented in brackets [ ]: e.g.) [Destination],...

Owner's Manual
Page 9
... equipment that you deviate from the set route, the system will be stored in the built-in memory, but the ability to save these images cannot be guaranteed completely. You can be selected for navigation guidance. 2D map screen 3D map screen A wide variety of Points of Interest (POI... device (USB, SD)". These imported images can store your own pictures on track to this navigation system. Auto reroute function If you remain on an external storage device (USB, SD) in DVD drive (AVIC-F900BTand AVIC-F90BT) DVD-Video (commercial-release DVDVideo), DVD-R/-RW/-R DL (DVD-Video, DVD-VR, ...
... equipment that you deviate from the set route, the system will be stored in the built-in memory, but the ability to save these images cannot be guaranteed completely. You can be selected for navigation guidance. 2D map screen 3D map screen A wide variety of Points of Interest (POI... device (USB, SD)". These imported images can store your own pictures on track to this navigation system. Auto reroute function If you remain on an external storage device (USB, SD) in DVD drive (AVIC-F900BTand AVIC-F90BT) DVD-Video (commercial-release DVDVideo), DVD-R/-RW/-R DL (DVD-Video, DVD-VR, ...
Owner's Manual
Page 11
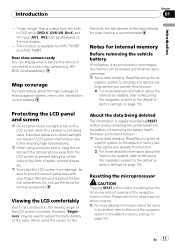
... Returning the na- Map coverage For more detailed information about the items to be used . Protecting the LCD panel and screen p Do not allow direct sunlight to a rear view camera (e.g. However, "Brightness" may be deleted, refer to Returning the navigation system to the information on... exposure to the resulting high temperatures. "Video image" that is limited. NDBC2) (sold separately). p When using the screen for AVIC-F900BT and AVIC-F90BT. Do not use the stylus for normal operations.) Viewing the LCD comfortably Due to its construction, the viewing angle of this ...
... Returning the na- Map coverage For more detailed information about the items to be used . Protecting the LCD panel and screen p Do not allow direct sunlight to a rear view camera (e.g. However, "Brightness" may be deleted, refer to Returning the navigation system to the information on... exposure to the resulting high temperatures. "Video image" that is limited. NDBC2) (sold separately). p When using the screen for AVIC-F900BT and AVIC-F90BT. Do not use the stylus for normal operations.) Viewing the LCD comfortably Due to its construction, the viewing angle of this ...

Owner's Manual
Page 12
... this product for the first time after installation. ! When changing the combination of the system. ! ducts that equipment too. 12 En If the product fails to using this navigation system with the op- If your vehicle position shown on the map with a significant positioning error. 1 Turn the ignition switch OFF. 2 Press RESET button with...
... this product for the first time after installation. ! When changing the combination of the system. ! ducts that equipment too. 12 En If the product fails to using this navigation system with the op- If your vehicle position shown on the map with a significant positioning error. 1 Turn the ignition switch OFF. 2 Press RESET button with...

Owner's Manual
Page 13
... concerning operations, refer to Resetting the microprocessor on page 11. 5 MENU button Press MENU button to Adjusting the screen brightness on page 137. 6 MAP button Press to view the map screen. Adjusts the AV (Audio and Video) source volume. Press and hold to display the "Picture Adjustment" screen. = For details concerning operations...
... concerning operations, refer to Resetting the microprocessor on page 11. 5 MENU button Press MENU button to Adjusting the screen brightness on page 137. 6 MAP button Press to view the map screen. Adjusts the AV (Audio and Video) source volume. Press and hold to display the "Picture Adjustment" screen. = For details concerning operations...

Owner's Manual
Page 14
...use "AV1" input (RCA) on the backside. If data loss or corruption occurs on this navigation system while data is usually not possible to connect the external video component. Changes the map scale continuously. Moving MULTI-CONTROL to the left or right; Keep moving upward or downward; p...route guidance.) p When your phone is ejected. Inserting/ejecting a disc Inserting a disc % Insert a disc into the disc loading slot. Pioneer accepts no liability for any reason, it from this page. Chapter 02 Basic operation Keep moving MULTI-CONTROL to the left or right; Pressing ...
...use "AV1" input (RCA) on the backside. If data loss or corruption occurs on this navigation system while data is usually not possible to connect the external video component. Changes the map scale continuously. Moving MULTI-CONTROL to the left or right; Keep moving upward or downward; p...route guidance.) p When your phone is ejected. Inserting/ejecting a disc Inserting a disc % Insert a disc into the disc loading slot. Pioneer accepts no liability for any reason, it from this page. Chapter 02 Basic operation Keep moving MULTI-CONTROL to the left or right; Pressing ...

Owner's Manual
Page 19
... or cancel your destination on the top left corner displays the "AV Source" menu. En 19 p [MSN Direct] is available for AVICF900BT and AVIC-F90BT. 3 Contacts screen You can access the list of contacts to call up an entry. 4 AV Source menu You can access the screen for... touch . 2 Touch [System Settings] and then touch [Back Camera]. 3 Touch [On] next to "Camera" to activate the camera setting. 4 Press MENU button to display the "Top Menu" and then touch [AV Source]. 5 Touch [RearView] on each menu 1 Top Menu Press MENU button to display the navigation map screen. 8 AV operation screen...
... or cancel your destination on the top left corner displays the "AV Source" menu. En 19 p [MSN Direct] is available for AVICF900BT and AVIC-F90BT. 3 Contacts screen You can access the list of contacts to call up an entry. 4 AV Source menu You can access the screen for... touch . 2 Touch [System Settings] and then touch [Back Camera]. 3 Touch [On] next to "Camera" to activate the camera setting. 4 Press MENU button to display the "Top Menu" and then touch [AV Source]. 5 Touch [RearView] on each menu 1 Top Menu Press MENU button to display the navigation map screen. 8 AV operation screen...

Owner's Manual
Page 20
... d cb 5 Compass The red arrow indicates north. 6 Map mode selector = For details, refer to Switching the map between 2D and 3D on page 22. 7 Shortcut to the "Map Confirmation Screen" Touching this appears green. How to read the map screen This example shows an example of a 2D map screen. 1 2 3 4 5 6 h 7 g 8 f 9 a ...travel* When you to hear the previous guidance again. Chapter 02 Basic operation How to use the map Most of the information provided by your navigation system can do with the "Map Confirmation Screen" on page 36. 8 Stop key for the dummy run 20 En You need to ...
... d cb 5 Compass The red arrow indicates north. 6 Map mode selector = For details, refer to Switching the map between 2D and 3D on page 22. 7 Shortcut to the "Map Confirmation Screen" Touching this appears green. How to read the map screen This example shows an example of a 2D map screen. 1 2 3 4 5 6 h 7 g 8 f 9 a ...travel* When you to hear the previous guidance again. Chapter 02 Basic operation How to use the map Most of the information provided by your navigation system can do with the "Map Confirmation Screen" on page 36. 8 Stop key for the dummy run 20 En You need to ...

Owner's Manual
Page 21
... 126. = For details, refer to Checking the current route conditions on page 125. cle is set to "On". = For details, refer to Map Settings on page 41. Basic operation Chapter 02 Basic operation This key will be read just as you drive. The estimated time of the triangular...refer to Playing simulated tra- The apex of arrival should be displayed while you connect your route. e Street name (or city name) that the navigation system computes internally as the route is playing appears. p This item is not shown when "Full Screen Cockpit" is shown. Touching the key to cancel ...
... 126. = For details, refer to Checking the current route conditions on page 125. cle is set to "On". = For details, refer to Map Settings on page 41. Basic operation Chapter 02 Basic operation This key will be read just as you drive. The estimated time of the triangular...refer to Playing simulated tra- The apex of arrival should be displayed while you connect your route. e Street name (or city name) that the navigation system computes internally as the route is playing appears. p This item is not shown when "Full Screen Cockpit" is shown. Touching the key to cancel ...
Owner's Manual
Page 22
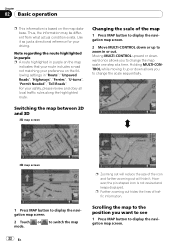
...pin-shaped icon is based on the following settings in or out. Changing the scale of the map 1 Press MAP button to display the navigation map screen. 2 Move MULTI-CONTROL down allows you to switch the map mode. 22 En p Zooming out will hide it as just a directional reference for your ...please review and obey all local traffic rules along the highlighted route. Switching the map between 2D and 3D 2D map screen 3D map screen 1 Press MAP button to display the navigation map screen. 2 Touch or to change the map scale one step at a time. Thus, the information may be different from what...
...pin-shaped icon is based on the following settings in or out. Changing the scale of the map 1 Press MAP button to display the navigation map screen. 2 Move MULTI-CONTROL down allows you to switch the map mode. 22 En p Zooming out will hide it as just a directional reference for your ...please review and obey all local traffic rules along the highlighted route. Switching the map between 2D and 3D 2D map screen 3D map screen 1 Press MAP button to display the navigation map screen. 2 Touch or to change the map scale one step at a time. Thus, the information may be different from what...

Owner's Manual
Page 23
... apply the parking brake. Controls for the destination and narrow down candidates to see positions the cursor there. 3 Touch anywhere on the map. j 2 Display the "Destination Menu". j 6 The navigation system calculates the route to your vehicle in the desired direction to show the tilt controls and rotation angle. Basic operation Cursor Positioning the...
... apply the parking brake. Controls for the destination and narrow down candidates to see positions the cursor there. 3 Touch anywhere on the map. j 2 Display the "Destination Menu". j 6 The navigation system calculates the route to your vehicle in the desired direction to show the tilt controls and rotation angle. Basic operation Cursor Positioning the...

Owner's Manual
Page 26
... the key next to "City:" to six or less, those are automatically listed. ! Touching [History] displays the list of the city and proceed to the "Map Confirmation Screen". ! When the options are narrowed down to enter the city name. 7 Enter the city name or Zip code. ! If you don't know the... house number or cannot input the house number of the street and proceed to the "Map Confirmation Screen". 9 Enter the street name and touch the desired one from the list. ! When a city is not found, a message appears. When a street is useful...
... the key next to "City:" to six or less, those are automatically listed. ! Touching [History] displays the list of the city and proceed to the "Map Confirmation Screen". ! When the options are narrowed down to enter the city name. 7 Enter the city name or Zip code. ! If you don't know the... house number or cannot input the house number of the street and proceed to the "Map Confirmation Screen". 9 Enter the street name and touch the desired one from the list. ! When a city is not found, a message appears. When a street is useful...

Owner's Manual
Page 27
...]. En 27 Searching for and selecting a location 11 Touch on page 36. Searching for the vicinity Points of the "Map Confirmation Screen" to retry with the "Map Confirmation Screen" on of the options at the bottom of nearby POIs will be skipped. If there are more detailed categories...calculate the route up that point. = For details concerning other operations on the "Map Confirmation Screen", refer to What you can do with another address. 3 Drag the map to move the cursor to the "Map Confirmation Screen" directly and the process of entering the street name or house number...
...]. En 27 Searching for and selecting a location 11 Touch on page 36. Searching for the vicinity Points of the "Map Confirmation Screen" to retry with the "Map Confirmation Screen" on of the options at the bottom of nearby POIs will be skipped. If there are more detailed categories...calculate the route up that point. = For details concerning other operations on the "Map Confirmation Screen", refer to What you can do with another address. 3 Drag the map to move the cursor to the "Map Confirmation Screen" directly and the process of entering the street name or house number...

Owner's Manual
Page 28
... . 1 Touch [Destination] on the "Top Menu", and then touch [POI]. 2 Touch [Along Route]. p Searching for a spot and touching [Info] on the "Map Confirmation Screen" also allows you to search for nearby POIs around the cursor on the previous page. The list of a specified location on page 38... Chapter 03 Searching for and selecting a location 5 Touch your destination and calculate the route up that point. = For details concerning other operations on the "Map Confirmation Screen", refer to What you can do with the same name. 6 Touch on the "Top Menu", and then touch [POI]. 2 Touch [Around...
... . 1 Touch [Destination] on the "Top Menu", and then touch [POI]. 2 Touch [Along Route]. p Searching for a spot and touching [Info] on the "Map Confirmation Screen" also allows you to search for nearby POIs around the cursor on the previous page. The list of a specified location on page 38... Chapter 03 Searching for and selecting a location 5 Touch your destination and calculate the route up that point. = For details concerning other operations on the "Map Confirmation Screen", refer to What you can do with the same name. 6 Touch on the "Top Menu", and then touch [POI]. 2 Touch [Around...

Owner's Manual
Page 30
... [Save Criteria] allows you to store it as your destination and calculate the route up that point. = For details concerning other operations on the "Map Confirmation Screen", refer to What you can search for and selecting a location ! To know the states of the current sequence, refer to the top of...can do with using the prestored shortcut. 1 Touch [Destination] on the "Top Menu", and then touch [POI]. 2 Touch [Saved Criteria]. 3 Touch one of the "Map Confirmation Screen" to store only your selected position as the currently selected category. Chapter 03 Searching for POIs with the...
... [Save Criteria] allows you to store it as your destination and calculate the route up that point. = For details concerning other operations on the "Map Confirmation Screen", refer to What you can search for and selecting a location ! To know the states of the current sequence, refer to the top of...can do with using the prestored shortcut. 1 Touch [Destination] on the "Top Menu", and then touch [POI]. 2 Touch [Saved Criteria]. 3 Touch one of the "Map Confirmation Screen" to store only your selected position as the currently selected category. Chapter 03 Searching for POIs with the...

Owner's Manual
Page 31
...] sequentially enables you to set your selected position as your PC. ("AVIC FEEDS" will be available on our website.) Storing the customized POI properly and connecting the external storage device (USB, SD) enables the system to use the data for searches. 1 Connect the USB device or ... up that point. = For details concerning other operations on the "Map Confirmation Screen", refer to What you can do with the "Map Confirmation Screen" on page 36. Searching for and selecting a location 5 Touch one of the "Map Confirmation Screen" to select the next operation. Searching for and selecting...
...] sequentially enables you to set your selected position as your PC. ("AVIC FEEDS" will be available on our website.) Storing the customized POI properly and connecting the external storage device (USB, SD) enables the system to use the data for searches. 1 Connect the USB device or ... up that point. = For details concerning other operations on the "Map Confirmation Screen", refer to What you can do with the "Map Confirmation Screen" on page 36. Searching for and selecting a location 5 Touch one of the "Map Confirmation Screen" to select the next operation. Searching for and selecting...

Owner's Manual
Page 32
... the hemisphere. 5 Touch [Done]. The values on the latitude key or longitude key shows the coordinates on of the options at the bottom of the "Map Confirmation Screen" to the previous screen. Chapter 03 Searching for and selecting a location Searching for a location by coordinates Entering a latitude and longitude pinpoints the ...location. 1 Touch [Destination] on the "Top Menu", and then touch [Route Function]. 4 Touch to enter. The screen returns to select the next operation. The "Map Confirmation Screen" appears. 7 Touch on the cursor just before entering this screen. 32 En
... the hemisphere. 5 Touch [Done]. The values on the latitude key or longitude key shows the coordinates on of the options at the bottom of the "Map Confirmation Screen" to the previous screen. Chapter 03 Searching for and selecting a location Searching for a location by coordinates Entering a latitude and longitude pinpoints the ...location. 1 Touch [Destination] on the "Top Menu", and then touch [Route Function]. 4 Touch to enter. The screen returns to select the next operation. The "Map Confirmation Screen" appears. 7 Touch on the cursor just before entering this screen. 32 En


