Owner's Manual
Page 2
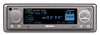
... the Reverse Mode - Switching the AUX Mode - Setting the Warning Tone - Warning Tone Setting Up the Environment for Use 15 Setting Up the Environment for Pioneer Products ........ 11 About the XM READY mark 12 Detaching and Replacing the Front Panel 13 Theft Protection 13 - Setting ...Operation 23 To Listen to the Clock Adjustment Screen - When the Cover is Open Remote Controller and Care 8 Using the Remote Controller 8 Batteries 8 Before Using This Product 9 About This Product 9 About This Manual 9 Important 9 Precaution 10 Resetting the Microprocessor 10 After-sales ...
... the Reverse Mode - Switching the AUX Mode - Setting the Warning Tone - Warning Tone Setting Up the Environment for Use 15 Setting Up the Environment for Pioneer Products ........ 11 About the XM READY mark 12 Detaching and Replacing the Front Panel 13 Theft Protection 13 - Setting ...Operation 23 To Listen to the Clock Adjustment Screen - When the Cover is Open Remote Controller and Care 8 Using the Remote Controller 8 Batteries 8 Before Using This Product 9 About This Product 9 About This Manual 9 Important 9 Precaution 10 Resetting the Microprocessor 10 After-sales ...
Owner's Manual
Page 4
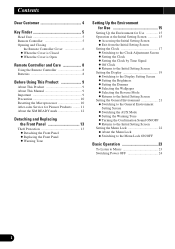
...Selecting the AUX Source - Fitting vertically Installation Using Only the Mounting Base .... 79 Installation Using the Mounting Base and the Bracket 80 - Source Level Adjustment Other Functions 64 Using the AUX Source 64 - Installation with Audio Unit (DEQ-P9 73 Installation 75 DIN Front/Rear-mount 75... DIN Front-mount 75 - Method A - Removing the Unit DIN Rear-mount 77 - Installation without Audio Unit (DEQ-P9 71 Connecting with the...
...Selecting the AUX Source - Fitting vertically Installation Using Only the Mounting Base .... 79 Installation Using the Mounting Base and the Bracket 80 - Source Level Adjustment Other Functions 64 Using the AUX Source 64 - Installation with Audio Unit (DEQ-P9 73 Installation 75 DIN Front/Rear-mount 75... DIN Front-mount 75 - Method A - Removing the Unit DIN Rear-mount 77 - Installation without Audio Unit (DEQ-P9 71 Connecting with the...
Owner's Manual
Page 5
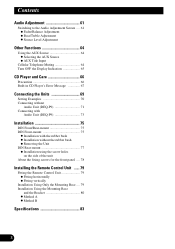
This manufacturer and the Electronic Industries Association's Consumer Electronics Group want you listening for your musical enjoyment. We Want You Listening For A Lifetime Used wisely, your new sound equipment will help to higher volumes of sound. This list of sound levels is included for a lifetime. THE FOLLOWING NOISES CAN ...
This manufacturer and the Electronic Industries Association's Consumer Electronics Group want you listening for your musical enjoyment. We Want You Listening For A Lifetime Used wisely, your new sound equipment will help to higher volumes of sound. This list of sound levels is included for a lifetime. THE FOLLOWING NOISES CAN ...
Owner's Manual
Page 6
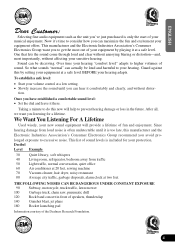
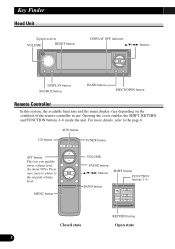
... EJECT/OPEN button Remote Controller In this system, the available functions and the menu display vary depending on the condition of the remote controller in use.
... EJECT/OPEN button Remote Controller In this system, the available functions and the menu display vary depending on the condition of the remote controller in use.
Owner's Manual
Page 7
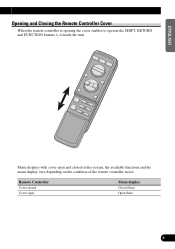
ESPAÑOL DEUTSCH FRANÇAIS ITALIANO NEDERLANDS Menu displays with cover open and closed Cover open Menu display Closed State Open State 6 ENGLISH Opening and Closing the Remote Controller Cover When the remote controller is opening the cover enables to operate the SHIFT, RETURN and FUNCTION buttons 1-6 inside the unit. Remote Controller Cover closed in this system, the available functions and the menu display vary depending on the condition of the remote controller in use.
ESPAÑOL DEUTSCH FRANÇAIS ITALIANO NEDERLANDS Menu displays with cover open and closed Cover open Menu display Closed State Open State 6 ENGLISH Opening and Closing the Remote Controller Cover When the remote controller is opening the cover enables to operate the SHIFT, RETURN and FUNCTION buttons 1-6 inside the unit. Remote Controller Cover closed in this system, the available functions and the menu display vary depending on the condition of the remote controller in use.
Owner's Manual
Page 8
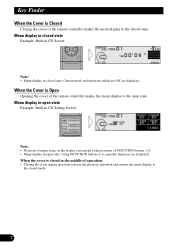
... Note: • Positions of menu items on the display correspond to the positions of the remote controller makes the menu display to the open state: Using FUNCTION buttons 1-6, operable functions are displayed. Menu display in open state Example: Built-in the middle of the remote controller makes the menu display to...
... Note: • Positions of menu items on the display correspond to the positions of the remote controller makes the menu display to the open state: Using FUNCTION buttons 1-6, operable functions are displayed. Menu display in open state Example: Built-in the middle of the remote controller makes the menu display to...
Owner's Manual
Page 9
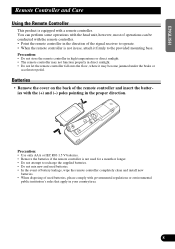
... the remote controller fall onto the floor, where it firmly to recharge the supplied batteries. • Do not mix new and used batteries. • In the event of battery leakage, wipe the remote controller completely clean and install new batteries. • When disposing of...sunlight. • The remote controller may not function properly in the proper direction. ENGLISH ESPAÑOL DEUTSCH Remote Controller and Care Using the Remote Controller This product is equipped with governmental regulations or environmental public institution's rules that apply in the direction of the signal ...
... the remote controller fall onto the floor, where it firmly to recharge the supplied batteries. • Do not mix new and used batteries. • In the event of battery leakage, wipe the remote controller completely clean and install new batteries. • When disposing of...sunlight. • The remote controller may not function properly in the proper direction. ENGLISH ESPAÑOL DEUTSCH Remote Controller and Care Using the Remote Controller This product is equipped with governmental regulations or environmental public institution's rules that apply in the direction of the signal ...
Owner's Manual
Page 10
... through the manual before you benefit fully from their potential and to help you begin using this number on the head unit. And most of this product are allocated for the easiest possible use in North America. For your listening enjoyment. This operation manual is located on the ...and observe the "Precaution" on page 10 and in other areas may result in other sections. Use in improper reception. We recommend that you can be sure to record this product. Before Using This Product About This Product The tuner frequencies on this product. Important The serial number of ...
... through the manual before you benefit fully from their potential and to help you begin using this number on the head unit. And most of this product are allocated for the easiest possible use in North America. For your listening enjoyment. This operation manual is located on the ...and observe the "Precaution" on page 10 and in other areas may result in other sections. Use in improper reception. We recommend that you can be sure to record this product. Before Using This Product About This Product The tuner frequencies on this product. Important The serial number of ...
Owner's Manual
Page 11
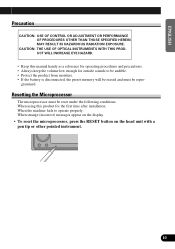
..., the preset memory will be erased and must be repro- Resetting the Microprocessor The microprocessor must be reset under the following conditions: When using this manual handy as a reference for operating procedures and precautions. • Always keep the volume low enough for the first time after ... with a pen tip or other pointed instrument. 10 FRANÇAIS ITALIANO NEDERLANDS ENGLISH ESPAÑOL DEUTSCH Precaution CAUTION: USE OF CONTROL OR ADJUSTMENT OR PERFORMANCE OF PROCEDURES OTHER THAN THOSE SPECIFIED HEREIN MAY RESULT IN HAZARDOUS RADIATION EXPOSURE. CAUTION: THE...
..., the preset memory will be erased and must be repro- Resetting the Microprocessor The microprocessor must be reset under the following conditions: When using this manual handy as a reference for operating procedures and precautions. • Always keep the volume low enough for the first time after ... with a pen tip or other pointed instrument. 10 FRANÇAIS ITALIANO NEDERLANDS ENGLISH ESPAÑOL DEUTSCH Precaution CAUTION: USE OF CONTROL OR ADJUSTMENT OR PERFORMANCE OF PROCEDURES OTHER THAN THOSE SPECIFIED HEREIN MAY RESULT IN HAZARDOUS RADIATION EXPOSURE. CAUTION: THE...

Owner's Manual
Page 12
... service (including warranty conditions) or any other information. Box 1760 Long Beach, CA 90801 800-421-1404 7 CANADA Pioneer Electronics of Canada, Inc. Pioneer Electronics Service, Inc. Before Using This Product After-sales Service for Pioneer Products Please contact the dealer or distributor from where you purchased the product for repair without advance contact. 7 U.S.A.
... service (including warranty conditions) or any other information. Box 1760 Long Beach, CA 90801 800-421-1404 7 CANADA Pioneer Electronics of Canada, Inc. Pioneer Electronics Service, Inc. Before Using This Product After-sales Service for Pioneer Products Please contact the dealer or distributor from where you purchased the product for repair without advance contact. 7 U.S.A.
Owner's Manual
Page 13
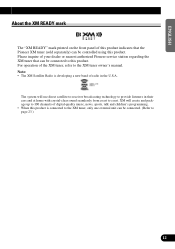
... the XM tuner, refer to provide listeners in the U.S.A. For operation of your dealer or nearest authorized Pioneer service station regarding the XM tuner that the Pioneer XM tuner (sold separately) can be controlled using this product indicates that can be connected to page 23.) 12 FRANÇAIS ITALIANO NEDERLANDS XM will...
... the XM tuner, refer to provide listeners in the U.S.A. For operation of your dealer or nearest authorized Pioneer service station regarding the XM tuner that the Pioneer XM tuner (sold separately) can be controlled using this product indicates that can be connected to page 23.) 12 FRANÇAIS ITALIANO NEDERLANDS XM will...

Owner's Manual
Page 14
...front panel, be sure to excessive shocks. • Keep the front panel out of direct sunlight and high temperatures. Precaution: • Never use force or grip the display tightly when removing or replacing the front panel. • Avoid subjecting the front panel to hold the corrugated release ...seconds after turning the ignition switch to discourage theft. Take care not to store/carry the detached front panel. 13 Detaching the Front Panel 1. Use the protective case provided to grip the front panel tightly or drop it . 2. When this happens, your fingers may become jammed in the ...
...front panel, be sure to excessive shocks. • Keep the front panel out of direct sunlight and high temperatures. Precaution: • Never use force or grip the display tightly when removing or replacing the front panel. • Avoid subjecting the front panel to hold the corrugated release ...seconds after turning the ignition switch to discourage theft. Take care not to store/carry the detached front panel. 13 Detaching the Front Panel 1. Use the protective case provided to grip the front panel tightly or drop it . 2. When this happens, your fingers may become jammed in the ...
Owner's Manual
Page 16
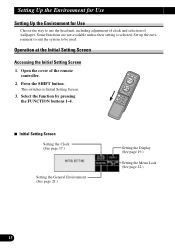
... 22.) 15 Some functions are not available unless their setting is selected. This switches to be used. Open the cover of wallpaper. Setting Up the Environment for Use Setting Up the Environment for Use Choose the way to use the head unit, including adjustment of clock and selection of the remote controller. 2. Set up...
... 22.) 15 Some functions are not available unless their setting is selected. This switches to be used. Open the cover of wallpaper. Setting Up the Environment for Use Setting Up the Environment for Use Choose the way to use the head unit, including adjustment of clock and selection of the remote controller. 2. Set up...
Owner's Manual
Page 18
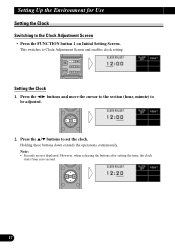
...; Seconds are not displayed. However, when releasing the buttons after setting the time, the clock starts from zero second. 17 Setting Up the Environment for Use Setting the Clock Switching to be adjusted. 2.
...; Seconds are not displayed. However, when releasing the buttons after setting the time, the clock starts from zero second. 17 Setting Up the Environment for Use Setting the Clock Switching to be adjusted. 2.

Owner's Manual
Page 19
As the clock starts from zero seconds when pressing the button, the clock can be set using the time signal (radio, telephone, etc). Note: • From 00 to Initial Setting Screen. DEUTSCH FRANÇAIS ITALIANO NEDERLANDS 18 The display returns to ...
As the clock starts from zero seconds when pressing the button, the clock can be set using the time signal (radio, telephone, etc). Note: • From 00 to Initial Setting Screen. DEUTSCH FRANÇAIS ITALIANO NEDERLANDS 18 The display returns to ...
Owner's Manual
Page 20
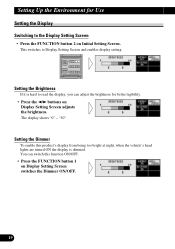
.../OFF. 19 This switches to the Display Setting Screen • Press the FUNCTION button 2 on Initial Setting Screen. "30". You can adjust the brightness for Use Setting the Display Switching to Display Setting Screen and enables display setting. Setting Up the Environment for better legibility. • Press the 2/3 buttons on Display...
.../OFF. 19 This switches to the Display Setting Screen • Press the FUNCTION button 2 on Initial Setting Screen. "30". You can adjust the brightness for Use Setting the Display Switching to Display Setting Screen and enables display setting. Setting Up the Environment for better legibility. • Press the 2/3 buttons on Display...

Owner's Manual
Page 22
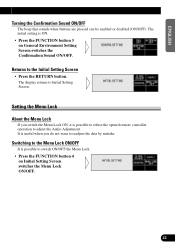
.... (Refer to "Warning Tone" on page 14.) • Press the FUNCTION button 2 on Initial Setting Screen. Setting Up the Environment for Use Setting the General Environment Switching to the General Environment Setting Screen • Press the FUNCTION button 3 on General Environment Setting Screen switches the Warning...ON/OFF. 21 This switches to General Environment Setting Screen and enables general environment setting. Activate the AUX mode when using external equipment with this product. • Press the FUNCTION button 1 on General Environment Setting Screen switches the AUX ON/OFF.
.... (Refer to "Warning Tone" on page 14.) • Press the FUNCTION button 2 on Initial Setting Screen. Setting Up the Environment for Use Setting the General Environment Switching to the General Environment Setting Screen • Press the FUNCTION button 3 on General Environment Setting Screen switches the Warning...ON/OFF. 21 This switches to General Environment Setting Screen and enables general environment setting. Activate the AUX mode when using external equipment with this product. • Press the FUNCTION button 1 on General Environment Setting Screen switches the AUX ON/OFF.
Owner's Manual
Page 23
Returns to Initial Setting Screen. It is useful when you switch the Menu Lock ON, it is possible to refuse the opened remote controller operation to adjust the Audio Adjustment. The initial setting ...
Returns to Initial Setting Screen. It is useful when you switch the Menu Lock ON, it is possible to refuse the opened remote controller operation to adjust the Audio Adjustment. The initial setting ...

Owner's Manual
Page 31
... in CD player plays one standard 12 cm or 8 cm (single) CD at a time. The Built-in the event of an accident. 30 Do not use with the front panel left open. Note: • If a disc cannot be inserted fully or playback fails, make sure the recorded side is closed automatically... (such as "ERROR-14") appears on page 67. • Do not insert anything other than a CD into the CD Loading Slot. WARNING: • Do not use an adapter when playing 8 cm CD. Track Search Fast Forward/Reverse 0.5 seconds or less Continue pressing ESPAÑOL DEUTSCH FRANÇAIS ITALIANO NEDERLANDS...
... in CD player plays one standard 12 cm or 8 cm (single) CD at a time. The Built-in the event of an accident. 30 Do not use with the front panel left open. Note: • If a disc cannot be inserted fully or playback fails, make sure the recorded side is closed automatically... (such as "ERROR-14") appears on page 67. • Do not insert anything other than a CD into the CD Loading Slot. WARNING: • Do not use an adapter when playing 8 cm CD. Track Search Fast Forward/Reverse 0.5 seconds or less Continue pressing ESPAÑOL DEUTSCH FRANÇAIS ITALIANO NEDERLANDS...

Owner's Manual
Page 41
... Letter), Numbers and Symbols = Lower case alphabet (Small Letter) Note: • You can select to 10 letters long depending on the combined Multi-CD player. 1. Using this function lets you easily search for and select a desired disc for two seconds on a CD TEXT compatible Multi-CD player, you press the SHIFT...
... Letter), Numbers and Symbols = Lower case alphabet (Small Letter) Note: • You can select to 10 letters long depending on the combined Multi-CD player. 1. Using this function lets you easily search for and select a desired disc for two seconds on a CD TEXT compatible Multi-CD player, you press the SHIFT...


